background image

ES

8

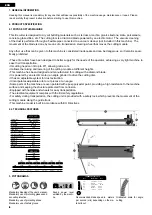
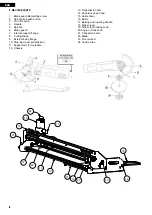
8. PARTES DE LA MÁQUINA

1.  Tornillo desmontaje resguardo disco

2.  Pulsador bloqueo husillo.

3. 

Interruptor conexión / desconexión.

4.  Empuñadura.

5. 

Husillo.

6.  Resguardo disco.

7.  Brida de apoyo interior.

8. 

Disco de corte.

9. 

Brida de fijación exterior.

10.  Volante transmisión.

11.  Brazo de apoyo para materiales.

12.  Chasis.

13.  Correa de la transmisión.

14.  Pomo bloqueo descenso cabezal.

15.  Cadena portacable.

16.  Motor.

17. Puño para elevación y descenso.

18. Regla lateral.

19. Pomo bloqueo regla lateral.

20. Pomo bloqueo corte en ángulo.

21. Ruedas de transporte.

22. Disco de corte.

23. Regla frontal.

24. Tubo de aspiración.

12

11

10

14

13

15

16

17

18

19

20

21

22

23

24

Summary of Contents for Elite 123

Page 1: ...e instrucciones Original user guide Manuel original d utilisation Elite 123 SIMA S A Pol gono Industrial Juncaril C Albu ol Parcela 250 C P 18220 Albolote Granada ESPA A Telf 34 958 490 410 info simas...

Page 2: ...ES 2...

Page 3: ...E SEGURIDAD 7 8 PARTES DE LA M QUINA 8 9 POSICI N OPERARIO CONEXI N Y DESCONEXI N 9 9 1 CORTE A 45 9 9 2 CORTE CON DESCENSO DEL CABEZAL 10 9 3 CORTE DE RANURAS O CORTE DOBLE PASADA 10 9 4 BRAZOS DE AP...

Page 4: ...m 1230 mm 22 mm 35 mm 20 mm 102 5 35 Kg 40 Kg 1700 x 580 x 450 230 V 50 60 Hz 1 3Kw 0 95 Hp 125 mm 22 2 mm 4 mm 1230 mm 22 mm 35 mm 20 mm 102 5 35 Kg 40 Kg 1700 x 580 x 450 1530 mm 20 mm 102 5 35 Kg 4...

Page 5: ...ES 5 4 MONTAJE DE LA M QUINA 01 Montaje MOUNTING MONTAGE 1 4 7 10 13 16 2 5 8 11 14 17 3 6 9 12 15 18 Sistema antiperdida...

Page 6: ...m quina esta visible en el motor de la m quina ATENCI N no conecte la m quina a la red si no est seguro de la tensi n de alimentaci n disponible en caso contrario si la tensi n no fuese la correcta e...

Page 7: ...Las m quinas cortadoras deben ser utilizadas por personas que est n familiarizadas con su funcionamiento Sea precavido y no permita la presencia en el entorno de la m quina cuando est en funcionamien...

Page 8: ...a de fijaci n exterior 10 Volante transmisi n 11 Brazo de apoyo para materiales 12 Chasis 13 Correa de la transmisi n 14 Pomo bloqueo descenso cabezal 15 Cadena portacable 16 Motor 17 Pu o para elevac...

Page 9: ...material a cortar Una vez conectado el cable de alimentaci n conecte la aspiradora pulse el interruptor del motor y encl velo para ponerlo en marcha La parada de la m quina se consigue simplemente pul...

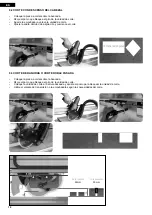
Page 10: ...spiraci n y comience el corte 9 3 CORTE DE RANURAS O CORTE DOBLE PASADA Coloque la pieza a cortar sobre la bancada Afloje el pomo que bloquea el giro de la unidad de corte Coloque la unidad de corte a...

Page 11: ...quina sobre el suelo o sobre los caballetes 9 5 ASPIRACI N Para la aspiraci n del polvo recomendamos un aspirador domestico con filtro de agua 1600W El periodo de aspiraci n sin necesidad de limpiar...

Page 12: ...ada limpiarrestosdesuciedaddelama quina con una brocha limpia y las ranuras del puente gu a por donde se deslizan los patines 2 Aspirar las ranuras del los perfiles de aluminio del chasis SUSTITUCI N...

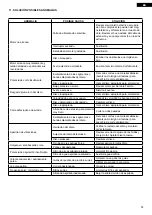
Page 13: ...elocidad de avance excesiva Reducir la velocidad de avance del corte Disco deteriorado o desgastado Cambiar el disco Disco inapropiado Usar el disco apropiado para el material Altura de corte excesiva...

Page 14: ...icados en los planos de repuestos y podr n visua lizarse a trav s de B2B Para solicitar cualquiera de ellos deber ponerse en contacto con el departamento de post venta y especificar claramente el n me...

Page 15: ...ENG 2 2...

Page 16: ...7 7 SECURYTI RECOMMENDATION 8 8 MACHINE PARTS 9 9 MACHINE AND OPERATOR POSITION 10 9 1 CORTE A 45 10 9 2 BENDING THE HEAD TO CUT 11 9 3 CUTTING SLOTS CUTTING AT TWO PASSES 11 9 4 FOLDING SUPPORT ARMS...

Page 17: ...1700 x 580 x 450 1530 mm 20 mm 102 5 35 Kg 40 Kg 2000 x 550 x 450 Elite 103 Elite 123 Elite 123 Elite 153 1380 420 1030 560 2862 19 1 25 4 5 5 A B C D RPM m s A Vac o A Carga 1680 420 1230 560 3424 2...

Page 18: ...ENG 5 5 4 MACHINE SET UP 01 Montaje MOUNTING MONTAGE 1 4 7 10 13 16 2 5 8 11 14 17 3 6 9 12 15 18 Sistema antiperdida...

Page 19: ...ible on the angle grinder WARNING Do not plug the machine in the mains if you are not sure of the available supply voltage if the voltage is not correct the motor will suffer irreparable damage or it...

Page 20: ...erate the mechanical and electrical elements of the machine while the engine is running Cutting machines should be used only by people who are familiar with cutting operations Be cautious and do not a...

Page 21: ...ade 9 External fixing flange 10 Steering wheel transmission 11 Support arm for materials 12 Chassis 13 Transmission belt 14 Knob lock down head 15 Cable chain 16 Motor 17 Raising and lowering handle 1...

Page 22: ...head and the material to be cut Once the power cord is connected connect the vacuum system press the motor switch and lock it to start it up To stop the machine press the switch button again Operate t...

Page 23: ...ght of the suction tube and start cutting 9 3 CUTTING SLOTS CUTTING AT TWO PASSES Place the piece to cut on the bench Loosen the knob that blocks the rotation of the cutting unit Set the cutting unit...

Page 24: ...ine on the floor or on the easels 9 5 DUST EXTRACTION For dust extraction we recommend a domestic vacuum cleaner with water filter 1600W These water filters allow much lon ger working periods without...

Page 25: ...e end of each day having used the machine remove debris with a clean brush from the slots of the guide bridge where the skids slide 2 Vacuum the grooves of the chassis aluminium profiles REPLACEMENT O...

Page 26: ...ot straight cut Excessive cutting speed Reduce the speed by releasing the pres sure on the cutting progress Broken or worn out blade Change the blade Inappropriate blade Usar el disco apropiado para e...

Page 27: ...SIMA site www simasa com To request any of them please contact the after sales department clearly specifying the number identifying the part as well as the machine model manufacturing number and year...

Page 28: ...ENG 15 15...

Reviews: