background image

Menu

This menu section provides access to OSD adjustments.

Language
Selects the desired OSD language. The SUPERLUMIS can display the menus in English, 
Italian, French, German, Spanish, Swedish, Portuguese, Russian and Simplified 
Chinese.

Source List
Allows customization of the Input list. To change the status of an input:

1. highlight the input
2. use the 

 and 

 keys to Enable or Disable the input.

Disabled inputs are not shown in the input selection menu and cannot be selected via 
keys 1-5 of the remote control.

Important:

 Active inputs are numbered according to their position in the list. 

Changing the status of an input modifies the numbers assigned to the inputs that 
follow (which is undesirable if you are using a custom control system).
You can change the label of each input (for example assigning the name of the device 
it is connected to). To rename an input:

1. highlight the input
2. press 

 on the remote control to enter Text Entry menu

3. use the 

 and 

 keys to underline the character you would like to change

4. enter the desired symbol using keys 1-9 on the remote control
5. cycle through steps 3 and 4 until you have finished entering your custom label
6.

press   on the remote control to save the label you have entered, or Esc to 
discard your changes

F1-F2 Keys
You can have direct access to some functions through the F1 and F2 keys on the 
remote control. 
The default assignments are: F1 = Zoom, F2 = Focus.
To assign a different function to one of these keys:

1. highlight the function using 

 or 

2. press F1 or F2 to set the key assigned to that function.

Available functions are:

Zoom Activates the optical zoom control, where the 


and


 keys zoom out 

and in respectively. By pressing 

 on the remote control a specific internal test 

pattern is displayed. This is the default function for key F1.

Focus Once selected, 


and


 allow the image to be focused. By pressing 

 on 

the remote control a pattern a specific internal test pattern is displayed. This 
is the default function for key F2.

Blank Turns off the video signal on-screen. Press Esc to restore video to the 
screen.

Gamma correction Activates Gamma Correction quick menu. Use 

 or 

 to 

cycle through available Gamma tables.

Freeze Turns on or off picture still mode.

4  

Operation

SUPERLUMIS

User Guide

32

Summary of Contents for SUEPRLUMISHB

Page 1: ...SIM2 Multimedia SUPERLUMISEC SUPERLUMISHB User Guide ...

Page 2: ...e Control Projector Keypad Connections 3D RF Emitter 3D Glasses 13 Chapter 3 Installation Location Mounting Connections Switching On and Off 19 Chapter 4 Operation Viewing 3D Content 3D Menu Input Menu Main Menu Picture Image Setup Menu Memories Info Quick Menus Messages 35 Chapter 5 Troubleshooting 37 Chapter 6 Specifications 39 Chapter 7 Projection Distances 40 Chapter 8 Dimensions SUPERLUMIS Us...

Page 3: ...rvice center Read this manual Read all chapters of this manual carefully before switching on the projector This manual provides basic instructions for operating the SUPERLUMIS projector Installation preliminary adjustments and procedures that necessitate the removal of the top cover and contact with electrical components must be performed by authorized trained technicians To ensure safe operation ...

Page 4: ...hem to sources of heat and make sure they do not become knotted or crimped If the power cords become damaged stop using the projector and request the assistance of an authorized technician Disconnect the projector from the mains power during electrical storms and when not in use To prevent damage from lightning strikes in the vicinity disconnect the projector during storms or when the projector is...

Page 5: ... as their visual system is still under development Monitor children including teenagers watching 3D content as they are more at risk of experiencing discomfort and less inclined to report symptoms Individuals who may be susceptible to epileptic seizures or strokes on the basis of personal and family history should consult a doctor before watching 3D content All viewers should take regular breaks f...

Page 6: ...ronic Industries Alliance at www eiae org or check www lamprecycle org Notice The appliance has been subjected to exhaustive operating tests by SIM2 to guarantee the highest quality The projector bulb life should thus initially be around 30 60 hours In addition to the customary checks the Quality Control department also runs addi tional statistical tests before shipment In such cases the packaging...

Page 7: ... perfectly normal for this optical system and will not be considered as a malfunction of the product Note One pixel corresponds to 10 thousandths of a millimeter on the DMD Important information SUPERLUMIS User Guide 7 ...

Page 8: ...lete control over primary secondary and white point color coordinates gamma tables allowing calibration experts to accurately calibrate the final image via a user friendly application for Windows based computers Key Features and Benefits high picture quality SIM2 renown image processing and the latest 0 95 in 1080p DarkChip4 DMD from Texas Instruments precision optics SIM2 ALPHAPATH light engine h...

Page 9: ...ase anything has to be shipped Optional Accessories Projector ceiling bracket LUMISBRKT PANAMORPH Anamorphic lens systems static or motorized ISCO Anamorphic lens systems static or motorized VISUSRF BOX 8 SIM2 Visus 3D RF glasses VISUSRF SYSTEM 7 SIM2 Visus 3D RF glasses and 1 RF emitter for SIM2 Visus 3D RF glasses VISUSRF SYSTEM ACC 4 SIM2 Visus 3D RF glasses and 1 RF emitter for SIM2 Visus 3D R...

Page 10: ...rm user defined actions default assignments are F1 Zoom F2 Focus Info displays projector Info A Auto performs Auto Adjustment Aspect enters Aspect Quick menu Not used Custom Remotes You can use your own IR remote control to control your SUPERLUMIS projector If you are using a remote control with learning capabilities use the projector remote control to teach the commands to your remote If you are ...

Page 11: ...tall batteries in the remote control 1 Open the battery cover 2 Insert four AAA LR03 batteries making sure the polarities match the marks inside the battery compartment 3 Replace the cover Replace the batteries with new ones when the operating range of the remote control decreases Dispose of used batteries according to local regulations Make sure you do not mix old and new batteries or different t...

Page 12: ...ts component or RGB high definition signals Control Service USB USB 1 1 type B port for serial commands and firmware upgrade RS 232 RS232 female D Sub 9 pin port for serial commands and firmware upgrade Outputs TRIG 1 12 V 100 mA max output for motorized screen control Activates when the projector is switched on TRIG 2 12 V 100 mA max output for motorized screen masking systems control See Screen ...

Page 13: ...3D content the projector alternately displays one image for the left eye and one image for the right eye in rapid succession The 3D glasses turn on and off their lenses in sync with the projector so that each eye receives exactly the image intended for it The sync is possible thanks to the RF pulses received by the glasses from the 3D RF emitter Button Button for ON and OFF LED Indicating glasses ...

Page 14: ...the powers outlets are grounded and preferably shielded from power surges and fluctuations A UPS is optional SUPERLUMIS power supply operates on any nominal line voltage between 100 240 V AC 50 60 Hz Cables Check planned cable lengths for video and control cables and make sure these lengths do not exceed specifications Ambient Light Avoid or minimize light sources directed at the screen to preserv...

Page 15: ...o not over tighten the screws Orientation By default the SUPERLUMIS is configured for a Front installation projector installed upright and in front of the screen If the projector is installed behind the screen or inverted you can use the image orientation function of the projector see Orientation on page 30 Vertical Lens Shift Ideally the projector should be positioned at a right angle to the scre...

Page 16: ...rojector to correct the image shape See Keystone on page 30 Note Keystone correction may cause artifacts in the image and may not be available when displaying specific 3D content see Table 4 2 Zoom and Focus The SUPERLUMIS provides motorized Zoom and Focus controls You can access these adjustments through the remote control directly F1 key for optical Zoom F2 key for Focus See F1 F2 Keys on page 3...

Page 17: ...vice at the same it is connected reducing drastically the time required for HDMI source switching For this reason you may note a slight delay before the image appears on the screen but it is perfectly normal Graphics RGB Input for Personal Computer and other sources that outputs RGB or YPrPb signals These sources must be able to provide separate H V sync or composite H V sync RGB YPrPb Input for D...

Page 18: ...roximity Association with 3D RF emitter The following procedure has to be done every time the glasses are introduced to new 3D RF emitter During the proximity association 3D glasses shall be located within 1 m from 3D RF emitter Switch on the glasses 1 short press on the button LED will change from off to bright indicating glasses power on Press button for minimum of 1 second After 1 second LED wi...

Page 19: ...y status The indicator light on the left hand side of the projector turns red and the status display next to it shows 2 Press any of the numeric keys 0 9 on the remote control or the I O button on the projector keypad to switch on the projector 3 The indicator light turns green and red and the status display shows 88 for a while 4 When the projector is ready for use an image appears on screen this...

Page 20: ...tent and is HDMI 1 4 compliant plus of course a copy of a film that has released on Blu ray in 3D Only films with the 3D logo are compatible Ensure your player has the latest software installed If your Blu ray Player has dual HDMI outputs we would recommend direct connection to the projector from one of the HDMI connections and the second HDMI output to the input of an appropriate AV receiver proc...

Page 21: ... mode Adjust the 3D picture and lamp settings accordingly for 3D viewing 3D Glasses Follow the simple instructions below to operate your 3D glasses On Press the button once see 3D Glasses on page 13 You will see the indicator light ramp from off to bright and then turn off again You are now in SIM2 Cinema mode and the glasses and the projector are synced If for any reason the glasses behave differ...

Page 22: ...inal vertical resolution and sent simultaneously F S Frame Sequential This mode should be applied to 3D images that consist of a sequence of alternating frames wherein each successive frame carries the image meant for one or the other eye Note You may need to change the order in which left and right frames are displayed See 3D Left Right below 3D Left Right Use this setting if the 3D effect has an...

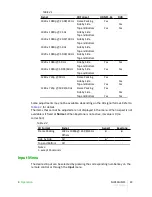
Page 23: ...and Bottom Yes Yes 1280 x 720p 59 94 60 Hz Frame Packing Yes Side by Side Yes Top and Bottom Yes Yes Some adjustments may not be available depending on the 3D signal format Refer to Table 4 2 for details The items that cannot be adjusted are not displayed in the menu When Aspect is not available is it fixed at Normal When Keystone is not active its value is 0 no correction Table 4 2 3D Format Sign...

Page 24: ...keypad To return to the previous menu when in a submenu press MENU on the remote control or on the keypad To select menu items press MENU or MENU on the remote control or on the keypad To turn off the main menu press Esc on the remote control or on the keypad To change settings or select an item on a list press or on the remote control or on the keypad Note Depending on the selected input source a...

Page 25: ... reduce the brightness of the black band as much as possible while ensuring that it can still be distinguished from the adjacent band with brightness slightly higher than black Alternatively use a scene composed of black objects alongside other dark colored objects and try to ensure that all the objects can be separately identified Contrast Use this control to adjust the image s white level withou...

Page 26: ...ness adjustment For an interlaced or progressive video signal set to Video for PC graphics signals set to Graphics If the Video option is set it applies Noise Reduction to increase the clarity of the image Noise Reduction This adjustment lets you choose the value of the noise reduction filter Filter This adjustment selects the mode in which the input signal is processed Selecting the most appropri...

Page 27: ...ection Over scan Position Frequency Phase Y C Delay Signal Range 1 Lamp Power Notes 1 when RGB or AVI infoframe missing or incomplete Aspect This adjustment changes the dimensions and aspect ratio relationship between width and height of the displayed image There are six default aspects available and three user aspects with user settable parameters You can select a different aspect for each source...

Page 28: ...io Screen controls TRIG2 and be should be used for the control of a screen masking system Anamorphic Lens controls TRIG3 and should be used for the control of a motorized anamorphic lens mount See Connections on page 12 for a description of Triggers and their functions Color Management This menu is divided in three sections Choose 1 on the remote control to activate the first column on the left Pr...

Page 29: ...s For the most common video sources if you set the parameter to 2 2 you obtain pleasant and well contrasted images Note When using Live Color Calibration software Natural and Dynamic preset curves can be replaced by two custom curves Overscan Removes the outer edges of the image and magnifies the remaining portion of the image to fill the display area It is useful with sources that output images w...

Page 30: ...16 235 sets black at R G B 16 and white at R G B 235 to match the luminance values of digital component standards 0 255 sets black at R G B 0 and white at R G B 255 Lamp Power Use this control to adjust the lamp output level in 10 W increments from 230 W to 280 W Lower values decrease brightness but extend the life of the lamp Setup This menu section provides access to installation adjustments Ori...

Page 31: ...he amount of the off axis This changing amount must be compensate with the vertical and or horizontal shift With some setting positions the range of lens shift may be restricted even though the unit is installed within the specified parameters Test Patterns Enters internal test patterns that are needed for installation or calibration purposes Press or on the remote control or on the projector keyp...

Page 32: ...the desired symbol using keys 1 9 on the remote control 5 cycle through steps 3 and 4 until you have finished entering your custom label 6 press on the remote control to save the label you have entered or Esc to discard your changes F1 F2 Keys You can have direct access to some functions through the F1 and F2 keys on the remote control The default assignments are F1 Zoom F2 Focus To assign a diffe...

Page 33: ... the OSD Clear or Solid OSD Position Changes the location for the display of the Main Menu OSD To select one of the nine preset positions press 1 9 on the remote control To create a custom position 1 select the preset that is closest to the desired position 2 use or for a finer adjustment Note Avoid locations too close to corners or edges to prevent cropping of larger menus OSD Display Timeout Set...

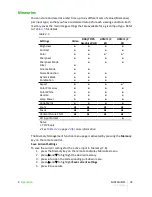
Page 34: ...cBlack PureMotion Aspect 2 Color Primaries Color White Gamma Lamp Power Variable Iris Zoom Focus Vertical Picture Shift Offset 3D Input Format Notes 1 YPrPb only 2 See Table 4 2 on page 23 for more information The Memory Management function menu page is activated by pressing the Memory key on the remote control Save Current Settings To save the current settings for the active input in Memory 1 6 1...

Page 35: ...ory 1 press the Memory key on the remote to display Memories menu 2 press and to highlight the desired memory 3 press to open the corresponding pull down menu 4 press and to highlight Save initial settings 5 press to execute The confirmation message Initial settings saved in Memory 1 6 is displayed The memory icon now indicates that the memory does not store custom values Note The other memories a...

Page 36: ...ges may appear on your screen No signal The projector does not recognize any signal applied to the selected input In this case make sure the selected input is connected to a video or graphic signal and that this source is functioning correctly check the condition of the cables used to connect the system to the various sources make sure the video or graphic signals supplied by the source are compat...

Page 37: ...M2 Authorized Dealer for assistance if the error persists Lamp may need replacement Contact your SIM2 Authorized Dealer for assistance No Signal Message is displayed Make sure the correct Input is selected Make sure the desired video source is on and its output is configured correctly Check cable connection from the desired video source to the projector Remote control does not work When using the ...

Page 38: ...handle the signal Try changing the cable or use a shorter cable Try using a lower resolution for example if you are using 1080p try switching to 1080i If this solves the problem the cable is the likely culprit When switching inputs on either the projector or the AV Receiver Processor sometimes the picture is either green or pink This usually means the incorrect color standard has been selected Thi...

Page 39: ...ng fan speed for minimum acoustic noise Lamp High pressure 350 W dimmable to 280 W Inputs 1 x Composite Video RCA 1 x Component Analog YPrPB RGBS 4 x RCA 1 x RGBHV D Sub 15 pin female 2 x HDMI 1 4 with 3D DeepColor and InstaPort Controls IR remote Keypad on rear panel RS 232 Serial commands Communication Ports 1 x USB 1 1 type B for serial commands and firmware upgrade 1 x RS232 female D Sub 9 pin...

Page 40: ... Normal Full Height Anamorphic Letterbox Panoramic Pixel to pixel Subtitle User 3 Color Gamut Includes REC 709 fully adjustable with presets HDTV EBU SMPTE C Power Requirement 100 240 V AC 10 48 62 Hz Operating Consumption 440 W Standby Consumption 1 W Size and Weight Depth 455 mm 17 9 in Width 460 mm 18 1 in Height 210 mm 8 3 in Weight 13 kg 28 6lb approx Temperature Operating 10 C to 35 C Storag...

Page 41: ... 3 49 8 60 10 56 11 15 15 50 16 12 24 17 1 74 300 6 64 3 74 9 22 11 32 11 94 16 60 17 27 25 90 1 87 Screen Projection Distance Vertical Offset in T1 1 37 1 66 1 T2 1 75 2 48 1 T3 2 54 3 90 1 Diagonal Size in Width in Height in Min ft Max ft Min ft Max ft Min ft Max ft 100 87 2 49 0 9 9 12 2 12 9 17 1 18 9 28 3 24 5 120 104 6 58 8 12 0 14 7 15 5 20 9 22 7 34 0 29 4 150 130 7 73 5 15 0 18 4 19 5 27 ...

Page 42: ...8 Dimensions SUPERLUMIS dimensions in millimeters and inches 8 Dimensions SUPERLUMIS User Guide 42 ...

Page 43: ......

Page 44: ...2 BRIONVEGA Co Ltd Room 303 304 No 244 Liaoning Road Shanghai 200080 CN Phone Fax 86 1 62881991 Email InfoCHINA sim2 com SIM2 UK Steinway House Worth Farm Little Horsted Nr Uckfield East Sussex TN22 5TT UK Phone 44 0182 5 750850 Fax 44 0182 5 750851 Email info sim2 co uk www sim2 co uk SIM2 Deutschland GmbH Arndtstrasse 34 36 60325 Frankfurt Am Main DE Phone 0800 800 7462 Germany 49 163 500 7462 I...

Reviews: