background image

I. Installing the Thermo Stabilizer

®

1. Ensure that the main switch to the device you wish to control 

    is off. 

2. Cut the wire going to the device and strip a small piece of the

    insulation plastic from all the wires. No wire should be exposed.

3. Unscrew the plastic cover and push the wire coming from the  

    mains (110V ~ 230V) through the centre gland and the wire 

    going to the Thermo Stabilizer

®

 to the output A terminal and tighten 

    the screws.

4. Remove your current thermal couple from your water heater and   

    replace it with the supplied Silux

©

 thermal couple. Push the 

    connector coming from the Silux

©

 thermal couple through the small 

    gland and plug it into the socket on the Thermo Stabilizer

©

.

*Please Note: The thermal couple is necessary to get live 

temperature readings and keep the water at the selected 

temperature.

5. Tighten all the glands and screw the plastic cover back on 

    again. You can mount the Thermo Stabilizer

®

 to a desired location 

    using the mounting holes on the side of the Thermo Stabilizer

®

 with  

    the supplied plugs and screws.

6. Turn the main switch to this device on. The RED light on the

    front of the device will switch on. This means the Thermo 

    Stabilizer

®

 has power.

*Please Note: There is a green light for output A and a green 

light for output B of the Thermo Stabalizer

®

 which switches on 

to show the corresponding devices is on.

II. Replacing the CR2032 3V battery

There will be one CR2032 battery included with the product. This 

battery is used to keep time and date as well as schedules in case of 

power disruptions.The battery will have a life span of up to 1-2 years, 

depending on how the Thermo Stabilizer

®

 is used.

We recomend switching the Thermo Stabilizer

®

’s power off before 

changing the battery. 

1. Open the plastics with a star screw driver.

2. Pop out the old CR2032 battery and replace it with the new  

    CR2032 battery. 

3. Place the  Thermo Stabilizer

©

 cover back over the plastics and 

    screw tight.

*Please Note: It’s not necessary to pair the Silux Control

®


devices again after replacing the battery.

III. How to pair with your smart device:

Please remember that the IntelliHub

®

 needs to be powered to be 

able to control the Thermo Stabilizer

©

 from your smart device. 

Please refer to the user manual of the IntelliHub

®

 for pairing the 

Thermo Stabilizer

©

 to your Android or iOS device.  

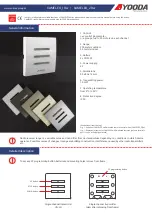
IV. How to pair with the Touch Lamina

©


Take note: When pairing directly to the Thermo Stabilizer

©

 the 

button only controls Output A.

1. A red light will indicate that the the Thermo Stabilizer

©

 has 

    power. Press the Teach button on the Thermo Stabilizer

©

. The 

    green light on the Thermo Stabilizer

©

 will start flashing.

2. Ensure the Touch Lamina

©

 has power. Press the Teach button 

    on the Touch Lamina

©

 . The green light on the Touch Lamina

®


    will start flashing.

3. Tap the button on the Touch Lamina

®

 corresponding to the 

    Silux

®

 device you wish to pair with this device. The green light  

    will switch off on both devices after successfully paired.

    If the green light stays on, the pairing was unsuccessful 

    and you should wait for 30 seconds for the green light to 

    go off before trying again.

    Please refer to the Touch Lamina

®

 and Seeker

®

 manuals 

    regarding controlling your Thermo Stabilizer

© 

from network 

    paired devices. 

Summary of Contents for SC-TS01

Page 1: ...OPERATION MANUAL SC TS01 Thermo Stabilzer ...

Page 2: ...th your smart device IV How to pair with Touch Lamina 6 Hubcentric Topology 7 What is a Trigger 8 Factory Reset 9 Safety precautions 10 Versions and Changes 11 More Silux Control automation products Appendix II 1 Troubleshooting 2 Warranty I What this warranty covers II What period does this warranty cover III What Silux will do to correct any problems IV What is not covered by this warranty 3 Sup...

Page 3: ... from the convenience of your living room or anywhere across the world using any smart device running Android or iOS At Silux Control we tried to keep our products as affordable as possible without compromising quality Our devices are specially designed to make it as easy as possible to install with easy usability and a wide range of applications With encrypted data control you are also protected ...

Page 4: ... other devices with a high wattage rating 4 Electrical Specifications Power supply Operating Voltages 110V AC 230V AC Power supply Frequency Range 50Hz 60Hz Maximum Switching Power Output A 4000W Output B 4000W Wire Thickness 2 5mm 3mm Operating Temperatures 5 C 60 C 5 Instructions A B STATUS Device Device Mains 2 3 OFF 1 Screw holes Thermo Stabilizer Output A Status Output B Red light Status Powe...

Page 5: ...eadings and keep the water at the selected temperature 5 Tighten all the glands and screw the plastic cover back on again You can mount the Thermo Stabilizer to a desired location using the mounting holes on the side of the Thermo Stabilizer with the supplied plugs and screws 6 Turn the main switch to this device on The RED light on the front of the device will switch on This means the Thermo Stab...

Page 6: ...ng directly to the Thermo Stabilizer the button only controls Output A 1 A red light will indicate that the the Thermo Stabilizer has power Press the Teach button on the Thermo Stabilizer The green light on the Thermo Stabilizer will start flashing 2 Ensure the Touch Lamina has power Press the Teach button on the Touch Lamina The green light on the Touch Lamina will start flashing 3 Tap the button...

Page 7: ...ices Use the diagnostics section of your Silux Control app to diagnose any issues you might be experiencing with communication on your Silux Control Network 7 What is a Trigger An trigger is a device used to control a Silux Control device Think of it as a remote control This device will only be on for a brief period of time while sending the command to your Silux Control device and will go back in...

Page 8: ...th a high humidity If water or any chemical is spilt on this device please shut the main switch or circuit breaker off Never handle this product when hands feet or body are wet or when standing on a wet floor When electrocuted consult a doctor Keep highly flammable liquids away from this device Do research about wire insulating colour codes for your country Please consult a qualified electrician W...

Page 9: ...lux has to offer 11 More Silux Control automation products Product Silux Control Name Hub IntelliHub Relay Module Dry contact Collector Relay Module Collector Relay Relay Module Dimmable Collector Dimmable Repeater Range Extender Silux RPT PIR Sensor Seeker Touch Plate EU SA Touch Lamina Altus Touch Plate USA Touch Lamina Artatus Plug Electrifier Smoke Gas Detector Halitus Water Heater Geyser Ther...

Page 10: ...rrants to the original purchaser of this Silux Control product that the product shall be free from defects in design assembly material or workmanship under normal use and operation Silux Control s sole and exclusive obligation under the foregoing warranty shall be to repair or replace at its option any defective product that fails during the warranty period The expense of removal and reinstallatio...

Page 11: ...ite at www siluxcontrol com for any other support products future products and updated user manuals 4 Disclaimer of Liability Please read this user manual thoroughly before using the product Follow all safety precautions when installing this product It is always recommended to use a qualified electrician Under no circumstances shall Silux Control or its associates be liable for any direct indirect...

Page 12: ...rranty is available on our website www siluxcontrol com Please take a moment to fill out your information Please return the warranty card with defective product and the sales receipt as proof of the date purchase Warranty cannot be carried out without it Product Model No Serial No Date of Purchase Name Surname E Mail Address Phone No Address Country D D M M Y E A R Cut Here ...

Reviews: