Operating manual
Twister II NA
Copyright Silca S.p.A. 2015
13
7
CUTTING OPERATIONS
ATTENTION: for complete safety during the cutting operations, take the following precautions:
• Always work with dry hands.
• Ensure that the machine is properly grounded.
• Wear protective goggles even if the machine is provided with a safety shield over the cutting tool.
• Before starting the motor (switch Q), carry out the following operations:
a) place the pattern and blank keys into the clamps.
b) install and calibrate the cutter and tracer (see section 6.2).
• Keep hands away from the cutting tool in motion.
7.1 GAUGING KEYS
When loading keys into the clamps on the TWISTER II NA both the pattern key and the key to be cut must be
gauged properly in the clamp prior to beginning the cutting operation. Keys are gauged using either the shoulder
stop or tip of the key (for keys that do not have a shoulder).
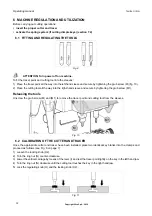
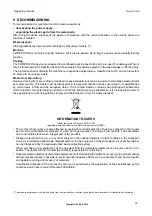
When loading keys with shoulder stops place the key in the jaw so that the shoulder of the key is resting against
the front edge of the clamp (Fig. 12).
When loading keys gauged by the tip, insert the tip stop bar into the appropriate slots on the clamp and load the
key into the jaw so that the tip of the key rests against the tip stop bar (Fig. 13).
It is important that both the pattern key and the key to be cut are gauged in the same manner in each jaw.
0
tip stop bar
Fig. 12
Fig. 13
7.2
CUTTING DIMPLE KEYS
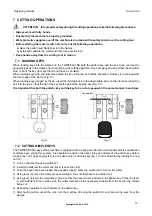
The TWISTER II NA key-cutting machine is equipped with a spring mechanism which allows precise duplication
of dimple keys. Using this system, it is possible to position the tracer into each dimple of the pattern key before
making the cut. The spring system is to be used only for dimple keys (
fi
g. 1) and is activated by rotating the ring
nut (O).
1) Turn on the machine using switch (P).
2) Install and calibrate the cutter and tracer (see section 6.2).
3) Once the keys have been loaded and gauged properly, press the switch (Q) to turn on the cutter.
4) Using lever (C) move the clamp group according to the cuts that have to be carried out.
5) Using lever (I) lower the cutter/tracer group so that the tracer enters a dimple in the pattern key. Press the lever
(I) with suf
fi
cient force to make sure the cutter removes all the necessary material from the key for the dimple
being cut.
6) Repeat the operation for each dimple on the pattern key.
7) After having carried out all the cuts, turn the machine off using the switch (Q) and remove the keys from the
clamps.

