background image


30 

turn daylight saving time on/off, etc. 


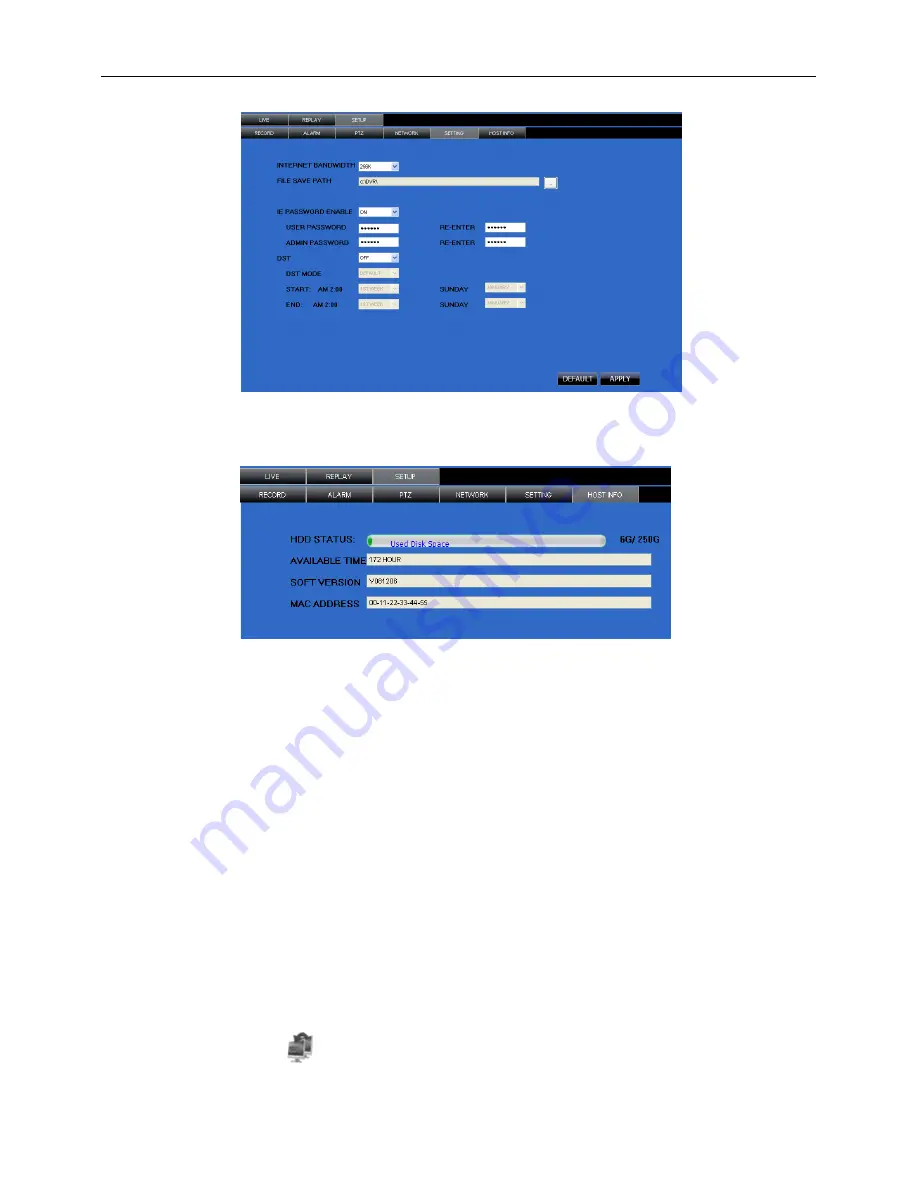
 Host Info


Click [Host Info.] to enter into the sub menu (shown as Picture 6-12). Here you can check Usage rate of 

HDD, available recording time, software version and MAC address. 


6.3.1.4 Log out 

Log out of the system. 

6.3.2 PTZ Control 

Note: below-mentioned series no will be consistent with the remark no shown as Picture 6-2. 

2.

PTZ direction control:

 Control PTZ moving direction 

3.

Zoom, Focus and Iris Control:

 control direction, zoom, focus and iris of PTZ. 

4.

Presetting bit Control


CUR

display current presetting bit or input a presetting bit you want to fix at according edit box


Load

Load one presetting bit setting you have saved last time. 

Save:

 Save presetting bit. 

Set: 

set presetting bit parameter (Details setting method please refer to section 5.5- cruise set. 

GOTO:

 on the preview mode, please input one presetting bit no and click [GOTO] button, you could 

fix the presetting bit quickly. 

Clean:

 clean presetting bit setting. 

Cruise:

 control cruise status (including on and off). 

6.3.3 Live Play Control 

On / Off Live display [          ]

When Live display status is “On”, Clicking the button closes Live display. 

When “Off” clicking the button opens the Live display.   

Picture 6-11 

(Numbers 2, 3, 4 on Picture 6-3) 

(Numbers 6 through 10 on Picture 6-3)


Picture 6-12


Summary of Contents for QV-3030

Page 1: ...Model No QV Camera Kit 4 Channel 10 LCD DVR USER S MANUAL 3030 ...

Page 2: ...EVIEW 10 5 2 MAIN MENU 11 5 2 1 Camera setup 11 5 2 1 1 Color Setup 11 5 2 1 2 Privacy Zone Setup 11 5 2 1 3 Autoseq Setup 12 5 2 2 Record setup 12 5 2 2 1 Record Mode 13 5 2 2 2 Record Schedule Setup 13 5 2 2 3 Manual Recording 13 5 2 3 Network Set 14 5 2 4 Recording Search 15 5 2 4 1 Search 15 5 2 4 2 Playback Interface 15 5 2 4 3 Video Backup 16 5 2 5 Multi player 16 5 2 6 Device Management 18 ...

Page 3: ...F NET VIEWER AND IE 26 6 3 1 Menu column 26 6 3 1 1 Live 26 6 3 1 2 Replay 26 6 3 1 3 Setup 27 6 3 1 4 Log out 30 6 3 2 PTZ Control 30 6 3 3 Live Play Control 30 6 3 3 1 Playback Local File with Netviewer 31 CHAPTER 7 SPECIFICATIONS 32 CHAPTER 8 WINDOWS VISTA USER 33 CHAPTER 9 APPENDIX 35 9 1 OPERATION FUNCTION TABLE 35 9 2 RECORDING ALARM SETTING 35 9 3 TROUBLESHOOTING 36 9 4 USAGE MAINTENANCE 36...

Page 4: ...t an authorized dealer or service center 8 Do not attempt to remove the top cover Warning You may be subjected to severe electrical shock if you remove the cover of the DVR 9 Handle DVR box carefully If you accidentally drop your DVR on any hard surface it may cause a malfunction If the DVR doesn t work properly due to physical damage contact an authorized dealer for repair or exchange 10 Use stan...

Page 5: ...aster menu navigation PTZ Control Supports PTZ camera operations through RS 485 List 1 1 Other Features H 264 video compression format 4CH supports D1 HD1 and CIF resolution ADPCM audio compression format Windows Graphical interface BNC YLGHR output Supports remote live viewing via 3G mobile networks Supports sending email alerts when motion is detected by system Triplex recording playback and net...

Page 6: ... you to scroll through the video feeds transmitted from each camera hooked up to your system 4 down When pressed while the Main Menu is not displayed the down arrow button allows you to scroll through the video feeds transmitted from each camera hooked up to your system 5 IR Receiver Receives Signal from Remote Control 6 HDD When the Red Indicator Light Flashes it Means the Hard Drive is Being Rea...

Page 7: ...t BNC 3 AUDIO INPUT Audio Input Audio Signal Input RCA Interface Connection 4 AUDIO OUTPUT Audio Output Audio Signal Output RCA Interface Connection 5 USB Port USB Mouse Connection 6 LAN Ethernet Port Intranet and Internet Connection RJ 45 Interface 7 RS485 Alarm Port RS485 Interface 8 DC12V Power Port Power Supply DC12V 3A 9 Power Switch Turn Power On And Off ...

Page 8: ... and character input use instead of Enter or Backspace In the Detailed file menu mode clicking left key will playback one recording file Click right key of Mouse In live display mode clicking right key will display pop up menu shown as Picture 5 1 In Main menu or sub menu mode clicking right key will exit current menu Double click Left key of Mouse In live display or playback mode double clicking ...

Page 9: ...per cover back carefully re attach screws 3 2 Connecting Your DVR to Cameras and a Monitor Connect camera cable to the Video Input port of the DVR Connect the monitor to the Video Output port of the DVR using a BNC connector See Rear Panel Section 2 2 To connect a PTZ speed dome to your DVR System connect your PTZ Camera data cables to your RS485 A B ports See Chapter 5 for a more detailed account...

Page 10: ...age of After connecting the power adapter the system will boot up and start initializing After finishing system initialization the system will enter into main interface Picture 4 2 is the main interface displayed by system which is showing no video input status Once there are video inputs the interface will display live images from the cameras In main interface mode if you use the mouse to double ...

Page 11: ... Network Time Setting System Maintenance User password Video Setting Language Select System Information System Device Management HDD Management PTZ Setting Mobile Motion Area setting Alarm Setting E mail setting Camera Color set Dwell time display Rec Search Search Playback Detail List File Backup Main Menu ...

Page 12: ... Picture 5 4 You can also use the Menu button on the front panel to bring up the window when using the front panel buttons use the FWD and REW button to move in the menu and the SEL button to select the icon You use the ESC button to return to previous window In Main Menu mode you can control device management settings such as Camera Recording Network Recording search HDD Alarm PTZ Control Mobile ...

Page 13: ...ord or not RESOLUTION 4 CH only decides the recording video resolution About the definition of resolution please refer to the specification chapter QUALITY select recording video quality higher quality will need more HDD space to save the video AUTOSEQ allows system to display every selected channel in full screen by certain dwell time and auto switch in sequence Default dwell time 5 second Select...

Page 14: ... able to configure 24 hours recording schedule for every channel or all channel from Sunday to Saturday Steps 1 Select Channel 2 Select a recording status among ALARM GENERAL and NO RECORD 3 Move the cursor to the time point you want to set click on the box in the schedule time line that you want to apply the selected record type to 4 If you want to change another recording status repeat step 2 st...

Page 15: ... selecting network mode such as DHCP PPPOE and static allocation and setup web port you could visit DVR remotely via network If you need to visit DVR via Internet you should setup the inflection of video port at the public Router located in the DVR shown as Picture 5 19 Host Port 9000 Web Port 8080 LAN IP address of DVR 192 168 1 101 Input http router IP 8080 192 168 1 101 8080 to you computer IE ...

Page 16: ...o play back File list To check recoding event list you can sort the files by Channel Record Type Normal Record Alarm Record 5 2 4 2 Playback Interface FIRST Turn to the first page PREV Turn to previous page NEXT Turn to next page LAST Turn to the last page ALL Select all files in current page REVERSE Allows you to revert the selected and unselected events on the current page except those you have ...

Page 17: ...ewer program that comes with the DVR so you can use any player that supports AVI format Introduced on Chapter 6 5 2 5 Multi player 1 Copy backup file to your PC 2 Open multimedia player and click File Local F to find select the backup file and then click open button Note the file type you have selected should be 264 format 3 Open backup file 2 Click pop up menu button on the bottom of multimedia p...

Page 18: ...ndow 3 Pause 12 Start 4 Stop 13 Cut 5 Previous frame Next frame 14 Delete 6 Slow play Normal play Fast Play 15 Convert AVI 7 Next Hour 16 OSD 8 Capture picture 17 Mute switch 9 Reduce window 18 Volume adjust 4 Please refer to the below Video on setting procedure System default video for every channel is on Setting Video play setting Normal video Bar Select the channel you want to display Select to...

Page 19: ...MAT You use this option to format the hard drive you can not record files to the hard drive until it has been formatted Click Format HDD button to start formatting When selecting Format HDD option the system will prompt you Format HDD will loss all the data do you confirm click OK system will prompt you Is formatting and successful format and then system will restart automatically USB FORMAT Use t...

Page 20: ...ra damage cable broken or damaged or power supply malfunction Motion Detection When an object moves into motion detection area alarm will be triggered You can adjust sensitivity level to suit the needs of your actual application environment I O Status System can convert alarm signal triggered by external sensor into signal identified by system HDD loss When Hard Drive is not detected HDD damage po...

Page 21: ...avoid overloading your email account For detailed SMTP protocols settings refer to the below picture 5 35A If your setting is still not ri ght please contact the web site where you have applied for your email box to get SMTP server and SSL of mail box Note Sender email is required to enable IMAP POP3 SMTP function details please refer Pi cture 5 39 Picture 5 40 which is IMAP POP3 SMTP Enable setti...

Page 22: ...xplanation Please connect DVR to Internet before setting DVR port number and the server port no is not equal to network menus You can find the PTZ control menu on the pop up menu bar and open the PTZ control interface You can click Z Z keys to zoom In or out click F F keys to control camera focus and click I I to adjust the focus point Picture 5 42 You can find the PTZ control menu on the pop up m...

Page 23: ...l SENSITIVITY This option allows you to set sensitivity level of motion detection from 1 to 4 with 4 being the most sensitive The System Menu includes the below sub menus Time Set User Password Audio Video Setting Language select System Info and System Maintenance After entering into the System you can configure the system to meet your needs This option allows you set the device ID for the DVR and...

Page 24: ... Search Playback function and view the live images You re limited to check change any system settings Login with ADMIN PASSWORD you will have the authority to operate all menus MENU LOCK menu only displays on the pop up menu bar when password protection is enabled When you exit the main menu the system will remember your login information for a while so that you don t need to input the password fo...

Page 25: ...ls Click Main Menu System Info to enter into System Information menu to view system info including Device type Software firmware version and MAC address etc This option allows you reset the DVR to default settings update system software firmware and config system auto maintenance When the auto maintain function is enabled you can set system to restart regularly to clear up some temporary storage m...

Page 26: ...r Open Internet Explorer and enter the IP Address or DDNS address of your DVR A pop up will ask you to install an ActiveX plug in to your computer Please confirm the download and install the software Reminder If the ActiveX plug in is not downloaded successfully please check if your browser s safety level or firewall setting is set properly as stated above Please also make sure all of the setup of...

Page 27: ...6 3 1 1 Live After Logging in to system system will enter into Live display shown as Picture 6 3 6 3 1 2 Replay Play button Play Pause Stop button stop playing recording This option allows you to playback recordings remotely First select the day channel and type and proceed searching and refreshing second select any event from search result list to playback Please note you can control playing spee...

Page 28: ... surveillance software To backup files remotely 1 Click REPLAY at the top of the main screen 2 Select a date on the calendar and click RELOAD 3 Double click a file from the File List to begin playback 4 Click BACKUP Backup begins to C DVR ip address Backup NOTE If you playback a file you must wait for the file to load before backing it up otherwise you may receive an error message When file backup...

Page 29: ...etup Please refer to Section 5 2 2 Record Setup Alarm Click Alarm menu to enter into its sub menu shown as Picture 6 7 You can set I O alarm for every channel motion detection alarm motion recording motion trace motion sensitivity video loss alarm HDD not enough space alarm HDD not found alarm and alarm output time etc For details on setup method please refer to section 5 2 5 2 Picture 6 5 Picture...

Page 30: ...setup Please refer to Section 5 2 3 Network Set Setting Click setting menu to enter into the menu interface shown as Picture 6 11 Click button to preview net viewer recording saving path and screen capture saving path The menu also allows you to set a lower bandwidth for Internet video transmission set user password Picture 6 8 System allows you setup motion detection settings for each channel of ...

Page 31: ...t presetting bit or input a presetting bit you want to fix at according edit box Load Load one presetting bit setting you have saved last time Save Save presetting bit Set set presetting bit parameter Details setting method please refer to section 5 5 cruise set GOTO on the preview mode please input one presetting bit no and click GOTO button you could fix the presetting bit quickly Clean clean pr...

Page 32: ... Click or slide the control bar to adjust sound volume 6 3 3 1 Playback Local File with Netviewer Run the Netviewer software you will see the OFFLINE button displayed on the Login interface Press this button to enter local file playback mode Press the ADD button to add backup H 264 files or folder saved in your computer you will see the files will be listed in the queue window select a file then p...

Page 33: ...45 60min Video backup USB flash disk removable HDD USB Burner Network backup to AVI File Format Playback Mode PLAY SLOW FWD Frame by Frame Alarm Type Motion Video loss HDD Space HDD Loss PTZ Control Built in RS 485 port supports PELCO P PELCO D USB 2 0 Port Supports USB mouse removable HDD USB flash drive to backup to AVI file and upgrade system Ethernet One RJ 45 10M 100M self adaptable Ethernet ...

Page 34: ...Tool bar and select to appear the below picture 2 Second select icon and tick the settings of ActiveX controls and plug ins to Enable details as follows 3 4 Lastly after tick all the Enable please click to exit At this moment you could input IP address to run your programme ...

Page 35: ...lows Click Start Set Control panel User account to set user access authority shown as below picture Remind If the widgets ar e not downl oaded successfully please check if you r browser s safety l evel or firewall setting is too advanced Open IE browser to enter into tool Internet Option Internet user defined level enable widgets Downloading and auto running install widgets need one minute please ...

Page 36: ...etting system auto maintenance maintenance time regularly system upgrade ex factory default value recovery and manual restart system 22 Network Setting Network and Port setting Selecting network mode and setting net viewer port web port DNS and DDNS parameters 27 Network Function Live display Real time video input remotely 25 Remote recording Setting recording mode and status of DVR remotely 28 Re...

Page 37: ...om my PC in the DVR A You can if the hard drive is the same type and the size is supported by the DVR If you install it in the DVR it will be formatted for use in the DVR and the PC will not be able to read it 7 Q Do I have to stop recording to playback files on the DVR A No you do not have to stop recording the DVR will support both functions at the same time 8 Q Can I erase files from the hard d...

Page 38: ...ection Configuration Diagram is for reference only to show where to attach various devices to the DVR the cameras external alarms USB flash drives monitors and computers are not included with the standard DVR package ...

Reviews: