Signature Hardware GRAYVIK 946603 Quick Start Manual Download Page 2

2

1.800.221.3379

INSTALLATION

INSTALACIÓN

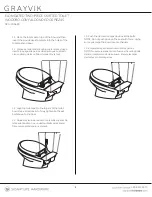
5. Lift the bowl over the closet flange and gently lower 
the bowl into place aligning the flange connection 
holes with the connection brackets. Firmly push the 

toilet down seating the bowl horn into the rubber 

gasket.

5. Levante la taza sobre la brida del inodoro y bájela con 

cuidado hasta que calce en su lugar, alineando los 

orificios de conexión de la brida con los soportes de 
conexión. Empuje firmemente el inodoro hacia abajo, 
asentando el cuerno de la taza dentro de la junta de 

goma.

6. Line up the side mount holes with the floor brackets 
and secure with fixing screws. Place the decorative cap 
over the screws.

6. Alinear los orificios laterales de la montura con los 
soportes del suelo y asegurar con los tornillos de fijación. 

Colocar la tapa decorativa sobre los tornillos. 

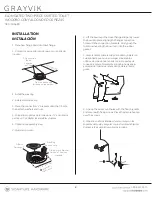
1. Place new flange bolts into toilet flange.

1.  Colocar los pernos de la brida nuevos en la brida del 
inodoro.

2. Install the wax ring.

2. Instale el anillo de cera.

3. Place the connection “L” brackets onto the T-bolts, 
then attach washers and nuts.

3. Colocar los soportes de la conexión en “L” en sobre los 

pernos en T, y adaptar las arandelas y tuercas. 


4. Tighten the assembly snug.

4. Ajustar el conjunto

G R AY V I K

Floor outlet flange

Brida de salida del piso

)

m

m

5

0

3

(

2

1

T-Connection

Bolts

Conexión 

en T Pern

8-1/4" (210mm)


    Important

Importante

T-Bolts

Pernos en T

T-Bolt, Nuts, Washer

Perno en T, tuercas, 

arandela 

Wax Ring

Anillo de cera

ELONGATED TWO-PIECE SKIRTED TOILET

INODORO CON FALDÓN DE DOS PIEZAS

SKU: 946603

Summary of Contents for GRAYVIK 946603

Page 1: ...e Hardware no asume ninguna responsabilidad con respecto a los daños causados al inodoro sistema de plomería suelo o daños personales durante la instalación Cumpla con todas las normas locales de plomería y construcción Retire el inodoro del empaque y verifique si se produjeron daños durante el envío Si encuentra algún daño comuníquese con nuestro equipo de Servicio al cliente al 1 800 221 3379 CÓM...

Page 2: ...ear los orificios laterales de la montura con los soportes del suelo y asegurar con los tornillos de fijación Colocar la tapa decorativa sobre los tornillos 1 Place new flange bolts into toilet flange 1 Colocar los pernos de la brida nuevos en la brida del inodoro 2 Install the wax ring 2 Instale el anillo de cera 3 Place the connection L brackets onto the T bolts then attach washers and nuts 3 Coloca...

Page 3: ...iento de hule en el vástago del tanque Conectar el tubo de abasto a la válvula de llenado e insertar las arandelas de conexión en las tuercas de conexión del tanque 8 Insert the connection bolt assemblies into the connection holes and gently set the tank in place Reach around the bowl and tighten the bolts on top of the washer Tighten the bolts evenly DO NOT OVERTIGHTEN 8 Insertar el ensamblaje de...

Page 4: ...r to firmly tighten both seat bolts down to the bowl 12 Alineé el asiento del inodoro con la orilla superior de la taza del inodoro Use un destornillador para apretar firmemente ambos pernos a la taza 13 Push the decorative caps down over the bolts NOTE Do not push down on the seat with force doing so may damage the slow close mechanism 13 Empuje las tapas decorativas sobre los pernos NOTA No empuje...

Page 5: ...imes and check all connections for leaks Periodically check for leaks for several days following the installation CONFIRMAR LA OPERACIÓN Descargar el inodoro varias veces y revisar que ninguna conexión tenga pérdidas Verificar periódicamente que no existan pérdidas durante varios días después de la instalación CARE AND CLEANING Clean the outside surface of your vitreous china water closet with mild...

Reviews: