background image

7

7


A

A

D

D

J

J

U

U

S

S

T

T

I

I

N

N

G

G


I

I

M

M

A

A

G

G

E

E

S

S


7

7

.

.

6

6


S

S

a

a

v

v

i

i

n

n

g

g


a

a

n

n

d

d


a

a

p

p

p

p

l

l

y

y

i

i

n

n

g

g


c

c

u

u

s

s

t

t

o

o

m

m


s

s

e

e

t

t

t

t

i

i

n

n

g

g

s

s


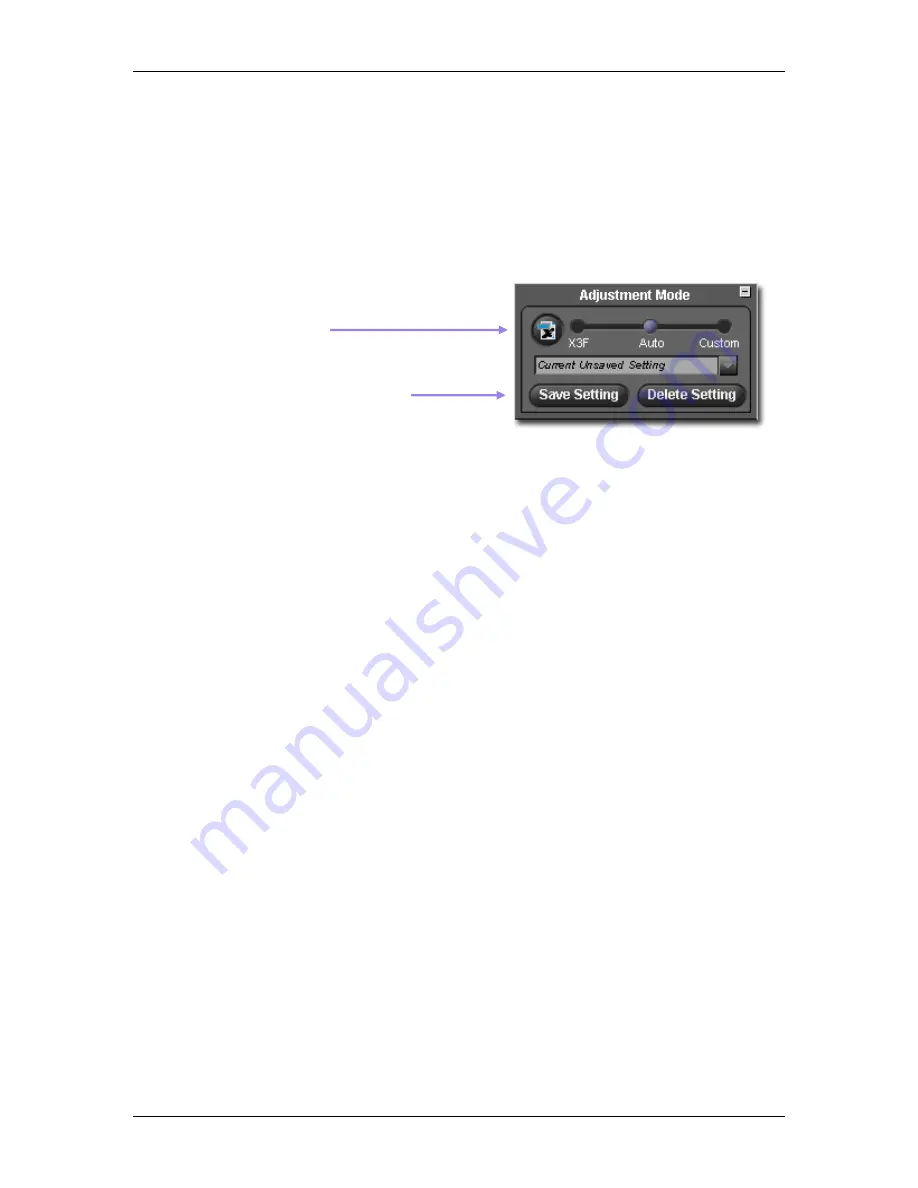
Applying settings from the Adjustment Controls Palette 

To view the Adjustment Mode, display the Adjustment Controls Palette on your screen, and open the panel 
titled Adjustment Mode. 
 
The Adjustment Mode settings in the Adjustment Control Palette reflect the same information as the 
Adjustment Mode settings found in the active Review Window. See Page 18 for a review of this 
information. 


Click the X3F Button to replace the stored 
settings in the X3F file 


Click the Save Setting Button to save the 
current settings in the application  


Saving application settings 

 
To save the current setting in the Adjustment Control Palette, click on the 

Save Setting 

button located at the 

bottom of the Adjustment Mode Panel. The 

Save Setting

 dialog box will appear.  

 
Type in a name for your new setting in the input field. To update an existing saved setting, click on the 
name of the setting you wish to update. Click 

Save


Deleting application settings 

 
To delete a saved setting, click on the 

Delete Setting 

button located at the bottom of the Adjustment Mode 

Panel. The 

Delete Setting

 dialog box will appear.  

 
Click on the name of the setting you wish to delete and click 

Delete


Replacing stored X3F settings 

 
To replace the original X3F settings (as rendered on your SIGMA digital camera) with current settings, 
click the 

X3F

 button. The dialog box will confirm you want to change the embedded adjustment settings 

associated with the X3F file. 
 
At any time, you can replace the current stored X3F settings with new updated settings of your choice, 
including the Auto Mode settings if you wish. The ability to store your preferred adjustment settings 
directly in the X3F file allows you to save unique settings for fast accurate processing in the future. 
 
To restore the original X3F settings, select Custom Mode and choose 

Zero Adjust

 from the pop-down box. 

Once 

Zero Adjust

 is selected, click the X3F button again to replace the current X3F settings with the 

original X3F settings as rendered on your SIGMA digital camera. 
 
To apply your stored X3F settings when processing a single image, select X3F Mode in the Review 
Window, the Adjustment Controls Palette, or from the Review Window’s Save dialog box. 
 
To apply your stored X3F settings when processing groups of images, select X3F Mode from the Main 
Window’s Save dialog box. 
 

SIGMA Photo Pro User Guide 


34 

Summary of Contents for PHOTO PRO 2.5

Page 1: ...S SI IG GM MA A P Ph ho ot to o P Pr ro o U Us se er r G Gu ui id de e Companion Processing Software for SIGMA Digital Cameras Version 2 5 For WINDOWS...

Page 2: ...player can cause hearing loss Playing the included CD ROM on a music CD player could damage the speakers The images recorded with this camera are intended strictly for personal use and should never b...

Page 3: ...ware 7 2 2 Setting up your monitor 8 Verifying monitor brightness gamma and color 8 Using a pre existing monitor profile 8 Choosing the best monitor resolution for your screen size 8 3 3 T TR RA AN NS...

Page 4: ...Navigation Buttons to select images 19 Selecting specific images from the Main Window 19 5 3 Using the Magnification Loupe 19 Turning the loupe on and off 19 Changing the magnification of the loupe 19...

Page 5: ...sure 29 Contrast 29 Shadow 29 Highlight 29 Saturation 29 Sharpness 29 X3 Fill Light 29 7 3 Making Color Adjustments 30 Using the Color Wheel 30 Using the Color Wheel to manually adjust color 31 Using...

Page 6: ...E E O O F F C C O O N N T T E E N N T T S S Image information in the Thumbnail Pane 36 Image information in the Camera and Computer Panes 36 8 2 Accessing the Image Information Window 37 The Image In...

Page 7: ...SIGMA Photo Pro User Guide 1 1 1 I I N N T T R R O O D D U U C C T T I I O O N N In this section you will learn The main features of SIGMA Photo Pro How this manual works...

Page 8: ...ture information View file information View processing information Adjustment Controls Palette Adjust image Exposure Compensation Contrast Shadow Highlight Sharpness Saturation and Fill Light Adjust c...

Page 9: ...in TIFF or JPEG formats SIGMA Photo Pro User Guide 3 Use Edit Buttons to rotate mark lock or delete selected images Click on the Info Button to open the Image Information Window Use Thumbnail Buttons...

Page 10: ...image in TIFF or JPEG format Click on the Info Button to open the Image Information Window Use Edit Buttons to rotate mark lock or delete the currently displayed image Press the X3F Button to update...

Page 11: ...enu Choice Keyboard Equivalents are shown as follows Ctrl Letter or Symbol Ctrl is an abbreviation for the Control Key on a Windows system Navigating the on screen version of the manual To view the SI...

Page 12: ...SIGMA Photo Pro User Guide 6 2 2 C C O O M M P P U U T T E E R R S S E E T T U U P P In this section you will learn How to install SIGMA Photo Pro on your computer How to set up your monitor...

Page 13: ...computer insert the installation disk that shipped with your SIGMA camera Double click on the CD icon on your desktop Then double click on the Set Up icon to install the program The wizard will take...

Page 14: ...verification of color neutrality and gamma only Use your monitor s adjustment controls as specified in the manufacturer s documentation to make any adjustments Using a pre existing monitor profile For...

Page 15: ...SIGMA Photo Pro User Guide 9 3 3 T T R R A A N N S S F F E E R R R R I I N N G G I I M M A A G G E E S S In this section you will learn How to connect your camera to your computer...

Page 16: ...files from the camera to your computer 1 Click the SIGMA folder in the DCIM folder of the camera detected as a storage device to display the stored images in the camera s card to the Thumbnail Pane 2...

Page 17: ...4 M M A A N N A A G G I I N N G G I I M M A A G G E E S S In this section you will learn How to display view and sort images How to select and move images How to rename images How to mark lock and rot...

Page 18: ...mages Access the Image Information Window Open an image in a Review Window The Thumbnail Pane displays images directly from the camera when the Camera Pane is selected or images from folders when the...

Page 19: ...yi in ng g i im ma ag ge es s i in n t th he e M Ma ai in n W Wi in nd do ow w View images stored on your computer Click on the Computer Pane to select the last folder viewed The Computer Pane title w...

Page 20: ...s Click on the button or select View Large Thumbnails in the Main Window menu Small thumbnails with details Click on the button or select View Thumbnails with Details in the Main Window menu Sorting a...

Page 21: ...must remain unchanged 4 4 5 5 S Se el le ec ct ti in ng g i im ma ag ge es s Selecting one image Click once on a thumbnail to select an image Double clicking selects and then displays the image in a...

Page 22: ...marked and unmarked images all images will be marked If all selected images are marked clicking the Mark button will unmark the images Only X3F images can be marked Locking and unlocking images Lock...

Page 23: ...s section you will learn How to open a Review Window How to view different images in the Review Window How to view details using the loupe How to check shadows and highlights with the warning mask How...

Page 24: ...he following View individual images at a larger size and higher resolution Process and save images individually Review images with different adjustment settings Access Adjustment Controls for custom p...

Page 25: ...in the folder Whenever you switch folders in the Main Window both Navigation buttons will be disabled until you replace the image in the Review Window with an image from the new folder Selecting spec...

Page 26: ...r of the loupe which represent Red Green and Blue values in a 5 by 5 pixel sample in the center of the loupe For additional information on color refer to Section 7 3 Making Color Adjustments 5 5 4 4 V...

Page 27: ...sted automatically for each image displayed Auto Mode remains selected until you choose another mode or manually adjust a setting using Adjustment Controls To see what adjustments Auto is making open...

Page 28: ...eing applied to the image 5 5 6 6 M Mu ul lt ti ip pl le e R Re ev vi ie ew w W Wi in nd do ow ws s Opening Multiple Review Windows Having multiple Review Windows open lets you compare images or setti...

Page 29: ...6 6 P P R R O O C C E E S S S S I I N N G G S S A A V V I I N N G G In this section you will learn How to process and save images How to apply adjustments How to choose resolution file type and color...

Page 30: ...batch of images 1 Select the folder containing the X3F images you wish to process 2 You can process the entire folder selected images or marked images 3 Select or mark specific thumbnails if desired...

Page 31: ...g dialog box appears Source The original capture resolution and filename are recorded here This data cannot be changed Adjustment Mode Reflects which Adjustment Mode is selected for image processing C...

Page 32: ...is the same as the resolution you selected when capturing the image on your camera High Medium or Low You can also select one half or double the resolution one half or double the number of pixels in...

Page 33: ...G G I I M M A A G G E E S S In this section you will learn How to use the Adjustment Controls palette How to make tonal adjustments How to make color adjustments How to use the Histogram How to set th...

Page 34: ...djustment Controls Palette To open Adjustment Controls click on the Adjustment Controls button in the Review Window Adjustment Mode Use to set the adjustment mode and to save and delete specific adjus...

Page 35: ...ckness of the blacks and the whiteness of the whites with a single control Increasing the constrast brightens the whites and darkens the blacks Decreasing the contrast grays both the whites and the bl...

Page 36: ...pen and close the Color Adjustment panel The Color Adjustment Eyedropper Click the Reset button to restore color adjustments to default no adjustment settings The Cyan Magenta and Yellow values displa...

Page 37: ...r image Locate a portion of your image in the current Review Window that includes a known neutral color that is not rendered as a neutral color Click on the eyedropper button The pointer turns to an e...

Page 38: ...side of the graph The scale in which these values are measured is between 0 blackest shadow and 255 whitest highlight Enabling disabling and setting values for the Warning Masks To turn the warning ma...

Page 39: ...ing Flash Select this setting when taking pictures with th Sigma EF 500 DG flash Auto Select this setting to allow the camera to automatically determine the appropriate white balance adjustments Monoc...

Page 40: ...te Setting button located at the bottom of the Adjustment Mode Panel The Delete Setting dialog box will appear Click on the name of the setting you wish to delete and click Delete Replacing stored X3F...

Page 41: ...Guide 35 8 8 G G E E T T T T I I N N G G I I M M A A G G E E I I N N F F O O In this section you will learn How to find image info in the Main and Review Windows How to open an Image Info Window for a...

Page 42: ...In addition to text information single images will also display icons in the information field indicating marked status locked status and transfer status If the selected image is a TIFF or JPEG proces...

Page 43: ...e button in the Title Bar or on the Close button at the bottom of the window There are three sections in the Information Window The top section contains general information about your file Next the ca...

Reviews: