background image

Chapter 4: Using the DVD Station     19

Perform the following steps to create a Play List:

1. Select the clip’s icon that you wish to add to the Play List from 

the Title List window and drag it to the Play List window. To
move all of the clips in the Title List to the Play List, click the 
Add All button. To clear the Play List, click the Remove All
button.

2.  To remove a clip from the Play List, click on the clip’s icon and 

drag it to the Title List box. To change a clip’s playing order, drag
and reposition its icon in the Play List box.

3.   Click OK when you have finished adding, removing, and/or 

changing the order of the clips to the Play List.

4.  Click the Play Mode button            in the main window (refer to

Figure 10) until the word Play List is highlighted in the Display
Panel. All clips included in the Play List will play in order.

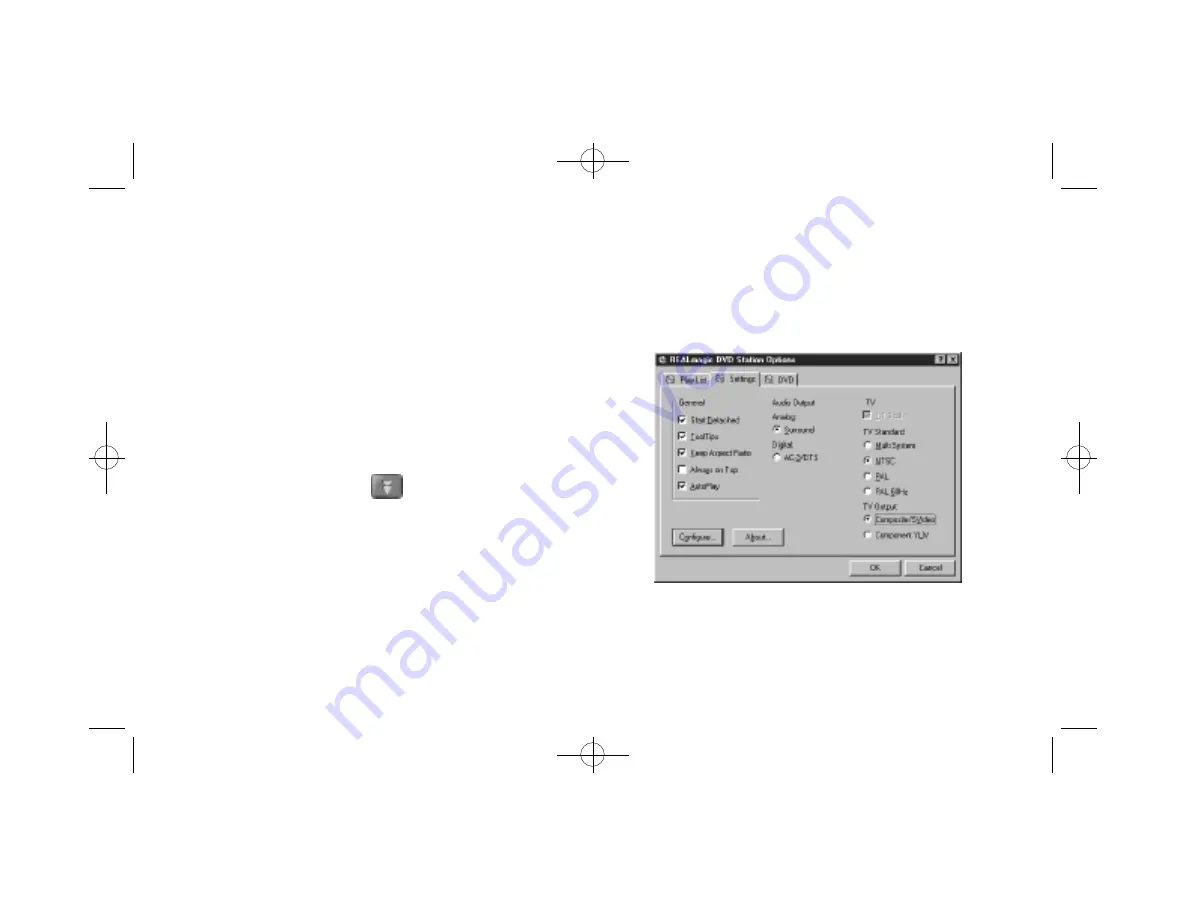
Settings

Click on the Settings tab to display the DVD Station Settings (Figure
13). This section allows you to choose the various DVD Station set-
tings to enable and disable.

Figure 13. DVD Station Settings

NetStream 2000 Manual 6.6.2000  6/6/00  2:47 PM  Page 24

Summary of Contents for REALmagic NetStream 2000

Page 1: ...The Plug and Play Solution for Interactive MPEG 2 Video NetStream2000 NetStream 2000 Manual 6 6 2000 6 6 00 2 47 PM Page 1...

Page 2: ...ademarks of Sigma Designs Inc Microsoft MS and MS DOS are registered trademarks of Microsoft Corporation As used in this man ual Windows refers to Microsoft Windows Microsoft Corporation s implementat...

Page 3: ...e receiving antenna Increase the separation between the equipment and receiver Connect the equipment into an outlet on a circuit different from that to which the receiver is connected Consult the deal...

Page 4: ...re Under Windows 9x 10 Installing Software Under Windows NT 4 0 11 Border Adjustment and Color Calibration 12 Chapter 4 Using the DVD Station 14 Starting the DVD Station 14 Standard Buttons 16 Custom...

Page 5: ...back 29 Shortcut Keys 30 Chapter 5 Windows Media and DirectShow Support 32 Appendix A Advanced Configuration Options 34 Manual Color Calibration 34 Advanced Color Adjustments 35 Border Adjustments 37...

Page 6: ...eam 2000 requires the following 2 megabytes MB of free hard disk space 16 MB of RAM Pentium based PC or compatible 133 MHz or higher VGAcard PCI 2 1 compliant expansion slot Plug and Play BIOS support...

Page 7: ...been embraced by the computer and entertainment communities as the current standard of digital video on both televi sion and personal computers DVD DVD is a revolutionary storage medium that is curren...

Page 8: ...colors full CCIR601 For MPEG 1 the video resolution is 16 8 million colors at 352 x 240 shown at 24 25 or 30 fps Both MPEG 2 and MPEG 1 files may include MPEG compressed audio 16 bit 48kHz stereo sou...

Page 9: ...expansion slot cover on the back of your computer This drains static electricity from the package and from your body Do not touch any exposed printed circuitry after opening the package Keep other pe...

Page 10: ...the NetStream 2000 into the PCI expansion slot Press down gently on the top edges of the board to ensure that all connecting points are seated securely Anchor the board s mount ing bracket using the...

Page 11: ...ernal VGAPass Through Cable to the VGAIN connector at the back of the NetStream 2000 refer to Figure1 2 Attach the other end 15 pin D shape of the cable to the output port on your VGAcard or your PC s...

Page 12: ...the LINE IN port on your sound card and then attach your receiver or amplified speakers to the LINE OUT or SPEAKER port on your sound card This will allow you to use one set of speakers to listen to b...

Page 13: ...the REALmagic NetStream 2000 by using an S Video to Composite adapter cable Composite Video is more common and works with most televisions The S Video Out connector provides better picture quality The...

Page 14: ...card If you are using this solution attach your receiver or amplified speakers to the Line Out port of your sound card to obtain the audio sound signal Note With this solution the volume for both CD...

Page 15: ...rdware manufacturer 2 Click OK 3 The Install From Disk dialog appears Insert Disk 1 the NetStream 2000 Drivers disk into the floppy disk drive 4 Make sure the dialog specifies the floppy disk drive le...

Page 16: ...ck Start on the task bar then click Run 4 Type A SETUP in the dialog box then click OK this example assumes that your floppy disk drive letter is A 5 You will see the Welcome screen Click Next 6 When...

Page 17: ...and BorderAdjust You will see the REALmagic Configuration dialog Figure 5 2 At the REALMagic Configuration dialog Figure 5 click Adjust border 3 You will see the BorderAdjust dialog Figure 6 Use the...

Page 18: ...reboot your system and try the Auto Color Calibration function again If the Auto Color Calibration function still fails you will need to per form a manual color calibration See Appendix A Advanced Co...

Page 19: ...Check the owner s manual for your DVD drive to make sure your DVD drive meets these requirements before attempting to play DVD discs Starting the DVD Station Follow the steps below to start the DVD St...

Page 20: ...f the track being played Depending on the type of disc you are playing additional information may appear The Volume Control Figure 9 increases or decreases the audio level With the mouse move the leve...

Page 21: ...again for 8x speed and click again to resume normal playback is the Previous Track button Click this button to skip to the previous track on the CD is the Next Track button Click this button to skip...

Page 22: ...a TV The MPEG window will vanish from the computer monitor and the DVD MPEG 2 Playback Card will output the video only on the TV screen If the video out is on TV clicking this button will switch the v...

Page 23: ...ve E is the CD ROM Since the DVD MPEG 2 Playback Card is capable of playing both MPEG 1 and MPEG 2 files you may choose to play MPEG 1 and MPEG 2 files from the CD ROM drive or from your hard disk dri...

Page 24: ...ist box To change a clip s playing order drag and reposition its icon in the Play List box 3 Click OK when you have finished adding removing and or changing the order of the clips to the Play List 4 C...

Page 25: ...not appear on top of the movie window Allows you to enable and disable the Windows AutoPlay feature of the DVD Station General Feature Start Detached Tool Tips Keep Aspect Ratio Always on Top AutoPla...

Page 26: ...s support multi lingual audio You may select the default language of your choice under the Default Language selec tion If the chosen default language is not available on that DVD movie title DVD Stati...

Page 27: ...t restrictions this feature does not work with DVD Video titles Segment Play A B This feature lets you loop playback between any two points in a movie Click this button on the progress bar once during...

Page 28: ...elector This operation only functions with a DVD movie disc that contains multiple language soundtracks Press the Audio Soundtrack Language Selector during play Click and select the language you want...

Page 29: ...18 Language Selector Subtitle Selector This operation only functions with a DVD disc that contains multi ple language subtitles or closed captions Refer to Figure 19 Press the Subtitle Selector during...

Page 30: ...not visible click the right mouse button will bring the Control Panel to the foreground Menu Selector Some DVD discs have a unique menu structure called DVD menu For example some discs allow you to a...

Page 31: ...r the hard disk click the Options Button on the DVD Station In the Options dialog Figure 21 select the drive that represents your DVD ROM drive DVD Station will automatically search for all available...

Page 32: ...ound During full screen video playback use the right mouse button to hide and unhide the 10 key keypad 10 Key Keypad If DVD Station detects that a DVD movie disc is in the DVD ROM drive it will displa...

Page 33: ...appear and the display will show VCD instead of VCD2 Select Buttons Video CD 2 0 Only Video CD 2 0 discs feature embedded playback controls When you play a Video CD 2 0 disc you can experience a whol...

Page 34: ...nel to select the song number and click the Menu Select key on the control panel using your mouse Note Some Video CDs have different formats and do not require the Menu Select key Some formats will wo...

Page 35: ...only Move mouse to Display mini controls full bottom of screen screen mode only F1 Help F2 Toggle to detach attach playback controls to movie window F3 Display DVD movie information window playback m...

Page 36: ...tween VGAand TV mode Alt F4 Quit ctrl a Activate angle menu ctrl c Activate frame capture ctrl d Toggle display timer ctrl e Eject disk ctrl f Fast forward cycles from 2x 8x then normal ctrl g Segment...

Page 37: ...t version of the Windows Media Player from the Microsoft website DirectShow and the Windows Media Player are used with the NetStream 2000 to support streaming video playback from video server products...

Page 38: ...rs are experts at digital video and network design and can help to cre ate a solution perfectly suited for your needs Software development documents are available from Sigma Designs for programmers wi...

Page 39: ...6 use your mouse to move the bar marked R slowly up or down to a point where the image of the big box on the right hand side of the Dialog window appears similar to the image of the GOOD box You can u...

Page 40: ...displayed through an area of you application There may also be instances where the default color is not compatible with your VGAdisplay Follow the steps below to set your own chroma key color if You...

Page 41: ...by adjusting the width W and length L slider bars of each color to make the video appear both inside and outside of the color chart Normally adjusting these sliders can easily make a very large hole i...

Page 42: ...G video image from the Left Right Top and Bottom This allows you to position the video with greater precision The In delay value delays the display of the video pixel on the left hand side of the MPEG...

Page 43: ...e staff available to assist you over the telephone by FAX or via the Internet Customer Service Hours 8 00 A M to 5 00 P M Pacific Time Monday through Friday Telephone Number 408 957 9866 FAX 408 957 9...

Page 44: ...Notes Appendix B Customer Service Information 39 NetStream 2000 Manual 6 6 2000 6 6 00 2 48 PM Page 44...

Page 45: ...5 Composite Video Out 8 Compression 2 Customer Service Information 38 D DAT Files 3 Data Transfer Rate 2 Discrete Digital Audio Channels 2 Dolby Digital Surround Sound 2 3 Dolby Pro Logic 1 2 3 DVD 1...

Page 46: ...4 Moving Picture Experts Group 2 MPEG 1 2 3 6 7 8 9 14 17 18 20 25 32 33 34 35 36 37 MPEG 2 1 2 3 7 8 17 18 32 35 38 MPG Files 3 P Pass through Cable 6 Pro Logic Surround Sound 2 3 7 S Software Instal...

Page 47: ...V VBS 3 Video CD 3 14 28 29 31 Video Connection 6 W Windows 95 20 32 World Wide Web 37 June 2000 42 Index NetStream 2000 Manual 6 6 2000 6 6 00 2 48 PM Page 47...

Page 48: ...355 Fairview Way Milpitas CA 95035 3024 Tel 408 262 9003 Fax 408 957 9740 Website www sigmadesigns com NetStream 2000 Manual 6 6 2000 6 6 00 2 48 PM Page 48...

Reviews: