15
4T MODE
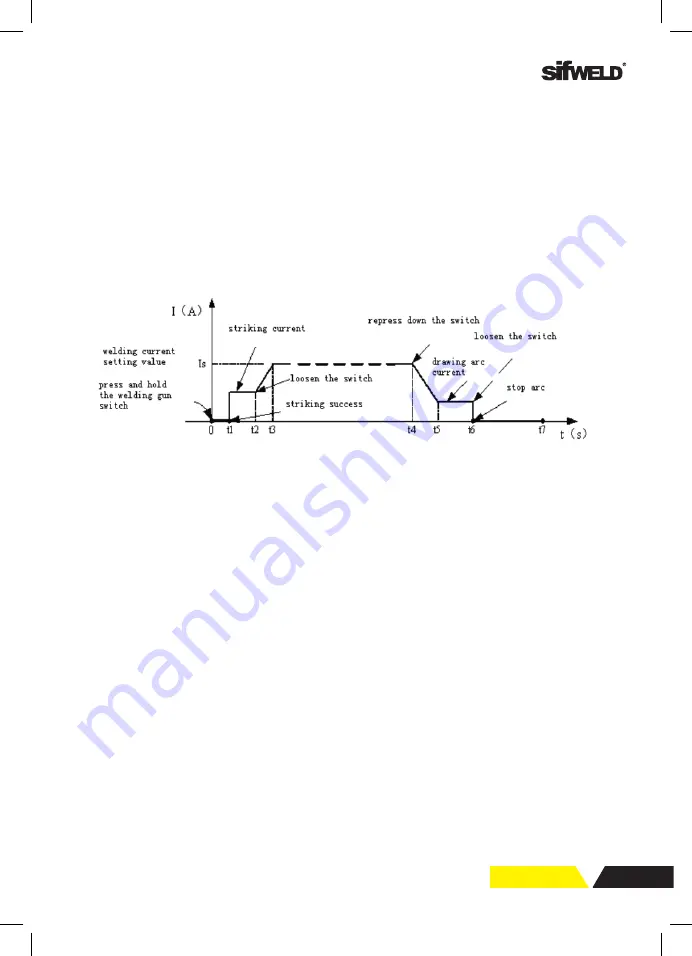
This is known as ’latching’ mode. The trigger is pulled once and released to activate the welding circuit,
pulled and released again to stops the welding circuit. This function is useful to longer welds as the
trigger is not required to be held on continuously. TIG series of welding machines also has more current
control options that can be used in 4T mode.
The start current and crater current can be pre-set. This function can compensate the possible crater
that appears at the beginning and end of the welding. Thus, 4T is suitable for the welding of medium
thickness plates.
PANEL FUNCTIONS & DESCRIPTIONS
1
welding circuit, pulled and released again to stops the welding circuit. This function is
useful to longer welds as the trigger is not required to be held on continuously. TIG series
of welding machines also has more current control options that can be used in 4T mode.
The start current and crater current can be pre-set. This function can compensate the
possible crater that appears at the beginning and end of the welding. Thus, 4T is suitable
for the welding of medium thickness plates.
Introduction:
(1) 0: Press and hold the gun switch, Electromagnetic gas valve is turned on. The
shielding gas stars to flow;
(2) 0
~
t1: Pre-gas time (0.1~2.0S);
(3) t1
~
t2: Arc is ignited at t1 and then output the setting value of start current;
(4) t2: Loosen the gun switch, the output current slopes up from the start current;
(5) t2
~
t3: The output current rises to the setting value (I
w
or I
b
), the upslope time can be
adjusted;
(6) t3
~
t4: Welding process. During this period, the gun switch is loosen;
Note
: Select the pulsed output, the base current and welding current will be outputted
alternately; otherwise, output the setting value of welding current;
(7) t4: Press the torch switch again, the welding current will drop in accordance with the
selected down-slope time.
(8) t4
~
t5: The output current slopes down to the crater current. The downslope time
can be adjusted;
(9) t5
~
t6: The crater current time;
(10) t6: Loosen the gun switch, stop arc and keep on argon flowing;
(11) t6
~
t7: Post-gas time can be set by the post-gas time adjustment knob on the front
Introduction
1. 0:
Press and hold the gun switch, Electromagnetic gas valve is turned on. The shielding gas stars to flow.
2. 0~t1:
Pre-gas time (0.1~2.0S);
3. t1~t2:
Arc is ignited at t1 and then output the setting value of start current;
4. t2:
Loosen the gun switch, the output current slopes up from the start current;
5. t2~t3:
The output current rises to the setting value (Iw or Ib), the upslope time can be adjusted;
6. t3~t4:
Welding process. During this period, the gun switch is loosen;
Note:
Select the pulsed output, the base current and welding current will be outputted alternately;
otherwise, output the setting value of welding current;
7. t4:
Press the torch switch again, the welding current will drop in accordance with the selected down-
slope time.
8. t4~t5:
The output current slopes down to the crater current. The downslope time can be adjusted;
9. t5~t6:
The crater current time;
10. t6:
Loosen the gun switch, stop arc and keep on argon flowing;
11. t6~t7:
Post-gas time can be set by the post-gas time adjustment knob on the front


