background image

en

    Installation and connection

20

Optional accessories

Washer-dryer stack connection set:

To save space, the dryer can be 

placed on top of a suitable washing 

machine of the same width and 

depth. 

The dryer must be secured to the 

washing machine using this 

connection set. 

Order number without pull-out 

worktop: 

WZ20311

.

Platform:

For easier loading and unloading, 

use a platform to raise your dryer.

Transport laundry with the integrated 

clothes basket integrated in the 

platform's pull-out drawer.

Order number: 

WZ20500

.

Exhaust air duct:

The exhaust air duct is extracted via 

a hose.

Order number: 

WZ20180

.

Summary of Contents for WT34A201HK

Page 1: ...Register your product online ens home com welcome siemens home bsh group com welcome en QVWDOODWLRQ DQG RSHUDWLQJ LQVWUXFWLRQV Tumble dryer WT34A201HK ...

Page 2: ...If the operating and installation instructions describe different models any differences will be pointed out at the relevant points in the text Read these operating and installation instructions before operating the tumble dryer Display rules Warning This combination of symbol and signal word indicates a possibly dangerous situation Not heeding the warning can cause death or injuries Caution This ...

Page 3: ...panel 23 Display panel 24 Z Laundry 25 Preparing the laundry 25 Sorting laundry according to 25 Programs and buttons 26 Programs 26 Buttons 28 1 Operating the appliance 29 Loading laundry and switching on the dryer 29 Setting a program 29 Starting the program 29 Program sequence 29 Changing the program or adding laundry 30 Program interruption 30 Program end 30 Removing laundry and switching off t...

Page 4: ...r service Read and follow the operating and installation instructions and all other information provided with this appliance Retain the documents for subsequent use or for subsequent owners Safety instructions Safetyinstructions The following safety information and warnings are provided to protect you from injury and to prevent material damage to your surroundings It is nevertheless important to t...

Page 5: ... Warning Risk of suffocation If allowed to play with the packaging plastic film or packing components children may become caught in these or pull them over their heads and suffocate Keep packaging plastic film and packing components away from children Warning Risk of poisoning Detergents and care products may result in poisoning if consumed If accidentally swallowed seek medical advice Keep deterg...

Page 6: ...e material damage damage to the appliance If the appliance s mains cable is altered or damaged this may result in electric shock short circuiting or fire due to overheating The mains cable must not be kinked crushed or altered and must not come into contact with any heat sources Warning Risk of fire poisoning Connecting the exhaust air duct to ventilation shafts or chimneys to which gas or coal bu...

Page 7: ...iance in any other way is forbidden Riskofinjury materialdamage damagetotheappliance If you take hold of any of the appliance s protruding parts e g the appliance door in order to lift or move it these parts may break off and cause injury Do not take hold of any of the appliance s protruding parts in order to move the appliance Warning Risk of injury The appliance is very heavy Lifting it may resu...

Page 8: ... may cause an explosion Make sure that the area around the appliance is kept clean when it is in operation Warning Risk of fire material damage damage to the appliance If a program is terminated before the drying cycle has finished this prevents the laundry from cooling down sufficiently and may cause the laundry to ignite or may result in material damage or damage to the appliance During the last...

Page 9: ...aterial damage damage to the appliance If the amount of laundry in the appliance exceeds its maximum load capacity it may not be able to operate properly or this may result in material damage or damage to the appliance Do not exceed the maximum load capacity of dry laundry Make sure you comply with the maximum load capacities specified for each of the programs Page 26 Materialdamage damagetotheapp...

Page 10: ...e note Switch off the appliance Disconnect the appliance from the power supply pull out the plug Never take hold of the mains plug with wet hands When removing the mains plug from the socket always take hold of the plug itself and never the mains cable otherwise this may damage the mains cable Do not make any technical modifications to the appliance or its features Repairs and any other work on th...

Page 11: ...re parts and accessories only Caution Material damage damage to the appliance Cleaning agents and agents for pretreating laundry e g stain removers prewash sprays etc may cause damage if they come into contact with the surfaces of the appliance Therefore please note Do not allow these agents to come into contact with the surfaces of the appliance Clean the appliance with nothing but water and a so...

Page 12: ...gy Load the dryer with the maximum load Note Do not exceed the maximum load for the programs as this prolongs the drying time and increases energy consumption Ventilate the room and keep the air inlet on the dryer free to ensure air exchange Clean the fluff filter after each drying cycle If the fluff filter is dirty the drying time is prolonged and energy consumption is increased Energy saving mod...

Page 13: ...contact with heat sources or sharp edges Warning Children may lock themselves in the dryer putting their lives at risk Do not set up the dryer behind a door or sliding door as this may obstruct the dryer door or prevent it from opening Caution Risk of injury Due to the heavy weight of the dryer you may injure yourself if you lift it Do not lift the dryer on your own You could cut your hands on the...

Page 14: ...appliance In order to avoid it follow advises included in this chapter Notes It is recommended to route the exhaust air directly into the open air through an exhaust air duct A drain check valve must be fitted then to prevent air from flowing back The air extraction system must not exceed the specified pressure losses Clean the exhaust air duct regularly at least once a year When operating the dry...

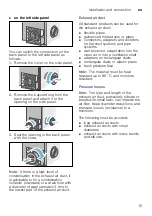
Page 15: ... duct All standard products can be used for the exhaust air duct flexible pipes galvanised metal ducts or pipes connectors adapters and diverters for flat duct systems and pipe systems wall boxes for evaporation into the open air or into a ventilation shaft adapters on rectangular ducts rectangular ducts or plastic pipes back pressure flap Note The material must be heat resistant up to 80 C and mo...

Page 16: ... for pipe connection inside diameter 100 mm In order to ensure the minimum required air flow a certain pressure loss resistance must not be exceeded The permissible total pressure loss in an exhaust air duct must not exceed a certain value This is calculated as the sum of all individual pressure loss values for the straight pieces and fixtures in the exhaust air duct Note The value for the maximum...

Page 17: ... grooved Flexible pipe cor rugated 110 x 54 smooth 220 x 54 smooth Model variant straight piece per 1 m length 4 6 12 10 3 Fixtures Diverters Bend R 300 mm 3 5 7 6 3 R 200 mm 4 7 8 8 4 R 100 mm 6 9 10 12 6 Angle 10 16 17 26 8 Elbow 19 22 24 50 17 Telescopic wall box with grid 14 28 7 Wall box with backpressure flap 6 13 3 5 Total pressure loss Pipe connection 0 50 100 0 80 110 120 130 ...

Page 18: ...r duct directly into the open air via an exhaust air pipe through an open window Example pipe connection inside diameter 100 mm flexible pipe corrugated Through a wall box into chimneys or ventilation shafts Notes It is not permitted to connect the exhaust air duct to chimneys which are connected to gas or coal fired ovens cookers or gas fired heating systems If the appliance is being connected to...

Page 19: ...on pipe for every dryer These valves prevent the moist exhaust air from flowing back into the washing and drying room through dryers which are not in operation The outlet for the exhaust air must be arranged routed in such way as to prevent any additional backpressure e g from a direct ingress of wind on the escaping exhaust air In every case have safe operation confirmed by the responsible ventil...

Page 20: ... dryer must be secured to the washing machine using this connection set Order number without pull out worktop WZ20311 Platform For easier loading and unloading use a platform to raise your dryer Transport laundry with the integrated clothes basket integrated in the platform s pull out drawer Order number WZ20500 Exhaust air duct The exhaust air duct is extracted via a hose Order number WZ20180 ...

Page 21: ...ief 1 Load the laundry and close the door Switch on the dryer Select a program and if necessary adjust the program default settings 2 Select the start button Ü Dry Unload the laundry 3 Switch off the dryer Clean the fluff filter Clean the exhaust air duct at least once a year ...

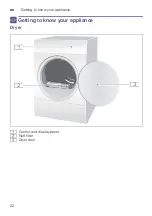
Page 22: ...en Getting to know your appliance 22 Getting to know your appliance Gettingtoknowyourappliance Dryer Control and display panel 0 Fluff filter 8 Dryer door ...

Page 23: ... 23 Control panel Use the program selector to switch the dryer on and off and to select the program 0 Programm Page 26 8 Start button for starting or interrupting the program Page 28 Buttons Page 28 H Display panel with buttons Page 24 ...

Page 24: ...the Ready in time Select Anti Crease H Select Low Heat Drying Fine adjustment of the dryness level Ý Anti crease selected w Childproof lock selected μ Low Heat Drying selected Ü Start or Pause selected 3 h Program delay in hours when Ready in time is selected 1 27 Expected program duration in hours and minutes e Ø Ý Ÿš Program progress Wet Iron Dry Cupboard Dry Anti Crease End and Pause Clean the ...

Page 25: ...particles which may be deposited on the moisture sensor This may impair the sensor function and in consequence the drying result Notes When washing laundry to be tumble dried use the correct amount of detergent and care products as specified in the manufacturer s instructions Clean the moisture sensor regularly Page 33 Sorting laundry according to c Suitable for tumble drying a Dry at normal tempe...

Page 26: ...ormal hard wearing and heat resistant fabrics made of a single layer of cotton or linen that need to be damp after drying and are suit able for ironing or hanging up 7 kg Easy Care Ó Cupboard Dry Extra Ò Synthetic or blended fabrics that are made of more than one layer and do not dry readily 3 5 kg Easy Care Ó Cupboard Dry Normal synthetic or blended fabrics made of a single layer 3 5 kg Easy Care...

Page 27: ...just the programme length using the button for the drying time Cold û All types of fabric For freshening up or airing items of laundry that have not been worn for long 3 kg You can adjust the programme length using the button for the drying time Shirts Business k Non iron shirts or blouses made of cotton linen synthetic fibres or blended fabrics 1 5 kg Rapid 40 ñ Synthetics and light cottons 2 kg ...

Page 28: ...rogrammes Between 20 minutes and 3 hours in 10 minute increments Finish in 5 The programme will end in 1 24 hrs Set the Ready in time in increments of one hour to delay the start of the programme The required number of hours after the programme ends is displayed in the display panel w 3 sec Child proof lock Press and hold the Ready in time button and the drying time button at the same time for 3 s...

Page 29: ...e display panel Note Default program settings are standard settings that are already defined when a program is selected After selecting a program you can see the default program settings in the display panel 3 If required adjust the default program settings You can find detailed information on this from Page 26 onwards Starting the program Press the Start button Note If you want to lock the progra...

Page 30: ...t any time to pause open the dryer door or press the Start button Caution Risk of fire Laundry may catch fire If you cancel the program you must remove the laundry items and spread them out so that the heat can disperse Program end Ÿš appears in the display panel Removing laundry and switching off the dryer 1 Remove the laundry 2 Turn the program selector to the off position Clean the fluff filter...

Page 31: ...speed that is used for spinning your laundry before it is dried The volume of the audible signal at the end of the program The volume of the audible button signals You will need to activate the setting mode in order to change these settings Activating setting mode 1 Switch the dryer on 2 Select the Cottons programme in position 1 and wait for five seconds The symbols go out in the display panel an...

Page 32: ...ange the volume 7 Turn the program selector clockwise to position 4 8 The volume for the audible button signal is shown in the display 0 off 1 quiet 2 medium 3 loud 4 very loud 9 Press the Finish in time button or the drying time button to change the volume Exiting setting mode Turn the program selector to the Off position once you have set the required spin speed and the volume The settings have ...

Page 33: ... sensor The moisture sensor measures how damp the laundry is After long periods of usage the moisture sensor may become covered by a fine layer of limescale or residues of detergents and care products Such residues must be removed regularly as the sensor function and in consequence the drying result may be impaired Open the door and clean the moisture sensor with a coarse sponge Caution Moisture s...

Page 34: ...ong program for the type of fabric All the required information can be found in the program table Remove clothes immediately after drying Creasing may occur if they are left in the drum Water is leaking out Not a fault The dryer may be positioned on an incline Level the dryer Laundry is not dried cor rectly or is still too damp After the end of the program warm laundry feels damper than it actuall...

Page 35: ...st air duct lenght Futher information Page 14 Displayed drying time changes during drying process Not a fault The moisture sensors detect the remaining moisture in load and cor rect the programme lenght except timed programmes Humidity in the room increases Not a fault Make sure the room is sufficiently ventilated Exhaust air duct installed the exhaust air routes directly into the open air Page 14...

Page 36: ...act information for your nearest after sales service can be found here or in the enclosed after sales service directory Please provide after sales service with the dryer s product number E no and production number FD You can find this information on the inside of the dryer door or on the rear of the dryer Trust the expertise of the manufacturer Contact us You can therefore be sure that the repair ...

Page 37: ...min 3 13 kWh 800 rpm 115 min 3 60 kWh Easy Care 3 5 kg 3 5 kg Cupboard Dry 800 rpm 50 min 1 41 kWh 600 rpm 62 min 1 75 kWh Program setting for testing in accordance with the applicable IEC 61121 standard The values may differ from those specified depending on the type of fabric composition of laundry to be dried residual moisture in the laundry the degree of dryness that has been set the amount of...

Page 38: ...ta TechnicaldataDimensions 85 x 60 x 60 cm Height x width x depth Weight Approx 37 kg Maximum load 7 kg Connected voltage 220 240 V Connected load Max 2200 W Fuse 10 A Drum interior light Ambient temperature 5 35 C Depending on the model ...

Page 39: ...6 ...

Page 40: ...WXUHG E 6 DXVJHUlWH PE XQGHU 7UDGHPDUN LFHQVH RI 6LHPHQV Repair order and advice in the event of faults You can find the contact information for all countries in the attached after sales service directory GB 0344 892 8999 Calls charged at local or mobile rate IE 01450 2655 0 03 per minute at peak Off peak 0 0088 per minute ...

Reviews: