background image

0DQXIDFWXUHGE\%6++DXVJHUlWH*PE+XQGHU7UDGHPDUN/LFHQVHRI6LHPHQV$*

%6++DXVJHUlWH

*PE+

&DUO:HU\6WU0QFKHQ

VLHPHQVKRPHEVKJURXSFRP

*(50$1<

*9001313483*

9001313483

990208

Summary of Contents for VB554CCR0

Page 1: ...5HJLVWHU RXU SURGXFW RQOLQH VLHPHQV KRPH EVK JURXS FRP ZHOFRPH Instruction manual Built in oven VB554CCR0 ...

Page 2: ......

Page 3: ... 12 Overview of the time setting options 12 Operating the electronic clock 12 Setting the automatic timer 13 A Childproof lock 13 Activating the childproof lock 13 Deactivating the childproof lock 13 D Cleaning 14 Suitable cleaning agents 14 Surfaces in the cooking compartment 15 Keeping the appliance clean 15 Cleaning the cooking compartment 15 p Rails 16 Detaching the shelf supports 16 Refitting...

Page 4: ...ways slide accessories into the cooking compartment the right way round Accessories on page 9 Important safety information ImportantsafetyinformationGeneral information Warning Risk of fire Combustible items stored in the cooking compartment may catch fire Never store combustible items in the cooking compartment Never open the appliance door if there is smoke inside Switch off the appliance and un...

Page 5: ...any sort of foil or greaseproof paper Do not place ovenware on the cooking compartment floor if a temperature of over 50 ºC has been set This will cause heat to accumulate The baking and roasting times will no longer be correct and the enamel will be damaged Aluminium foil Aluminium foil in the cooking compartment must not come into contact with the door glass This could cause permanent discoloura...

Page 6: ...tment Open the appliance door as infrequently as possible when the appliance is in use It is best to bake several cakes one after the other The cooking compartment stays warm This reduces the baking time for the second cake You can place two cake tins next to each other in the cooking compartment For longer cooking times you can switch the appliance off 10 minutes before the end of the cooking tim...

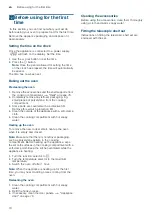
Page 7: ...ad at a glance The value that you can currently set is in focus It is displayed in white lettering with a dark background Buttons and display The buttons are touch keys with sensors underneath Simply touch a symbol to select the function The display shows symbols for active functions and the time setting options 0 Function selector Use the function selector to set the heating function or other fun...

Page 8: ...bove the door Caution Do not cover the ventilation slots otherwise the oven will overheat To cool the cooking compartment more quickly after operation the cooling fan continues to run for a certain period afterwards Heating function Temperature setting Use Þ Off position In this position the oven is switched off I Rapid heat up 50 250 C For rapidly heating up the oven 3D hot air 50 250 C For cooki...

Page 9: ...The open side must be facing the appliance door and the curvature must be at the bottom i e When inserting baking trays ensure that the lug is at the rear and is facing downwards The sloping edge of the accessory ƒ must be facing towards the appliance door Example in the picture Universal pan Special accessories You can buy accessories from the after sales service Accessories Description Baking an...

Page 10: ...on film 4 Clean the outside of the appliance with a soft damp cloth 5 Clean the cooking compartment with hot soapy water Heating up the oven To remove the new cooker smell heat up the oven when it is empty and closed Note Make sure that there is no leftover packaging such as polystyrene pellets in the cooking compartment Before heating up the appliance wipe the smooth surfaces in the cooking compa...

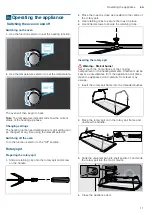
Page 11: ...ring the rotary spit 1 Slide a retaining clip onto the rotary spit and screw on the handle 2 Place the roast as close as possible to the centre of the rotary spit 3 Use retaining clips to secure the roast in place 4 Use milled screws to secure the retaining clips Inserting the rotary spit Warning Risk of burns Never touch the hot surfaces of the cooking compartment or the heating elements Children...

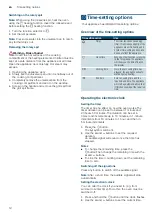
Page 12: ...ond increments up to 10 minutes in 1 minute increments from 10 minutes to 1 hour and then in 5 minute increments 1 Press the v button The V symbol will be lit 2 Use the and A buttons to set the required duration An audible signal will sound once the time has elapsed Notes To change the remaining time press the v button Then change the remaining time with the and A buttons To stop the timer countin...

Page 13: ...ng time Note The cooking time can be set to between 1 minute and 23 hours 59 minutes The cooking time can be set in 1 minute increments up to 1 hour and then in 5 minute increments The x symbol will be lit 4 Press the v button again 5 Use the and A buttons to set the end time Note When the button is first pressed a value will be suggested on the display This suggested value is calculated using the...

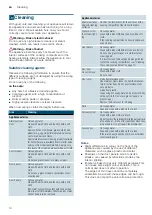
Page 14: ...e available from our after sales service or from specialist retailers Apply a very thin layer of the cleaning product with a soft cloth Control panel Hot soapy water Clean with a dish cloth and then dry with a soft cloth Do not use glass cleaner or a glass scraper Door panels Hot soapy water Clean with a dish cloth and then dry with a soft cloth Do not use a glass scraper or a stainless steel scou...

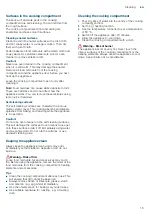
Page 15: ... not use oven cleaner on the self cleaning surfaces This will damage the surfaces If oven cleaner does get onto these surfaces dab it off immediately using water and a sponge cloth Do not rub the surfaces or use abrasive cleaning aids Keeping the appliance clean Always keep the appliance clean and remove dirt immediately so that stubborn deposits of dirt do not build up Warning Risk of fire Loose ...

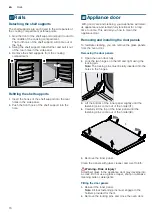
Page 16: ... come This will tell you how to clean the appliance door Removing and installing the door panels To facilitate cleaning you can remove the glass panels from the oven door Removing the door panels 1 Open the oven door fully 2 Lock the two hinges on the left and right using the locking pin Note The locking pins must be fully inserted into the holes in the hinges 3 Lift the bottom of the inner panel ...

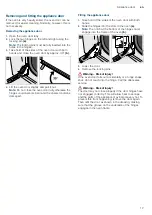
Page 17: ...d the enamel could be damaged Fitting the appliance door 1 Take hold of the sides of the oven door with both hands 2 Slide the hinges into the slots in the oven a Note The notch at the bottom of the hinges must engage into the frame of the oven b 3 Lower the door 4 Remove the locking pins Warning Risk of injury If the oven door falls out accidentally or a hinge snaps shut do not reach into the hin...

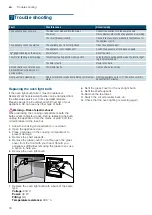
Page 18: ...ure resistance 300 C 8 Refit the glass cover for the oven light bulb 9 Refit the shelf supports 10 Remove the tea towel 11 Switch the circuit breaker back on 12 Check that the oven lighting is working again Fault Possible cause Notes remedy The appliance does not work The plug is not plugged into the mains Connect the appliance to the power supply Power cut Check whether other kitchen appliances a...

Page 19: ...rol panel To save time you can make a note of the numbers for your appliance and the telephone number of the after sales service in the space below in case you need them Please note that a visit from an after sales service engineer is not free of charge in the event that the appliance has been misused even during the warranty period Please find the contact data of all countries in the enclosed cus...

Page 20: ...eheating the oven or opening the door carefully Table of dishes Dish Weight in kg Shelf position Heating function Temperature in C Cooking time in minutes Lasagne 3 4 1 220 230 45 50 Lasagne 3 2 8 220 45 Pasta bake 3 4 1 220 230 45 50 Joint of veal 2 2 180 190 90 100 Pork loin 1 5 2 2 190 200 90 100 Pork loin 2 2 8 200 120 Sausages 1 5 3 4 220 First side 10 Second side 7 Roast beef 1 2 200 45 55 R...

Page 21: ...n Small baked items stick to one another during baking There should be a gap of approx 2 cm around each item This gives enough space for the baked items to expand well and brown on all sides The cake is too dry Set the temperature 10 C higher and shorten the baking time The cake is generally too light in col our If the shelf position and the cookware are correct then you should increase the temper...

Page 22: ... the roast is too dry Check the shelf position and temperature Select a lower temperature the next time and reduce the roasting time if necessary The crackling is too thin Increase the temperature or switch on the grill briefly at the end of the roasting time The roast looks good but the juices are burnt Next time use a smaller roasting dish and add more liquid if necessary The roast looks good bu...

Page 23: ...6 ...

Page 24: ...0DQXIDFWXUHG E 6 DXVJHUlWH PE XQGHU 7UDGHPDUN LFHQVH RI 6LHPHQV 6 DXVJHUlWH PE DUO HU 6WU 0 QFKHQ VLHPHQV KRPH EVK JURXS FRP 50 1 9001313483 9001313483 990208 ...

Reviews: