background image

Chapter 2

Installing the Device

RUGGEDCOM WIN5137

Installation Guide

18

Connecting to a RUGGEDCOM RP100 or RP110 (AC

Only)

Section 2.5

Connecting to a RUGGEDCOM RP100 or RP110

(AC Only)

The RUGGEDCOM RP100 and RP110 are optional power injectors that can be ordered to power the

RUGGEDCOM WIN5137 (AC Only). The RUGGEDCOM RP100 and RP110 meet a wider temperature and

voltage range than the WIN1010.
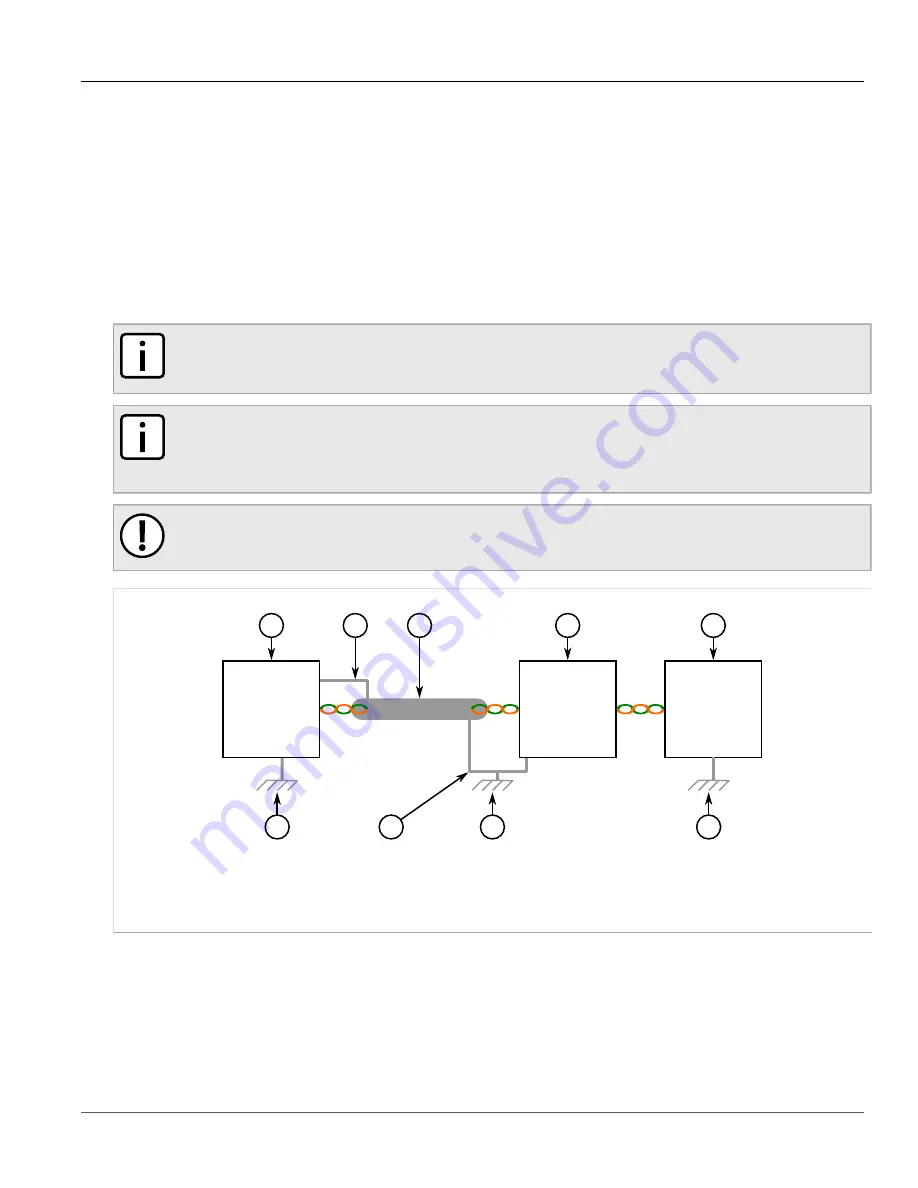
When the CPE is connected to a RUGGEDCOM RP100 or RP110, make sure there is a solid connection

between the lightning protector and the CPE. The following illustration details a typical installation:

NOTE

A shielded cable must be used and connected to local ground at both the RUGGEDCOM WIN5137

and CPE.

NOTE

The lightning protector must meet the necessary requirements of IEC/UL/CSA 60950-1. The clamping

voltage must also be less than 60 V and the protector must not activate when the voltage is less than

56 V. For more information, contact Siemens Customer Support.

IMPORTANT!

Install the lightning protector and the RUGGEDCOM RP100/RP110 as close as possible.

1

3

3

3

4

5

2

6

3

Figure 17: Typical Outdoor Installation

1.

 RUGGEDCOM WIN5137   


2.

 Shielded Cable   


3.

 Ground Connection   


4.

 Lightning Protector   


5.

 RUGGEDCOM RP100/RP110   

6.

 Drain Wire (Shielded)

For more information about the RUGGEDCOM RP100 or RP110, refer to either the 

RUGGEDCOM RP100

Installation Guide

 or the 

RUGGEDCOM RP110 Installation Guide

.

Summary of Contents for RUGGEDCOM WIN5137

Page 1: ...RUGGEDCOM WIN5137 Installation Guide 08 2015 Preface Introduction 1 Installing the Device 2 Technical Specifications 3 Dimension Drawings 4 Certification 5 RC1139 EN 04 ...

Page 2: ...ontinuous development Siemens recommends strongly that you regularly check for product updates For the secure operation of Siemens products and solutions it is necessary to take suitable preventive action e g cell protection concept and integrate each component into a holistic state of the art industrial security concept Third party products that may be in use should also be considered For more in...

Page 3: ... a Pole 9 2 1 2 Mounting the Device to a Wall or Tower 11 2 2 Installing the Antenna 12 2 3 Assembling the PoE Cable 13 2 4 Connecting the WIN1010 Data Adapter AC Only 16 2 5 Connecting to a RUGGEDCOM RP100 or RP110 AC Only 18 2 6 Installing the Device in Hazardous Locations 19 2 7 Grounding the Device 20 2 8 Weatherproofing the Device 20 2 9 Configuring the CPE 22 Chapter 3 Technical Specificatio...

Page 4: ...37 Installation Guide iv Chapter 4 Dimension Drawings 27 Chapter 5 Certification 29 5 1 Standards Compliance 29 5 2 Agency Approvals 29 5 3 MIL STD Ratings 30 5 4 IEEE 802 16e Mobile WiMAX Compliance 30 5 5 Environmental Type Tests 30 ...

Page 5: ...uidance Alerts The following types of alerts are used when necessary to highlight important information DANGER DANGER alerts describe imminently hazardous situations that if not avoided will result in death or serious injury WARNING WARNING alerts describe hazardous situations that if not avoided may result in serious injury and or equipment damage CAUTION CAUTION alerts describe hazardous situati...

Page 6: ...ndustrial markets allows Siemens to provide training specific to the customer s application For more information about training services and course availability visit www siemens com ruggedcom or contact a Siemens sales representative Customer Support Customer support is available 24 hours 7 days a week for all Siemens customers For technical support or general information contact Siemens Customer...

Page 7: ...pectrum supporting a range of user environments The RUGGEDCOM WIN5137 Outdoor Unit ODU Customer Premises Equipment CPE device also complies with the IEEE 802 16 2005 standard for the deployment of point to multipoint PMP and point to point PTP network architectures The device is a WiMAX Forum IEEE 802 16e Wave 2 MIMO certified subscriber Each subscriber registers and establishes a bi directional d...

Page 8: ...ce can be fed directly with 10 to 30 VDC enabling the unit to be powered from any number of vehicles Flexibility The device supports both IP convergence sublayer for wireless Internet service providers or Ethernet Convergence Sublayer ideal for mission critical private networks Radio and Modem Features Supported Frequency Bands 5251 5151 7251 Frequency 3650 MHz to 3700 MHz Radio Access Method IEEE...

Page 9: ...TH PWR Name Description Connector Type ETH PWR Data and power from PoE injector RJ 45 ANT1 Antenna 1 N Type female ANT2 Antenna 2 N type female Ground Ground Grounding screw WIN5137 DC 3 1 4 5 2 Figure 2 WIN5137 DC Connectors 1 ANT1 2 DC 3 ANT2 4 Ground 5 ETH Name Description Connector Type ETH Ethernet data connection only RJ 45 Ground Ground Grounding screw ANT1 Antenna 1 RF ...

Page 10: ...plete WLNK is BLINKING Green The link between the CPE and the base station is down PWR is ON Green CPE power is on RSSI one LED is ON least significant Green RSSI 90 RSSI two LEDs are ON Green 85 RSSI 90 RSSI three LEDs are ON Green 80 RSSI 85 RSSI four LEDs are ON Green 75 RSSI 80 RSSI five LEDs are ON Green 70 RSSI 75 RSSI six LEDs are ON Green 65 RSSI 70 RSSI seven LEDs are ON Older Hardware LE...

Page 11: ...and Chassis Antenna or Antennas Dual omni or polarization antennas supporting MIMO schemes 1 3 4 2 Figure 3 RUGGEDCOM WIN5137 CPE Block Diagram External Antennas 1 Power Supply 2 RF 3 Base Band 4 Antennas Outdoor Grounding System Verify the antenna or cable system is grounded The CPE antenna installation must be as per Article 810 of the NEC WARNING Fire hazard risk of serious personal injury and ...

Page 12: ...RUGGEDCOM WIN5137 Installation Guide Chapter 1 Introduction Antennas 6 ...

Page 13: ...s the cables that lead indoors are well protected from lightning between the protector and the building entrance WARNING Safety hazard risk of serious personal injury and or damage to equipment Installing the RUGGEDCOM WIN5137 can pose a serious safety hazard Be sure to take precautions to avoid the following Exposure to high voltage lines during installation Falling when working at heights or wit...

Page 14: ... follows 1 Mount the device to a pole or wall 2 Install and connect the antenna 3 Assemble the PoE cable 4 Connect a RUGGEDCOM WIN1010 adapter 5 Connect a RUGGEDCOM RP100 RP110 6 If the device is to be installed in a hazardous location install the Class I Division II kit 7 Make sure the device is grounded 8 Weatherproof the ends of all cables 9 Configure the device These steps and other related in...

Page 15: ...e RUGGEDCOM WIN5137 solution The site survey should include details important to the planning of the CPE deployment in each specific site including potential mounting points for CPE and antennas as well as the routing options for data power and antenna cables Recommended Site Requirements It is highly recommended the RUGGEDCOM WIN5137 be mounted with as few obstructions as possible between the CPE...

Page 16: ...sher 6 M8 Spring Washer 7 M8 Nut 8 M8 70 Hex Screw 9 M8 Spring Washer 10 M8 Flat Washer 1 2 10 9 8 6 5 7 5 4 6 2 3 Figure 5 Mounting the Antenna Enclosure to a Small Pole 1 Pole 2 Clamping Bracket 3 Mounting Bracket 4 M8 25 Hex Screw 5 M8 Flat Washer 6 M8 Spring Washer 7 M8 Nut 8 M8 70 Hex Screw 9 M8 Spring Washer 10 M8 Flat Washer 4 Adjust the position of the device For more information about ali...

Page 17: ...rew 5 M8 Flat Washer 6 Spring Washer 7 M8 Nut 8 M5 Flat Washer 9 Screw for Chipboard 10 Wall Plug Plastic Anchor To mount the device to a wall do the following 1 Select a mounting location on the wall 2 Place the mounting bracket on the wall and mark 4 mounting holes 3 Drill 4 holes and insert a wall plug into each hole 4 Secure the mounting bracket to the wall with 4 type NS 1 4 1 2 HEX screws 4 ...

Page 18: ...ce is compliant with the requirements set forth in CFR 47 section 1 1307 addressing Radio Frequency RF exposure from radio frequency devices as defined in OET Bulletin 65 The emitted radiation should be as little as possible To achieve minimum RF exposure install the device when it is configured not to transmit and set it to operational mode remotely rather than enabling transmission by the instal...

Page 19: ...ding to local standards Section 2 3 Assembling the PoE Cable The following describes how to assemble the PoE cable using the supplied connector kit The ODU CPE uses a shielded male RJ45 connector to provide the data and Power over Ethernet PoE connection to the device The following components and tools are required CPE RJ45 Connector Kit supplied with the device Contains an RJ45 connector and load...

Page 20: ...1 Wire Jacket 2 Foil 3 Fold the foil back over the wire jacket 1 2 3 Figure 9 Folding Back the Foil 1 Foil 2 Twisted Pair Wires 3 Drain Wire 4 Bend the drain wire back over the jacket 3 1 2 Figure 10 Bending the Drain Wire 1 Foil 2 Drain Wire 3 Twisted Pair Wires 5 Partially untwist each wire pair making sure to retain a half twist at the end ...

Page 21: ...P3 7 Slide the wires into the loading bar and then pull the loading bar down until its face is 16 mm 0 63 in from the wire jacket If necessary use pliers to hold the wires while pulling the loading bar 1 2 2 1 1 3 4 Figure 13 1 Loading Bar 2 Wires 3 Pin 1 4 Pin 8 8 Trim the wires until they are flush with the face of the loading bar 9 Insert the wires and loading bar into the plug body Make sure t...

Page 22: ... the plug or keeping the dust cover engaged tighten the compression nut to 0 56 N m 5 In lbs 4 2 3 1 Figure 15 Connecting the PoE Cable to the CPE 1 PoE Cable 2 Dust Cover 3 Plug Housing 4 CPE Section 2 4 Connecting the WIN1010 Data Adapter AC Only The RUGGEDCOM WIN1010 data adapter powers the device and distributes data The WIN1010 data adapter unit provides RJ45 input connectors that include 10 ...

Page 23: ...other type of connection or application of the device and or WIN1010 data adapter is not permitted Route all power supply cords so that people cannot walk on them or place objects on or against them which can pinch or damage the cords 3 2 6 4 7 1 5 Figure 16 Power over Ethernet Connection Schematic 1 ODU CPE 2 PoE 3 Data Adapter 4 AC Power 5 Ethernet 6 Switch 7 Ethernet NOTE Before connecting the ...

Page 24: ...TE A shielded cable must be used and connected to local ground at both the RUGGEDCOM WIN5137 and CPE NOTE The lightning protector must meet the necessary requirements of IEC UL CSA 60950 1 The clamping voltage must also be less than 60 V and the protector must not activate when the voltage is less than 56 V For more information contact Siemens Customer Support IMPORTANT Install the lightning prote...

Page 25: ...onents may impair suitability for Class I Division II Do not disconnect equipment unless power has been switched off or the area is known to be non hazardous Use only Lambda DPP50 48 Power Supply in conjunction with the unit RISQUE D EXPLOSION La substitution decomposants peut rendre ce matériel inacceptable pour les emplacements de Classe I Division II Avant de déconnecter l equipment couper le c...

Page 26: ... moisture to penetrate the connector interface Siemens strongly recommends weatherproofing all outdoor cable connections to prevent the ingress of water and help secure connections Since PoE cables also carry DC current the need for proper weatherproofing cannot be overstated Use electrical tape and a heavy duty weather abrasion and UV resistant rubber splicing or self amalgamating tape to seal co...

Page 27: ...gaps Continue wrapping until the tape is 25 mm 1 in down the cable Figure 19 Wrapping the Connector with Rubber Splicing or Self Amalgamating Tape NOTE Where available use 3M Scotch Super 88 electrical tape 4 To protect the rubber splicing or self amalgamating tape from UV damage stretch and wind two layers of electrical tape around the connector and cable the same way it was done in Step 3 Figure...

Page 28: ...guring the CPE Once the CPE is installed and connected to the network it must be configured The RUGGEDCOM WIN5137 features a Web based User Interface UI for all configuration management For more information about configuring the base station refer to the RUGGEDCOM WIN CPE User Guide associated with the device and the installed software release ...

Page 29: ...U Cable Specifications Section 3 1 Power Supply Specifications AC Only Power Supply Type Model Type Input Output 48 VDC WIN1010 100 240 VAC 50 60 Hz 1 5 A 48 VDC 48 W 52 VDC RP100 12 VDC 3 5 A 52 VDC 25 W 52 VDC RP100 24 VDC 2 A 52 VDC 32 W 52 VDC RP100 48 VDC 1 A 52 VDC 32 W 52 VDC RP100 100 240 VAC 50 60 Hz 0 7 A 52 VDC 25 W 52 VDC RP100 125 250 VDC 0 7 A 52 VDC 25 W IMPORTANT Use only the suppl...

Page 30: ...ransmission stations outdoor installations in harsh environments General Construction Custom made cable designed specially for wireless systems meeting the requirements of Cat 5e per ANSI TIA EIA 568 B 2 and IEC 61156 5 The cable contains 4 twisted pairs cabled foil tape shielded and jacketed with two special black UV resistant flame retardant PVC compounds for direct outdoor use in harsh electric...

Page 31: ...stant FR PVC Inner Jacket Diameter 6 1 mm Total Number of Wires 8 IDU to ODU Cable Standards Flammability Rating IEC 60332 UL1581 VW 1 Standards IEC 61156 TIA EIA 568 IDU to ODU Cable Performance Frequency Range 1 100 MHz Impedance 100 Ω DC Resistance 93 Ω km nominal Max DC Resistance 95 Ω km 20 C Capacitance Unbalance 1 6 pF m maximum Velocity of Propagation 68 nominal Propagation Delay Skew 35 n...

Page 32: ...RUGGEDCOM WIN5137 Installation Guide Chapter 3 Technical Specifications IDU to ODU Cable Specifications 26 ...

Page 33: ...er 4 Dimension Drawings 27 Dimension Drawings NOTE All dimensions are in millimeters unless otherwise stated Overall Dimensions WIN5137 AC 92 2 249 226 241 4 154 11 36 4 5 79 6 71 2 15 5 25 1 69 5 44 2 80 1 29 8 Figure 22 Overall Dimensions AC ...

Page 34: ...Chapter 4 Dimension Drawings RUGGEDCOM WIN5137 Installation Guide 28 Overall Dimensions WIN5137 DC 15 5 253 7 241 3 36 97 9 98 3 4 154 11 92 2 226 71 2 44 2 Figure 23 Overall Dimensions DC ...

Page 35: ...art 15 of the FCC Rules These limits are designed to provide reasonable protection against harmful interference when the equipment is operated in a commercial environment This equipment generates uses and can radiate radio frequency energy and if not installed and used in accordance with the instruction manual may cause harmful interference to radio communications Operation of this equipment in a ...

Page 36: ...Levels IEC 60068 2 11 MIL STD 810E SALT FOG 5 NaCI 35 48h Section 5 4 IEEE 802 16e Mobile WiMAX Compliance The IEEE802 16 2005 specifications describe a Point to Multipoint PMP broadband wireless access standard for systems This standard includes descriptions for both the Media Access Control MAC and the physical PHY layers The device is compliant to the IEEE802 16 2005 WiMAX forum Wave 2 profile ...

Page 37: ...ass 4M5 SHOCK 4M5 Spectrum Half sine Duration 11 ms Accelerator 50 m s 100 shocks in each direction IEC 60068 2 1 LOW TEMP 40 C Duration 72h IEC 60068 2 2 HIGH TEMP 70 C Duration 72h IEC 60068 2 14 TEMP CHANGE 40 30 C 1 C min Duration 5 cycles IEC 60068 2 30 HUMIDITY Cycling 40 C 90 100 Duration 2 cycles IEC 60068 2 18 WATER Rain 0 01 m min 90 kPa Duration 15 min IEC 60068 2 64 RANDOM VIBRATION AS...

Page 38: ...s Test Description Test Levels Duration 72h IEC 60068 2 2 HIGH TEMP 55 C Duration 72h IEC 60068 2 30 HUMIDITY Cycling 30 C 90 100 Duration 2 cycles IEC 60068 2 6 SINE VIBRATION Velocity 5 mm s Displacement 1 5 mm Acceleration 2 m s Frequency Range 5 62 62 200 Hz 3 Axes Duration 3x5 sweep ...

Reviews: