background image

RUGGEDCOM RX1000P

Installation Guide

Chapter 5

Dimension Drawings

39

486.4

476.3
438.2

51

.6

84

.1

13

4.

4

28

5.

2

30

3.

3

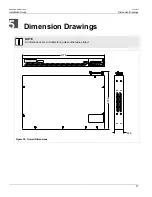
Figure 32: Panel and DIN Rail Mount Dimensions

Summary of Contents for RUGGEDCOM RX1000P

Page 1: ...RUGGEDCOM RX1000P Installation Guide 4 2015 Preface Introduction 1 Installing the Device 2 Communication Ports 3 Technical Specifications 4 Dimension Drawings 5 Certification 6 RC1050 EN 03 ...

Page 2: ...ontinuous development Siemens recommends strongly that you regularly check for product updates For the secure operation of Siemens products and solutions it is necessary to take suitable preventive action e g cell protection concept and integrate each component into a holistic state of the art industrial security concept Third party products that may be in use should also be considered For more in...

Page 3: ...Device 5 2 1 1 Mounting the Device to a Rack 6 2 1 2 Mounting the Device on a DIN Rail 7 2 1 3 Mounting the Device to a Panel 7 2 2 Connecting Power 8 2 2 1 Connecting AC Power 9 2 2 2 Connecting DC Power 10 2 2 3 Wiring Examples 11 2 3 Connecting the Failsafe Alarm Relay 14 2 4 Grounding the Device 15 2 5 Cabling Recommendations 15 2 6 Connecting to the Device 16 Chapter 3 Communication Ports 17 ...

Page 4: ... Cellular Modem 28 3 9 3 GSM EDGE Internal Cellular Modem 29 3 10 Connecting Multiple RS485 Devices 30 Chapter 4 Technical Specifications 33 4 1 Power Supply Specifications 33 4 2 PoE Power Supply Specifications 34 4 3 Failsafe Relay Specifications 34 4 4 Copper Ethernet Port Specifications 34 4 5 Serial Port Specifications 34 4 6 IRIG B Output Specifications 35 4 7 Operating Environment 35 4 8 Me...

Page 5: ...minently hazardous situations that if not avoided will result in death or serious injury WARNING WARNING alerts describe hazardous situations that if not avoided may result in serious injury and or equipment damage CAUTION CAUTION alerts describe hazardous situations that if not avoided may result in equipment damage IMPORTANT IMPORTANT alerts provide important information that should be known bef...

Page 6: ...lication For more information about training services and course availability visit www siemens com ruggedcom or contact a Siemens sales representative Customer Support Customer support is available 24 hours 7 days a week for all Siemens customers For technical support or general information contact Siemens Customer Support through any of the following methods Online Visit http www siemens com aut...

Page 7: ...ace and time synchronization options are also available The RX1000P is hardened to the RuggedRated specification which provides a high level of immunity to electromagnetic interference EMI and heavy electrical surges typical of the harsh environments found in many industrial applications An operating temperature range of 40 to 85 C 40 to 185 F allows the RX1000P to be placed in almost any location...

Page 8: ...anized steel enclosure and 48 cm 19 in rack mount adapter Universal Power Supply Options Fully integrated power supplies Input voltage range of 9 59 VDC 88 300 VDC or 85 264 VAC for worldwide operability Power over Ethernet PoE power supply 48 VDC CSA UL 60950 1 safety approved to 85 C 185 F Physical Ports Ethernet Options up to 4 ports 10 100Base TX 100Base FX Cellular Modem WAN Port Options up t...

Page 9: ... LEDs These LEDs indicate the state of each port Green Solid Link detected Green Blinking Link activity Off No link detected Display Mode Indicator LEDs These LEDs indicate the current display mode for the port status indicator LEDs i e PPP DATA PPP LINK or GPS LOCK Mode button The Mode button sets the display mode for the port status indicator LEDs i e PPP DATA PPP LINK or GPS LOCK It can also be...

Page 10: ...RUGGEDCOM RX1000P Installation Guide Chapter 1 Introduction Ports Controls and Indicator LEDs 4 ...

Page 11: ...ed service by unauthorized personnel shall render all warranties null and void Changes or modifications not expressly approved by Siemens Canada Ltd could invalidate specifications test results and agency approvals and void the user s authority to operate the equipment IMPORTANT This product should be installed in a restricted access location where access can only be gained by authorized personnel...

Page 12: ...ed on the correct side of the chassis To make the modules and ports accessible install the rack mount adapters at the rear of the chassis To make the management ports and LEDs accessible install the rack mount adapters at the front of the chassis NOTE The chassis features multiple mounting holes allowing the rack mount adapters to be installed up to 25 mm 1 in from the face of the device 3 3 1 2 F...

Page 13: ...the adapters with the DIN rails and slide the device into place 2 1 2 3 3 Figure 3 DIN Rail Mounting 1 Panel DIN Rail Adaptor 2 DIN Rail 3 Screw 2 Install one of the supplied screws on either side of the device to secure the adapters to the DIN rails Section 2 1 3 Mounting the Device to a Panel For panel installations the RX1000P can be equipped with panel DIN rail adapters pre installed on each s...

Page 14: ...ips screws and compression plates allowing either bare wire connections or crimped terminal lugs Use 6 size ring lugs for secure reliable connections under severe shock or vibration NOTE For 100 240 VAC rated equipment an appropriately rated AC circuit breaker must be installed For 88 300 VDC rated equipment an appropriately rated DC circuit breaker must be installed Use only 16 gage copper wiring...

Page 15: ... removed in order to avoid damage to transient suppression circuitry during testing NOTE The terminal block is divided into separate terminals for each internal power supply Make sure to connect the external power supply to the appropriate terminals 1 Remove the terminal block cover 2 If a screw type terminal block is installed remove the screws from the appropriate terminals Use these screws alon...

Page 16: ...t a high or low DC power supply to the device do the following CAUTION Electrical hazard risk of damage to equipment Before testing the dielectric strength HIPOT in the field remove the metal jumper This metal jumper connects transient suppression circuitry to chassis ground and must be removed in order to avoid damage to transient suppression circuitry during testing NOTE The terminal block is di...

Page 17: ...r between terminals 2 4 and 6 to connect the surge ground terminals to the chassis ground terminal The surge ground terminals are used as the ground conductor for all surge and transient suppression circuitry internal to the unit 6 Connect the ground terminal on the power source to the chassis ground terminal on the device For more information refer to Section 2 4 Grounding the Device DANGER Elect...

Page 18: ...Chapter 2 Installing the Device RUGGEDCOM RX1000P Installation Guide 12 Wiring Examples Figure 7 Single AC Power Supply Figure 8 Single DC Power Supply ...

Page 19: ...RUGGEDCOM RX1000P Installation Guide Chapter 2 Installing the Device Wiring Examples 13 Figure 9 Dual AC DC Power Supply Figure 10 Dual DC Power Supply ...

Page 20: ...mally Open contact is closed when the unit is powered and there are no active alarms If the device is not powered or if an active alarm is configured the relay opens the NO contact and closes the NC Normally Closed contact NOTE Control of the failsafe relay output is configurable through ROX One common application for this relay is to signal an alarm if a power failure occurs For more information ...

Page 21: ... 3 Figure 13 Chassis Ground Connection 1 Stainless Steel Stud 2 6 32 Screw 3 6 Ring Lug Section 2 5 Cabling Recommendations Siemens does not recommend the use of copper cabling of any length for critical real time substation automation applications All copper Ethernet ports on RUGGEDCOM products include transient suppression circuitry to protect against damage from electrical transients and confor...

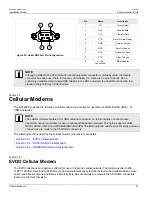
Page 22: ...e console port is intended to be used only as a temporary connection during initial configuration or troubleshooting Connection to the console port is made using an RJ45 to DB9 console cable The following is the pin out for the console port 1 8 Figure 14 RJ45 Console Port Pin Configuration Pin RJ45 Male DB9 Female Name Description 1 6 DSR a Data Set Ready 2 1 Reserved Do Not Connect 3 4 DTR a Data...

Page 23: ... 5 Slot 5 6 Slot 6 Slot s Communication Port 1 GSM EDGE cellular modem 1 2 V 90 modem RS232 external modem 3 Copper 10 100Base Tx Ethernet with PoE ports 4 Fiber 100Base FX multi mode or single mode Ethernet with ST SC LC or MTRJ ports 5 6 Single T1 E1 Channelized Unchannelized Dual T1 E1 Channelized Unchannelized Quad T1 E1 Channelized Unchannelized Clear Channel T3 DS3 card DSL card 56 kBbps DDS...

Page 24: ...nt Ethernet ports in Slot 3 2 ports and can accommodate two more in Slot 4 In addition to the 10 100BaseTX port features the PoE ports provide nominal 48 VDC at 350 mA max 15 4W port with auto sensing and automatic power off when cables are removed Each port features a Speed and Link LED that indicates the state of the port LED State Description Yellow The port is operating at 100 Mbps Speed Off T...

Page 25: ...d Do Not Connect 7 Reserved Do Not Connect 8 Reserved Do Not Connect Section 3 3 DSL Ports The RX1000P can optionally be equipped with a dual port DSL Digital Subscriber Line card which can communicate over standard telephone communication lines The DSL card supports the following modulation standards G 992 1 G DMT G 992 2 G Lite G 992 Annex A ADSL over POTS Each DSL card is equipped with standard...

Page 26: ... network Tip 8 R Receive data from network Ring Section 3 5 Modem Port The RX1000P can optionally be equipped with a V 90 Modem connection for PPP Point to Point Protocol connections For information about how to configure and operate the modem refer to the ROX User Guide for the RX1000P WARNING Fire hazard risk of serious personal injury and or damage to equipment To reduce the risk of fire use on...

Page 27: ...ll serial RJ45 ports default to RS485 mode Each port can be individually set to RS232 RS485 or RS422 mode through ROX For more information refer to the ROX User Guide for the RX1000P NOTE For information about how to connect devices configured to run in RS485 mode refer to Section 3 10 Connecting Multiple RS485 Devices All serial ports feature an LED that indicates the current state of the port St...

Page 28: ...b 8 RTS b TX RX TX Shield Chassis Ground a Connected internally b In RS232 mode this pin enters a high impedance state A DTE that asserts RTS will see CTS asserted although the device will not perform hardware flow control Section 3 7 Precision Time Protocol PTP Ports The optional Precision Time Protocol PTP card for the RX1000P provides accurate time synchronization across local and wide area net...

Page 29: ...signals are inaccessible The PTP card is an ideal product for use in existing installations already well served by NTP and or GPS It also provides a migration path for the use of the new IEEE 1588 standard As more end devices enter the market with IEEE 1588 compatibility this card provides an easy transition to this new time synchronization standard The following sections describe the PTP card in ...

Page 30: ...d through ROX the card outputs a 5 V pulse every second Section 3 7 3 GPS Antenna Installation Recommendations The signals received from the GPS satellite network are at a frequency of 1575 42 MHz with a minimum power of 162 dBW The GPS antenna must have a clear view of the sky in order to receive the low power signals and track the maximum number of satellites Rooftops or other structures clear o...

Page 31: ...loss lightning arrestor loss line amplifier gain and filter loss at the antenna input The PTP Card requires an active antenna with the following specifications Characteristic Active Antenna Polarization Right Hand Circular Polarized Receive Frequency 1 57542 GHz 1 023 MHz Power Supply 5 VDC DC Current 10 mA at 3 VDC Antenna Gain Select antenna gain based on system configuration Total Gain at PTP G...

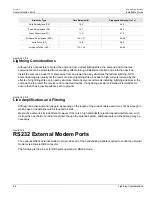
Page 32: ...urrents induced by the effects of a lightning strike on a nearby structure Siemens also recommends installing lightning arrestors in the antenna line to protect the receiver and connected devices If a lightning arrestor is installed it is important to ensure that it has a low impedance path to ground Section 3 7 3 4 Line Amplification and Filtering Although an active antenna has gain depending on ...

Page 33: ...m line modules for operation on GSM EDGE HSPA or CDMA networks NOTE The cellular modems feature 50 Ω SMA antenna connectors on the front plate of each module The HSPA option is available for use on various GSM based networks This option supports GSM GPRS EDGE UMTS and WCDMA HSDPA HSUPA The Main antenna and Receive Diversity antenna connections are made to the 50 Ω SMA connectors The following sect...

Page 34: ...ts GSM GPRS EDGE UMTS and WCDMA HSDPA HSUPA The Main and Receive Diversity antenna connections are made to the 50 Ω SMA connectors located on the front faceplate 1 2 3 Figure 27 HSPA Cellular Modem 1 Receive Diversity Antenna SMA Connector 2 Access Panel 3 Main Antenna SMA Connector Installing a SIM Card SIM card access is available on the front faceplate of the HSPA module Follow these steps to i...

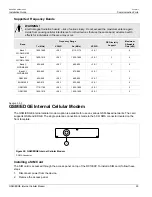
Page 35: ...V WCDMA 850 824 849 2 5 1 869 894 3 5 1 Y 5 Band VI WCDMA 800 830 840 2 5 1 875 885 3 5 1 Y 5 GSM 850 824 849 2 5 1 869 894 3 5 1 5 EGSM 900 880 915 2 5 1 925 960 3 5 1 5 GSM 1800 1710 1785 2 5 1 1805 1880 3 5 1 4 GSM 1900 1850 1910 2 5 1 1930 1990 2 5 1 4 Section 3 9 3 GSM EDGE Internal Cellular Modem The GSM EDGE internal cellular modem option is available for use on various GSM based networks T...

Page 36: ...1805 1880 3 5 1 4 GSM 1900 1850 1910 2 5 1 1930 1990 2 5 1 4 Section 3 10 Connecting Multiple RS485 Devices Each RS485 port can communicate with multiple RS485 devices by wiring devices together in sequence over a single twisted pair with transmit and receive signals on the same two wires half duplex For reliable continuous communication adhere to the following guidelines To minimize the effects o...

Page 37: ... Ports Connecting Multiple RS485 Devices 31 1219 m 4000 in 120Ω 10nF 120Ω 10nF 1 2 3 5 5 6 4 Figure 29 Recommended RS485 Wiring 1 RX1000P Device 2 Common Isolated Ground 3 Negative 4 Positive 5 Shield to Earth Connected At a Single Point 6 RS485 Devices 32 Total ...

Page 38: ...RUGGEDCOM RX1000P Installation Guide Chapter 3 Communication Ports Connecting Multiple RS485 Devices 32 ...

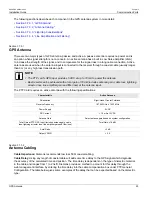
Page 39: ...ting Environment Section 4 8 Mechanical Specifications Section 4 1 Power Supply Specifications NOTE For specifications on the PoE power supply refer to Section 4 2 PoE Power Supply Specifications Input Range Power Supply Type Minimum Maximum Internal Fuse Rating ab Isolation Maximum Power Consumption c 12 VDC 24 VDC 10 VDC 36 VDC 6 3 A F 48 VDC 36 VDC 59 VDC 3 15 A T 1 5 kVDC HI 125 250 VDC d 88 V...

Page 40: ...80 VDC Rated Switching Current 0 3 A 30 VAC 1 A 30 VDC 0 3 A 80 VDC Section 4 4 Copper Ethernet Port Specifications The following details the specifications for copper Ethernet ports that can be ordered with the RX1000P Speed f Connector Duplex f Cable Type g Wiring Standard h Maximum Distance Isolation i PoE Voltage PoE Current 10 100Base TX RJ45 FDX HDX CAT 5 TIA EIA T568A B 100 m 328 ft 1 5 kV ...

Page 41: ...5 Ω Section 4 7 Operating Environment Parameter Range Comments Ambient Operating Temperature 40 to 85 C 40 to 185 F Measured from a 30 cm 12 in radius surrounding the center of the enclosure Ambient Relative Humidity 5 to 95 Non condensing Ambient Storage Temperature 40 to 85 C 40 to 185 F Section 4 8 Mechanical Specifications Parameter Value Dimensions Refer to Chapter 5 Dimension Drawings Weight...

Page 42: ...RUGGEDCOM RX1000P Installation Guide Chapter 4 Technical Specifications Mechanical Specifications 36 ...

Page 43: ...RUGGEDCOM RX1000P Installation Guide Chapter 5 Dimension Drawings 37 Dimension Drawings NOTE All dimensions are in millimeters unless otherwise stated 437 4 305 8 44 5 Figure 30 Overall Dimensions ...

Page 44: ...Chapter 5 Dimension Drawings RUGGEDCOM RX1000P Installation Guide 38 28 9 51 1 21 1 32 5 31 8 12 7 25 4 461 0 4 7 6 4 479 3 Figure 31 Rack Mount Dimensions ...

Page 45: ...RUGGEDCOM RX1000P Installation Guide Chapter 5 Dimension Drawings 39 486 4 476 3 438 2 51 6 84 1 134 4 285 2 303 3 Figure 32 Panel and DIN Rail Mount Dimensions ...

Page 46: ...RUGGEDCOM RX1000P Installation Guide Chapter 5 Dimension Drawings 40 ...

Page 47: ...elf Conformity Route FCC FCC Part 15 Class A Approved FDA CDRH 21 CFR Chapter I Sub chapter J Approved Section 6 2 FCC Compliance This equipment has been tested and found to comply with the limits for a Class A digital device pursuant to Part 15 of the FCC Rules These limits are designed to provide reasonable protection against harmful interference when the equipment is operated in a commercial en...

Page 48: ...ption Test Levels Severity Levels Enclosure Contact 8 kV 4 IEC 61000 4 2 ESD Enclosure Air 15 kV 4 IEC 61000 4 3 Radiated RFI Enclosure ports 20 V m Note a Signal ports 4 kV 2 5 kHz Note a DC Power ports 4 kV 4 AC Power ports 4 kV 4 IEC 61000 4 4 Burst Fast Transient Earth ground ports b 4 kV 4 Signal ports 4 kV line to earth 2 kV line to line 4 DC Power ports 2 kV line to earth 1 kV line to line ...

Page 49: ... 1 5 kVDC Dielectric Strength AC Power ports 2 kVAC Signal ports 5 kV Fail Safe Relay output DC Power ports 5 kV IEC 60255 5 HV Impulse AC Power ports 5 kV a Siemens specified severity levels b Only applicable to functional earth connections separated from the safety earth connection IEEE 1613 C37 90 x EMI Immunity Type Tests NOTE The RX1000P meets Class 2 requirements for an all fiber configurati...

Page 50: ...90 Dielectric Strength AC Power ports 2 kVAC Environmental Type Tests Test Description Test Levels IEC 60068 2 1 Cold Temperature Test Ad 40 C 40 F 16 Hours IEC 60068 2 2 Dry Heat Test Bd 85 C 185 F 16 Hours IEC 60068 2 30 Humidity Damp Heat Cyclic Test Db 95 non condensing 55 C 131 F 6 cycles IEC 60255 21 1 Vibration 2 g 10 150 Hz IEC 60255 21 2 Shock 30 g 11 ms Section 6 5 Cellular Modem Certifi...

Reviews: