background image

Installing the Device

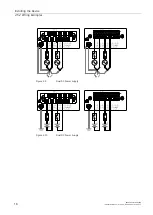
2.5.1 Connecting AC or DC Power

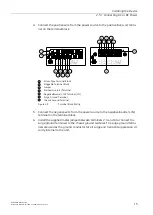
4. Connect the positive wire from the power source to the positive/live (+/L) termi-

nal on the terminal block.

4

2

1

3

4

6

5

7

4

6

5

3

6

5

7

4

6

5

     1    

Screw-Type Terminal Block

     2    

Pluggable Terminal Block

     3    

Jumper

     4    

Positive/Live (+/L) Terminal

     5    

Negative/Neutral (-/N) Terminal (-/N)

     6    

Surge Ground Terminal

     7    

Chassis Ground Terminal

Figure 2.5

Terminal Block Wiring

5. Connect the negative wire from the power source to the negative/neutral (-/N)

terminal on the terminal block.

6. Install the supplied metal jumper between terminals 2, 4 and 6 to connect the

surge ground terminals to the chassis ground terminal. The surge ground termi-

nals are used as the ground conductor for all surge and transient suppression cir-

cuitry internal to the unit.

RUGGEDCOM RSG2200

Installation Manual, 01/2020, C79000-G8976-1043-15

15

Summary of Contents for RUGGEDCOM RSG2200

Page 1: ...Edition 01 2020 Installation Manual SIMATIC NET Rugged Ethernet Switches RUGGEDCOM RSG2200 https www siemens com ...

Page 2: ...d Ethernet Switches RUGGEDCOM RSG2200 Installation Manual Preface Introduction 1 Installing the Device 2 Device Management 3 Communication Ports 4 Technical Specifications 5 Certification 6 01 2020 C79000 G8976 1043 15 ...

Page 3: ... personnel are those who based on their training and experience are capable of identify ing risks and avoiding potential hazards when working with these products systems Proper Use of Siemens Products Note the following WARNING Siemens products may only be used for the applications described in the catalog and in the relevant technical documentation If products and components from other manufactur...

Page 4: ...7 2 2 Unpacking the Device 8 2 3 Mounting the Device 8 2 3 1 Mounting the Device to a Rack 9 2 3 2 Mounting the Device on a DIN Rail 10 2 3 3 Mounting the Device to a Panel 11 2 4 Connecting the Failsafe Alarm Relay 12 2 5 Connecting Power 13 2 5 1 Connecting AC or DC Power 14 2 5 2 Wiring Examples 16 3 Device Management 21 3 1 Connecting to the Device 21 3 2 Configuring the Device 22 4 Communicat...

Page 5: ...r Optic Ethernet Port Specifications 33 5 6 Operating Environment 34 5 7 Mechanical Specifications 34 5 8 Dimension Drawings 35 6 Certification 39 6 1 Approvals 39 6 1 1 CSA 39 6 1 2 European Union EU 39 6 1 3 FCC 40 6 1 4 FDA CDRH 40 6 1 5 ISED 40 6 1 6 ISO 41 6 1 7 RoHS 41 6 1 8 Other Approvals 41 6 2 EMC and Environmental Type Tests 41 iv RUGGEDCOM RSG2200 Installation Manual 01 2020 C79000 G89...

Page 6: ...ument contact Siemens Customer Support Training Siemens offers a wide range of educational services ranging from in house training of standard courses on networking Ethernet switches and routers to on site cus tomized courses tailored to the customer s needs experience and application Siemens Educational Services team thrives on providing our customers with the es sential practical skills to make ...

Page 7: ...App Install the Industry Online Support app by Siemens AG on any Android Apple iOS or Windows mobile device and be able to Access Siemens extensive library of support documentation includ ing FAQs and manuals Submit SRs or check on the status of an existing SR Contact a local Siemens representative from Sales Technical Support Training etc Ask questions or share knowledge with fellow Siemens custo...

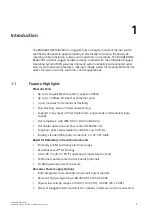
Page 8: ...blocking store and forward switching Supports many types of fiber multimode single mode bidirectional single strand Full compliance with IEEE 802 3 802 3u 802 3z Full duplex operation and flow control IEEE 802 3x Long haul optics allow Gigabit at distances up to 70 km Industry standard fiber optic connectors LC SC SFP GBIC Rated for Reliability in Harsh Environments Immunity to EMI and heavy elect...

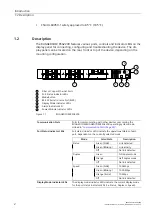
Page 9: ...n Ports Ports for communicating with other devices or accessing the RUGGEDCOM RUGGEDCOM RSG2200 operating system are de scribed in Communication Ports Page 23 Port Status Indicator LEDs Port status indicator LEDs indicate the operational status of each port dependent on the currently selected mode Mode Color State Description Green Solid Link detected Green Blinking Link activity Status Off No lin...

Page 10: ...e AC power cord 16 AWG For connecting power to the device CAT 5 Ethernet cables For connecting the device to the network Flathead screwdriver For mounting the device to a DIN rail Phillips screwdriver For mounting the device to a panel 4 x 8 32 screws For mounting the device to a panel 1 4 Decommissioning and Disposal Proper decommissioning and disposal of this device is important to prevent malic...

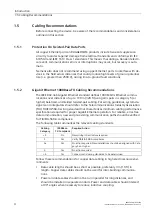
Page 11: ...delines system de signers and integrators should refer to the Telecommunications Industry Association TIA TIA EIA 568 A wiring standard that characterizes minimum cabling performance specifications required for proper Gigabit Ethernet operation For reliable error free data communication new and pre existing communication paths should be verified for TIA EIA 568 A compliance The following table sum...

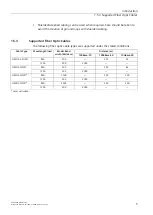
Page 12: ...llowing fiber optic cable types are supported under the stated conditions Distance m Cable Type Wavelength nm Modal Band width MHz km 100Base FX 1000Base SX 10GBase SR 850 200 275 33 OM1 62 5 125 1300 500 2000 850 500 550 82 OM2 50 125 1300 500 2000 850 1500 550 300 OM3 50 125 a 1300 500 2000 850 3500 550 400 OM4 50 125 a 1300 500 2000 a Laser optimized RUGGEDCOM RSG2200 Installation Manual 01 202...

Page 13: ...Introduction 1 5 3 Supported Fiber Optic Cables 6 RUGGEDCOM RSG2200 Installation Manual 01 2020 C79000 G8976 1043 15 ...

Page 14: ...viceable parts Attempted service by unauthorized personnel shall render all warranties null and void Changes or modifications not expressly approved by Siemens AG could invalidate specifications test results and agency approvals and void the user s authority to operate the equipment NOTICE This product should be installed in a restricted access location where access can only be gained by authorize...

Page 15: ...TICE If any item is missing or damaged contact Siemens for assistance 2 3 Mounting the Device The RUGGEDCOM RSG2200 is designed for maximum mounting and display flexibili ty It can be equipped with connectors that allow it to be installed in a 48 cm 19 in rack 35 mm 1 4 in DIN rail or directly on a panel NOTICE Heat generated by the device is channeled outwards from the enclosure As such it is rec...

Page 16: ...d by the rack Make sure each device in the rack is separated by at least one rack unit of space or 44 mm 1 75 in to promote convectional airflow Forced airflow is not re quired However any increase in airflow will result in a reduction of ambient temperature and improve the long term reliability of all equipment mounted in the rack space Do not exceed the maximum number of devices or weight restri...

Page 17: ...ce of the device 1 2 3 3 1 Rear 2 Front 3 Rack Mount Adapter Figure 2 1 Rack Mount Adapters 2 If required install adapters on the opposite side of the device to protect from vi brations 3 Insert the device into the rack 4 Secure the adapters to the rack using the supplied hardware 2 3 2 Mounting the Device on a DIN Rail For DIN rail installations the RUGGEDCOM RSG2200 can be equipped with panel DI...

Page 18: ...gure 2 2 DIN Rail Mounting 2 Install one of the supplied screws on either side of the device to secure the adapters to the DIN rails 2 3 3 Mounting the Device to a Panel For panel installations the RUGGEDCOM RSG2200 can be equipped with panelDIN rail adapters pre installed on each side of the chassis The adapters allow the device to be attached to a panel using screws RUGGEDCOM RSG2200 Installatio...

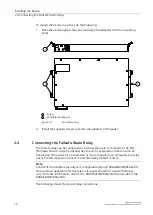
Page 19: ...m conditions The NO Normally Open contact is closed when the unit is powered and there are no ac tive alarms If the device is not powered or if an active alarm is configured the relay opens the NO contact and closes the NC Normally Closed contact Note Control of the failsafe relay output is configurable through RUGGEDCOM RSG2200 One common application for this relay is to signal an alarm if a powe...

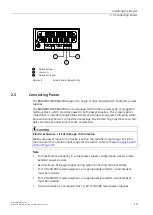
Page 20: ...nnections under severe shock or vibration CAUTION Electrical hazard risk of damage to the device Make sure power input to the device is within the specified input range For infor mation about the nominal input range for the device refer to Power Supply Specifi cations Page 31 Note For maximum redundancy in a dual power supply configuration use two inde pendent power sources Use minimum 16 gage cop...

Page 21: ...umper This metal jumper connects transient suppression circuitry to chassis ground and must be removed in order to avoid damage to transient suppression circuitry during testing CAUTION Electrical hazard risk of damage to equipment Do not connect AC power cables to a DC power supply terminal block Damage to the power supply may occur 1 Remove the terminal block cover 2 Identify the internal power ...

Page 22: ...urge Ground Terminal 7 Chassis Ground Terminal Figure 2 5 Terminal Block Wiring 5 Connect the negative wire from the power source to the negative neutral N terminal on the terminal block 6 Install the supplied metal jumper between terminals 2 4 and 6 to connect the surge ground terminals to the chassis ground terminal The surge ground termi nals are used as the ground conductor for all surge and t...

Page 23: ... 6 32 Screw 3 6 Ring Lug Figure 2 6 Chassis Ground Connection DANGER Electrocution hazard risk of death serious personal injury and or damage to the device Make sure the supplied terminal block cover is always installed before the de vice is powered 8 Install the terminal block cover 2 5 2 Wiring Examples The following illustrate how to connect power to single and dual power supplies 16 RUGGEDCOM ...

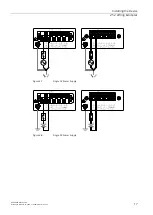
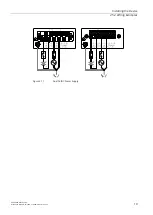
Page 24: ...Installing the Device 2 5 2 Wiring Examples Figure 2 7 Single AC Power Supply Figure 2 8 Single DC Power Supply RUGGEDCOM RSG2200 Installation Manual 01 2020 C79000 G8976 1043 15 17 ...

Page 25: ...Installing the Device 2 5 2 Wiring Examples Figure 2 9 Dual AC Power Supply Figure 2 10 Dual DC Power Supply 18 RUGGEDCOM RSG2200 Installation Manual 01 2020 C79000 G8976 1043 15 ...

Page 26: ...Installing the Device 2 5 2 Wiring Examples Figure 2 11 Dual AC DC Power Supply RUGGEDCOM RSG2200 Installation Manual 01 2020 C79000 G8976 1043 15 19 ...

Page 27: ...Installing the Device 2 5 2 Wiring Examples 20 RUGGEDCOM RSG2200 Installation Manual 01 2020 C79000 G8976 1043 15 ...

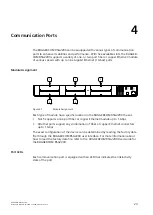
Page 28: ...o RUGGEDCOM RSG2200 s console and Web interfaces NOTICE The serial console port is intended to be used only as a temporary connection during initial configuration or troubleshooting Connection to the console port is made using an RJ45 to DB9 console cable The fol lowing is the pin out for the console port 1 8 Figure 3 1 RJ45 Console Port Pin Configuration Pin RJ45 Male DB9 Female Name Description ...

Page 29: ...ch and access the RUGGEDCOM RSG2200 console and Web interfaces via the device s IP address For more information about available ports refer to Communication Ports Page 23 3 2 Configuring the Device Once the device is installed and connected to the network it must be configured All configuration management is done via the RUGGEDCOM RSG2200 interface For more information about configuring the device...

Page 30: ...e RUGGEDCOM RSG2200 chassis Slot 5 supports a one port fiber or copper Ethernet module up to 1 Gbps All other ports support any combination of fiber or copper Ethernet connectors up to 1 Gbps The exact configuration of the device can be determined by reading the factory data file through the RUGGEDCOM RSG2200 user interface For more information about how to read the factory data file refer to the ...

Page 31: ...P cables WARNING Electric shock hazard risk of serious personal injury and or equipment inter ference If shielded cables are used make sure the shielded cables do not form a ground loop via the shield wire and the RJ45 receptacles at either end Ground loops can cause excessive noise and interference but more importantly create a potential shock hazard that can result in serious injury Pin Out The ...

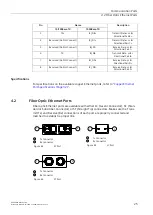
Page 32: ...ional Pair D Specifications For specifications on the available copper Ethernet ports refer to Copper Ethernet Port Specifications Page 32 4 2 Fiber Optic Ethernet Ports Fiber optic Ethernet ports are available with either LC Lucent Connector SC Stan dard or Subscriber Connector or ST Straight Tip connectors Make sure the Trans mit Tx and Receive Rx connections of each port are properly connected ...

Page 33: ...RUGGEDCOM SFP1112 1 6GK6000 8CG01 0AA0 10 100 1000 b CAT 5e Copper 0 1 RUGGEDCOM SFP1121 1FX2 6GK6000 8FE51 0AA0 100 MM 2 RUGGEDCOM SFP1131 1FX20 6GK6000 8FE52 0AA0 100 SM 20 RUGGEDCOM SFP1131 1FX50 6GK6000 8FE53 0AA0 100 SM 50 RUGGEDCOM SFP1131 1FX90 6GK6000 8FE54 0AA0 100 SM 90 RUGGEDCOM SFP1132 1BX10R 6GK6000 8FB51 0AA0 1000 SM 10 RUGGEDCOM SFP1132 1BX10T 6GK6000 8FB52 0AA0 1000 SM 10 RUGGEDCOM...

Page 34: ...ssed CAUTION Electrical hazard risk of damage to equipment Make sure all electrostatic energy is dissipated before installing or removing compo nents from the device An electrostatic discharge ESD can cause serious damage to the component once it is outside the chassis NOTICE Only install GBIC optical ports that are compatible with the RUGGEDCOM RSG2200 1 Make sure all potential electrostatic buil...

Page 35: ... 1 GBIC Optical Port Module 2 Socket 3 Locking Latch Figure 4 8 Installing a GBIC Optical Port 6 Release the latches and make sure the port is locked in place NOTICE Only remove the dust plug when ready to connect a cable to the GBIC optical port 7 Remove the dust cover from the port and store for future use 8 Remove the dust cap from the cable and immediately connect it to the port 9 Connect the ...

Page 36: ...harge ESD This can be accomplished by wearing an ESD preventive wrist trap connected to either the chassis ground connector or a bare metal surface on the router switch 2 Disconnect the cable from the port and install the dust cap to the cable end 3 Squeeze the latches on either side of the port and pull it from the socket 2 1 3 1 Socket 2 GBIC Optical Port 3 Locking Latch Figure 4 9 Removing a GB...

Page 37: ...Communication Ports 4 4 2 Removing a GBIC Optical Port 30 RUGGEDCOM RSG2200 Installation Manual 01 2020 C79000 G8976 1043 15 ...

Page 38: ... 125 250 VDC d 88 VDC 300 VDC 2 A T HI 110 230 VAC d 85 VAC 264 VAC 2 A T 28 W a F denotes fast acting fuse b T denotes time delay fuse c Power consumption varies based on configuration 10 100Base TX ports consume roughly 1 W less than fiber optic ports d The HI power supply is the same power supply for both AC and DC 5 2 Failsafe Relay Specifications Max Switching Volt age 240 VAC 125 VDC Rated S...

Page 39: ...cifications The following details the specifications for copper Ethernet ports that can be ordered with the RUGGEDCOM RSG2200 Note Maximum segment length is greatly dependent on factors such as fiber quality and the number of patches and splices Consult a Siemens sales associate when determining maximum segment distances All optical power numbers are listed as dBm averages F51 transceivers are rat...

Page 40: ... 125 1310 5 0 35 3 50 30 SM SC 9 125 1310 0 5 37 0 90 37 SM LC 9 125 1310 0 5 37 0 90 37 a Typical b Typical distance The maximum distance is greatly dependent on factors such as cable type the number of connectors and number of splices Consult a Siemens sales associates when determining maximum distances Gigabit Ethernet 1 Gbps Optical Specifications Note These transceivers utilize a distributed ...

Page 41: ... Typical distance The maximum segment length is greatly dependent on factors such as fiber quality and the number of patches and splices Consult a Siemens sales associates when determining maximum segment distances e Operating temperature range of 25 to 85 C 13 to 185 F 5 6 Operating Environment The RUGGEDCOM RSG2200 is rated to operate under the following environmental conditions Ambient Operatin...

Page 42: ... All dimensions are in millimeters unless otherwise stated Note Dimensional tolerances are in accordance with ISO 2768 mK unless otherwise stat ed 44 45 0 8 303 28 438 15 285 24 Figure 5 1 Overall Dimensions RUGGEDCOM RSG2200 Installation Manual 01 2020 C79000 G8976 1043 15 35 ...

Page 43: ...ions 5 8 Dimension Drawings 478 79 479 29 314 70 308 10 28 96 12 70 51 05 25 40 11 68 21 08 32 77 6 35 31 75 4 57 6 35 Figure 5 2 Rack Mount Dimensions 36 RUGGEDCOM RSG2200 Installation Manual 01 2020 C79000 G8976 1043 15 ...

Page 44: ...ns 5 8 Dimension Drawings 134 3 51 6 159 8 84 1 285 5 486 4 476 3 38 9 125 5 80 0 11 7 158 0 127 5 7 4 10 4 Figure 5 3 Panel and DIN Rail Mount Dimensions RUGGEDCOM RSG2200 Installation Manual 01 2020 C79000 G8976 1043 15 37 ...

Page 45: ...Technical Specifications 5 8 Dimension Drawings 38 RUGGEDCOM RSG2200 Installation Manual 01 2020 C79000 G8976 1043 15 ...

Page 46: ... UL 60950 1 UL 60950 1 Information Technology Equipment Safety Part 1 General Requirements 6 1 2 European Union EU This device is declared by Siemens AG to comply with essential requirements and other relevant provisions of the following EU directives EN 60950 1 Information Technology Equipment Safety Part 1 General Requirements EN 61000 6 2 Electromagnetic Compatibility EMC Part 6 2 Generic Stand...

Page 47: ...rgy and if not in stalled and used in accordance with the instruction manual may cause harmful inter ference to radio communications Operation of this equipment in a residential area is likely to cause harmful interference in which case users will be required to correct the interference at their own expense NOTICE Changes or modifications not expressly approved by the party responsible for com pli...

Page 48: ...Informa tion Products A copy of the Material Declaration is available online at https support indus try siemens com cs ww en view 109738831 6 1 8 Other Approvals This device meets the requirements of the following additional standards IEEE 1613 IEEE Standard Environmental and Testing Requirements for Communications Networking Devices in Electric Power Substations IEC 61000 6 2 Electromagnetic Comp...

Page 49: ...DC Power Ports AC Power Ports IEC 61000 4 4 Burst Fast Transient Earth Ground Ports 4 kV 4 Signal Ports 4 kV Line to Ground 2 kV Line to Line 4 DC Power Ports 2 kV Line to Ground 1 kV Line to Line 3 IEC 61000 4 5 Surge AC Power Ports 4 kV Line to Ground 2 kV Line to Line 4 Signal Ports DC Power Ports AC Power Ports IEC 61000 4 6 Induced Con ducted RFI Earth Ground Ports 10 V 3 40 A m Con tinuous N...

Page 50: ...lass 2 requirements for an all fiber configuration and Class 1 requirements for copper ports Class 1 allows for temporary communica tion loss while Class 2 requires error free and interrupted communications Description Test Levels Enclosure Contact 2 kV 4 kV 8 kV ESD Enclosure Air 4 kV 8 kV 15 kV Radiated RFI Enclosure Ports 35 V m Signal Ports 4 kV 2 5 kHz DC Power Ports 4 kV AC Power Ports 4 kV ...

Page 51: ...orts 100 A m Environmental Type Tests Test Description Test Levels IEC 60068 2 1 Cold Temperature Test Ad 40 C 40 F 16 Hours IEC 60068 2 2 Dry Heat Test Bd 85 C 185 F 16 Hours IEC 60068 2 30 Humidity Damp Heat Cyclic Test Db 95 Non Condensing 55 C 131 F 6 Cycles IEC 60068 21 1 Vibration 2g 10 150 Hz IEC 60068 21 2 Shock 30 g 11 ms 44 RUGGEDCOM RSG2200 Installation Manual 01 2020 C79000 G8976 1043 ...

Page 52: ...ttps www siemens com ruggedcom Industry Online Support service and support https support industry siemens com Industry Mall https mall industry siemens com Siemens AG Digital Industry Process Automation Postfach 48 48 90026 NÜRNBERG GERMANY ...

Reviews: