background image

16

First steps

Gigaset S800-S800A / en Großbritannien / A31008-M2125-L101-1-7619 / starting.fm / 20.05.2010

V

e

rsion 4.1, 21

.11.2007

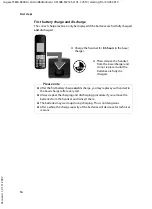
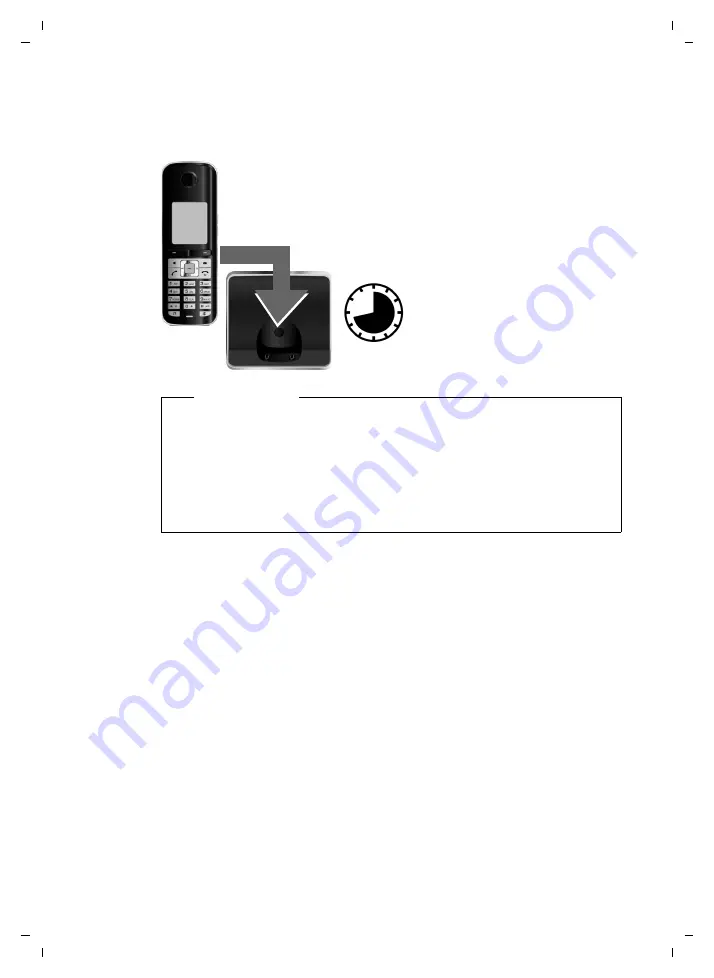
First battery charge and discharge

The correct charge level can only be displayed if the batteries are first fully charged 

and

 discharged.

¤

Charge the handset for 

8.5 hours

 in the base/

charger.

¤

Then remove the handset 
from the base/charger and 
do not replace it until the 
batteries are fully dis-
charged.

8.5 hrs

Please note

u

After the first battery charge 

and

 discharge, you may replace your handset in 

the base/charger after every call. 

u

Always repeat the charging and discharging procedure if you remove the 
batteries from the handset and reinsert them.

u

The batteries may warm up during charging. This is not dangerous.

u

After a while, the charge capacity of the batteries will decrease for technical 
reasons.

Summary of Contents for Gigaset S800

Page 1: ...5 Bocholt Manufactured by Gigaset Communications GmbH under trademark license of Siemens AG As of 1 Oct 2011 Gigaset products bearing the trademark Siemens will exclusively use the trademark Gigaset All rights reserved Subject to availability www gigaset com Gigaset Communications GmbH 2010 ...

Page 2: ...yphonic ringtones u Directory for approx 500 entries u Caller picture u PC interface e g for managing directory entries ringtones and screensavers u www gigaset com gigasetS800H Gigaset C59H handset u Illuminated graphic colour display 65k colours u Polyphonic ringtones u Directory for approx 150 entries u SMS prerequisite CLIP must be enabled u Room monitor u www gigaset com gigasetc59h Gigaset S...

Page 3: ...rectory in future the picture will appear every time you receive a call from this number page 35 u If you do not want to take calls where the caller has withheld their number just set your handset to only ring if Calling Line Identification has not been withheld page 71 u If you do not wish to be disturbed you can simply set up a time control so that your phone will only ring when it is convenient...

Page 4: ...he microphone 9 Microphone 10 Recall key Consultation call flash Insert a dialling pause press and hold 11 Star key Ringtone on off press and hold with an open connection switch between pulse dialling tone dialling press briefly text input open table of special characters 12 Headset socket page 19 13 Key 1 Dialansweringmachine S800Aonly network mailbox press and hold 14 Talk key Flashes incoming c...

Page 5: ... ØìÚ Alarm page 60 Signal strength i page 57 or ECO Mode icon page 57 Answering machine switched on S800A only page 5 Bluetooth activated page 66 or ô õ Bluetooth headset data device connected Ringtone switched off page 71 Keypad lock switched on page 24 ØáÚ Appointment page 58 Batteries are charged page 18 Charge status of the batteries page 18 Alarm switched on and wake up time set page 60 Curre...

Page 6: ...new messages is displayed 99 flashes quickly the answering machine is full During message playback 4 Play Stop key Play back new messages from answering machine or cancel playback press briefly Play back new and old messages press and hold 5 Skip to next message press once or skip ahead two messages press twice 6 Skip back five seconds press briefly once skip back to the beginning of the message p...

Page 7: ... Connecting the charger if included 13 Setting up the handset for use 14 Setting the date and time 17 Connecting the headset 19 Connecting the USB data cable 19 What would you like to do next 20 Using the phone 21 Control key 21 Display keys 22 Keys on the keypad 22 Side keys 22 Correcting incorrect entries 22 Using the menus 23 Activating deactivating the handset 24 Activating deactivating the ke...

Page 8: ...code preselection 41 SMS text messages 43 Writing sending an SMS 43 Receiving an SMS 44 SMS with vCard 46 Notification via SMS 46 SMS mailboxes 46 Setting SMS centres 47 SMS on a PABX 48 Activating deactivating SMS function 48 SMS troubleshooting 49 Operating the Gigaset S800A base answering machine 50 Operating via the handset 50 Activating deactivating call screening 53 Setting the recording par...

Page 9: ...ctivating deactivating auto answer 70 Changing the speaker earpiece volume 70 Setting a handsfree profile 70 Changing ringtones 70 Resource Directory 72 Activating deactivating advisory tones 73 Setting your own area code 73 Restoring the handset default settings 73 Setting the base 74 Changing the base Gigaset S800A ringtones 74 Activating deactivating music on hold 74 Repeater support 74 Protect...

Page 10: ...010 Version 4 1 21 11 2007 Appendix 82 Caring for your telephone 82 Contact with liquid 82 Specifications 82 Writing and editing text 83 Additional functions via the PC interface 84 Accessories 86 Mounting the base on the wall Gigaset S800 only 89 Mounting the charger on the wall 89 Index 90 ...

Page 11: ...set to your ear when it is ringing or when speaker mode is activated Otherwise you risk serious and permanent damage to your hear ing Your Gigaset is compatible with the majority of digital hearing aids on the market However perfect function with all hearing aids cannot be guaranteed The handset may cause an unpleasant humming or whistling noise in hearing aids or cause them to overload If you req...

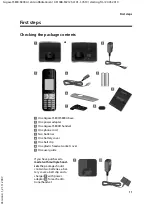
Page 12: ...A base 2 One power adapter 3 One Gigaset S800H handset 4 One phone cord 5 Two batteries 6 One battery cover 7 One belt clip 8 One plastic headset socket cover 9 One user guide If you have purchased a model with multiple hand sets the package should contain two batteries a bat tery cover a belt clip and a charger 9 with power adapter J for each addi tional handset 2 1 3 4 5 7 6 9 8 or 9 J ...

Page 13: ...urfaces cannot be completely ruled out Please note u Never expose the telephone to the influence of heat sources direct sunlight or other electrical devices u Protect your Gigaset from moisture dust corrosive liquids and fumes Connecting the base First connect the power adapter 1 Then connect the telephone jack 2 and insert the cables into the cable ducts Please note u The power adapter must alway...

Page 14: ...19 starting fm 20 05 2010 Version 4 1 21 11 2007 Connecting the charger if included Plug the power adapter into the plug socket 2 Connect the flat plug from the power adapter 1 To disconnectthe plug from the charger press the release button1 and disconnect the plug 2 1 2 1 2 ...

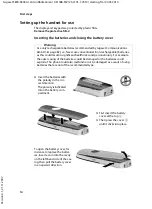
Page 15: ... in significant health risks and personal injury For example the outer casing of the batteries could be damaged or the batteries could explode The phone could also malfunction or be damaged as a result of using batteries that are not of the recommended type Insert the batteries with the polarity in the cor rect direction The polarity is indicated in on the battery com partment First insert the bat...

Page 16: ...re of the belt clip firmly with your right thumb push the fingernail of your left index finger up between the clip and the housing and pull the clip in an upward direction Placing the handset in the base charger Place the handset in the base charger with its display facing forward Each handset is registered with the base at the factory You do not need to register the handset again If you wish to u...

Page 17: ...Then remove the handset from the base charger and do not replace it until the batteries are fully dis charged 8 5 hrs Please note u After the first battery charge and discharge you may replace your handset in the base charger after every call u Always repeat the charging and discharging procedure if you remove the batteries from the handset and reinsert them u The batteries may warm up during char...

Page 18: ...u have already set the time and date open the input field via the menu page 29 The Date Time submenu is shown on the display Theactiveinputpositionflashes Enter day month and year as an 8 digit number via the keypad e g 4 Q2QQ O for 14 10 2009 Date Time Date 31 01 2009 Time 00 00 Back Save Calls Time Press the right or left control key to change the input position and correct an entry Enter the ho...

Page 19: ...flashes Green Eco Mode activated page 57 u Charge status of the batteries y y empty to full y flashes red batteries almost empty xy x x charging u INT 1 Internal name of the handset page 63 If Eco Mode page 57 is activated the icon is displayed in the top left cor ner of the display Your answering machine is set with a pre recorded announcement Your phone is now ready for use Press the key below S...

Page 20: ...ended headsets The headset volume corresponds to the settings for the handset volume page 70 After using the headset replace the plastic cover to enable optimum sound in speaker mode Connecting the USB data cable You can connect a standard USB data cable with a mini B connector to the back of your handset to connect the handset to a PC page 84 Remove the belt clip if attached page 15 Remove the ba...

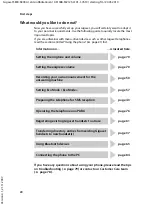
Page 21: ...If you have any questions about using your phone please read the tips on troubleshooting page 79 or contact our Customer Care team page 78 Information on is located here Setting the ringtone and volume page 70 Setting the earpiece volume page 70 Recording your own announcement for the answering machine page 50 Setting Eco Mode Eco Mode page 57 Preparing the telephone for SMS reception page 43 Oper...

Page 22: ...menus and lists t s Scroll up down line by line In input fields Use the control key to move the cursor up t down s right v or left u Press and hold v or u to move the cursor word by word During an external call s Open the directory u Initiate an internal consultation call t Adjust the loudspeaker volume for earpiece and speaker mode Functions when pressing the middle of the control key Depending o...

Page 23: ...eypad c Q etc Press the matching key on the handset Enter digits or letters Side keys ø Press the keys on the right of the handset to set the volume for the handset ringtone speaker alarm signalling of appointments and the headset depending on the situation Correcting incorrect entries You can correct incorrect characters in the input fields by navigating to the incor rect entry using the control ...

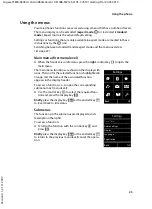
Page 24: ... main menu The main menu functions are shown in the display with icons Theiconfortheselectedfunctionishighlightedin orange and the name of the associated function appears in the display header To access a function i e to open the corresponding submenu next menu level Use the control key p to select the required func tion and press the display key OK Briefly press the display key Back or the end ca...

Page 25: ...in idle status press and hold the end call key confir mation tone to switch off the handset Press and hold the end call key again to switch the handset on Activating deactivating the keypad lock The keypad lock prevents any inadvertent use of the phone Press and hold the hash key in idle status to activate or deactivate the keypad lock You will hear the confirmation tone If the keypad lock is acti...

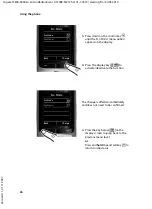
Page 26: ...ode on means Press right on the control key v to open the main menu Press right left down and up on control key p to navigate to the Settings submenu Press the display key OK to confirm your selection Press down on the control key s until the Eco Mode menu option appears on the display Press the display key OK to confirm your selection Settings Display Language Registration Menu View Eco Mode Back...

Page 27: ... confirmed Press down on the control key s until the Eco Mode menu option appears on the display Press the display key Change to activate deactivate the function Eco Mode Eco Mode Eco Mode Back Change Eco Mode Eco Mode Eco Mode Back Change Press the key below Back on the display screen to jump back to the previous menu level or Press and hold the end call key a to return to idle status ...

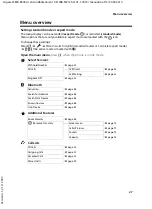
Page 28: ... or Complete expert mode Select the active mode is marked with Ø Open the main menu press v when the phone is in idle mode Ç Select Services Withhold Number page 33 All Calls Call Divert page 34 Call Waiting page 33 Ringback Off page 33 ò Bluetooth Activation page 66 Search for Headset page 66 Search Data Device page 66 Known Devices page 66 Own Device page 67 É Additional Features Room Monitor pa...

Page 29: ...e 45 Draft page 44 Settings Service Centres page 48 SMS Mailboxes page 46 Notification page 46 Ì Voice Mail Play Messages Network Mailbox page 56 Answering Machine page 50 Activation page 50 Announcements Rec Announcement page 50 Play Announcement page 50 Del Announcement page 50 Rec Advisory Msg page 50 Play Advisory Msg page 51 Del Advisory Msg page 51 Recordings page 53 Call Screening page 53 N...

Page 30: ...eypad Screensaver page 68 Large Font page 69 Colour Schemes page 69 Display Backlight page 69 Keypad Illumination page 69 Language page 68 Registration Register Handset page 61 De reg Handset page 61 Select Base page 62 Telephony Auto Answer page 70 Area Codes page 73 Listening In page 63 Preselection page 42 Access Code page 76 Dialling Mode page 76 Recall page 76 System Handset Reset page 73 Bas...

Page 31: ...a Press the end call key Accepting a call The handset indicates an incoming call in three ways by ringing by a display on the screen and by the flashing talk key c Accept the call by Pressing the talk key c Pressing the speaker key d Gigaset S800 press the display key Accept Gigaset S800A press the display key Ô to divert the call to the answering machine page 53 If the handset is in the base char...

Page 32: ...ler this will also be displayed or 1 Ringtone icon 2 Number or name of caller The following is displayed in place of the number u External if no number is transmitted u Withheld if the caller has withheld Call ing Line Identification page 33 u Unavailable if the caller has not arranged Calling Line Identification Speaker mode In speaker mode instead of holding the handset to your ear you can put i...

Page 33: ...he speaker key d while placing the handset in the base charger and for a further 2 seconds For instructions on adjusting the speaker volume page 70 Switching to mute You can deactivate the microphone in your handset during an external call h Press key to mute the handset The display shows Microphone is off Press the key again to reactivate the microphone Please note Ifyouhaveaheadsetconnected youc...

Page 34: ...f the number you have called is engaged you can initiate ringback As soon as the line belonging to the person you called is free your handset will ring You hear the busy tone Options Ringback a Press the end call key Cancelling ringback You can cancel a ringback that has already been initiated v Ç Ringback Off Call waiting during an external call If the function is activated during an exter nal ca...

Page 35: ...nal caller The first call is placed on hold During an external call Ext Call Press the display key The previous call is placed on hold The other participant hears an announcement Enter the second participant s telephone number The phone number is dialled You are con nected to the second participant If the caller does not answer select the dis play key End to return to the first participant Ending ...

Page 36: ...wing fields First Name Surname Enter first names and or surnames If you do not enter a name in either of the fields the phone number is saved and displayed in place of a surname For instructions on entering text and special characters please see page 83 Phone Home Phone Office Phone Mobile Enter a number in at least one of the fields When scrollingthrough the directory the entries are highlighted ...

Page 37: ...en entered the directory searches for the first name Select from the directory s s Select entry c Press the talk key If several numbers are entered select the required number by pressing r and press the talk key c again The number is dialled Managing directory entries Viewing entries s s Select entry View Press the display key The entry is displayed Options Press the display key Thefollowingfuncti...

Page 38: ... can transfer several individual entries one after the other by responding to the Entry copied Copy next entry prompt with Yes A successful transfer is confirmed by a mes sage and confirmation tone on the receiving handset Please note u Entries with identical numbers are not overwritten on the receiving handset u The transfer is cancelled if the phone rings or if the memory of the receiving handse...

Page 39: ...er the other s Scroll to the Anniversary line v Select On You can enter data in the following fields Annivers Date Enter day month year in 8 digit format Anniversary time Enter the hour minute for the reminder call in 4 digit format Anniversary tone Select the reminder type Save Press the display key Deactivating anniversaries s s Select entry View Edit Press display keys one after the other s Scr...

Page 40: ... and open listening is activated Party answers Press the talk key c The function is ended Party does not answer The call is terminated after approx 30 seconds The function is ended after pressing any key or after ten unsuccessful attempts Display Number as in the directory page 36 Delete Entry as in the directory page 36 Delete All as in the directory page 37 Incoming SMS message list All received...

Page 41: ...nger be shown in bold Opening lists with the message key Use the message key f to open the follow ing list selection u Answering machine list Gigaset S800A only or network mailbox if your network provider supports this function and fast access is set for the network mailbox page 56 u Incoming SMS message list page 44 If multiple mailboxes are set up page 46 several lists are displayed u List of mi...

Page 42: ...th u Number or name u Date and time The most recent entry is at the head of the list Press the display key Delete to delete the selected entry If 10 entries are already stored in the list the next appointment reminder will delete the oldest entry Making cost effective calls Make phone calls through a network pro vider who offers particularly low cost call rates call by call Automatic network provi...

Page 43: ...fixed according to the country in the With Preselection list This means for example that all national calls or calls to the mobile network are automati cally linked to the preselection number you have saved previously v Ï Telephony Preselection With Preselection No Preselection s Select entry Enter or edit the first digits of the number Save Press the display key Temporarily cancelling preselectio...

Page 44: ...ct and press OK SMS Select and press OK s Select number with access code even if you are in that area from the directory or enter directly For sending SMS mes sages to an SMS mailbox add the mailbox ID to the end of the number Send Press the display key The SMS is sent Please note If your phone is connected to a PABX please read page 48 Please note u For instructions on entering text and special c...

Page 45: ...t Display text in the selected character set Deleting draft SMS list Open the draft message list and then Options Open menu Delete All Select press OK and confirm with Yes The list is deleted Receiving an SMS All received SMS messages are saved in the incoming SMS list Linked SMS messages are displayed as one message If this is too long orisnottransferredcompletely itissplitinto individual message...

Page 46: ...t is deleted Reading or deleting SMS messages Open the incoming message list then q Select SMS Read Press the display key The text is displayed Scroll line by line using q or delete the SMS with Options Delete Entry OK Afteryou have reada new SMS itis given the status Old is no longer shown in bold Changing the character set Read the SMS Options Press the display key Character Set Text is shown in...

Page 47: ...irec tory and save it You will return to the vCard automatically Notification via SMS You can be notified about missed calls or new answering machine messages Gigaset S800A only via SMS Prerequisite For missed calls the caller s number CLI must have been transmitted Notification is sent to your mobile phone or another phone with SMS functionality You only need to save the telephone number to which...

Page 48: ...aved in this mailbox are deleted Deactivating PIN protection Set Protection to Off The mailbox PIN is reset to 0000 Changing the name of a mailbox v Ë Settings SMS Mailboxes s Select mailbox Edit Press the display key Enter new name Save Press the display key Changing a mailbox s PIN and ID v Ë Settings SMS Mailboxes s Select mailbox Enter mailbox PIN if necessary and press OK Set Box ID Protectio...

Page 49: ...BX CLIP The CLIP evaluation of the SMS centre number is completed in your Gigaset u Depending on your PABX you may have to add the access code external line pre fix before the number of the SMS centre If in doubt test your PABX e g by send ing an SMS to your own number once with and once without the access code u When you send SMS messages your sender numbermaybe sent withoutyour extension number ...

Page 50: ... rest of the SMS You have stopped receiving SMS messages 1 You have changed the ID of your mailbox Give your SMS contacts your new ID or undo the change page 47 2 You have not activated your mailbox Activate your mailbox page 47 3 Call divert redirecting is set to When All Calls or All Calls is activated for the network mailbox Change the call divert settings page 34 The SMS is played back 1 The d...

Page 51: ...dit Press the display key You can enter data in the following fields Activation Select On or Off to activate deactivate the answering machine Mode Select Answer record Answer only or Alternating If Alternating mode is selected Record from Enter hours minutes for the start of the period in 4 digit format The time must be set on the phone beforehand Record until Enter hours minutes for the end of th...

Page 52: ...key If the answering machine s memory is full it will switch to Answer only mode Delete old messages and the answering machine will automatically switch back to Answer record mode Repeat recording if required Deleting personal announcements advisory messages v Ì Announcements Del Announcement Del Advisory Msg Yes Press the display key to confirm the prompt Onceyouhavedeletedyourannouncement the re...

Page 53: ...age is displayed as a new message again During message playback Press the star key or Options Open menu Mark as New Select and press OK An announcement informs you of the mes sage s new status Playback of the current message is can celled Playback of next message starts if applicable The f key on the handset flashes Copying a phone number from a message to the directory During playback or pause Op...

Page 54: ...answering machine If the memory is full you will hear an end tone the recording is aborted and the call recorded up to that point is listed in the answering machine list as a new mes sage Activating deactivating call screening Whileamessageisrecording youcanscreen callsviathebaseloudspeakerandregistered handsets Permanently activating deactivating call screening v Ì Call Screening Handset Base on ...

Page 55: ...rk mailbox for fast access page 56 you can reset this setting v Ì Set Key 1 Answering Machine Select and press OK Once you have selected the answering machine press and hold key You are connected directly The setting for fast access applies to all regis tered handsets Operating when on the move remote operation You can check and activate your answering machine from any other telephone hotel pay ph...

Page 56: ...o messages Prerequisite You must have stored an SMS notification number page 46 You can use the telephone mobile phone or any other device with SMS functionality for which you have stored the SMS notification number in your phone to send an SMS to your answering machine when you are away from home It will then call you back The message playback begins when you accept the call and press any digit k...

Page 57: ...tering the network mailbox number Gigaset S800 v Ì Set Key 1 Network Mailbox Select and press Network Mailbox Ø Select selected Gigaset S800A v Ì Network Mailbox To continue Enter the number for the net work mailbox Save Press the display key The setting for fast access applies to all Gigaset S800H handsets Calling the network mailbox Press and hold You are con nected straight to the network mailb...

Page 58: ...ched off in the idle state This is also true when multiple handsets are used provided the handsets support Eco Mode Eco Mode Eco Mode can be activated deactivated independently of one another andcanalsobeusedwithmultiplehandsets The handset must not be placed in the base Activate deactivate Eco Mode Eco Mode v Ï Eco Mode Eco Mode Eco Mode Change Press the display key on Status displays Display ico...

Page 59: ...ect On or Off Date Enter day month year in 8 digit format Time Enter hours minutes in 4 digit format Text Enter text max of 16 characters The text appears as the appointment name in the list and is displayed on the screen during the appointment reminder If you do not enter any text only the date and time of the appointment are displayed Signal Select the reminder type Save Press the display key Si...

Page 60: ...ed appointments anniversaries page 38 are displayed in the Missed Alarms list if u You do not accept an appointment anni versary u The appointment anniversary was sig nalled during a phone call u The handset is deactivated at the time of the appointment anniversary u Automatic redial was activated at the time of an appointment anniversary page 39 The icon nand the number of new entries are shown i...

Page 61: ...me are displayed A wake up call is signalled on the display and with the selected ringtone page 4 The wake up call sounds for 60 seconds If no key is pressed the wake up call is repeated twice at five minute intervals and then switched off While the wake up call sounds you can permanently change the volume by press ing the side keys ø louder or quieter During a call the wake up call is only sig na...

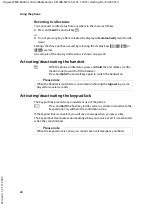
Page 62: ...register and press OK The handset you are currently using is highlighted with Enter the current system PIN and press Save Yes Press the display key Locating a handset Paging You can locate your handset using the base Briefly press the registration paging key on the base page 5 All handsets will ring simultaneously paging even if the ringtones are deac tivated Ending paging Briefly press the regist...

Page 63: ... the list of handsets The external participant hears music on hold if activated page 74 s Select a handset or Call All and press OK When the internal participant answers If necessary announce the external call a Press the end call key The external call is transferred to the other handset Iftheinternal participant doesnotanswer or the line is busy press the display key End to return to the external...

Page 64: ...n the conversation All the partici pants are made aware of additional listeners by a signal tone Activating deactivating listening in v Ï Telephony Listening In Press Change to activate deactivate the func tion on Internal listening in The line is engaged with an external call Your screen will display information to that effect To listen in to the external call c Press and hold the talk key You ca...

Page 65: ...e room monitor is activated incom ing calls to the handset are indicated with out a ringtone and are only shown on the screen The display and keypad are not illu minated and advisory tones are also turned off If you accept an incoming call the room monitor is suspended for the duration of the call but the function remains activated If you deactivate then reactivate the hand set the room monitor re...

Page 66: ...s the display key OFF on the handset To reactivate the room function with the same phone number Turn on the activation again and save with Save page 64 Using Bluetooth devices Your Gigaset handset can communicate wirelessly via Bluetooth with other devices using this technology Before you can use your Bluetooth devices you must first activate Bluetooth and then register the devices to the handset ...

Page 67: ... Cancel Press the display key Repeat search if necessary Options Press the display key Repeat Search Select and press OK Editing the list of known trusted devices Open list v ò Known Devices A corresponding icon appears next to each device name in the list displayed If a device is connected the corresponding symbol ò is shown in the header of the dis play Viewing entries Open list s select entry O...

Page 68: ...s Yes Press the display key No Press the display key use temporarily Changing the Bluetooth name of the handset You can change the handset name used to identify it on the display of another Blue tooth device v ò Own Device Change Press the display key Change the name Save Press the display key Handset settings Your handset is preconfigured but you can change the settings to suit your individual re...

Page 69: ...vailable Call Lists Display call lists page 39 INT Internal calls page 62 SMS Assign menu for SMS functions to a key page 43 Withhold Number Withhold Calling Line Identification for the next call page 33 Select an entry and press OK Changing the display language You can view the display texts in different languages v Ï Language The current language is indicated by a Ø s Select language and press S...

Page 70: ...Setting the display Backlight Depending on whether or not the handset is in the base charger you can activate or deactivate the backlight If it is activated the display is permanently dimmed If the back light is deactivated it is switched on by pressing any key In this case the pressed key has no other function v Ï Display Keypad Display Backlight The current setting is displayed You can enter dat...

Page 71: ...e In idle state you can set various handsfree profiles to optimally adapt your phone to your environment Profile 1 The optimum setting for most connec tions and set as default Profile 2 Optimum volume in handsfree mode However thismeansthattheparticipants cannot speak at the same time as the per son speaking is given preferential trans mission making two way conversations difficult Profile 3 Optim...

Page 72: ...nter the end of the period in 4 digit for mat Activating deactivating the ringtone for unknown calls You can set your phone not to ring for calls where Calling Line Identification has been withheld The call will only be signalled on the display In idle status v Ï Audio Settings Ringtones Handset Anon Calls Silent Press Change to activate or deactivate the function on Activating deactivating the ri...

Page 73: ...st delete one or more pictures or sounds Playingbacksounds viewingcaller pictures v Screensavers Caller Pictures Sounds select entry Pictures View Press the display key The selected picture is displayed Switch between pictures using the q key If you have saved a picture in an invalid file format you will see an error message after selecting the entry Sounds The selected sound is played back immedi...

Page 74: ...ds Key Tones Select On or Off Confirmation Select On or Off Battery Select On or Off Save Press the display key Setting your own area code To transfer phone numbers e g in vCards it is essential that your area code interna tional and local area code is saved on the phone Some of these numbers are already preset v Ï Telephony Area Codes Check that the pre set area code is correct You can enter data...

Page 75: ...ength of your base You will need to activate repeater mode This will ter minate any calls that are in progress at the time Prerequisite A repeater is registered v Ï System Repeater Mode Press Change to activate or deactivate repeater mode on Protecting against unauthorised access Protect the system settings of the base with a PIN known only to yourself The system PIN must be entered when for examp...

Page 76: ...ecting the power cable to the base Hold down the key for at least 5 seconds The base has now been reset and the system PIN set to 0000 Resetting the base to the factory settings When the settings are restored u Date and time are retained u Handsets are still registered u Eco Mode is activated and Eco Mode is deactivated u The system PIN is not reset v Ï System Base Reset Enter the system PIN and p...

Page 77: ... to change this value Please refer to the user guide for your PABX v Ï Telephony Recall s Select recall and press Select Ø set value Possible values are 80 ms 100 ms 120 ms 180 ms 250 ms 300 ms 400 ms 600 ms 800 ms Saving an access code outside line code Prerequisite You may have to enter an access code in front of the number for exter nal calls in your PABX e g 0 v Ï Telephony Access Code Enter o...

Page 78: ...s Enter a number for the length of the pause 1 800 ms 2 1600 ms 3 3200 ms and press OK Changing a dialling pause pause after access code Prerequisite You have saved an access code page 76 v Open the main menu Q5 Press keys Enter number for the length of the pause 1 1 sec 2 2 secs 3 3 secs 4 6 secs and press OK To insert a dialling pause press and hold S for 2 seconds A P appears in the dis play Sw...

Page 79: ... with each other u Downloads for user manuals and current software updates u E mail contact form for customer service Our service representatives are available on the telephone for more advanced questions or in person consultation Here you can get competent advice on questions regarding installation operation and configuration UK 0845 367 0812 local call cost charge Please note that if the Gigaset...

Page 80: ...eregistered Register the handset page 61 Handset does not ring 1 The ringtone is deactivated Activate the ringtone page 71 2 Call divert set for All Calls Deactivate call divert page 34 3 The phone only rings if the phone number has been transferred Switch on the ringtone for unknown calls page 71 You cannot hear a ringtone dialling tone from the fixed line network The phone cord supplied has not ...

Page 81: ...ilure to comply with information contained in the user guides u This Guarantee shall not apply to or extend to services performed by the authorised dealer or the customer them selves e g installation configuration software downloads User guides and any software supplied on a separate data medium shall be excluded from the Guar antee u The purchase receipt together with the date of purchase shall b...

Page 82: ...on sibility for our products that comprises their entire life cycle The environmental impact of products including their manufacture procurement distribution use service and disposal are already evaluated during prod uct and process design Further information on environmentally friendly products and processes is available on the Internet at www gigaset com Environmental management system Gigaset C...

Page 83: ...is completely dry When it has fully dried out you will normally be able to use it again Specifications Batteries Technology Nickel metal hydride NiMH Size AAA Micro HR03 Voltage 1 2 V Capacity 550 1000 mAh The device is supplied with two approved batteries Handset operating times charging times This Gigaset can charge batteries up to a capacity of 1000 mAh The use of special high performance batte...

Page 84: ...s display key Ñ to delete the char acter to the left of the cursor Press and hold to delete the word to the left of the cursor u The first letter of the name of directory entries is automatically capitalised fol lowed by lower case letters Setting upper lower case or digits Repeatedly press the hash key to change the text input mode The active mode is indicated at the bottom right of the screen DE...

Page 85: ... to use the Bluetooth connection your computer must be equipped with a suitable dongle Transferring data Start the Gigaset QuickSync program You can now u Synchronise your handset directory with Outlook u Download caller pictures bmp from the computer to the handset u Download pictures bmp as a screen saver from the computer to the handset u Download sounds ringtones from the computer to the hands...

Page 86: ...lashing Once the update is complete your phone will automatically restart Procedure in case of an error If the update procedure fails or your phone does not work properly following the update repeat the update procedure as fol lows Close the Gigaset QuickSync program on the PC Remove the USB data cable from the tel ephone Remove the battery page 14 Replace the battery Complete the firmware update ...

Page 87: ...gtones u Directory for approx 500 entries u Caller picture u SMS prerequisite CLIP must be enabled u PC interface e g for managing directory entries ringtones and screensavers u Bluetooth u Headset socket u Room monitor www gigaset com gigasetS800H Gigaset C59H handset u Illuminated graphic colour display 65k colours u Illuminated keypad u Speaker mode u Polyphonic ringtones u Directory for approx...

Page 88: ... handset u Illuminated graphic colour display 65k colours u Illuminated keypad u Speaker mode u Polyphonic ringtones u Directory for approx 250 entries u Caller picture u SMS prerequisite CLIP must be enabled u Headset socket u Bluetooth Gigaset S68H only u Room monitor www gigaset com gigasetS67h Gigaset SL37H handset u Illuminated graphic colour display 65k colours u Illuminated keypad u Speaker...

Page 89: ...007 Gigaset repeater The Gigaset repeater can be used to increase the reception range between your Gigaset handset and the base www gigaset com gigasetrepeater Use only original accessories This will avoid possible health risks and personal injury and also ensure that all the relevant regulations are complied with ...

Page 90: ...S800 only Gigaset S800 S800A en Großbritannien A31008 M2125 L101 1 7619 accessories_SAG fm 20 05 2010 Version 4 1 21 11 2007 Mounting the base on the wall Gigaset S800 only Mounting the charger on the wall Approx 5 5 mm 41 mm Approx 4 mm 21 mm ...

Page 91: ...ist 39 40 playing back messages 51 recording a personal announcement advisory message 50 remote operation 54 scrolling back 52 scrolling forward 52 Answering machine see also Network mailbox Appointment 58 Appointment anniversary display missed 59 Appointments activating deactivating 59 deleting 59 managing 59 Area code setting own area code 73 Assigning a number key 67 Authorisation 80 Automatic ...

Page 92: ... earpiece volume 70 internal number of a handset 64 name of a handset 63 pauses 77 ringtone 70 74 speaker volume 70 system PIN 74 75 Character set 44 45 84 Charge status display 3 4 CLI CLIP 31 CLIR 33 Colour scheme 69 Conference internal 62 Confirmation tone 73 Connecting base to PABX 76 headset 19 Consultation call 34 internal 62 Control key 3 21 Correcting incorrect entries 22 Customer Care 78 ...

Page 93: ...preselection 42 selecting from directory 36 Environment 81 Error tone 73 Expert mode 27 79 External call call waiting 33 forwarding to ans mach 53 F Fast access answering machine 54 network mailbox 56 Firmware update 85 G General troubleshooting 79 Group call 62 Guarantee Certificate 80 H Handset activating deactivating 24 advisory tones 73 changing internal number 64 changing name 63 changing the...

Page 94: ...k 24 Keys control key 3 21 delete key 22 display keys 3 22 end call key 3 30 fast access 3 54 hash key 3 24 message key 3 mute key 3 on off key 3 quick dial 37 recall key 3 side keys 3 speaker key 3 star key 3 talk key 3 30 L Language display 68 Large font 69 Linking see SMS List answering machine 39 40 call lists 39 handsets 21 known devices Bluetooth 66 missed calls 39 network mailbox 40 SMS dra...

Page 95: ...tory 38 copying to the directory 38 displaying caller s number CLIP 31 entering with directory 38 saving in directory 35 O On Off key 3 Operating remotely 54 Order in directory 36 P PABX connecting base 76 pauses 77 saving access code 76 setting dialling mode 76 setting recall 76 SMS 48 switching to tone dialling 77 Package contents 11 Paging 61 Pause after access code 77 after line seizure 77 aft...

Page 96: ...5 Setting the date 17 29 Setting the time 17 29 Setting up handset 14 Side keys 3 Signal tone see Advisory tones Slide show 68 SMS 43 active send service centre 47 changing mailbox 47 deleting 44 45 draft message list 44 forwarding 45 incoming message list 44 linked 43 list 40 mailbox ID 46 mailboxes 46 notification by SMS 46 PIN protection 47 reading 44 45 receiving 44 replying to or forwarding 4...

Page 97: ...010 Version 4 1 21 11 2007 U Unknown 31 Unknown caller 31 Update 85 USB connection 19 V vCard SMS 46 Viewing the network mailbox message 56 Volume earpiece 70 handset speaker volume 70 loudspeaker 70 ringtone 70 74 W Warning tone see Advisory tones Writing SMS 43 Writing and editing text 83 ...

Reviews: