background image

28/49

A6V10336897_d_en_

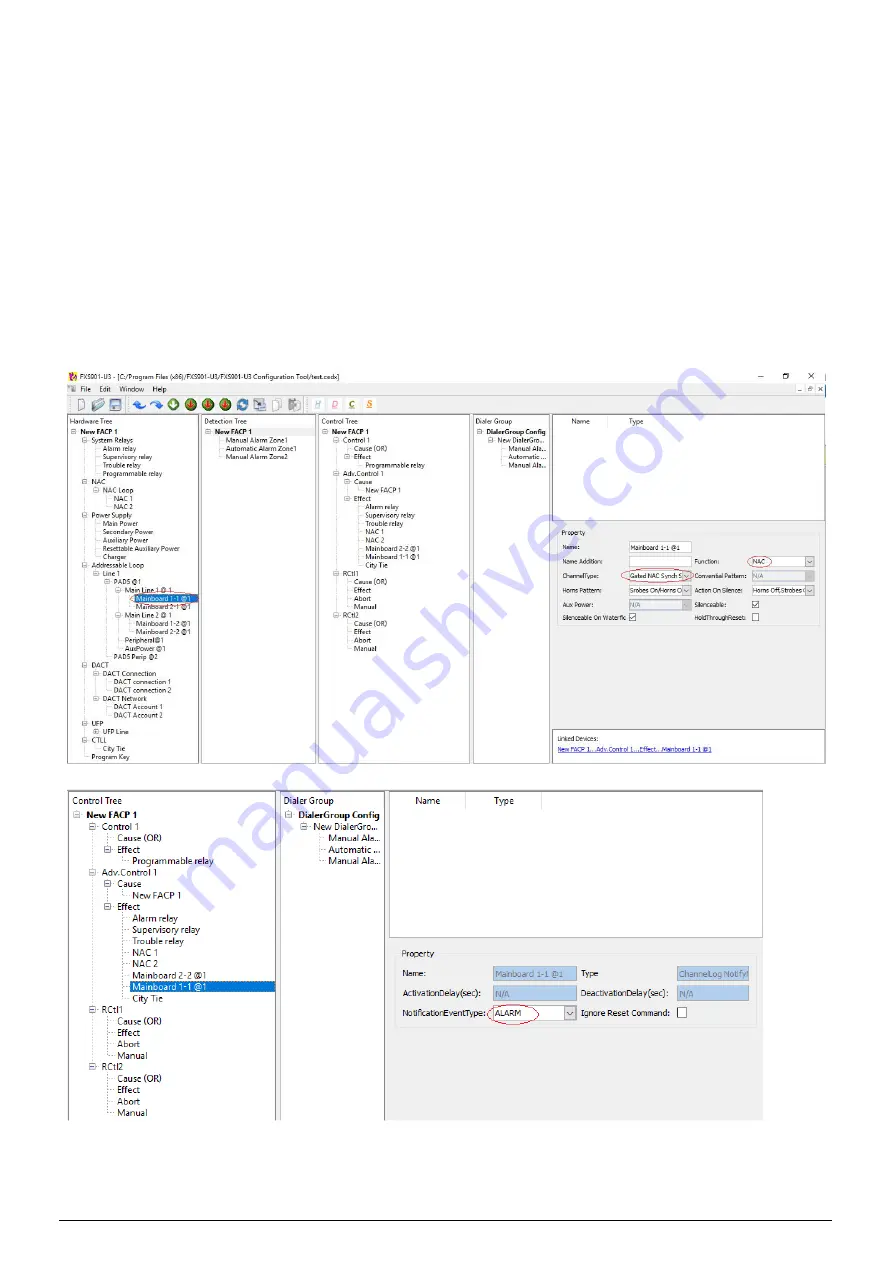
5.17  HOW TO SYNCHRONIZE PAD5 NAC WITH NAC SOURCE

A NAC connected to PAD5 can be configured to 4 different types: Conventional NAC, Synch Strobes Horns,
Gated NAC Conventional and Gated NAC Synch Strobes Horns. The Conventional NAC and Synch Strobes
Horns type NAC work according to PAD5 settings. As for Gated NAC Conventional and Gated NAC Synch
Strobes Horns, when there is a NAC source available, the PAD5 NAC is synchronized to the NAC source if
their notification event types are selected as the same. If their notification event type are selected differently
or the NAC source is missing, the PAD5 NAC works as degraded mode, which is working according to PAD5
settings.
Below screenshots display an example to show the settings when a PAD5 NAC is synchronized to the NAC
source:

Summary of Contents for FC901-U3

Page 1: ...A6V10336897_d_en_ 2019 12 10 Smart Infrastructure FXS901 User Manual ...

Page 2: ...CITYTIE OR LEASELINE 21 5 12 HOW TO DELETE A DEVICE ZONE CHANNEL 22 5 13 HOW TO EDIT PARAMETERS 23 5 14 HOW TO ASSIGN A CHANNEL TO ZONE EFFECT 24 5 15 HOW TO CREATE A CONTROL LOGIC 25 5 16 HOW TO CONFIGURE THE DIALER GROUP 27 5 17 HOW TO SYNCHRONIZE PAD5 NAC WITH NAC SOURCE 28 5 18 HOW TO DOWNLOAD UPLOAD CONFIGURE FILE 30 5 19 HOW TO DOWNLOAD PANEL SYSTEM FILE 32 5 20 HOW TO DOWNLOAD FSD REMOTE AN...

Page 3: ...m Microsoft Windows XP SP3 or higher version Windows 7 Windows 10 USB port CPU PIII 1 0GHZ Memory 512M Hard disk 10G Display resolution 1024 768 2 2 INSTALLATION PROCESS The FXS901 tool installation packages are FXS901 U2 Setup msi for Desigo version and FXS901 U3 Setup msi for Cerberus version Follow the below steps to install the software 1 Double click FXS901 U2 Setup msi or FXS901 U3 Setup msi...

Page 4: ...d_en_ 3 49 3 Click Next Next to confirm the installation and then the installation starts 4 During the tool installation process the device driver installation wizard pops up automatically Click Next to continue installing the driver ...

Page 5: ...4 49 A6V10336897_d_en_ 5 If Windows security pops up select Install this driver software anyway to continue ...

Page 6: ...ser Manual A6V10336897_d_en_ 5 49 6 Wait until you see the below screen then click Finish to finish the driver installation 7 Wait until you see the below screen then click Close to finish the tool installation ...

Page 7: ...tomatic installation fails the below error message pops up when using the tool In this case uses can install the usb driver manually Step 1 Insert the USB cable then the following window Found New Hardware Wizard pops up automatically Step 2 Select Install from a list or specific location advanced and click on Next ...

Page 8: ...XS901 User Manual A6V10336897_d_en_ 7 49 Step 3 Select the item Search for the best driver in these location and Include this location in the search for the FXS901 software with driver and click on Next ...

Page 9: ...on All programs SIEMENS FXS901 U3 Configuration Tool Uninstall FXS901 U3 then click Yes to uninstall or click No to cancel The second way Open the Control Panel and then the Programs and Features Find FXS901 U3 Configuration Tool and then click Uninstall A confirmation window pops up Click Yes to uninstall or click No to cancel ...

Page 10: ...and click on it 3 2 EXIT There are two ways to exit FXS901 The first way Select Exit from the File menu System will remind users to save the file if the document is changed Click OK to save it and exit FXS901 The second way Directly click on the X on the top right corner of the window System will remind users to save the file if the document is changed Click on OK to save it and exit FXS901 ...

Page 11: ... file 12 Copy 4 Upload configure files FACP PC 13 Paste 5 Download configure files PC FACP 14 Hide unhide hardware tree 6 Download system files PC FACP 15 Hide unhide detection tree 7 Download FSD system file 16 Hide unhide control tree 8 Download RPM system file 17 Hide unhide dialer group 9 Download LED annunciator system file Menu Bar Tool Bar Hardware Tree Detection Tree Control Tree Dialer Gr...

Page 12: ...eld application 1 Click Edit Panel Type to select the panel type that matches with the field application NOTE Before opening a configure file users also need to make sure the panel type selected on the tool matches with the type of the configure file ced cedx file is UL type sed sedx file is ULC type If the type is selected wrongly error message pops up when opening the configure file ...

Page 13: ... a name for the new file in the pop up window and click Save then the configure file with default setting is displayed as below 3 Edit the parameters in the property view 4 Add devices according to section 5 3 5 Configure control logic according to section 5 15 6 Configure dialer group refer to section 5 16 7 Save the configuration ...

Page 14: ...FXS901 User Manual A6V10336897_d_en_ 13 49 5 3 HOW TO OPEN A CONFIGURE FILE 1 Click File Open 2 Select the configure file that you want to open and then click Open ...

Page 15: ...ll selectable device series are listed 2 Click the wanted series and then all selectable devices are listed Click on the wanted device select the zone type and then click OK The device is then added and displayed under Line 1 and on the children view 3 Select the device and edit its parameters in the property view 4 Save the configuration ...

Page 16: ...ection tree and then click Insert Node All selectable zones are listed Click on the wanted zone and then the zone is added and listed under New FACP1 and on the Children view 2 Select one zone and edit its parameters in the property view 3 Drag devices from the hardware tree to zones under the detection tree 4 Save the configuration ...

Page 17: ...ne 1 and then click Insert Node All selectable channels are listed Select the wanted channel and click on it Then the channel is added and displayed under the device and on the Children view 2 Select the channel and edit its parameters in the property view 3 Save the configuration ...

Page 18: ... right click on it Click Insert Node 2 audible control functions Then the 2 channels sounder base is added and displayed under the device and on the Children view 2 Select the sounder base and edit its parameters in the property view 3 Save the configuration Use sounder base in addition to panel NAC or PAD5 NAC when multiple alarm tones are needed in one zone ...

Page 19: ...t its parameters in the property view The following parameters can be set Supervision Define the printer whether it is supervised Report Alarm Define whether it reports alarm event Report Trouble Define whether it reports trouble event Report Supervisory Define whether it reports supervisory event Report Status Define whether it reports status The address must be same as the setting of Dip Switch ...

Page 20: ...n the Children view 2 Select the FSD and edit its parameters in the property view The following parameters can be set Report Alarm Define whether it reports alarm event Report Trouble Define whether it reports trouble event Report Supervisory Define whether it reports supervisory event Report Status Define whether it reports status The address must be same as the setting of Dip Switch on FSD PCB 3...

Page 21: ...ake FT2007 as an example for configuring FT2007 has the following elements which need to be configured 6 system LEDs 16 inputs 32 area LEDs System LEDs Select a system LED under hardware tree and edit in property view System LED list Define event category Reset Acknowledge Silence Audibles on Trouble Ground fault Inputs Select an input under hardware tree and edit in property view Input Type syste...

Page 22: ... can be connected to the control panel at the same time Below is how to select between CityTie and LeaseLine under CTLL 1 Click CTLL under the Hardware tree In the property window click the drop down list for WorkMode and then select between CityTie and LeaseLine 2 Selected option is added and displayed under CTLL ...

Page 23: ...A6V10336897_d_en_ 5 12 HOW TO DELETE A DEVICE ZONE CHANNEL 1 Right click the device zone channel which you want to delete and then click Delete Node The device zone channel is deleted 2 Save the configuration ...

Page 24: ...ser Manual A6V10336897_d_en_ 23 49 5 13 HOW TO EDIT PARAMETERS Select a zone device channel and then all editable parameters are displayed on the Property window Edit these parameters and save the configuration ...

Page 25: ...gged to effect under control tree For input channel 1 Right click an input channel from the hardware tree and then click Assign to Zone Select the target zone and then the channel is added to the selected Zone under the Detection tree For output channel 1 Click and hold on an output channel and then drag it to the target Effect folder under the Control tree ...

Page 26: ...ith the releasing channel Mimic control OR The LED status changes with the status of the cause Test control OR When cause conditions are fulfilled the selected channels under Effect are activated A maximum of 4 input channels are supported for test control and the 4 channels are selected in Property by default The 4 channels Active Channel 1 2 3 and 4 correspond respectively to the devices listed ...

Page 27: ...under the Cause OR of Control 2 4 Add Automatic Alarm Zone 3 to Cause OR under Control 2 as in Step 3 5 Assign O2 Output 2 1 to Effect under Control 2 6 Change the Cause Calculation property to AND from the property view of the Cause OR under Control 2 The new control logic is now created NOTE FXS901 software provides an easy way to assign a device zone to control tree from detection tree and hard...

Page 28: ...arm Code from the drop down list in the property area 4 Save the configuration NOTE The automatic alarm zone and manual alarm zone under one dialer group use the same contact ID selected for Contact ID Alarm Code Other zone types still use their own contact ID For example if Generic fire alarm is selected for Contact ID Alarm Code for the new dialer group 1 then all the automatic alarm zones and m...

Page 29: ... to PAD5 settings As for Gated NAC Conventional and Gated NAC Synch Strobes Horns when there is a NAC source available the PAD5 NAC is synchronized to the NAC source if their notification event types are selected as the same If their notification event type are selected differently or the NAC source is missing the PAD5 NAC works as degraded mode which is working according to PAD5 settings Below sc...

Page 30: ...FXS901 User Manual A6V10336897_d_en_ 29 49 ...

Page 31: ...nfigure File PC FACP NOTE First time users may get an Install New Hardware Wizard window If so follow steps in section 2 3 to install the USB drivers 3 Enter password and click OK 4 Select the configuration file and click Open Downloading starts 5 When downloading is finished the following information is displayed Click OK to restart the FACP If you do not click OK FACP will count down 30 seconds ...

Page 32: ...d to be modified it is suggested to upload them to PC for easier modifying 1 Connect the communication cable between PC and FACP 2 On the tool click Edit Upload Configure Files FACP PC 3 Enter password and click OK Uploading starts 4 When uploading is finished the following information is displayed Click OK to close it ...

Page 33: ...be downloaded to the panel 1 Connect the communication cable between PC and FACP 2 Select Download System File PC FACP from Edit menu NOTE First time users may get an Install New Hardware Wizard window If so follow steps in section 2 3 to install the USB drivers 3 Enter password and click OK 4 Select the system file img and click Start ...

Page 34: ...ted If the Keep Engineering Data File checkbox is enabled the exiting configuration file on the panel will not be reset Otherwise the configuration file on panel will be reset to default 5 Downloading is processing 6 When downloading is finished the following window is displayed Click OK to restart the panel ...

Page 35: ...load the system file from PC to FSD remote annunciator 1 Click Edit Download FSD System File 2 Select communication port and click Select File to select a system file Click Start and downloading will start 3 When downloading is finished the following information is displayed Click OK to close it and reset FSD ...

Page 36: ... PC to RPM 1 Click Edit Download RPM System File 2 Select a RPM address which must be the same as the setting on RPM and then select a RPM system file Click Start NOTE If the RPM address on PC is not same as the setting on RPM the following information is displayed 3 When downloading is finished the following information is displayed ...

Page 37: ...36 49 A6V10336897_d_en_ 4 When the following window is displayed click OK to close it ...

Page 38: ... Edit Download LED Annunciator System File 2 Select an address which must be the same as the setting on LED annunciator and then select a LED Annunciator system file Click Start NOTE If the LED Annunciator address on PC is not the same as the setting on LED Annunciator the following information is displayed 3 When downloading is finished the following information is displayed ...

Page 39: ...the panel connects to on the UFP line If the panel connects to only one device on the UFP line the downloading time is about 6 7 minutes If a panel connects to 6 devices then the updating time is about 25 30 minutes 4 Wait until the following window displays then click OK to close it ...

Page 40: ..._d_en_ 39 49 5 23 HOW TO SYNCHRONIZE FACP TIME This function is used to synchronize the time between PC and FACP time 1 Click Edit Sync FACP Time 2 Enter password and click OK 3 When the sync is finished click OK to close the window ...

Page 41: ...is function is used to view all components of the system for user 1 Click Edit Export to txt 2 Input file name and click Save 3 When the export is finished the following window is displayed Click OK to close it 4 Open the txt document to check all the devices ...

Page 42: ...FXS901 User Manual A6V10336897_d_en_ 41 49 ...

Page 43: ...History File FACPgPC and then select one file format Xls or Txt 2 Enter password and click OK 3 Enter a file name and click Save Uploading starts 4 When uploading is finished the following information is displayed Click OK to close it 5 When the following window is displayed click OK to view the history file or click Cancel to return to FXS901 ...

Page 44: ...it Upload Sensitivity Report FACPgPC and then select one file format Xls or Txt 2 Enter password and click OK 3 Enter a file name and click Save Uploading starts 4 When uploading finishes the following information is displayed Click OK to close it 5 When the following window is displayed click OK to view the sensitivity report or click Cancel to return to FXS901 ...

Page 45: ...4 49 A6V10336897_d_en_ 5 27 HOW TO UPLOAD LOG FILE This function is used to upload the log file from FACP to PC 1 Select Upload log file FACPgPC from Edit menu 2 Select the desired log file and click OK ...

Page 46: ..._en_ 45 49 5 28 HOW TO CHANGE LANGUAGE FXS901 software provides three languages English Spanish and French 1 Click Edit Language Select the desired language and then the language is changed accordingly No need to restart the software ...

Page 47: ...OW TO BACKUP PANEL This function is used to backup the information on the current panel 1 Click Edit Backup Panel 2 Click Save As Select a target folder and enter a name for the backup file in the popup window and click Save Backup ...

Page 48: ...is used to restore the backup settings to the current panel 1 Click Edit Restore panel 2 Click Select file select a backup file and click open 3 Click Restore When the following window appears click OK to restart the panel or wait for 15 seconds for the panel to restart automatically ...

Page 49: ...ressing the programmable key on the panel NAC won t be activated no matter how users configure the control tree Manual active doesn t work as well The system returns to normal by pressing the programmable key again and the NAC act as they should be Fire drill Only for US Drag desired alarm zones to the programmable key group in the tool By pressing the programmable key on the panel the zone events...

Page 50: ...FXS901 User Manual A6V10336897_d_en_ 49 49 5 32 HOW TO VIEW THE VERSION OF FXS901 Select About from Help menu The version information of FXS901 is displayed ...

Page 51: ...Xibeiwang Haidian District 100094 BEIJING China 86 10 64768806 www siemens com buildingtechnologies Beijing Siemens Cerberus Electronics Ltd 2019 Technical specifications and availability subject to change without notice Doc No A6V10336897_d_en_ Manual FXS901 Date 2019 12 10 ...

Reviews: