Installation
9229 0106 176 0-
31
2020-09-18
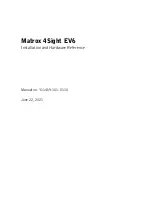
Removing the auxiliary
switch
• Press down the upper and lower pressure surfaces (1) at the same time and flip
up auxiliary switch (23) and remove it towards the front (2) (see Fig. 31).
• Both auxiliary switches can also be removed at the same time.
23
Auxiliary switch
33
Side plate
44
Switching lever cam
45
Switching lever for auxiliary switch
*
Recess in switching lever
Snap on the auxiliary
switch
• Connect the auxiliary switch (23) in accordance with the circuit diagram.
• If present, remove the label from the switching lever (45)
• Insert a screwdriver in the recess (*) in the switching lever (45) for the auxiliary
switch (23).
• Insert auxiliary switch (23) firstly with the hook and then with the holding latch
into the intended openings of the side wall, or the already mounted auxiliary
switch.
• At the same time, move the switching lever (45) with the screwdriver so that the
switching lever (45) fits easily in the opening in the cam (44) (see Fig. 32).
• The correct position is achieved when the switching lever (45) can only be
moved slightly back and forth.
If the switching lever (45) can be moved far in one direction after installation, the
switching lever (45) is not inserted in the cam (44) and the above steps must be re-
peated.
Wiring the connectors for
the electronic controller
The electronic controller (24) for the vacuum contactor is the interface to the custom-
er-side connection. Protection with appropriate fuses is performed by the customer.
Use the respective 2-pole plug or screw connectors supplied in the accessory pack
according to the supplied circuit diagram.
To protect against the effects of oscillations and vibrations, the connectors screwed
onto the socket are wired (see also Fig. 34 and Fig. 35):
• without shear, tensile, or compressive stresses
• without exceeding the permissible connector cross-sections
• under consideration of the potential voltage drops due to long cables
• with cables routed in an S configuration
• using suitable fastening elements to secure the cables
• Screw on the connectors hand-tight with a flat-head screwdriver (size 0.6 x 3.5).
Fig. 32
Snap on the auxiliary switch,
Fig. 33
Auxiliary switch with wiring
Summary of Contents for 3TM
Page 12: ...Transport storage packaging 12 9229 0106 176 0 2020 09 18 Blank page ...
Page 26: ...Description 26 9229 0106 176 0 2020 09 18 Blank page ...
Page 36: ...Installation 36 9229 0106 176 0 2020 09 18 Blank page ...
Page 48: ...Maintenance 48 9229 0106 176 0 2020 09 18 Blank page ...
Page 50: ...Index 50 9229 0106 176 0 2020 09 18 Blank page ...