18
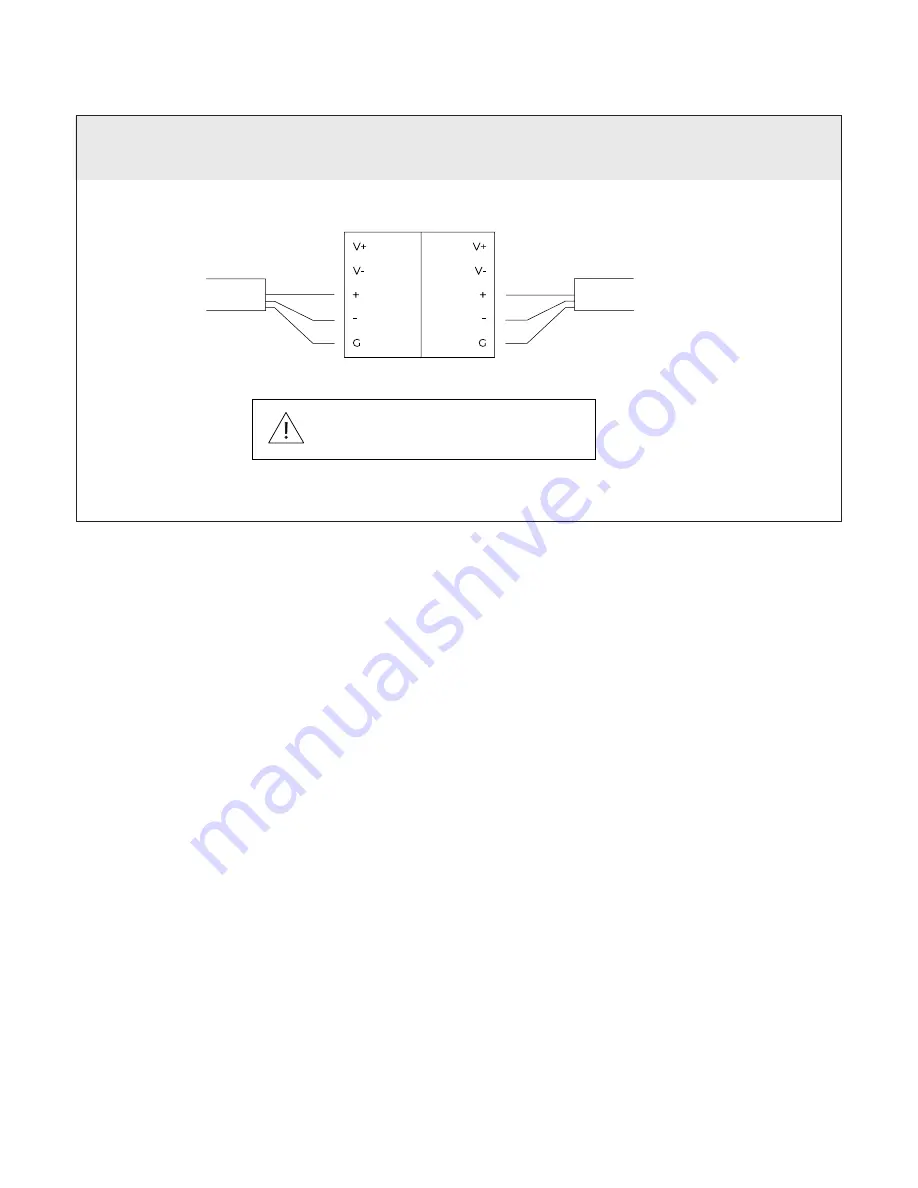
Pre-wire
Shade
Connect data only. DO NOT connect
110v AC power to terminal block.
Wiring - 110v AC - 485
WIRING
- 110v AC - 485
RJ45 DATA CABLE FOR DATA HUB ONLY
Page 1: ...Doc 400129 INSTALLERS Please leave this manual with the owner Indoor Shades Pocket Coupled Duo Installation Instructions 375 475...
Page 2: ...2...
Page 3: ...Pocket Coupled Duo Shades Installation 6 10 Side Sill Channels Installation 11 14 Wiring 24v DC 485 15 16 Wiring 24v DC RTS 17 Wiring 110v AC 485 18 Programming 485 19 Programming RTS 20 Troubleshoot...
Page 4: ...s list Pocket Coupled Duo shades 375 Roll 475 Roll 275 Roll Coupler Idler Side Brackets Please note all the Serial No s on your Shade motors See the last page on these instructions my my Motor Side Br...
Page 5: ...5 Leveling Shims used if the window frame is out of level Connect to shade brackets before installation Note do not use more than 2 leveling shims per bracket Leveling Shims LEVELING SHIMS OPTIONAL...
Page 6: ...Pocket Coupled Duo shades 0 46 1 Install the motor side bracket inside of the pocket with a distance of 0 46 inches from the wall backside 2 Install the idler side bracket inside of the pocket with a...
Page 7: ...To install the roll First insert the idler side of the roll in the idler side bracket Making a slight pressure to the idler side push up the motor side of the roll until lined up with the motor side...
Page 8: ...8 5 Repeat the same step 4 for the shades below Parts list Pocket Coupled Duo shades INSTALLATION POCKET COUPLED DUO SHADES...
Page 9: ...nserting the idler side of the roll in the idler side bracket Making a slight pressure to the idler side push up the motor side of the roll until lined up with the motor side bracket Parts list Pocket...
Page 10: ...ons you have succesfully installed the shades If you have Side Channels and need to install those keep following the instructions further on next page Side Channels Installation INSTALLATION POCKET CO...
Page 11: ...e of the right end bracket Repeat process on the left end bracket For the middle Side Channels use the edge of each shade to centralize the channels between the shade gaps SIDE CHANNELS INSTALLATION I...
Page 12: ...12 2 Install screws through the pre drill holes SIDE CHANNELS INSTALLATION Side Channels Installation...
Page 13: ...13 3 Install covers for each Side Channel SIDE CHANNELS INSTALLATION Side Channels Installation...
Page 14: ...14 4 You are done with installing the shades successfully We can now move to Wiring and Programing the Shades SIDE CHANNELS INSTALLATION Side Channels Installation...
Page 15: ...e 300 275 Shade 150 375 Shade Description Positive 24VDC Negative 24VDC 485 Data Positive 485 Data Negative 485 Data Ground Description Positive 24VDC Negative 24VDC 485 Data Positive 485 Data Negativ...
Page 16: ...re does not have a third insulated data conductor for the 485 ground terminate the wire as shown below Use the same termination on both ends 22 AWG Jumper wire Pre Wire Shade Pin 1 Pin 8 RJ45 Pin 1 2...
Page 17: ...for maximum wire lengths If the motors are powered using a Power Distribution Enclosure connect the motors to the 24v DC and 24v DC ports on the terminal blocks The RS485 ports are unused Wire Gauge A...
Page 18: ...18 Pre wire Shade Connect data only DO NOT connect 110v AC power to terminal block Wiring 110v AC 485 WIRING 110v AC 485 RJ45 DATA CABLE FOR DATA HUB ONLY...
Page 19: ...N tab on the top left 6 Press the spyglass to auto discover motors on the 485 network may have to press it more than once 7 Click on the motor you want to program 8 Name the motor 9 Right click on the...
Page 20: ...ed in the desired groups NOTE Each RTS motor can be paired with 12 unique transmitters PROGRAMMING STEPS must follow in order Step 1 Fine tune lower limit Step 2 Assign shades to groups Step 3 Pair gr...
Page 21: ...e steady on or flashing If no light is visible make sure power is available via the bus power supply or PoE SIFI is not on the local network Use the service keypad if available to validate the 485 net...
Page 22: ...is out of place or drained Check that the red LED on the remote flashes when buttons are pressed On the installation remote pry off the back by hand and ensure the battery is fully seated in the batte...
Page 23: ...S Please keep a note of all the Serial No s on your shade motors OR for larger shade orders refer to your Sales Order document for the list Room Room Shade 1 Shade 1 Shade 3 Shade 3 Shade 2 Shade 2 Sh...
Page 24: ...Screen Innovations 9715 B Rd Suite 400 Austin TX 78758 512 832 6939 www screeninnovations com 400129 v 1 0 7 July 2020...