Si-tex Explorer Nav Pro User Manual Download Page 40

40

Chart Plotter - User Manual
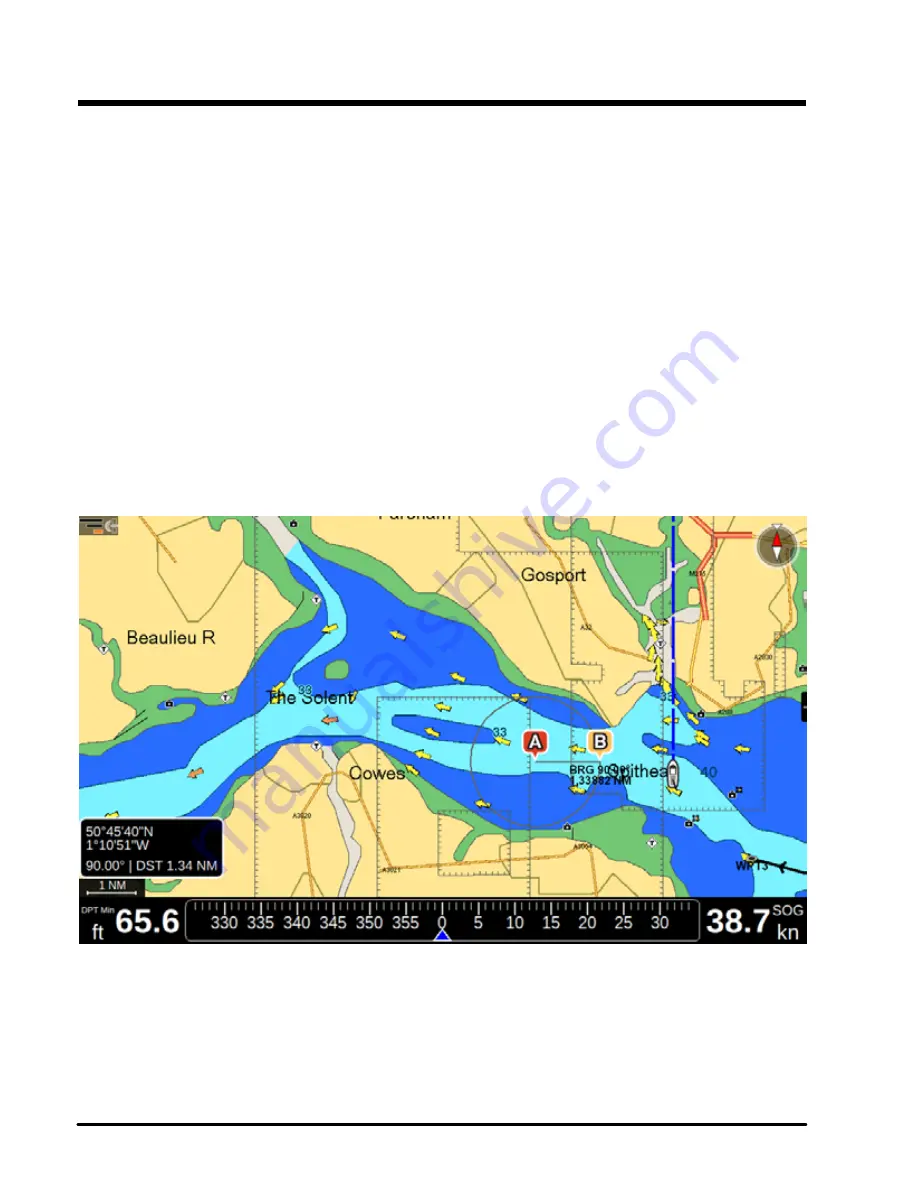
8. A-B function

The A-B function allows measuring the distance and bearing between two points on the map 
page. 
You can access the A-B function in the contextual menu of map.

1.  Open the map page
2.  Press [ENTER]
3.  Select “A-B”
4.  Press [ENTER]. The “A” point is positioned on the cursor position.
5.  Use the joystick to move the cursor to the desired place. You will see the “B” point at 

the other end of line.

The distance between “A” and “B” (DST) and the Bearing (BRG) to reach “B” from “A” are 
displayed 

To exit A-B mode press [ENTER] or [CLEAR]. This action deletes the “A” and “B” points and 
the connecting line.

Fig.8 – A-B function 

Summary of Contents for Explorer Nav Pro

Page 1: ...Chart Plotter USER MANUAL Explorer Nav Pro...

Page 2: ......

Page 3: ...de position 31 7 2 Routes 32 7 2 3 Editing a Route s color name and description 33 7 2 4 Checking a route 33 7 3 Waypoints 34 7 3 1 Editing waypoint s position 34 7 3 2 Changing the order of waypoints...

Page 4: ...18 6 Transducer setup 66 19 System messages 68 20 Updates 69 21 Acronyms and definitions 70 22 Technical specifications 76 23 Contextual menu diagram 77 24 Analytic index 79...

Page 5: ...ed to carry on board and use the officially published and approved nautical charts Please be aware that the serial ports are not opto isolated and therefore the peripherals are electrically connected...

Page 6: ...e controller 2 1 Keyboard 1 Function keys F1 F4 are special keys Each key can perform two functions A short press performs the function labeled on the unit face A long press executes a second function...

Page 7: ...f the map 7 ENTER is used to confirm an action or a selection When on map page pressing Enter opens the contextual menu of a map object 8 CLEAR exits from the current menu or if you are on map page an...

Page 8: ...Input the correct PIN which you can find on the backside of your remote controller 6 Press the remote controller joystick to activate it On the status bar left top of the page you will see the remote...

Page 9: ...n the map of chart plotter showing the pointed direction Compass Calibration The remote controller s inner compass needs to be calibrated 1 Simultaneously press BACK and COMPASS on the remote controll...

Page 10: ...anguage units time zone and time format This information can be changed at any time in the General Settings menu 1 Switch chart plotter ON and wait for the first Setup Page to appear on the screen 2 S...

Page 11: ...the geographical names of Italy will be in Italian language while other national territories will be in English At the same time all objects info pages will be in Italian International all map names...

Page 12: ...ect Time Zone and press ENTER 6 Select the desired zone and press ENTER to confirm 7 Select Daylight Saving and press ENTER to enable it it must be enabled disabled manually To change time format 1 Op...

Page 13: ...ange displayed page 1 Press MENU 2 Select Page 3 Press ENTER 4 In the widget popup select the desired page by moving joystick cursor and press ENTER 4 Pages widget pop up Aquicker way to switch betwee...

Page 14: ...arked with blue and red arrows respectively The compass bar can be switched off in the General Settings Databox Settings page The position box appears on the left bottom of the map and shows the lat l...

Page 15: ...ter User Manual Fig 4 2 2 Map Page Menu 4 3 Fish Finder page The Fish Finder page is available only if a Black Box Fish Finder accessory is connected to the Chart Plotter Fig 4 3 1 Fish Finder page si...

Page 16: ...art Plotter User Manual For more details about Fish Finder see Par 18 Press MENU to open Main Menu of the Fish Finder page Fig 4 3 2 Fish Finder Menu 4 4 GPS Status page Fig 4 4 Example of GPS Status...

Page 17: ...performance Each parameter presented with a scale divided into three zones green acceptable value yellow warning red critical If the value of any of those parameters exceeds the permissible range the...

Page 18: ...the map In order to operate on the Fish Finder view press MENU twice To Change the active view with remote controller 1 Press MENU twice OR 2 Long press SWITCH WHEEL FUNCTION You will see a green tran...

Page 19: ...n turn off data window display customize data boxes content or remove some of them You can choose to show either 2 columns 10 data boxes or 1 column 5 data boxes 1 Press MENU 2 Select General Settings...

Page 20: ...nding Your Boat Position The most common use of the chart plotter is to show your boat s current location You can home the cursor to the boat using CLEAR This would center the map view on the boat pos...

Page 21: ...on Chart Tooltip and press ENTER 5 To leave Full info page and get back to map press CLEAR Fig 5 3 Object s full info contextual menu on Map Full info page lists information about the selected object...

Page 22: ...gray line is shown on the screen connecting the destination with the initial boat s position departure point All navigation data in data window such as BRG TTG DST XTE is related to the destination W...

Page 23: ...R A new empty route will be created with default color and name 6 Press ENTER on the desired route to open its page for further editing adding waypoints editing route s name description and color To c...

Page 24: ...press ENTER 2 Select Default color or Default prefix 3 Save new default color by pressing ENTER on the selected color OR 4 Save new default prefix by inserting it into the keyboard and pressing OK Re...

Page 25: ...ess ENTER to switch this option off 6 3 1 Route following optimization Under normal route navigation without optimization the vessel is required to approach a waypoint within a certain distance arriva...

Page 26: ...ypoint When in navigation on an active route you can also append a waypoint at the end of the route by clicking anywhere on the map 1 Place cursor on the desired location on the map and press ENTER 2...

Page 27: ...in the route 2 Press ENTER 3 Select Extend 4 Press ENTER 5 Move cursor using joystick to place new waypoint 6 Press ENTER to save waypoint s position 6 4 Easy routing You may want to create a route in...

Page 28: ...n information about your boat parameters safe corridor depth height length 1 Place cursor on a route leg a line that connects two waypoints 2 Press ENTER 3 Select Easy routing 4 Press ENTER NOTE1 You...

Page 29: ...t of Route All the user data can be accessed both from map and from dedicated page in Main Menu Operating on map is possible via contextual menu When you press ENTER on map contextual menu appears Usi...

Page 30: ...r Manually 3 Press ENTER Use fix creates event on fix position Manually opens Lat Lon keyboard for inputting coordinates to add new mark Fig 7 1 1 Marks on map To add a mark on map 1 Place cursor on m...

Page 31: ...sor over mark 2 Press ENTER 3 In the contextual menu select Name and description or Color and symbol 4 Press ENTER 5 Introduce changes and press ENTER to save or CLEAR to exit without saving changes 7...

Page 32: ...ursor to Filter by and press ENTER to open filter window it has a color palette and name input field 2 Select color by pressing ENTER 3 Move cursor to the name field and press ENTER to open keyboard 4...

Page 33: ...Select More and press ENTER 5 Select Edit name and description or Edit color 6 Press ENTER 7 2 4 Checking a route The selected route can be checked in order to find out if it is safe for navigation 1...

Page 34: ...r menu 3 Select the way to create a waypoint Use fix or Manually 4 Press ENTER Fig 7 3 Waypoints page Use fix creates waypoint on fix position Manually opens Lat Lon keyboard for inputting coordinates...

Page 35: ...waypoints in a route Sometimes you might want to change the order of waypoints in a route to change the route navigation order You can easily do that by cut paste operation in the list of waypoints 1...

Page 36: ...ec 1 min 5 min 10 min or distance 0 01 10 0 Nm Setting a short time distance interval between track points is best suited to navigate within a close or complex environment while a greater time distanc...

Page 37: ...ct Tracks 3 Select a track in list and press ENTER 4 Select Convert to route 5 Press ENTER 7 4 4 Editing Track s color name and description 1 On map page press MENU 2 Open Tracks 3 Select a track in l...

Page 38: ...NOTE Events and waypoints prefix cannot be changed Displaying user data To enable or disable all Tracks Marks or Routes displaying on the map screen 1 Open Marks Tracks or Routes page 2 Select Hide a...

Page 39: ...il message Procedure completed appears on your screen To import user data from a micro SD card to your device 1 Insert a micro SD card to the slot of the chart plotter 2 Press MENU to open main menu 3...

Page 40: ...ap page 2 Press ENTER 3 Select A B 4 Press ENTER The A point is positioned on the cursor position 5 Use the joystick to move the cursor to the desired place You will see the B point at the other end o...

Page 41: ...menu NOTE Search function requires detailed C Map chart unless you search Marks In the map page 1 Press MENU 2 Select Search 3 Press ENTER 4 Select the object to search and press ENTER You can search...

Page 42: ...search the longer it takes You can interrupt search operation by pressing ENTER on the Searching status window 6 The full info page of the selected object opens where you can read information about th...

Page 43: ...Press the Tide Station icon on the map 5 In the Full info page press Tide Graph Fig 10 Tide Station on Map On the Tide Graph page you can see the information about sunrise and sunset time for the sel...

Page 44: ...select the tide graph You can move cursor along the tide graph to see its height for the specific time pressing left or right Press UP in order to move cursor back to the Change date button Press CLE...

Page 45: ...ed from any page by pressing MOB key of the chart plotter The MOB mark is placed on the current fix position and at the same time navigation towards the MOB position starts To locate MOB position on m...

Page 46: ...xternal alarm is a signal triggered by the plotter on a specific wire which can be used by an external device as a hooter or a buzzer When any alarm condition occurs the pin is switched from High Impe...

Page 47: ...ercentage of water level is lower than the one set in alarm settings Black water tank alarm the percentage of black water level is higher than the one set in alarm settings AIS alarms The AIS alarms a...

Page 48: ...inder transducer is too shallow Deep water alarm triggered when depth detected by Fish Finder transducer is too deep Water temperature alarm triggered when water temperature detected by Fish Finder tr...

Page 49: ...6 Move joystick RIGHT and press ENTER to change COG and SOG 7 Press ENTER to save the selected values or CLEAR to close without saving values Open map page and press CLEAR to get to home mode fix pos...

Page 50: ...14 1 Export Import User Settings Exporting and importing user settings to micro SD card can be done on Log Backup page 1 Insert micro SD card to the chart plotter 2 Open General Settings page 3 Selec...

Page 51: ...a function key you want to customize 4 Press ENTER to open list of possible values 5 Move the cursor UP DOWN to select the desired function and confirm your choice by pressing ENTER or cancel and clos...

Page 52: ...can be changed the scale is from 1 to 10 By default cursor speed is 5 Try different cursor speed to set up the most comfortable cursor speed 1 Open General Settings page 2 Select Keyboard 3 Press ENTE...

Page 53: ...ge 2 Select Ship Profile 3 Press ENTER Fig 14 5 Ship Profile page Ship type allows you choosing your boat s icon on the map Safe depth safe height safe corridor information is used for check route fun...

Page 54: ...mize its length infinite by time by distance To set the Course predictor length from 1 to 120 minutes 1 Open Course Predictor page 2 Select Time 3 Press ENTER 4 Move cursor down and select Course line...

Page 55: ...ixed with north up or it can be oriented as to keep the Route Up destination or course up Otherwise you can choose a fixed custom map orientation rotating the map using the remote control 1 On map pag...

Page 56: ...EA 0183 data by selecting one of the options NMEA 0183 device 1 Select NMEA 0183 device 2 Press ENTER 3 Move cursor down and select Configure baud rate 4 Press ENTER 5 Select the desired baud rate and...

Page 57: ...lank the connection may be interrupted and no data is being received Use Resume Pause button at the top bar of the page to pause or continue after pause data displaying 16 4 NMEA2000 port CAN bus is a...

Page 58: ...ay range 10 NM The display range is the range around your boat where Targets become active You can change the settings for display range 1 Open AIS page 2 Select Settings tab 3 Press ENTER 4 Move joys...

Page 59: ...select the classes you want to be displayed on map and on the AIS Targets page AIS Target information On the AIS Targets page you can access the following information Last Position Status Call Sign IM...

Page 60: ...from the map 1 Press ENTER on the AIS icon 2 Select Full info 3 Press ENTER AIS Tracks Each AIS Target within the display range can be tracked The track of AIS Target can be saved on the chart plotter...

Page 61: ...er it is converted into a voltage and is amplified by the receiver processed and sent to the display 18 1 Switching on the Fish Finder Before you can see the information from Fish Finder on the screen...

Page 62: ...h on which the Fish Finder is operating It is a scale which reflects the depth of the area being displayed 8 Variable depth marker VDM is a horizontal white line on the echogram with a depth label The...

Page 63: ...the vertical white line moving along the echogram The scrollable history is limited and covers around 2048 echoes In order to return the vertical time marker to the current time simply press CLEAR To...

Page 64: ...ion to the point 1 Move vertical time marker with joystick to place it in the desired position 2 Press ENTER 3 Select Go To Position 4 Press ENTER Navigation will begin to the point where your boat wa...

Page 65: ...3 Press ENTER 4 In the popup that appears choose the desired mode Auto or Manual for Gain Auto Manua l or Bottom Lock for Range The Manual and Bottom Lock adjustment can be done on Sensitivity page 1...

Page 66: ...gain gradually as the depth increases This is for the purpose of filtering out surface clutter Surface noise filter implements an advanced time varying filter that allows suppressing the surface clut...

Page 67: ...here a positive negative offset to display correct value on the Fish Finder screen Calibrate auxiliary water temperature calibrates the Aux Temperature sensor Using the readings from a precise temper...

Page 68: ...der by date filter by type Warnings or Alarms filter by date You can change the order of system messages in list from new to old and vice versa You can also filter them by date by choosing Since and T...

Page 69: ...20 Updates You can check your device Software version in the Device Info page 1 Press MENU 2 Select General Settings 3 Press ENTER 4 Select Device Info 5 Press ENTER Ask your customer support center f...

Page 70: ...code BRG Bearing Angle between the North True or Magnetic and a destination The horizontal direction of one terrestrial point from another referring to the North True or Magnetic It is often used to i...

Page 71: ...the quality of the position fix signal Fuel Consumption Rate Estimated fuel consumption rate per hour of an engine boat referred to its relative estimated cruising speed GNSS Global Navigation Satell...

Page 72: ...magnetic north the difference expressed in degrees East or West between the compass north and the magnetic north Magnetic Variation Angle between the magnetic and geographic meridians at any place exp...

Page 73: ...is the Active Route which is shown by a straight line and arrows to indicate the direction SCALE Allows the display of Map Scale magnitude of the reference scale expressed in the actual unit of measur...

Page 74: ...e on the chart identified by its coordinates and displayed on the screen with a reference symbol see Mark Waypoint UTC Universal Time Coordinated Time scale based on the rotation of the earth that is...

Page 75: ...l redundancy and reduce operational restrictions Waypoint Any point to which one intends to navigate A sequence of Waypoints makes up a Route plan Zoom In Shows more detail in a smaller area Zoom Out...

Page 76: ...2W typical Supply Voltage 10 35 Vdc Cartridge slot 1 x micro SD Card not included Back lit keyboard Integrated remote control receiver radio IF 2 4 Ghz Waterproof IPx6 Storage temperature 20 80 C Ope...

Page 77: ...Easy routing 5 Edit Color 6 Hide 7 Delete track 8 A B 9 Full info Track in navigation 1 Stop nav 2 Go To 3 Save Mark 4 New route 5 New Easy routing 6 Edit Color 7 Hide 8 Delete track 9 A B 10 Full in...

Page 78: ...Go To 2 Move 3 Edit position 4 Name and description 5 Color and symbol 6 New route 7 New Easy routing 8 Delete 9 Move to vessel 10 A B 11 Full info Mark in navigation 1 Stop nav 2 Go To 3 Move 4 Edit...

Page 79: ...76 Grounding alarm 46 H HDOP alarm 47 Heading line 54 Hide track 37 Home 7 14 20 49 54 I Incoming data 57 Insert waypoint 26 Interference 67 K Keel offset 66 Keyboard 6 24 30 32 34 38 39 52 65 76 L La...

Page 80: ...MAMC1XXAE020 MAMC1XXAE020q...

Reviews: