3. If a 12 Vdc (at 100 mA) power source is to be used (such as Shure’s PS20/PS20E),
plug a dc adapter cable (not supplied) into the DC power input on the side of the
receiver. The 9-volt battery need not be removed during 12 Vdc operation.
NOTE: The VP3’s flexible
1
/
4
wave antenna works in tandem with Shure’s unique
reflective counterpoise audio output cables* to achieve superior RF performance.
These specially designed cables function in an audio capacity and form an integral
part of the antenna system as well. The result is extended operating range and
greater immunity to signal “dropouts.”
*WA460: TA3F to miniature phone plug [furnished] or WA450: TA3F to 3-pin XLR [optional].
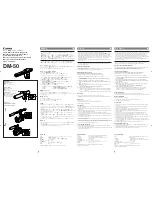
TRANSMITTER SETUP AND CONNECTIONS
T2 or EC2 Hand–Held Microphone-Transmitter
1. Make sure the transmitter POWER ON/OFF switch is in the OFF position.
2. While holding the upper part of the transmitter, unscrew (turn counterclockwise) the
handle and slide it downward, as shown below in Figure 3.
3. Insert a fresh 9 V alkaline battery into the compartment. Observe proper battery
polarity (+ and –). Close the handle.
IMPORTANT: When replacing the battery, use only 9-V alkaline battery or
heavy-duty, rechargeable 8.4-V nicad battery. Carbon-zinc and zinc-chloride
batteries are not recommended.
T1 or EC1 Body-Pack Transmitter
1. Press down on the OPEN side of the battery compartment cover and slide it in the
direction indicated until it flips open, as shown in Figure 4.
2. Insert a fresh 9-V alkaline battery. Make sure the battery polarity (+/–) is correct.
Close the compartment cover.
IMPORTANT: Use only 9 V alkaline battery or heavy-duty, rechargeable 8.4-V
nicad battery. Carbon-zinc and zinc-chloride batteries are not recommended.
3. Plug the connector end of the lavalier microphone cable into the 4-pin connector on
the transmitter. See Figure 5.
4. If you are using a lavalier microphone, press the microphone into the necktie
mounting block and clip it to your tie or lapel, or mount the microphone with a
sew-on mounting clip.
5. Attach the transmitter to your belt with the belt clip.
OPERATING THE SYSTEM
1. Slide the receiver POWER switch to the ON position. The POWER/RF light on the
receiver will illuminate green.
2. Set transmitter POWER and MIC switches to the ON position. The green POWER
light on the transmitter will illuminate, indicating a good battery.
3. Verify that the POWER/RF light on the receiver changes from green to orange and
is steadily illuminated. This indicates that the transmitter signal is being received.
NOTE: A flickering light indicates marginal operation.
4. While someone talks into the microphone, verify that the red AUDIO PEAK light on
the receiver flickers
only on loud peaks. If necessary, adjust the audio gain settings
according to the procedure in the
Audio Gain Adjustment paragraphs.
5. If monitor headphones are being used, turn up the headphones VOLUME control
so that the transmitted audio signal is heard. The headphones level may require
adjustment after the transmitter audio gain is adjusted.
6. While speaking into the microphone, move around the performing area to be used,
and make sure no problems such as radio signal loss occur.
7. When the performance or presentation is over, slide the receiver and transmitter
POWER switches to OFF to conserve battery power.
8. Note that during a performance or presentation, the transmitter can be
temporarily turned off using the MUTE switch. In this way, the transmitter RF power
remains on, and “popping” or “thumping” noise from microphone turn-on and-off is
avoided.
Audio Gain Adjustments
If the AUDIO PEAK light is constantly illuminated, the audio signal is too high and
may be distorted.
If the AUDIO PEAK light
never illuminates, the audio signal is too low and may be
noisy.
To correct these problems, adjust the transmitter as follows:
T1, T2, EC1 (Figures 6, 7): Using the supplied screwdriver, adjust the audio level
control on the transmitter until the receiver’s AUDIO PEAK light flickers red
occasionally in response to a typical audio signal from the source.
EC2 (Figure 7): Unscrew the handle on the hand-held microphone-transmitter
and locate the audio GAIN switch next to the battery holder. Select either the
LO gain or HI gain position so that the receiver’s AUDIO PEAK light flickers red
only occasionally in response to a typical audio signal from the source.
Changing VP3 Receiver Squelch Control Settings
The receiver SQUELCH control is factory-preset for operation in typical
environments. If squelch adjustment is necessary (as indicated by continued
illumination of the RF (orange) or PEAK (red) lights with the transmitter
off), proceed
as follows:
1. Position the system as it will be during use.
2. Using a screwdriver or fingernail, rotate the headphones VOLUME control on the
receiver full counterclockwise.
3. Turn the transmitter POWER switch
off.
4. If the RF or PEAK lights are on or are flickering, slowly turn the SQUELCH control,
located on the rear panel of the receiver, clockwise until the RF or PEAK lights on
the receiver turn off. Then continue turning the control clockwise
slightly past this
point. See Figure 8.
NOTE: Turning the SQUELCH control toward MIN
(counterclockwise) makes the
receiver more sensitive and increases the system’s range. However, it also allows
the microphone signal to become noisier before it is muted.
Turning the control toward MAX (clockwise) reduces the system’s range, but
prevents interfering signals and noise from overriding the squelch when the
transmitter signal is not present.
FEATURES AND CONTROLS
VP3 RECEIVER
(Figure 9)
1. Antenna: Receives RF signals from the transmitter. Pivot the antenna as required
to maintain vertical orientation.
2. Belt Clip: Allows the receiver to be worn on a belt or waistband. The clip can be
removed when the hook-and-loop (VELCRO type) mounting strip or “shoe” adapter
is used.
3. 12 Vdc Power Input Connector: Accepts 12 Vdc power from any well–filtered
12 Vdc (at 100 mA) power supply such as Shure’s PS/20 or PS/20E.
4. Headphones Output Connector: Insert headphones mini-plug (stereo/mono
compatible) into this connector to monitor the audio signal.
4
5
www.audiovias.com