background image


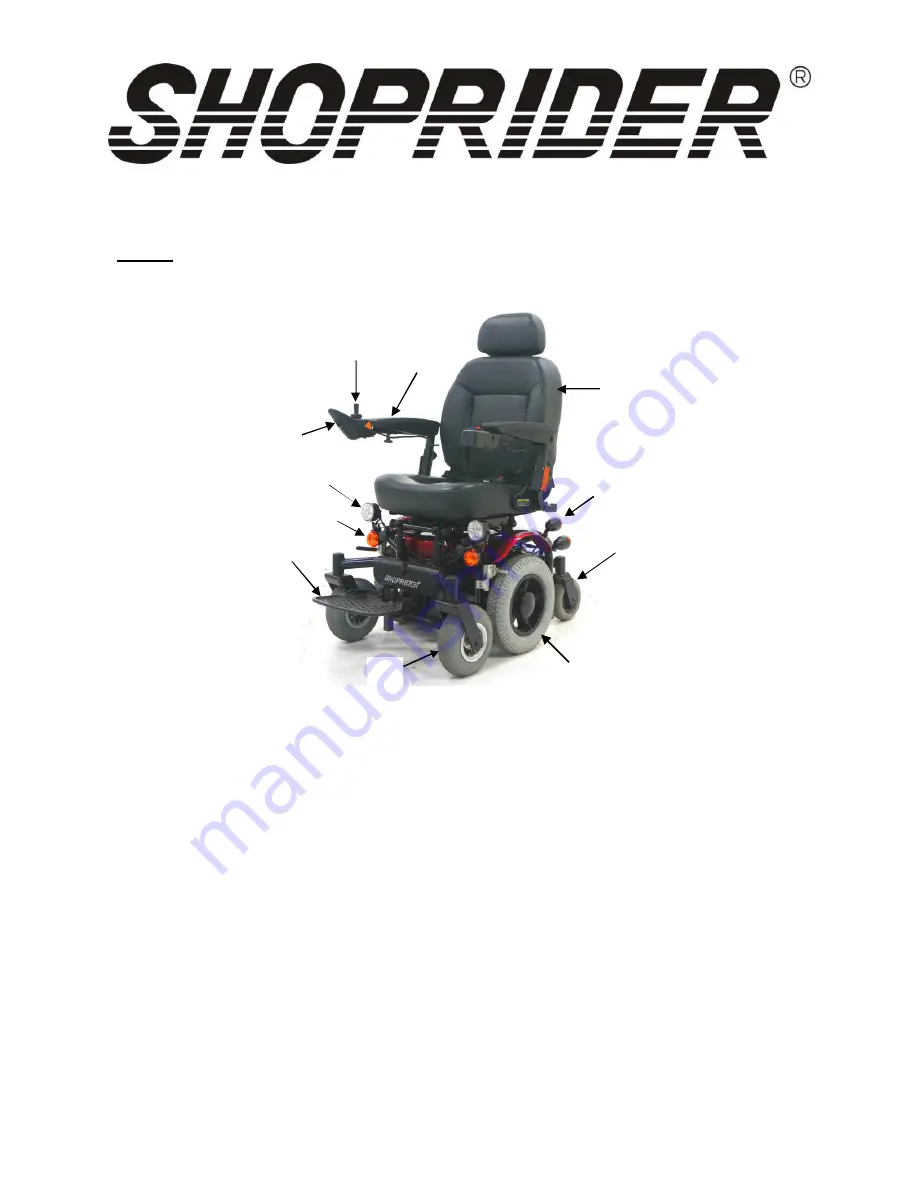
Feature Guide (888WNLLHD) 


(1) 

Armrests 

(2) 

Joystick Controller 

(3) 

Charging Port 

(4) 

Deluxe Reclining Captain Seat 

(5) 

LED Headlight 

(6) 

Indicator Light 

(7) 

Footplate 

(8) 

Front Castor  

(9) 

Drive Wheel 

(10) 

 Rear Castor  

(11) 

 Taillight 

Fig. 1 


11

10 

Summary of Contents for 888WNLLHD

Page 1: ...Mid wheel Powerchair USER MANUAL 888WNLLHD ATTENTION Please read your owner s manual before driving your Powerchair...

Page 2: ...YOUR POWERCHAIR 9 THE JOYSTICK CONTROLLER SHARK 10 GETTING READY TO DRIVE 12 LOCKING UNLOCKING THE JOY STICK CONTROLLER 13 ENGAGED DISENGAGED MODE 14 DRIVING YOUR POWERCHAIR 15 CARING FOR YOUR POWERC...

Page 3: ...s even when driving on uneven terrain hence the name 888WNLLHD Combine this with the programmable joystick controller adjustable arm assemblies flat free tires deluxe reclining captain seat easy acces...

Page 4: ...ed directly on the transmitting unit Examples include citizens band CB radios walkie talkies security fire and police transceivers cellular telephones and other personal communication devices NOTE Som...

Page 5: ...chair movement which could result in serious injury 1 Do not operate hand held transceivers transmitter receivers such as citizens band CB radios or turn ON personal communication devices such as cell...

Page 6: ...ff 7 Do not operate the Powerchair if the unit is in freewheel mode 8 Do not use on the road except when crossing between sidewalks 9 Do not sit on the Powerchair when in a vehicle but transfer to a v...

Page 7: ...ust be securely fastened onto battery terminals by the authorized dealer before using the unit Batteries must be tied down correctly and securely 26 Use caution and reduce speed when turning 27 Avoid...

Page 8: ...WNLLHD 1 Armrests 2 Joystick Controller 3 Charging Port 4 Deluxe Reclining Captain Seat 5 LED Headlight 6 Indicator Light 7 Footplate 8 Front Castor 9 Drive Wheel 10 Rear Castor 11 Taillight Fig 1 2 3...

Page 9: ...ted under the armrest controller bracket is a hand knob 2 By turning counter clockwise to release the controller bracket can be extended and reset in position by re tightening the hand knob HEIGHT The...

Page 10: ...uge 5 This is a 8 segment display which indicates if the Shark joystick is switched on and gives the state of charge of the battery Maximum Speed Indicator 6 This is a 5 segment display which indicate...

Page 11: ...Charging Port 10 for Off Board Charger Only plug a Shoprider certified charger into this port This port should not be used as a power supply for any other electrical devices Disregarding this will voi...

Page 12: ...g status you have to release the joystick immediately back to its center position If you do not release the joystick within five seconds the Battery Gauge will flash rapidly The Powerchair must be pow...

Page 13: ...ck the Powerchair controller While the Shark joystick is locked press the Power button to turn Shark joystick on All LED s will flash briefly The Battery Gauge LED s will them perform a slow right to...

Page 14: ...ARNING Always re engage the free wheeling device after use Failure to do so may result in injury Anti tip wheels The anti tip wheels are located at the rear of the Powerchair frame The Powerchair shou...

Page 15: ...ed floor etc 2 Always approach an incline head on not at an angle 3 Always travel at a speed that you are comfortable with and that you feel in complete control 4 Avoid sudden or erratic action with t...

Page 16: ...il in the breather cap located on the top of each worm gear DO NOT USE TOO MUCH GREASE Drips may stain or damage carpets furnishings etc It is recommended that the driving axles inside the drive wheel...

Page 17: ...ng battery capacity Any green LEDs lit indicate well charged batteries If only amber and red LEDs are lit the batteries are moderately charged Recharge before undertaking a long trip If only red LEDs...

Page 18: ...attery Information 1 Make sure to use two batteries of the exact same chemistry amp hours and capacity 2 Fully recharge new batteries prior to initial use 3 It is recommended that the batteries be cha...

Page 19: ...tery Fault Check the batteries and cabling Try charging the batteries Batteries may require replacing 3 Left Motor Fault Check the left motor connections and cabling 4 Right Motor Fault Check the righ...

Page 20: ...ph mph 11 12 6 9 7 5 Safe Climbing Angle Degree Fig 4 Range 3 per charge Battery Capacity Km mile 26 28 16 18 As a part of our ongoing product improvement initiative Shoprider reserves the right to ch...

Page 21: ...21 Notes...

Page 22: ...cts will be dealt with on a contingency liability basis Warranty is only valid when genuine SHOPRIDER parts are used All modifications on the Powerchair unless approved and authorized by SHOPRIDER wil...

Reviews: