background image

12

Getting Started

Welcome

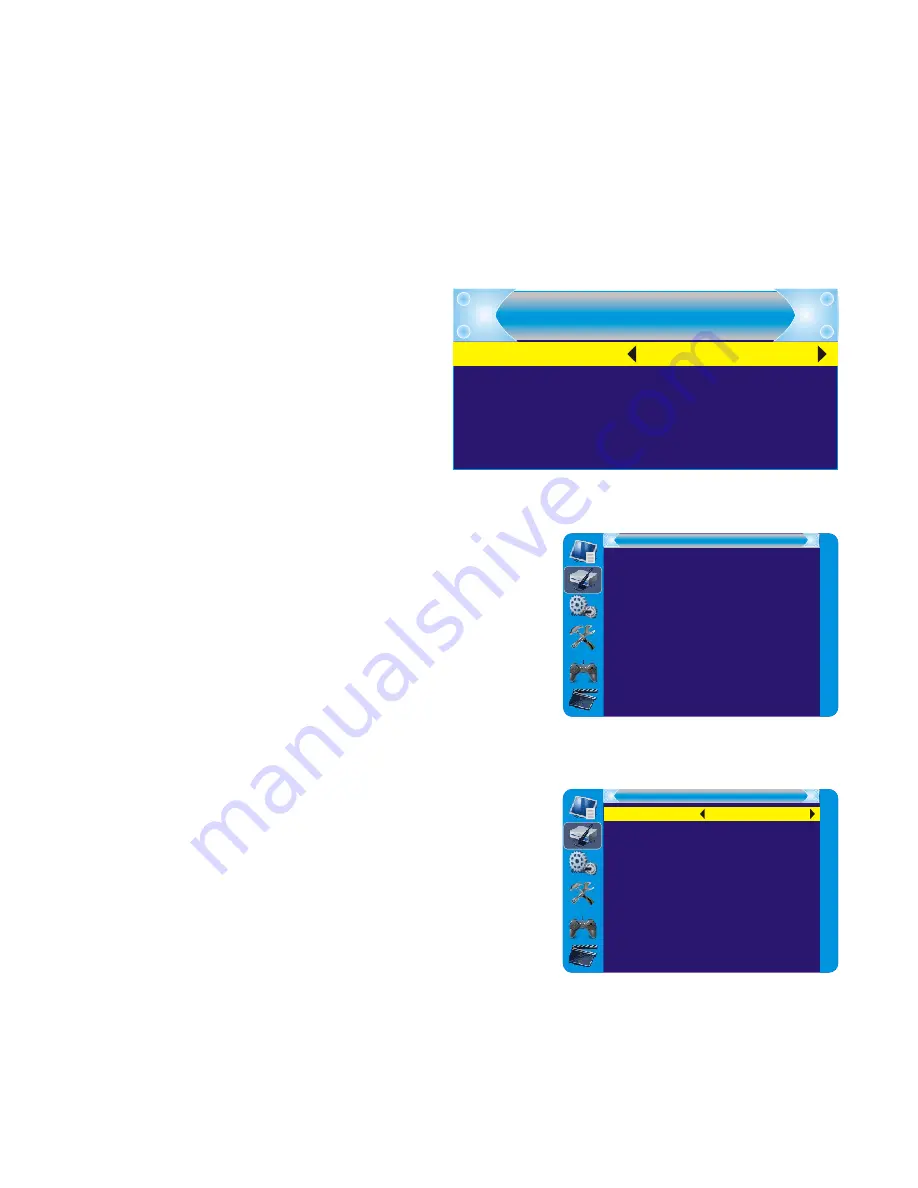
When you use the STB for the first 
time, the “Welcome” menu appears.
Press cursor button to setup the 
Region, Language, Display Mode
and Aspect Mode
Highlight “OK” and press the “OK” 
button to start channel search.

Installation

Press the “MENU” button to enter main 

1. 

menu
Press “UP” or “ DOWN “ button to highlight 

2. 

“Installation”, press “RIGHT” button to 
enter the Installation menu
Press “UP” or “DOWN” cursor button to 

3. 

highlight the desired item and press “OK” 
button to enter the sub-menu
Press “EXIT” button to exit

4. 

Auto Scan

Select the “Auto Scan”, press “OK” button 

1. 

to enter the Auto Scan menu
Press the cursor button to set “FTA Only”, 

2. 

then highlight “Search”, press the “OK” 
button to start auto scan

Welcome

Region

Language

Video Res olution

As pect Mode

Greece

Englis h

1080i

Auto

OK

Auto Scan

Channel Scan

Aerial Adjus tment

LCN

Ins tallation

Auto Scan

FTA Only

Search

No

Summary of Contents for SH-HDST01

Page 1: ......

Page 2: ......

Page 3: ...troduction 6 System Connection 8 Getting Started 10 Operation 12 Edit Channel 13 System Setup 15 Tools 18 Games 19 Rec Media 20 Timeshift Record 22 Troubleshooting 24 Specifications 26 HD Set Top Box Contents shintaro com au ...

Page 4: ...REVENT ELECTRIC SHOCK MATCH WIDE BLADE OF PLUG TO WIDE SLOT AND FULLY INSERT The apparatus should not be exposed to dripping or splashing and no objects filled with liquids such as vases should be placed on the apparatus Batteries should not be exposed to excessive heat such as sunshine fire or the like CAUTION Danger of explosion if battery is incorrectly replaced Replace only with the same or eq...

Page 5: ...ts appearance indicates damage or deteriorated insulation have it replaced by your service technician Power Cord Protection Power supply cords should be routed so that they are not likely to be walked on or pinched by items placed upon or against them paying particular attention to cords at plugs convenience receptacles and the point where they exit from the video product Ventilation Slots and ope...

Page 6: ...m should not be located in the vicinity of overhead power lines other electric light or power circuits or where it can fall into such power lines or circuits When installing an outside antenna system extreme care should be taken to keep from touching or approaching such power lines or circuits as contact with them might be fatal Installing an outdoor antenna can be hazardous and should be left to ...

Page 7: ...inet has been damaged F When the video product exhibits a distinct change in performance this indicates a need for service Replacement Parts When replacement parts are required have the service technician verify that the replacements he uses have the same safety characteristics as the original parts Use of replacements specified by the video product manufacturer can prevent fire electric shock or ...

Page 8: ......

Page 9: ...Blue button Press the button to play recording files in slow motion ...

Page 10: ......

Page 11: ......

Page 12: ...tion press RIGHT button to enter the Installation menu Press UP or DOWN cursor button to 3 highlight the desired item and press OK button to enter the sub menu Press EXIT button to exit 4 Auto Scan Select the Auto Scan press OK button 1 to enter the Auto Scan menu Press the cursor button to set FTA Only 2 then highlight Search press the OK button to start auto scan Welcome Region Language Video Re...

Page 13: ... selected On the STB will provide 5V power to antenna It will not provide power when Off is selected LCN If LCN Logical Channel Number Select function is activated you can t change the original number of TV channels by scanning You can activate deactivate the LCN function by setting the LCN Mode to on off Channel Scan Scan Mode Scan Band Ch No Search Frequency Bandwidth By channel UHF CH37 666000K...

Page 14: ...directly from on screen channel list This is displayed using the STB s main menu See Edit Channel in this manual for operation detail Accessing the Electronic Program Guide EPG Accessing the EPG of all channels Press EPG button to enter EPG menu 4 Press cursor button to switch between 5 channel list events schedule of the selected channel and now next events Press Green button to Time the 6 events...

Page 15: ...view the desired TV channel Use this menu to favor lock skip move sort delete and rename channel Press FAV button then press OK button to edit the FAV function Press color button then press OK button to edit the corresponding function TV Channel List Radio Channel List Group Rename Delete All Delete All Favorites Edit Channel BBC FOUR xxxxxxxx xxxxxx xxxx xxx TV Channel List FAV Lock Skip Move Edi...

Page 16: ... OK button 2 to listen to the desired TV channel Delete All Delete All Favorites In the Edit Channel menu select Delete All press OK button 1 A warning window appears 2 Select Yes press OK button to delete all channels Select No Press OK button to cancel deleting The operation of Delete All Favorites is the same as Delete All 1 2 3 4 5 6 7 8 Group Rename Fav group 1 Fav group 2 Fav group 3 Fav gro...

Page 17: ...YUV CVBS ...

Page 18: ...e Timer Setting This menu allows you to set the program timer You can set 8 timers Timer Mode Off Once Daily Timer Service Channel Record Wakeup Channel You can select a desired channel as the wakeup channel Wakeup Date Press OK then press numeric buttons to input date Wakeup Time Press OK then press numeric buttons to input the time Duration Press OK then press numeric buttons to input the durati...

Page 19: ...Channel Scan menu you must input the password You can set menu lock to on off Channel Lock Off AGE 10 AGE12 AGE16 AGE18 New Password To change the password Confirm Password To confirm the new password OSD Setting This menu allows you to set OSD Timeout OSD Transparency and load the default OSD setting OSD Timeout 1 10 OSD Transparency To set the OSD transparency to Off 10 20 30 40 Load Default OSD...

Page 20: ......

Page 21: ...K button to confirm Press YES button Game This menu allows you to play games Press the MENU button to enter main menu 1 Press UP or DOWN button to highlight 2 Game press RIGHT button to enter the Game menu Press UP or DOWN cursor button to 3 highlight the desired item and press OK button to enter the game Press EXIT button to exit 4 Upgrade by USB Upgrade mode Upgrade File Start Allcode No File Si...

Page 22: ... allows you to play the record files In REC menu select Record Manage press 1 OK button to enter Record Manage menu Press UP or DOWN cursor button to 2 select a desired item and press OK button to play the desired files Press EXIT button to exit 3 REC Media Media Record Manager DVR HDD Information HDD Format DVR Configuration J ump I swear mp3 3319KB 00 03 32 00 03 15 00 03 32 1 3 4 5 6 7 2 Media ...

Page 23: ... DVR Configuration Press UP or DOWN cursor button to select desired item press LEFT or RIGHT cursor button to change the setting Time Shift time min On Off Record Type TS PS TS Transportation stream which includes information such as teletext subtitle epg etc PS Program stream which will be packeted with the file format of mpg and also able to be played back by PC or other devices Record Selection...

Page 24: ...Storage Device on the USB port gives you access to Time Shift Record a broadcast programme Pause a broadcast programme and continue watching it later Time Shift Record a broadcast programme When the space available on the Mass Storage Device runs out recording operation of broadcast will stop J ump 30sec J ump NOTE Please use USB 2 0 di sk when re cording or timeshift For timeshift and recording f...

Page 25: ...s FORWARD button to fast forward the playback Press BACKWARD button to rewind the playback Stop the Time Shift Press STOP button to stop TimeShift Record Instant record In viewing mode press RECORD button to instantaneously start a record on the current channel If RECORD button is pressed again the instant record switches to duration mode Press STOP button to stop recording then a confirmation win...

Page 26: ...signal area Check aerial lead Check aerial Check with dealer No picture or sound Scart AV is not selected on your TV Select Scart AV Scrambled channel message Channel is scrambled Select alternative channel No response to remote control Receiver off Handset not aimed correctly Front panel obstructed Hand set batteries exhausted Plug in and turn on Aim handset at front panel Check for obstructions ...

Page 27: ...d the box 1 Replace the batteries 2 Check that there is nothing in the path between the remote control and the receiver After moving the STB to another room you find you are no longer able to receive digital reception The aerial feed former new point may come through a distribution system which may reduce the digital signal now received by the box Try a direct feed from the antenna ...

Page 28: ... AC3 YUV HDMI ...

Page 29: ......

Page 30: ...Blank ...

Page 31: ...Blank ...

Page 32: ......

Reviews: