background image

V I D E O   3   V I D E O / A U D I O   I N P U T

J A C K S

• The VIDEO 3 jacks may be also connected to an

additional video component such as a camcorder, a LD

F L U O R E S C E N T   D I S P L A Y

ENGLISH

8

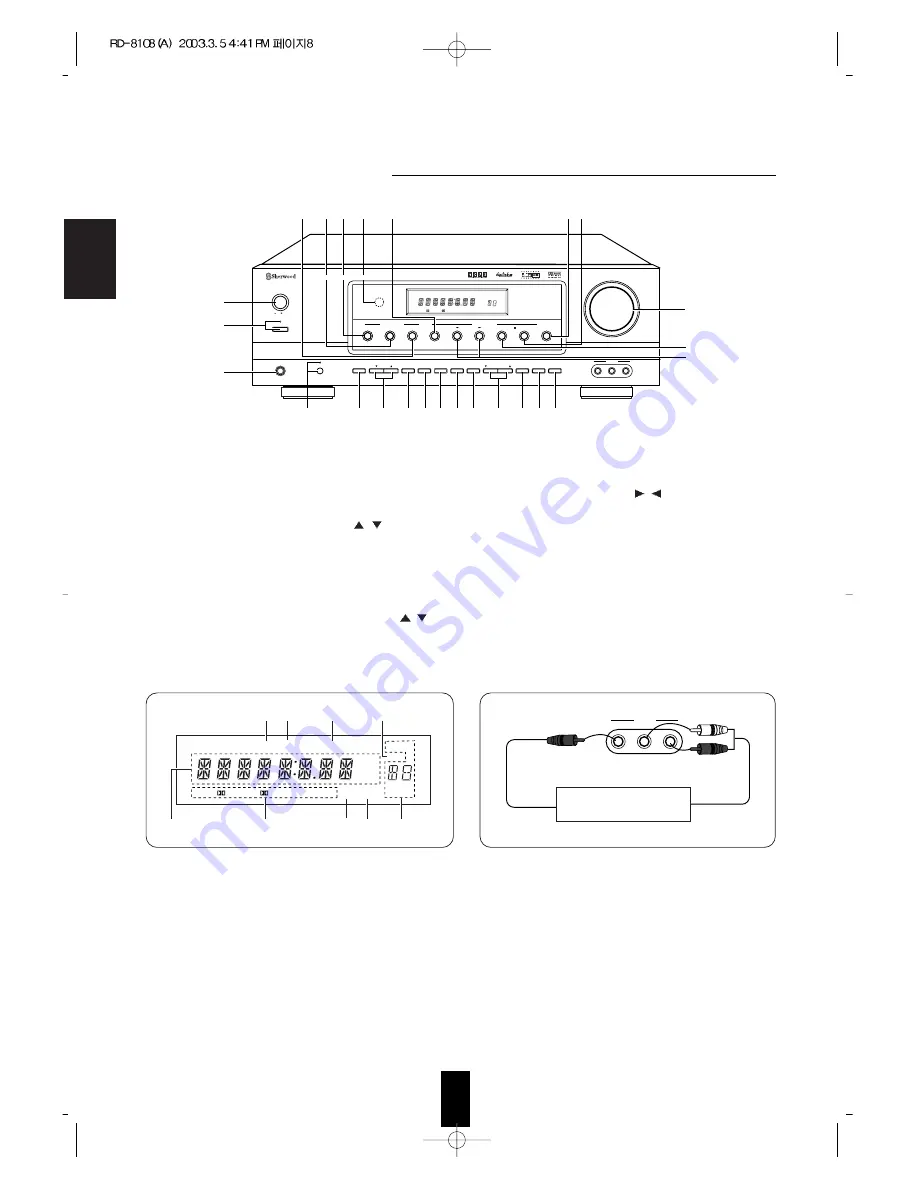
Front Panel Controls

1. POWER switch

2. STANDBY button/indicator

3. H E A D P H O N E jack

4. SPEAKER button/indicator

5. CHANNEL SELECTOR button

6. ADJUST U P / D O W N(

/

) buttons

7. TONE MODE button

8. SPEAKER SETUP button

9. DYNAMIC RANGE button

10. CINEMA EQ button

11. MEMORY/ENTER button

12. TUNING/PRESET U P / D O W N(

/

)

buttons

13. TUNING/PRESET MODE button

14. FM MODE button

15. BAND button

16. DSP MODE U P / D O W N(

/

)

 buttons

17. MASTER VOLUME control knob

18. STEREO button

19. PL II MUSIC PARAMETER button

20. DIGITAL INPUTS button

21. AUTO button

22. Remote sensor

23. AUDIO input selector button

24. VIDEO input selector button

25. 7 CH DIRECT button

1. Input, frequency, volume level, operating

information, etc.

2. Surround mode indicators

3. AUTO indicator

4. DIGITAL input signal indicator

5. PRESET number, SLEEP time, Speaker distance

display

6. MEMO R Y indicator

7. DIRECT indicator

8. TUNED indicator

9. STEREO indicator

REMOTE

SENSOR

MASTER VOLUME

ON/STANDBY

POWER

STANDBY

ON/

OFF

TUNING/PRESET

ADJUST

PHONES

CHANNEL

SELECTOR

VIDEO

L - AUDIO - R

VIDEO 3

BAND

FM MODE

T/P MODE

TONE MODE

SPEAKER

SETUP

DYNAMIC

RANGE

MEMO/ENTER

CINEMA EQ

ON/OFF

SPEAKER

ST TUNED TIME

DIRECT

PRESET

PRO LOGIC II C M DSP

DIGITAL EX

DTS ES

AUTO DIGITAL

SLEEP

dB
kHz
MHz

MEM

ft

INPUT SELECTOR

AUDIO

VIDEO

PL   MUSIC PARAMETER

7CH DIRECT

DSP MODE

SURROUND MODE

AUTO

STEREO

DIGITAL
INPUTS

25 24 23 22

21

2019

4

5

6

7 8 9 10 11 12 13 14 15

17

18
16

1

2

3

AUDIO/VIDEO RECEIVER RD-8108

ST TUNED

DIRECT

PRESET

PRO LOGIC II C M DSP

DIGITAL EX

DTS ES

AUTO DIGITAL

SLEEP

dB
kHz

MHz

MEM

ft

9

8

2

1

3

4

5

7

6

VIDEO OUT

AUDIO OUT

Additional video component

VIDEO

L - AUDIO - R

VIDEO 3

Summary of Contents for RD-8108

Page 1: ...nstaller This reminder is provided to call the CATV system installer s attention to Article 820 40 of the NEC that provides guidelines for proper grounding and in particular specifies that the cable g...

Page 2: ...thed and that the installation is completely safe For your safety if in any doubt about the effective earthing of the power point consult a qualified electrician PAN EUROPEAN UNIFIED VOLTAGE All units...

Page 3: ...TE CONTROL OPERATION RANGE 11 LOADING BATTERIES 11 USING FUNCTIONS OF REMOTE CONTROL 12 Operations LISTENING TO A PROGRAM SOURCE 15 SURROUND SOUND 18 ENJOYING SURROUND SOUND 23 LISTENING TO RADIO BROA...

Page 4: ...structions of the component to be connected SURROUND CH OUT CENTER CH OUT SURROUND BACK CH OUT SUBWOOFER CH OUT FRONT CH OUT SURROUND BACK CENTER FRONT SURROUND 7 CH DIRECT INPUT SUB WOOFER Decoder wi...

Page 5: ...B MODE R PLAY DUBBING O O CD SUN REC HIGH NORMAL AMS AMS EJECT REC BALAMCE REC LEVEL PHONES POWER MIC MIX MIC REVERSE T SIZE MEMORY B C OFF B A Tape deck or additional audio component MULTIPLE COMPACT...

Page 6: ...ion be sure to use a 75 COAXIAL cord not a conventional AUDIO cord All of the commercially available optical fiber cords cannot be used for the equipment If there is an optical fiber cord which cannot...

Page 7: ...n 1 Input frequency volume level operating information etc 2 Surround mode indicators 3 AUTO indicator 4 DIGITAL input signal indicator 5 PRESET number SLEEP time Speaker distance display 6 MEMO R Y i...

Page 8: ...5 6 7 8 9 0 T TONE DSP STEREO POWER AUDIO VCR SPK SET ADJUST M1 M2 M3 AUDIO SEL OSD SETUP SLEEP DISPLAY DIMMER RETURN P SCAN TUNER CD AUX VIDEO1 VIDEO2 VIDEO3 TAPE 7CH DIR 10 TUNE PRESET ENTER SUBTIT...

Page 9: ...R MUTE VOLUME UP DOWN NUMERIC POWER STANDBY POWER OFF CHANNEL LEVEL UP DOWN INPUT SELECTOR MUTE VOLUME UP DOWN PLAY PAUSE STOP RECORD REWIND FAST FORWARD NUMERIC POWER STANDBY POWER OFF AUDIO SELECTOR...

Page 10: ...is receiver you wish to control For details refer to Entering a setup code on page 12 2 Turn on the component you want to operate 3 Press the DEVICE button on the remote control corresponding to the c...

Page 11: ...peat the above steps 3 to 4 and try entering the same code again Manufacturers may use different setup codes for the same product category For that reason it is important that you check to see if the...

Page 12: ...TV volume or TV channel punch through press and hold down both TV button and either VOLUME or CH button for more than 1 second Removing all punch through functions Press and hold down both AUDIO butto...

Page 13: ...onents may not be able to complete one operation in 0 5 seconds and may miss the next code In this case the macro function cannot control the corresponding components correctly Be sure to use the remo...

Page 14: ...se analog signals can be heard only not recorded Switch the speakers on 2 POWER ON OFF AUTO 1 2 3 4 5 6 7 8 9 0 T TONE DSP STEREO POWER AUDIO VCR SPK SET ADJUST M1 M2 M3 AUDIO SEL OSD SETUP SLEEP DISP...

Page 15: ...UND on page 23 The sound from the component connected to the selected digital input can be heard regardless of the selected input source Adjust the overall volume 6 Operate the selected component for...

Page 16: ...ce without the tone effect DIRECT indicator lights up In general we recommend the bass and the treble to be set to 0 flat level Notes If the tone display disappears start from the step 10 again Extrem...

Page 17: ...rces with a DTS 5 1 channel decoder When DTS ES Discrete 6 1 or Matrix 6 1 sources are decoded with a DTS ES decoder the format is automatically detected upon decoding and the optimum surround mode is...

Page 18: ...mode employs sophisticated digital processing to create the illusion of phantom speakers this mode allows you to experience surround sound effects from Dolby Digital Dolby Surround or 2 channel record...

Page 19: ...front at a slightly higher position 0 to 10 inches than the surround speakers We recommend installing the surround back speaker at a slightly downward facing angle This effectively prevents the surrou...

Page 20: ...y reproduce sounds below 80 Hz When this is selected sounds below 80 Hz are sent to the subwoofer or the front speakers depending on wether the subwoofer setting is Yes or No None Select this when no...

Page 21: ...n select one of 11 different speaker settings FL CL SL FL CL SN FL CS SL FL CN SL FL CS SN FL CN SS FS CS SS FS CS SN FS CN SS FL CS SS FL CL SS F Front C Center S Surround L Large S Small N None L S...

Page 22: ...when surround back speaker setting is not N When PCM 2 channel stereo signals are input in the IN AUTO or IN PCM mode one of the following modes can be selected DOLBY PRO LOGIC II CINEMA DOLBY PRO LOG...

Page 23: ...the center speaker only from the left right speakers as a phantom image or from all three front speakers to varying degrees The control can be set in 8 steps from 0 to 7 Dimension control DIMEN defau...

Page 24: ...RESET ENTER SUBTITLE ZOOM VOLUME MUTE CH SEL CH LEVEL MACRO DVD CABLE SAT CD AUX TV STANDBY PL PARA MENU UNIVERSAL REMOTE CONTROL RNC 40 CH LEVEL AUTO 1 2 3 4 5 6 7 8 9 0 T TONE DSP STEREO POWER AUDIO...

Page 25: ...e source on the player is stopped interrupted etc the 2 CH downmix mode is not canceled even though ST and the DTS or Dolby Digital indicators go off If the headphones are plugged in and the SPEAKER b...

Page 26: ...desired band 2 Press the TUNING PRESET UP or DOWN button for more than 0 5 second 4 Tune in the desired station with auto or manual tuning 1 Press the MEMORY ENTER button 2 AUTO 1 2 3 4 5 6 7 8 9 0 T...

Page 27: ...tation press this button again to stop scanning When pressing the PRESET buttons on the remote control you need not select the preset mode on step 1 Tuning to preset stations Select the desired preset...

Page 28: ...AUX VIDEO1 VIDEO2 VIDEO3 TAPE 7CH DIR 10 TUNE PRESET ENTER SUBTITLE ZOOM VOLUME MUTE CH SEL CH LEVEL MACRO DVD CABLE SAT CD AUX TV STANDBY PL PARA MENU UNIVERSAL REMOTE CONTROL RNC 40 or AUDIO VIDEO...

Page 29: ...D recorder Notes Digital recording is available for the digital audio program sources such as CDs MDs some DVDs etc In most DVDs as well as some CDs etc digital recording may not be available dependin...

Page 30: ...ton is pressed the mode changes and the display scrolls DYNR 0 0 Off DYNR 0 5 Low compression DYNR 1 0 High compression In some Dolby Digital softwares this function may not be available Each time thi...

Page 31: ...ecorded onto VIDEO 1 VIDEO 1 OPTICAL 1 Input source Signal input FL C FR SW SL SW 0 SB SR 0dB The main menu will be shown To turn the menu screen off press this button In the bottom of the display up...

Page 32: ...ing the AUTO OSD Each time the ENTER button is pressed the AUTO OSD mode is set to ON to turn on the current display or OFF to turn it off When the AUTO OSD mode is set to ON the current status displa...

Page 33: ...ENGLISH 3 4 Select the desired menu or and change the condition with the corresponding buttons 4 Repeat the above steps 2 4 to change the conditions on other menus 5...

Page 34: ...tioned for the best reception Weak signals Noise is caused by motors fluorescent lamps or lightning etc Batteries are not loaded or exhausted The remote sensor is obstructed DIGI LINK connections are...

Page 35: ...ptical 660 nm 15 21 dBm VIDEO SECTION Video format NTSL Input sensitivity Output level 75 Video Composite normal 1 Vp p S Video luminance signal 1 Vp p chrominance signal 0 286 Vp p FM TUNER SECTION T...

Page 36: ...r 019 Fujitsu 026 Funai 027 026 023 Futuretech 027 G E 007 008 030 041 029 025 004 015 038 040 T V Goldstar 005 025 003 011 Gradiente 009 011 Grunpy 027 026 Hallmark 025 Harley Davidson 026 Harman Kar...

Page 37: ...n 007 Proton 025 032 Pulsar 002 003 Quasar 008 042 021 R C A 007 008 041 003 013 015 037 038 039 040 Radio Shack 007 019 021 027 005 025 003 011 006 Realistic 019 021 027 005 025 003 011 006 Runco 002...

Page 38: ...rter 011 Quartz 011 Quasar 004 028 029 031 R C A 013 004 027 023 008 019 Radio Shack 000 Radix 005 Realistic 004 005 027 012 000 017 011 Runco 007 STS 008 Samsung 023 010 033 Sanky 027 007 Sansui 000...

Page 39: ...Zenith 011 010 A B C 002 003 009 030 007 006 008 Allegro 018 021 Archer 018 026 Bell Howell 009 Century 018 Citizen 018 021 Comtronics 014 Contec 011 Easten 001 Emerson 026 Everquest 010 014 Focus 02...

Page 40: ...12 Radio Shack 018 Realistic 014 Sony 004 Star Choice 018 Toshiba 010 Uniden 006 005 014 Denon 007 Mitsubishi 007 N A D 007 Pioneer 007 Sony 017 018 SAT AUX LD Aiwa 004 034 Carver 004 Harman Kardon 01...

Page 41: ...18 Genexxa 004 035 Harman Kardon 010 011 Hitachi 004 JVC 007 C D Kenwood 003 029 016 024 025 Krell 010 LXI 035 Linn 010 M C S 002 M T C 019 Megavox 010 035 Marantz 002 010 013 Mission 010 N S M 010 Ni...

Reviews: