background image

24

Basic Operations

Watching the Playback on a
TV

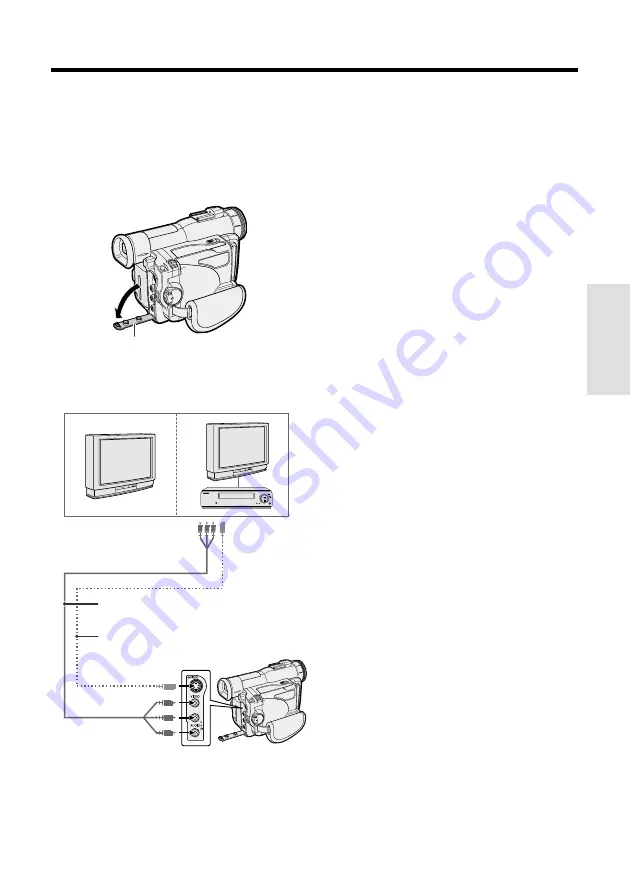
You can connect the camcorder to a TV to
allow a larger audience to enjoy playback.

Jack cover

2

Connect the camcorder to your TV (or
VCR) with the supplied audio/video
cable, as shown.

POWER

TV/VCR SET UP

CHANNEL

REC

PLAY

STOP/ 
EJECT

PAUSE 
/STILL

3

Turn on the TV and set it to the “AV” or
“VIDEO” channel. (See the operation
manual of your TV.)

• When connecting to a TV via a VCR, turn

on the VCR and set it to the “AV” or
“LINE” input channel. Operate the TV as
you normally do to see the signal from
the VCR. (See the operation manuals of
your TV and VCR.)

4

Set the Power switch on the camcorder
to VCR, and begin playback (see page
23).

Caution:

• Make sure that the camcorder, TV, VCR and

other equipment to be connected have been
turned off before you make connections. Making
connections with any of the components left
turned on may cause picture noise or malfunc-
tion.

Notes:

• If your TV or VCR has only one audio input jack,

use the white plug for the audio connection on
the TV or VCR.

• If your TV or VCR has an S-video input socket,

you can connect it to the S-VIDEO socket on the
camcorder with a commercially available S-video
cable.

• When the camcorder is connected to a TV for

playback, the picture on the TV screen may
flicker if the volume on the camcorder is set to
maximum. Should this occur, turn the volume
down (see page 23).

• Close the jack cover after use.

About the S-video socket

S-video sockets are used to separately pass
the chroma (color) and luminance (brightness)
components of video signals. They serve to
improve the picture quality in both recording
and playback.

S-video cable (commercially available)

To S-video input
socket

Yellow: To video input jack

White: To audio input (L) jack

Red: To audio input (R) jack

Audio/video cable (supplied)

To S-VIDEO socket

Yellow: To VIDEO jack

White: To AUDIO L jack

Red: To AUDIO R jack

1

Open the jack cover on the camcorder.

Summary of Contents for ViewCam VL-WD255U

Page 1: ...bed herein on behalf of Sharp The warranties described herein shall be the sole and exclusive warranties granted by Sharp and shall be the sole and exclusive remedy available to the purchaser Correction of defects in the manner and for the period of time described herein shall constitute complete fulfillment of all liabilities and responsibilities of Sharp to the purchaser with respect to the Prod...

Page 2: ...ninsulated voltage within the unit that can cause dangerous electric shocks This symbol alerts the user that there are important operating and maintenance instructions in the literature accompanying this unit CAUTION applies to the supplied AC adapter TO PREVENT ELECTRIC SHOCK MATCH WIDE BLADE OF PLUG TO WIDE SLOT FULLY INSERT CAUTION If the AC adapter is misplaced or needs to be replaced obtain t...

Page 3: ...ORMITY Sharp Camcorder This device complies with Part 15 of the FCC Rules Operation is subject to the follow ing two conditions 1 This device may not cause harmful interference and 2 this device must accept any interference received including interference that may cause undesired operation RESPONSIBLE PARTY SHARP ELECTRONICS CORPORATION Sharp Plaza Mahwah New Jersey 07430 Phone 1 800 BE SHARP CAUT...

Page 4: ...e product due to lightning and power line surges 1 Read Instructions All the safety and operating instructions should be read before the product is operated 2 Retain Instructions The safety and operating instructions should be retained for future reference 3 Heed Warnings All warnings on the product and in the operating instruc tions should be adhered to 4 Follow Instructions All operating and use...

Page 5: ... b If liquid has been spilled or objects have fallen into the product c If the product has been exposed to rain or water d If the product does not operate normally by following the operating instructions Adjust only those controls that are covered by the operating instructions as an im proper adjustment of other controls may result in damage and will often require extensive work by a qualified tec...

Page 6: ...ft up the viewfinder 3 Align the mark on the side of the battery pack with the q mark on the camcorder 1 and slide the battery pack down completely until it locks into place 2 Turning the Power on To use the camera recording functions hold down the Lock button and set the Power switch to CAMERA Media Selection switch Power switch To use the playback and editing functions hold down the Lock button ...

Page 7: ...cing upwards 3 Press the W mark gently until the cassette holder clicks into place Close the compartment door by pressing the center until it clicks into place Inserting a SmartMedia Card 1 Make sure that the power switch is set to OFF 2 Open the LCD monitor 3 Open the card slot cover in the direction of arrow Card slot cover Contact area W mark 4 Insert a SmartMedia card into the slot as shown be...

Page 8: ...eration button to rewind or fast forward the tape to the desired point 6 Press y to begin playback AUDIO1 2 AUDIO1 2 Quick Operation Guide Easy Camera Recording on Tape 1 Make sure that a cassette is inserted 5 Press the REC START STOP button to begin recording 2 Remove the lens cap and lift up the viewfinder 3 Set the Media Selection switch to TAPE 4 Hold down the Lock button and set the Power sw...

Page 9: ...ock button and set the Power switch to CAMERA 5 Press the STILL button to begin recording AUTO CARD 90 0 1 90 3 Set the Media Selection switch to CARD 4 Hold down the Lock button and set the Power switch to VCR 5 Press e or r on the Operation button to move the selection frame to the desired image 3 6 2 5 1 4 10 0 0003 NORMAL 2 1 6 Press y NORMAL 1 0 3 1 0 3 NORMAL 10 0 0003 CARD CARD LCD monitor ...

Page 10: ...TAZZ Lens cap GCOVH1271TASA PixLab Video Capture Software Lite Version CDSKA0059TA01 PC connecting cable QCNW 2022TAZZ The part numbers for the AC adapter battery charger and battery pack supplied with this camcorder are valid only in the U S and Latin America If this camcorder was purchased outside of these areas the part numbers may be different Please refer to the part numbers printed on the la...

Page 11: ...battery pack BT L441n Zoom microphone VR 5MCN Note The listed model names are for U S accessories For optional and additional accessories contact your local dealer call the Sharp Accesso ries and Supply Center at 1 800 642 2122 or visit SHARP s website http www sharp usa com ...

Page 12: ...ing the camcorder in close proximity to lighting equipment The heat from incandescent lights may deform the camcorder or cause it to malfunction Always respect prohibitions or restrictions on the use of electronic equipment on commercial flights or in other sensitive areas Be aware of the temperature and humidity You can use your camcorder at 32 F to 104 F 0 C to L40 C and at 30 to 80 relative hum...

Page 13: ...ing the LCD Monitor 19 Camera Recording Easy Camera Recording on Tape in Full Auto Mode 20 Zooming 21 Tips on Recording Positions 21 Remaining Recording Time Display 22 Remaining Battery Power Display 22 Playback Tape Playback 23 Volume Control 23 Watching the Playback on a TV 24 Video Search 25 Still 25 Selecting the Camcorder Mode 26 Using the Controls 27 Selecting the User Mode 28 Using the Men...

Page 14: ...peed 49 Manual Exposure 51 White Balance Lock 52 Digital Picture Effects 53 Scene Menu Program AE 54 Using the Zoom Microphone Optional Accessory 55 Windbreak 56 Setting the Confirmation Sounds 56 World Clock 57 Selecting Daylight Saving Time 59 Playback Playback Zoom 60 Gamma Playback 61 Multiple Strobe Playback 61 Playback Effects 62 Picture Effect Playback 63 Picture Backlight Adjustments 64 Ed...

Page 15: ...k 79 Delete protection 80 Deleting One Stored Image 81 Deleting All Stored Images 82 Print Order 83 Transferring the Data on a SmartMedia Card to a Computer 85 Useful Information 86 Demonstration Mode 93 Before Requesting Service 94 Specifications 96 Guía de operación rápida en español 97 Visualizaciones en pantalla en español 105 Affichages sur écran en français 107 Appendix Preparation Useful Fe...

Page 16: ...cated in brackets Left view W B White Balance button p 52 CAT S EYE switch p 35 Lens hood Zoom lens Remote sensor p 43 Stereo microphone p 68 GAMMA BRIGHTER button pp 33 34 61 AUTO ON OFF button p 28 Operation button p 27 MENU DISPLAY button p 27 Operation References Media Selection switch TAPE CARD selection switch p 26 ...

Page 17: ...le p 55 LCD monitor p 19 LCD monitor OPEN release button p 19 Lithium battery compartment door p 13 Viewfinder p 18 Diopter adjustment p 18 Power source PUSH release button pp 10 11 Power source mounting surface pp 10 11 Bottom view Tripod socket Card slot cover ...

Page 18: ...ton pp 39 40 61 74 Power Zoom Wide angle Telephoto control p 21 VOLume control p 23 Jack cover pp 24 65 66 RECord START STOP button p 20 Power switch CAMERA VCR select switch pp 26 27 Cassette compartment door p 12 Cassette compartment door release p 12 PC connection jack p 71 DV terminal p 67 EarPHONES jack p 23 Jack cover pp 23 67 71 Speaker p 23 Hand strap p 17 ...

Page 19: ...d of the last recorded scene after playback See page 36 Quick Return To record yourself in the scene while monitoring the shot See page 42 Letting the Subject Monitor the Shot To focus on an off centered subject See page 47 Manual Focus To turn off the confirmation sounds which are made when you operate the camcorder See page 56 Setting the Confirmation Sounds To enlarge any part of the picture du...

Page 20: ... I C EFF ECT AUD I O PB EFF ECT MULTI FRAME PLAYBACK SET REMOTE SOUND T IME CODE TC OUT OTHERS LCD BR I GHT LCD COLOR LCD T I NT BACKL I GHT BR I GHT VF VF SE T LCD D I SPLAY CLOCK SE T MAN FOCUS EXPOSURE SHUT SPEED P I C EFFECT SCENE MENU FADE QK RETURN D I S MANUAL SET AUDIO1 2 SP AUD I O DUB P I C EFF ECT AUD I O PB EFF ECT MULTI FRAME PLAYBACK SET FADE PHOTO SNAP SOUND D I SPLAY EF F SNAP WI N...

Page 21: ...NU D I S MAN FOCUS EXPOSURE SHUT SPEED P I C E F FECT MANUAL SET 3 6 2 5 1 4 SL I DE SHOW EFF ECT P I C DE L E TE PROTECT PR I ORDER DE L E TE AL L PLAYBACK SE T SELF SOUND T IMER REC MODE MENU SL I DE SHOW EFF ECT P I C DE L E TE PROTECT PR I ORDER DE L E TE AL L PLAYBACK SET REMOTE SOUND OTHERS 90 0 1 90 0 1 NORMAL 10 0 0006 NORMAL 2 1 CARD CARD CAMERA mode CARD VCR mode p 28 p 31 p 74 p 22 p 74...

Page 22: ...te see page 12 THE ENDS SOON TAPE DEW LAMP LAMP DEW The tape has reached the end Replace it with a new cassette see page 12 The battery is almost depleted Replace it with a fully charged battery pack see page 10 Dew has formed inside the camcorder Wait for a few hours until the dew disappears see page 91 About 10 seconds after this warning appears the camcorder automatically turns off The video he...

Page 23: ... Format the card to use it with this camcorder see page 77 The SmartMedia card has not been formatted with this camcorder Format the card see page 77 A SmartMedia card with a write protect seal is inserted Remove the write protect seal to record images on the card see page 89 You are trying to delete a protected image Cancel the protection setting see page 80 The selected image cannot be read by t...

Page 24: ... charging This is not a malfunction Using the zoom see page 21 and other functions or turning the power on and off frequently will increase power consumption This may result in a decrease of more than 50 in the actual recording time compared to the maximum continuous recording time listed above The charging time and recording time may vary depending on the ambient temperature and the condition of ...

Page 25: ...release button 2 Press the power source PUSH release button 1 and slide the battery pack up and take it out 2 Cautions BEFORE REMOVING THE BATTERY PACK ALWAYS STOP RECORDING OR PLAYBACK AND TURN THE POWER OFF Removing the battery pack while shooting or during playback may damage the tape by causing it to wrap around the video head drum or may destroy the SmartMedia card rendering it unreadable and...

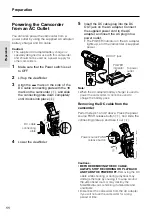
Page 26: ...plied power cord to the AC adapter and insert the AC plug into a power outlet The POWER indicator on the AC adapter lights up and the camcorder is supplied power Note When the AC adapter battery charger is used to power the camcorder it cannot be used to charge the battery pack DC OUT jack POWER indicator To power outlet Removing the DC cable from the camcorder Perform steps 1 and 2 above Press th...

Page 27: ...y retract Close the compartment door by pressing the center until it clicks into place Removing a Cassette Perform step 1 above then take out the cassette Cautions Do not try to close the cassette compartment door while the cassette holder is extending or retracting Be careful not to get your fingers caught in the cassette holder Do not apply force to the cassette holder except when pressing the W...

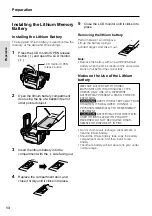
Page 28: ... above Lift up the battery using a pointed object and take it out Note Replace the battery with a new CR2025 lithium battery when the time indicator of the camcorder starts to fall behind the correct time Notes on the Use of the Lithium battery REPLACE BATTERY WITH TOSHIBA MATSUSHITA OR HITACHI MAXELL TYPE CR2025 ONLY USE OF A DIFFERENT BATTERY MAY PRESENT A RISK OF FIRE OR EXPLOSION X KEEP THIS B...

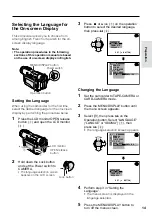
Page 29: ...ease button 1 Press the LCD monitor OPEN release button 1 and open the LCD monitor 2 3 Press d or y 1 on the operation button to select the desired language then press e 2 Changing the Language 1 Set the camcorder to TAPE CAMERA or CARD CAMERA mode 2 Press the MENU DISPLAY button until the menu screen appears 3 Select I then press r on the Operation button Select LANGUAGE LANGUE or IDIOMA 1 then p...

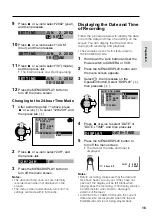
Page 30: ...s been installed see page 13 If you are in an area that observes daylight saving time set the time to the standard time You can then correct it for daylight saving time by performing the procedure on page 59 1 Press the LCD monitor OPEN release button 1 and open the LCD monitor 2 2 Hold down the Lock button and set the Power switch to CAMERA 4 Press r on the Operation button 5 Press d or y 1 until...

Page 31: ...th the date and time of recording on the screen You can display the date and time during both recording and playback The example screens for this feature are for TAPE CAMERA mode 1 Hold down the Lock button and set the Power switch to CAMERA or VCR 2 Press the MENU DISPLAY button until the menu screen appears 3 Select P then press r on the Operation button Select DISPLAY 1 then press r 2 4 Press d...

Page 32: ...eners of the grip strap and the hand strap flap Caution Do not swing the camcorder by the hand strap When attaching or removing the lens cap press both tabs on the top and bottom of the cap When recording hang the hook of the lens cap on the hand strap so that the cap will not get in the way Tabs Hook REC START STOP button Note Always replace the lens cap on the lens when the camcorder is not in u...

Page 33: ... the LCD monitor is opened When the vertical rotation of the monitor is between 135 and 180 however the viewfinder is on and the subject is displayed both in the viewfinder and on the monitor see page 42 Be sure to close the viewfinder after use Adjusting the Diopter Adjust the diopter according to your eyesight when the picture in the viewfinder is not clear 1 Lift up the viewfinder 2 Hold down t...

Page 34: ...instead of the LCD monitor when you want to save battery power Use the viewfinder if the LCD screen becomes difficult to see in bright daylight Closing the LCD monitor Return the LCD monitor to the vertical 90 position with the screen facing in and fold it into the camcorder until it clicks into place Cautions Do not use excessive force when moving the LCD monitor Do not try to rotate the LCD moni...

Page 35: ...r off Set the Power switch to OFF without pressing the Lock button Notes Battery power is consumed in Recording Standby mode Turn off the power if you will not be recording again soon If the camcorder remains in Recording Standby mode for more than 5 minutes in TAPE CAMERA mode the power will automatically turn off to save battery power and to protect the tape from being damaged To resume recordin...

Page 36: ...ntil it is able to focus on the subject See page 43 for recording macro shots See page 32 for use of the digital zoom Zoom range indicator Tips on Recording Positions To create images that are easy to watch during playback try to record with a stable posture while steadying your camcorder to prevent the image from shaking Holding the camcorder Put your right hand through the hand strap and place y...

Page 37: ...assette Remaining Battery Power Display When using the camcorder with the battery pack as the power source you can turn on and off the remaining battery power indicator by pressing the MENU DISPLAY button If the battery power becomes very low a warning indicator will appear Replace the battery pack BAT TERY I S TOO LOW Notes Use the remaining battery power indicator only as an approximate indicati...

Page 38: ... OFF without pressing the Lock button Notes The tape is automatically rewound when playback reaches the end of the tape Stereo earphones with a 3 5 mm diameter plug can be plugged directly into the PHONES jack When you use this jack the speaker automati cally turns off Watching the Playback in the Viewfinder You can also watch the playback in the viewfinder by closing the LCD monitor with the scre...

Page 39: ...ft turned on may cause picture noise or malfunc tion Notes If your TV or VCR has only one audio input jack use the white plug for the audio connection on the TV or VCR If your TV or VCR has an S video input socket you can connect it to the S VIDEO socket on the camcorder with a commercially available S video cable When the camcorder is connected to a TV for playback the picture on the TV screen ma...

Page 40: ...ne press y to return to normal playback Notes The sound is off during search Some picture noise appears during search This is not a malfunction Still The still function makes it possible to pause playback in TAPE VCR mode During playback in TAPE VCR mode press y on the Operation button AUDIO1 2 To return to normal playback press y again Notes The sound is off in Still mode To protect the tape the ...

Page 41: ...on switch to CARD Lock button Lock button Lock button Lock button TAPE CAMERA mode 2 Hold down the Lock button and set the Power switch to CAMERA 2 Hold down the Lock button and set the Power switch to VCR 2 Hold down the Lock button and set the Power switch to CAMERA 1 Set the Media Selection switch to CARD For recording motion and still images on tapes For playing back or editing motion and stil...

Page 42: ...tton Lock button MENU DISPLAY button The MENU DISPLAY button is used to turn the on screen indicators and the menu screens on or off Each time you press the MENU DISPLAY button the on screen display changes as shown below Note The warning indicators and some other indicators cannot be turned off by pressing the MENU DISPLAY button Operation button The Operation button is used to select and set the...

Page 43: ...Power switch AUTO ON OFF button 1 Set the Media Selection switch to TAPE or CARD 2 Hold down the Lock button and set the Power switch to CAMERA The user mode indicator is displayed AUTO User mode indicator 3 Press the AUTO ON OFF button Each time you press the AUTO ON OFF button the user mode changes between Auto mode and Manual mode To select Easy mode hold down the AUTO ON OFF button for more th...

Page 44: ...OOM TAPE SPEED 16 9 CAMERA SE T EFF SNAP 6 Press d or y 1 to select the desired menu setting then press e 2 To adjust another menu item press e then perform steps 4 to 6 00 1 PHOTO SNAP DGTL ZOOM TAPE SPEED 16 9 CAMERA SE T EFF SNAP To turn off the menu screen Press the MENU DISPLAY button Notes Certain menu items are common among Camcorder modes If the REMOTE menu item for example is set to OFF i...

Page 45: ...o select LP then press e LP TAPE SPEED 5 Press the MENU DISPLAY button to turn off the menu screen The recording mode indicator changes from SP to LP LP 45min To return to SP mode Select SP in step 4 above Notes on the use of LP mode To record in LP mode be sure to use a Mini DV cassette labeled for use with LP mode Frozen images mosaic pattern picture noise audio interruptions or audio loss may o...

Page 46: ...n DIS The digital image stabilization DIS function is factory preset to on to stabilize the image by electronically compensating for relatively minor image shaking that is often annoying in close up shots AUTO Note The DIS function cannot compensate for excessive image shaking Turning Off the DIS Function When image shaking does not occur e g when using the camcorder on a tripod turn off the DIS f...

Page 47: ... digital zoom settings are used 1 Set the camcorder to TAPE CAMERA or CARD CAMERA mode 2 Press the MENU DISPLAY button until the menu screen appears MAN FOCUS EXPOSURE SHUT SPEED P I C EFFECT SCENE MENU FADE QK RETURN D I S MANUAL SET 3 Select Y then press r on the Operation button Select DGTL ZOOM 1 then press r 2 OFF 50 100 780 PHOTO SNAP DGTL ZOOM TAPE SPEED 16 9 CAMERA SE T EFF SNAP 4 Press d ...

Page 48: ...he image unaffected GAMMA BRIGHTER button In TAPE CAMERA or CARD CAMERA mode press the GAMMA BRIGHTER button once GAMMA appears indicating that Gamma Brightness Compensation is now working To obtain a brighter picture Press the GAMMA BRIGHTER button again The x indicator appears Note When the x indicator is displayed the background will become slightly brighter AUTO AUTO GAMMA AUTO AUTO GAMMA To c...

Page 49: ...ting that the gain up function is now working AUT UTO AUTO GAMMA AUTO AUTO GAMMA L I GHT L I GHT L I GHT L I GHT To obtain a brighter picture Press the GAMMA BRIGHTER button again The indicator appears To cancel the gain up function Press the GAMMA BRIGHTER button until GAMMA disappears Notes Some picture noise appears in Gain up mode The picture noise increases when the indicator is displayed Whe...

Page 50: ...ghter To cancel Night Recording Set the CAT S EYE switch to OFF Notes The picture will turn white if you use Night Recording in a bright location The camcorder may not be able to focus correctly when using Night Recording In such cases use the manual focus function to obtain proper focus see page 47 The following functions do not work when using Night Recording Manual shutter speed Manual exposure...

Page 51: ... the camcorder enters Recording Standby mode 5 Press the MENU DISPLAY button to turn off the menu screen Notes To cancel the quick return function press r to select STOP then press e If the cassette has been removed since the last recording or if no recording has been made since the cassette was loaded the quick return function cannot be used Edit Search The edit search function lets you search wi...

Page 52: ... I C EFFECT SCENE MENU FADE QK RETURN D I S MANUAL SET 4 Press d or y to select ON then press e ON FADE 5 Press the MENU DISPLAY button to turn off the menu screen FADE is displayed AUTO AUTO SP SP 3 3 min 0 AUTO FAD ADE FADE SP min 0 12 bit bit 12 bit Using Fade Mode 1 Press the REC START STOP button to begin recording The picture turns white and the image and sound fade in AUTO SP 3 3 min min 0 ...

Page 53: ...produce an effective screen aspect ratio of 16 9 1 Set the camcorder to TAPE CAMERA mode 2 Press the MENU DISPLAY button until the menu screen appears 3 Select Y then press r on the Operation button Select 16 9 1 then press r 2 4 Press d or y to select ON then press e OFF ON PHOTO SNAP DGTL ZOOM TAPE SPEED 16 9 CAMERA SE T EFF SNAP ON 16 9 5 Press the MENU DISPLAY button to turn off the menu scree...

Page 54: ...1 Set the camcorder to TAPE CAMERA mode 5 Press y 1 to select PHOTO SNAP then press r 2 6 Press d or y to select the desired still recording mode then press e 7 Press the MENU DISPLAY button to turn off the menu screen Using Still Recording 1 Set the camcorder to TAPE CAMERA mode 2 In Recording Standby mode press the STILL button A still image of the subject is displayed 3 Press the REC START STOP...

Page 55: ... a still recording effect to select PHOTO SHOT 9 FRAMES or 16 FRAMES 2 In Recording Standby mode press the STILL button In TAPE CAMERA mode a still image of the subject is displayed with the selected effect Perform step 3 In CARD CAMERA mode the still image of the subject will be recorded with the selected effect Omit step 3 3 Press the REC START STOP button The still image of the subject will be ...

Page 56: ...subject 4 Press y to freeze the inset image Note Pressing y e or r while the inset image is frozen cancels the still image 5 Press the REC START STOP button The still image of the subject will be recorded In CARD CAMERA mode press the STILL button instead of the REC START STOP button To pause recording on tape Press the REC START STOP button To turn off the inset image Press the MENU DISPLAY butto...

Page 57: ... Set the Power switch to CAMERA The subject is displayed in the viewfinder and a mirror image of the subject is displayed on the LCD monitor 3 Set the Media Selection switch to TAPE or CARD and begin recording Caution Do not invert the image by rotating the monitor during recording Notes The screen image is automatically inverted when the vertical rotation of the monitor is between 135 and 180 Whe...

Page 58: ...e Power Zoom control to the W side and then move the camcorder closer to the subject until you obtain the desired angle of view The camcorder will automatically focus on the subject when the lens is set for the widest angle Notes When you are recording a macro shot be sure that the subject receives sufficient illumination It is recommended that you use a tripod for recording macro shots to prevent...

Page 59: ...ect sunlight or bright light from interior illumination to fall onto the remote sensor as this may prevent the remote control from operating properly Be sure that there are no obstacles between the remote control and the remote sensor When the batteries are depleted and the remote control does not operate replace them with new AA R6 or UM SUM 3 batteries Remote sensor 16 ft 5 m Approximate operati...

Page 60: ...frame advance function allows you to play back still images frame by frame 1 During playback in TAPE VCR mode press the PAUSE STILL button g to pause playback 2 Press the h or j button Each time you press the button the picture advances one frame forward or backward To return to normal playback press the PLAY button t Notes The sound is off during reverse slow and frame advance playback If you use...

Page 61: ...e Operation button Select TIME CODE 1 then press r 2 3 Press d or y to select DISP ON then press e 4 Press the MENU DISPLAY button to turn off the menu screen The time code appears D I SP OFF D I SP ON OTHERS REMOTE SOUND T IME CODE TC OUT SP TC0 05 35 To turn off the time code Select DISP OFF in step 3 above Note When the tape reaches an unrecorded section the time code returns to zero TC0 00 00 ...

Page 62: ...on Select MAN FOCUS 1 then press r 2 5 Press e to display the focus setting screen MAN FOCUS AUTO MANUAL EXPOSURE SHUT SPEED P I C EFFECT SCENE MENU FADE QK RETURN D I S MANUAL SET 6 Adjust the Power Zoom control to frame the subject as you desire Lack of contrast e g snow scene Fast moving subject Background is too bright Subject has horizontal stripes Subject is being shot through a dirty or wet...

Page 63: ...m control to wide angle and then try refocusing If the lens is dirty or fogged the camcorder may not be able to correctly focus When MF is displayed you can manually adjust the focus by pressing d or y even if the focus setting screen is not displayed When you want to cancel all manual settings and return to Auto mode press the AUTO ON OFF button MANUAL MF FOCUS FAR NEAR 12 bit SP SE T BUT TON MAN...

Page 64: ...ect T then press r on the Operation button Select SHUT SPEED 1 then press r 2 MAN FOCUS EXPOSURE SHUT SPEED P I C EFFECT SCENE MENU FADE QK RETURN D I S MANUAL SET AUTO MANUAL 5 Press e to display the shutter speed setting screen 6 Press d or y 1 to select the desired shutter speed then press e 2 The selected shutter speed is displayed on the menu screen 7 Press the MENU DISPLAY button to turn off...

Page 65: ... fast shutter speed Using a fast shutter speed under fluorescent lighting will cause flickering in the picture and possibly periodic color shifts The manual shutter speed setting will be canceled if a scene setting is selected thereafter The manual shutter speed setting cannot be used with Night Recording When you want to cancel all manual settings and return to Auto mode press the AUTO ON OFF but...

Page 66: ...ess r on the Operation button Select EXPOSURE 1 then press r 2 MAN FOCUS EXPOSURE SHUT SPEED P I C EFFECT SCENE MENU FADE QK RETURN D I S MANUAL SET AUTO MANUAL 5 Press e to display the exposure setting screen 6 Press d or y to select the desired exposure level The number shown is the selected exposure level The adjustment range is from 5 least light to L5 most light 7 Press e The selected exposur...

Page 67: ...hite object Adjust the distance of the object so that the entire screen is white 4 Press the MENU DISPLAY button to set the white balance lock W B LOCK flashes during the locking procedure To cancel the locking proce dure press the MENU DISPLAY button while W B LOCK flashes 5 Press the W B button to turn off the white balance lock screen W B LOCK is displayed To cancel White Balance Lock 1 Press t...

Page 68: ... to TAPE CAMERA or CARD CAMERA mode 2 Press the MENU DISPLAY button until the menu screen appears 3 Select T then press r on the Operation button Select PIC EFFECT 1 then press r 2 4 Press d or y to select the desired digital picture effect then press e The selected digital picture effect is displayed on the menu screen 5 Press the MENU DISPLAY button to turn off the menu screen To cancel the digi...

Page 69: ...et the camcorder to TAPE CAMERA or CARD CAMERA mode 2 Press the MENU DISPLAY button until the menu screen appears 3 Select T then press r on the Operation button Select SCENE MENU 1 then press r 2 SPORT SCENE MENU 4 Press d or y to select the scene setting that best fits the recording situation then press e The selected scene setting is displayed on the menu screen SP SPORT 30min 5 Press the MENU ...

Page 70: ...ype of Zoom Microphone modes AUTO The camcorder automatically selects the optimum sound according to the magnifi cation of the zoom lens When the zoom lens is at a wide angle setting the built in micro phone is used to record sounds As the zoom magnification increases the sounds from the zoom microphone and built in microphone are mixed according to the zoom setting TELE The zoom microphone is fix...

Page 71: ...n Sounds A confirmation sound is made when you turn on or off the Power switch press the REC START STOP button or perform other desig nated operations Use the procedure below to change the type of sound or to turn off the confirmation sounds altogether Type of Confirmation Sound Settings CHIME A chiming sound is made BEEP An electronic beeping sound is made OFF No confirmation sound is made 1 Pres...

Page 72: ...il the menu screen appears 3 Select P then press r on the Operation button Select AREA 1 then press r 2 4 Press d or y 1 to select 17 L A then press e 2 The camcorder is now set to Los Angeles time NEW YORK 20 D I SPLAY DYLT SAVE AREA SE TT I NG 12H 24H CLOCK SE T L A 17 AREA 5 Press the MENU DISPLAY button to turn off the menu screen HAWAII CHICAGO DENVER NEW YORK L A CARACAS FN ISL RIO ANCHRGE S...

Page 73: ...onesia Jakarta Thailand Vietnam Australia Perth China Hong Kong Indonesia Borneo Bali Malaysia Philippines Singapore Taiwan Japan Korea Australia Sydney New Caledonia Fiji New Zealand Western Samoa Hawaii Is Tahiti HST Hawaii Standard Time U S A Alaska AST Alaska Standard Time U S A Los Angeles San Francisco PST Pacific Standard Time U S A Denver MST Mountain Standard Time Mexico Mexico City U S A...

Page 74: ... on the Operation button Select DYLT SAVE 1 then press r 2 MAN FOCUS EXPOSURE SHUT SPEED P I C EFFECT SCENE MENU FADE QK RETURN D I S MANUAL SET D I SPLAY DYLT SAVE AREA SE TT I NG 12H 24H OFF ON CLOCK SE T 4 Press d or y to select ON then press e The time automatically changes to daylight saving time DYLT SAVE ON 5 Press the MENU DISPLAY button to turn off the menu screen The Q indicator appears ...

Page 75: ...ample screens for this feature are for TAPE VCR mode 1 During playback in TAPE VCR or CARD VCR mode press the ZOOM T button to zoom in 2 Press the Shift q w a or s button to shift the displayed image To cancel Playback Zoom Press the ZOOM W button to zoom out to the widest angle Notes Use of Playback Zoom may cause a reduction in picture quality for still images Images in Playback Zoom mode cannot...

Page 76: ... a second using a 9 or 16 frame picture This is useful when you want to check your form in sports such as tennis or golf 1 In TAPE VCR mode press the MENU DISPLAY button until the menu screen appears 2 Select V then press r on the Operation button Select MULTI FRAME 1 then press r 2 3 Press d or y to select 9 FRAMES 9 frame picture or 16 FRAMES 16 frame picture then press e OFF FRAMES FRAMES 1 6 9...

Page 77: ... 6 seconds may not dissolve properly Using Playback Effect 1 In TAPE VCR mode press the MENU DISPLAY button until the menu screen appears 2 Select V then press r on the Operation button Select PB EFFECT 1 then press r 2 3 Press d or y to select OVERLAP or WIPE then press e OFF OVERLAP W I PE AUD I O DUB P I C EFF ECT AUD I O PB EFF ECT MULTI FRAME PLAYBACK SET WIPE PB EFF ECT 4 Press the MENU DISP...

Page 78: ... screens for this feature are for TAPE VCR mode 1 During playback in TAPE VCR or CARD VCR mode press the MENU DISPLAY button until the menu screen appears 2 Select V then press r on the Operation button Select PIC EFFECT 1 then press r 2 OFF B W SEP I A SOLAR I NEGA MOSA I C AUD I O DUB P I C EFF ECT AUD I O PB EFF ECT MULTI FRAME PLAYBACK SET 3 Press d or y to select the desired picture effect th...

Page 79: ...KLIGHT 1 then press r 2 NORMAL BR I GHT AUTO BACKL I GHT BR I GHT LCD COLOR LCD VF T I NT LCD VF SE T LCD BR I GHT 3 Press d or y to select AUTO NORMAL or BRIGHT then press e BACKL I GHT BR I GHT AUTO The camcorder automatically switches between NORMAL and BRIGHT depending on the ambient lighting This mode is only available in TAPE CAMERA or CARD CAMERA mode NORMAL For use indoors or under moderat...

Page 80: ...he portion that you wish to keep 2 Load a video cassette into the recording VCR 3 Press y on the camcorder to begin playback and then press the Record button on the VCR to begin recording 4 Press the Pause Still button on the VCR to pause recording when the source tape reaches the beginning of the sequence to be cut 5 Press the Pause Still or Record button on the VCR to resume recording when the s...

Page 81: ...uipment connected to the camcorder Check the camcorder screen to see if the picture is being properly received 3 Press the REC START STOP button on the camcorder The camcorder enters the Recording Standby mode 4 Press y on the Operation button to begin recording Notes To pause recording press y Press y again to resume recording To operate by remote control perform steps 1 and 2 above and press the...

Page 82: ...ing Standby mode 4 Press y on the Operation button to begin recording To stop recording Press d on the Operation button Cutting Unwanted Sequences 1 Press y to pause recording when the source tape reaches the beginning of the sequence to be cut 2 Press y to resume recording when the source tape reaches the end of the sequence to be cut Notes Make sure that the video equipment from which you are re...

Page 83: ...Audio 2 No audio 16 bit audio recording The audio is recorded in stereo with the left and right sound on two separate channels Audio 1 Left sound Audio 2 Right sound In Audio Dubbing mode 12 bit audio recording The dubbed audio is recorded on Audio 2 Audio 1 Original stereo left and right sound Audio 2 Dubbed stereo left and right sound 16 bit audio recording The dubbed audio is recorded on Audio ...

Page 84: ...io or dub additional scenes 1 Press the MENU DISPLAY button to turn off the audio dubbing screen 2 Repeat steps 1 to 5 above Notes Audio dubbing cannot be used with record ings made in LP mode It is recommended that you use Audio Dubbing only with recordings made with this camcorder Use of recordings made with other digital video equipment may result in poor audio quality Audio dubbing will automa...

Page 85: ...U DISPLAY button until the menu screen appears 3 Select V then press r on the Operation button Select AUDIO 1 then press r 2 4 Press d or y to select the desired audio playback mode then press e 1 1 2 2 AUD I O DUB P I C EFF ECT AUD I O PB EFF ECT PLAYBACK SE T MULTI FRAME AUD I O 1 2 5 Press the MENU DISPLAY button to turn off the menu screen The selected audio playback mode indicator is displaye...

Page 86: ... To RS 232C port D sub 9 pin port PC connecting cable supplied To PC connection jack Notes It is recommended to use the AC adapter battery charger as a power source for extended periods of use Images with the following functions cannot be transferred to a personal computer TAPE VCR CARD VCR mode Playback Zoom Picture Effect Playback TAPE CAMERA CARD CAMERA mode Digital Zoom Digital Picture Effects...

Page 87: ...check the installation procedure Printing the PDF Manual Print out the PDF manual so that you can consult it whenever necessary 1 Insert the CD ROM of the Video Capture Software into the CD ROM drive 1 Open the PDF manual Language File name Chinese Simplified ar40chs exe Chinese Traditional ar405cht exe Dutch ar405dut exe English ar405eng exe French ar405fre exe German ar405deu exe Italian ar405it...

Page 88: ...over 2 Open the LCD monitor 3 Open the card slot cover in the direction of the arrow 4 Insert a SmartMedia card into the slot as shown below and push it in as far as it will go 5 Close the card slot cover Removing a SmartMedia Card Perform steps 1 and 2 above and then pull the SmartMedia card straight out as shown below Note Be sure not to apply pressure to the card slot cover as the camcorder may...

Page 89: ...recording The S indicator flashes red while data is being recorded on the SmartMedia card and returns to white when recording completes Notes Recording under insufficient lighting may result in blurred images It is recommended that you use a tripod to record insufficiently illuminated subjects Recording under the light of a fluorescent mercury or sodium lamp may cause flickering in the image and d...

Page 90: ... press the MENU DISPLAY button until the menu screen appears 2 Select Y then press r on the Operation button Select REC MODE 1 then press r 2 3 Press d or y to select the desired setting then press e REC MODE NORMAL DGTL ZOOM SNAP EFF ECONOMY F I NE CAMERA SE T REC MODE NORMAL 4 Press the MENU DISPLAY button to turn off the menu screen The selected resolution setting indicator is displayed NORMAL ...

Page 91: ...FOCUS EXPOSURE SHUT SPEED P I C E F FECT MANUAL SET CARD 90 0 1 3 Frame the subject and then press the STILL button to set the timer The self timer operating indicator flashes while the timer counts down The shutter will be automatically released 10 seconds after and a still image of the subject is recorded Notes When recording with the self timer stabilize the camcorder in the horizontal plane by...

Page 92: ...rd It is recom mended that you use the AC outlet for the power supply 1 Insert a SmartMedia card to be format ted into the camcorder 2 Set the camcorder to CARD CAMERA mode 3 Press the MENU DISPLAY button until the menu screen appears 4 Select I then press r on the Operation button Select FORMAT 1 then press r 2 to display the format screen SCENE SE LF T IMER MENU D I S MAN FOCUS EXPOSURE SHUT SPE...

Page 93: ...ss e or r the selection frame moves backward or forward Notes You can display a thumbnail of the previous or next 6 images by pressing e or r when the selection frame is on the image at the top left or bottom right Holding down e or r increases the speed of motion of the selection frame 3 6 2 5 1 4 10 0 0003 NORMAL 2 1 Selection frame 5 Press y The selected image is displayed in full screen Availa...

Page 94: ...Operation button Select SLIDE SHOW 1 then press r 2 CANCEL START SL I DE SHOW BUT TON BUT TON SL I DE SHOW EFF ECT P I C DE LETE PROTECT PR I ORDER DE LETE ALL PLAYBACK SET CARD CARD 5 Press y Beginning from the image selected in step 2 the recorded images will be displayed in full screen one after another in order of recording CANCEL BUT TON CANCEL BUT TON SL I DE SHOW SL I DE SHOW CARD After pla...

Page 95: ... NORMAL 2 1 4 Press y to set the protection The R indicator appears If you want to protect another image repeat steps 3 and 4 3 6 2 5 1 4 PROTECT 10 0 0004 CAN CANCEL SET BU BUT TON N BU BUT TON N END SET BUT TON BUT TON NORMAL 2 1 5 Press d then press the MENU DISPLAY button to turn off the menu screen To cancel the protection setting 1 Select the image for which the protec tion setting is to be ...

Page 96: ...C DE LETE PROTECT PR I ORDER DE LETE ALL PLAYBACK SET CARD 10 0 0006 SET BU BUT TON N BU BUT TON N END SET BUT TON BUT TON NORMAL 2 1 3 6 2 5 1 4 DEL E TE 10 0 0003 CANCEL SET BUT TON BUT TON END SET BUT TON BUT TON NORMAL 2 1 5 Press y to delete the image If you want to delete another image repeat steps 3 to 5 6 Press d then press the MENU DISPLAY button to turn off the menu screen Caution Do not...

Page 97: ...then press r 2 To cancel deletion press d 3 Press y to delete all the images Notes The protected images cannot be deleted Cancel the protection setting to delete the image see page 80 You cannot delete images on the SmartMedia card with a write protect seal affixed Deleting all stored images will not erase DPOF see page 83 assigned images with delete protection setting SL I DE SHOW EFF ECT P I C D...

Page 98: ...R mode press the MENU DISPLAY button until the menu screen appears 2 Select S then press r on the Operation button Select PRI ORDER 1 then press r 2 3 Press d or y 1 to select PRI SELECT then press e 2 to display a thumbnail of the recorded images 4 Press e or r 1 to select the image to which you want to assign a print order then press y 2 5 Press e or r to select the number of printouts 1 through...

Page 99: ...I ALL then press e 2 To cancel the print order for all images 1 Perform steps 1 and 2 in Assigning Print Order to an Image 3 6 2 5 1 4 P PR I NT 10 0 0004 SET BUT TON BUT TON END SET BUT TON BUT TON NORMAL 2 1 Print order indicator 0 3 6 2 5 1 4 3 6 2 5 1 4 P PR I NT 10 0 0004 SET BUT TON BUT TON END SET BUT TON BUT TON NORMAL 2 1 PR I NT 10 0 0004 SET BUT TON BUT TON END SET BUT TON BUT TON NORMA...

Page 100: ...otes Be careful when using a floppy disk adapter as it is possible to write and erase data even when a write protect seal is affixed to the SmartMedia card Remove the write protect seal from the SmartMedia card before inserting the card to a PC card adapter For details see the operation manuals of the computer floppy disk adapter and PC card adapter Sub folder of still images Serial number 100 to ...

Page 101: ...ch during playback Use a wide angle setting for fast moving subjects Optimal lighting range Lighting For clear good quality recording 500 to 100 000 lux is needed Recording is possible with less light but the picture quality may suffer Adequate lighting is also essential for correct white balance Note The figures in the chart are approximations Situation Lux Blue sky Clear day at noon 100 000 Clea...

Page 102: ...l VCR Conference for Standardization of Consumer Use Digital VCR Formats This product incorporates copyright protec tion technology that is protected by method claims of certain U S patents and other intellectual property rights owned by Macrovision Corporation and other rights owners Use of this copyright protection technology must be authorized by Macrovision Corporation and is intended for home...

Page 103: ...Mini DV cassette in direct sunlight near strong heat sources or in areas with excessive steam Store the Mini DV cassette in its case and stand it in an upright position If the tape is not properly wound rewind the tape Do not drop the Mini DV cassette or subject it to excessive shocks To protect recordings against acciden tal erasure Slide the protect tab on the rear of the Mini DV cassette to the...

Page 104: ...rotect seal once it has been affixed and removed Precautions on handling the SmartMedia card The card is a precision device Do not bend apply excessive pressure subject to shock or drop Do not store or use in a location subject to a strong electromagnetic field or electronic noise When not in use store the card in the protective case supplied with the card to prevent damage from static electricity...

Page 105: ...y discharged state Store the battery pack in a dry cool place When storing a fully charged battery pack put the cover on it so that the CHARGE mark printed on the label is seen through the window as shown When storing a battery pack that is not fully charged put the cover upside down so that only the battery pack casing can be seen through the window Cautions Improper handling of the battery pack ...

Page 106: ... stances When moving the camcorder from a cold place to a warm place When placing the camcorder in a cold room which is then heated rapidly When moving the camcorder outdoors from an air conditioned room When placing the camcorder in the direct path of air blowing from an air conditioner When placing the camcorder in a humid room How to prevent trouble due to dew formation When using the camcorder...

Page 107: ... The supplied AC adapter battery charger is compatible with 50 Hz and 60 Hz electrical systems in the range of 110 V to 240 V AC An AC plug adapter may be required depending on the design of the electrical outlet Television Signal Standards In any country you can always watch the video picture by using the LCD monitor screen However if you want to watch the picture on a TV screen the TV must be NT...

Page 108: ... QK RETURN D I S MANUAL SET 4 Select I then press r on the Operation button Select DEMO MODE 1 then press r 2 Canceling Demo Mode 1 During the demonstration press the MENU DISPLAY button to pause the demonstration OFF ON REMOTE SOUND T IME CODE TC DEMO MODE LANGUAGE OTHERS OUT ON DEMO MODE 2 Select I then press r on the Operation button Select DEMO MODE then press r 3 Press d or y to select OFF th...

Page 109: ...ical stripes Occurs when shooting subject with strong contrast to the background Does not indicate a malfunction Camcorder is unable to focus when zooming in on subject within 6 feet 1 8 m and automatically zooms out until it focuses on subject No subject in the field of view Camcorder is in Demo mode Video input channel on TV or TV channel is not selected properly Audio video cable is not properl...

Page 110: ... service p 96 or use a commercially available video head cleaning tape p 92 Use a new cassette Remove write protect seal p 89 Cancel the protection setting p 80 Remove write protect seal p 89 Connect power source properly pp 10 11 Charge battery pack sufficiently p 9 Stop tape and try again p 20 Adjust diopter p 18 Adjust picture p 64 Connect audio video or DV cable properly pp 65 67 Set REMOTE me...

Page 111: ...g the viewfinder in Full Auto mode with zoom motor off 4 8 W during camera recording using the LCD monitor in Full Auto mode with zoom motor off and backlight in normal mode Operating Temperature 32 F to 104 F 0 C to L40 C Operating Humidity 30 to 80 Storage Temperature 4 F to 140 F 20 C to L60 C Dimensions approx 3 11 16 W K 4 21 32 H K 7 11 32 D 93 7 mm W K 118 mm H K 186 5 mm D Weight approx 1 ...

Page 112: ...LLA ANCHA EN LA RANURA ANCHA E INTRODUZCA COMPLETAMENTE LA CLAVIJA PRECAUCION Si el adaptador de CA se extravía o tiene que ser cambiado adquiera otro del mismo tipo en el centro de servicio SHARP de su concesionario PARA TIRAR LA BATERÍA CONTIENE BATERÍA DE IONES DE LITIO ÉSTA DEBE RECICLARSE O TIRARSE DE LA FORMA APROPIADA PÓNGASE EN CONTACTO CON LAS AGENCIAS LOCALES PERTINENTES PARA OBTENER INF...

Page 113: ...luminación El calor producido por las luces incandescentes puede deformar la videocámara o hacer que ésta funcione mal Respete siempre las prohibiciones o restricciones relacionadas con la utilización de equipos electrónicos en vuelos comerciales o en otras áreas susceptibles Tenga cuidado con la temperatura y la humedad Podrá utilizar su videocámara a temperaturas de entre 32 F y 104 F 0 C y L40 ...

Page 114: ...te la antena o el sistema de cable Esto impedirá que el producto se estropee debido a las tormentas eléctrica o a la sobretensión en la línea de alimentación 1 Lectura de las instrucciones Antes de utilizar este producto deberán leerse todas las instrucciones de seguridad y manejo 2 Conservación de las instrucciones Las instrucciones de seguridad y manejo deberán guardarse para poder consultarlas ...

Page 115: ...r las cubiertas puede exponerse a una tensión peligrosa o a otros peligros Solicite las reparaciones al personal de servicio cualificado 19 Daños que requieren ser reparados Desenchufe este producto de la toma de corriente y solicite las reparaciones al personal de servicio cualificado cuando se produzcan las condiciones siguientes a Cuando el cable de alimentación o su clavija estén estropeados b...

Page 116: ...e la batería completamente hacia abajo hasta que quede bloqueada en posición 2 Conexión de la alimentación Para utilizar las funciones de grabación de la cámara mantenga pulsado el botón de bloqueo y ponga el interruptor de alimentación en CAMERA Conmutador selector de madio Interruptor de alimentación Botón de bloqueo Para utilizar las funciones de reproducción y edición mantenga pulsado el botón...

Page 117: ...W hasta que el portavideocasete encaje en posición produciendo un chasquido Cierre la puerta del compartimento pulsando sobre el centro hasta que quede cerrada produciendo un chasquido Inserción de una tarjeta SmartMedia Disponible en el comercio 1 Asegúrese de que el interruptor de alimentación esté en OFF 2 Abra el monitor LCD 3 Abra la cubierta de la ranura de la tarjeta en el sentido de la fle...

Page 118: ...el zoom Pulse el control del zoom motorizado hacia el lado de la T 1 telefoto o el lado de la W 2 granangular Botón de bloqueo Reproducción de cinta 1 Pulse el botón de abertura del monitor LCD OPEN 1 y abra el monitor LCD de manera que forme un ángulo de 90 con el cuerpo de la videocámara 2 2 Ajuste el monitor LCD con un ángulo que permita ver fácilmente las imágenes de la pantalla 3 Ponga el con...

Page 119: ... botón de bloqueo y ponga el interruptor de alimentación en CAMERA 5 Pulse el botón STILL para iniciar la grabación AUTO CARD 90 0 1 90 3 Ponga el conmutador selector de medio en CARD 4 Mantenga pulsado el botón de bloqueo y ponga el interruptor de alimentación en VCR 5 Pulse e o r del botón de operación para mover el cuadro de selección hasta la imagen deseada 3 6 2 5 1 4 10 0 0003 NORMAL 2 1 NOR...

Page 120: ...EMPO SAL I DA CT MODO DEMO I D I OMA OTROS LUZ FONDO BRI L LO LCD V I COLOR LCD MAT I Z BR I L LO LCD AJ V I SOR LCD V I SUAL I A LUZ D Í A Á REA AJUSTE 12H 24H AJUSTE RELOJ COP AUD I O EF IMAGEN AUD I O EF REPROD MUL T IMAGEN AJUSTE REPRO REMOTO SON I DO COD T I EMPO SAL I DA CT OTROS BRI L LO LCD COLOR LCD MAT I Z LCD LUZ FONDO BR I L LO V I SUAL I AJUSTE RELOJ ENFO MANU EXPOS I C I ÓN VEL OBTUR...

Page 121: ...M TARJ MENÚ AUTOD I SPA ESCE D I S ENFO MANU EXPOS I C I ÓN VEL OBTURA EF IMAGEN AJUSTE MAN 3 6 2 5 1 4 D I APOS I T IMAGEN EF BORRAR PROTEGER ORDEN IMP BORR TODO AJUSTE REPRO AUTOD I SPA SON I DO V I SUAL I MODO GRABA MENÚ D I APOS I T IMAGEN EF BORRAR PROTEGER ORDEN IMP BORR TODO AJUSTE REPRO REMOTO SON I DO OTROS NORMAL 10 0 0006 NORMAL 2 1 AJ V I SOR LCD V I LUZ FONDO BRI L LO LCD COLOR LCD MA...

Page 122: ... RETOUR D I S REGL MANUEL I NSTANTANE ZOOM NUM EFF I NSTAN V I T BANDE 16 9 REGL CAMERA MODE AUD I O VENT MI CRO ZOOM REGL AUD I O TEL ECOM SON CODEHOR SORT I E CH SORT I E CH DEMO MODE LANGUE D I VERS RE TROECL A I LUMI N LCD V I SEUR COUL EURLCD LCD LUM TE I NTE LCD R V I SEUR AF F I CHAGE HEURE ETE ZONE REGLAGE 12H 24H REGL HORLOGE DOUB SON MENU IMAGE AUD I O EFF ET LECT VUES MUL T I REGLE LECT...

Page 123: ...POS I T I ON V I T OBTUR MENU IMAGE REGL MANUEL ENREG MODE EFF I NSTAN ZOOM NUM REGL CAMERA FORMAT TEL ECOM SON MODE LANGUE DEMO D I VERS RE TROECL A I LUMI N LCD V I SEUR COUL EURLCD LCD LUM TE I NTE LCD R V I SEUR AF F I CHAGE HEURE ETE ZONE REGLAGE 12H 24H REGL HORLOGE PRES D I APO IMAGE MENU EFFACER PROTGER ORD IMPRES EFFACER T T REGLE LECT TEL ECOM SON D I VERS RE TROECL A I LUMI N LCD V I SE...

Page 124: ...bed herein on behalf of Sharp The warranties described herein shall be the sole and exclusive warranties granted by Sharp and shall be the sole and exclusive remedy available to the purchaser Correction of defects in the manner and for the period of time described herein shall constitute complete fulfillment of all liabilities and responsibilities of Sharp to the purchaser with respect to the Prod...

Reviews: