background image

Digital Still Camera Features
Card Recording

Digital Still Camera

Features

57

Recording with the Self-
timer

Available mode:

CARD-CAMERA

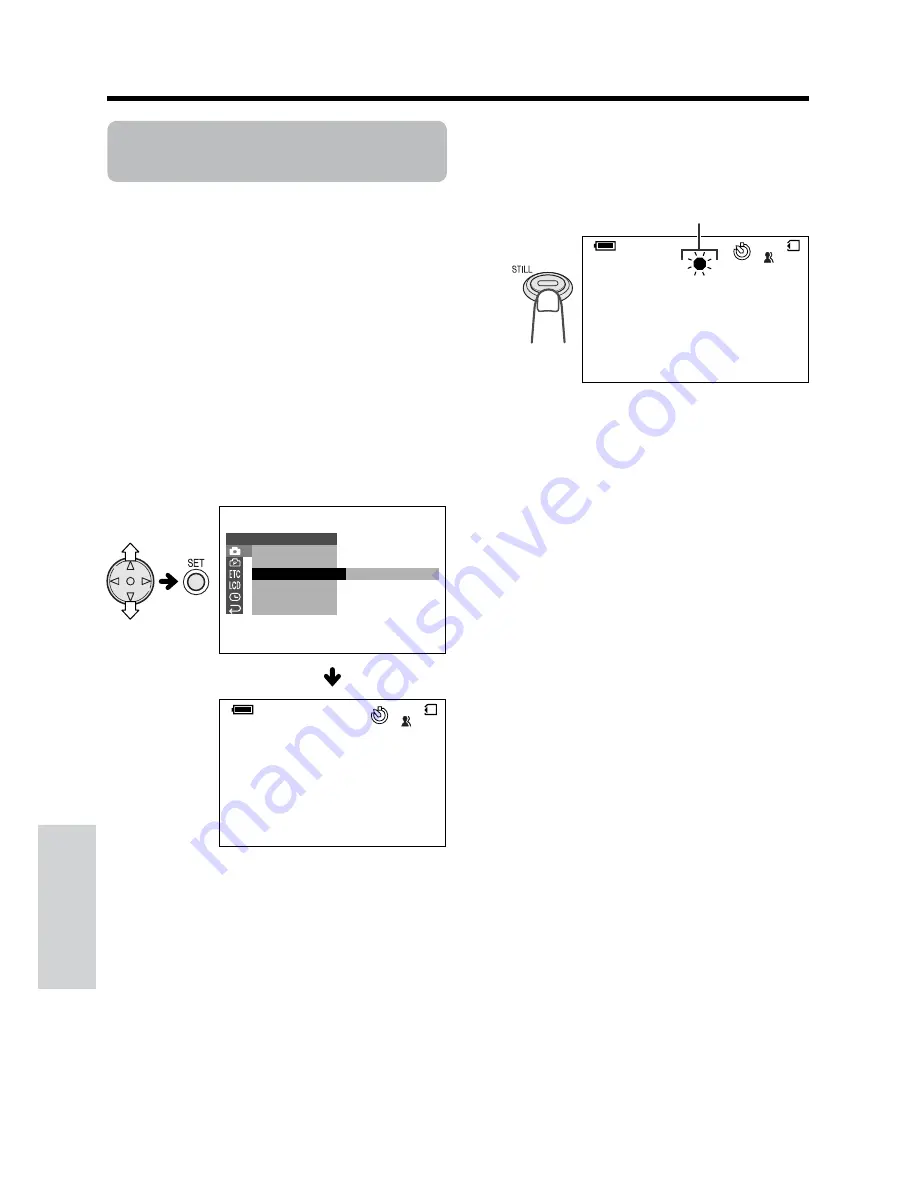
The self-timer function allows you to record
images after a time-lag of 10 seconds. This is
convenient when you want to record an image
of you and your friends together.

1

In CARD-CAMERA mode, press the
MENU button until the menu screen
appears.

2

Press

l

 or 

m

 on the operation button

to select 

T

, then press the SET button.

3

Press

l

 or 

m

 to select “SELF TIMER”,

then press the SET button.

4

Press the STILL button fully to set the
timer.

• The self-timer operating indicator flashes

while the timer counts down.

• The shutter automatically releases after

10 seconds, and a still image of the
subject is recorded.

Notes:

• When recording with the self-timer, stabilize the

camcorder in the horizontal plane by attaching it
to a tripod, etc.

• To cancel the self-timer, press the STILL button

fully again in step 4 above.

• Self-timer mode cancels after recording one

image. Repeat steps 1 to 4 to record another
image with the self-timer.

Caution:

• Do not turn the power off or remove the card

once the self-timer operating indicator begins
flashing.

E X E C U T E

NORMAL

A U T O

/

0

1

8 0

CARD

E F F E C T

P I C .
S C E N E ME N U

S E L F

R E T U RN

GU I D E

T I ME R

S E T T I N G    1

NORMAL

A U T O

/

0

1

8 0

CARD

Self-timer operating indicator

Summary of Contents for ViewCam VL-NZ100U

Page 1: ...he camcorder For assistance in reporting the theft or loss of this product record on the line below the model number and serial number which are located on the bottom of the unit Please retain this information See page 79 for use of Demo mode Appendix Preparation Useful Features Operation References Basic Operations Advanced Features Digital Still Camera Features ...

Page 2: ...AUTION applies to the supplied AC adapter TO PREVENT ELECTRIC SHOCK MATCH WIDE BLADE OF PLUG TO WIDE SLOT FULLY INSERT CAUTION If the AC adapter is misplaced or needs to be replaced obtain the same type of adapter from a SHARP service center of your dealer BATTERY DISPOSAL CONTAINS LITHIUM ION RECHARGEABLE BATTERY MUST BE RECYCLED OR DISPOSED OF PROPERLY CONTACT LOCAL AGENCIES FOR INFORMATION ON R...

Page 3: ...cate the receiving antenna CIncrease the separation between the equipment and receiver CConnect the equipment into an outlet on a circuit different from that to which the receiver is connected CConsult the dealer or an experienced radio TV technician for help CAUTION ON LITHIUM BATTERY MEMORY BACKUP BATTERY If a battery is reversed positive end where the negative end belongs and vice versa it can ...

Page 4: ...e system This will prevent damage to the product due to lightning and power line surges 1 Read InstructionsCAll the safety and operating instructions should be read before the product is operated 2 Retain InstructionsCThe safety and operating instructions should be retained for future reference 3 Heed WarningsCAll warnings on the product and in the operating instruc tions should be adhered to 4 Fo...

Page 5: ... b If liquid has been spilled or objects have fallen into the product c If the product has been exposed to rain or water d If the product does not operate normally by following the operating instructions Adjust only those controls that are covered by the operating instructions as an im proper adjustment of other controls may result in damage and will often require extensive work by a qualified tec...

Page 6: ...e direction of the arrow completely until it locks into place 2 Charging the Battery Pack 1 Attach the battery pack on the camcorder and make sure that the Power switch is set to OFF 2 Plug the AC adapter into a power outlet 1 then insert the DC plug into the DC input jack 2 The charge indicator lights up The charge indicator turns off when the battery is charged 3 Remove the DC plug from the DC i...

Page 7: ... holder to fully retract Close the compartment door by pressing the center until it clicks into place SAVE R E C Inserting a Card You can use an SD Memory Card or a MultiMediaCard for storing still images 1 Make sure that the Power switch is set to OFF 2 Slide the card slot cover release and open the card slot cover in the direction of the arrow 3 Insert a card into the slot as shown below and pus...

Page 8: ...rol to T 1 tele photo or W 2 wide angle side Tape Playback 1 Set the Media Selection switch to TAPE 2 Hold down the Lock button and set the Power switch to VCR 3 Press j or k on the Operation button to rewind or fast forward the tape to the desired point 4 Press m to begin playback To stop playback Press l Volume Control Push the Volume control to the L or side to increase 1 or decrease 2 the volu...

Page 9: ...ng recorded on the card and returns to white when recording completes AU T O NORMAL CARD 9 8 1 7 0 1 8 9 0 1 0 0 0 0 2 2 P A GE 1 NORMA L P L A Y B A C K 1 4 2 5 3 6 1 0 0 0 0 0 2 1 P A GE 1 NORMA L P L AY B ACK AU T O NORMAL 9 8 1 CARD NORMAL 9 8 1 CARD 3 0 0 0 0 0 1 NORMA L 0 1 3 1 0 0 0 0 0 1 NORMA L 0 1 1 CARD Card Playback 1 Set the Media Selection switch to CARD 2 Hold down the Lock button a...

Page 10: ... VL NZ150 16 MB CR2025 type lithium battery The part numbers for the AC adapter and battery pack supplied with this camcorder are valid only in the U S and Latin America If this camcorder was purchased outside of these areas the part numbers may be different Please refer to the part numbers printed on the labels of the supplied AC adapter and battery pack AA batteryK2 Extended life battery pack BT...

Page 11: ...S accessories For optional and additional accessories contact your local dealer call the Sharp Accessories and Supply Center at 1 800 642 2122 or visit SHARP s website http www sharp usa com Standard life battery pack BT L225n Extended life battery pack BT L445n ...

Page 12: ... Avoid placing the camcorder in close proximity to lighting equipment The heat from incan descent lights may de form the camcorder or cause it to malfunction Always respect prohibitions or restrictions on the use of electronic equipment on commercial flights or in other sensitive ar eas Be aware of the temperature and humidity You can use your camcorder at 32 F to 104 F 0 C to L40 C and at 30 to 8...

Page 13: ... 17 Using the Lens Cap 17 Tips on Recording Positions 18 Camera Recording Selecting the Camcorder Mode 19 Easy Camera Recording on Tape in Full Auto Mode 20 Zooming 21 Auto Focus 21 Macro Shots 21 Remaining Recording Time Display 22 Remaining Battery Power Display 22 Playback Tape Playback 23 Volume Control 23 Video Search 24 Still 24 Watching Playback on a TV 25 Using the Menu Screens 26 Camera R...

Page 14: ... Recording 39 Slow 39 Gamma Playback 40 Copying an Image from Tape to Card 40 Picture Effect Playback 41 Contents Advanced Features Camera Recording Manual Focus 42 Manual Exposure 43 White Balance Lock 44 Setting the Camcorder to Full Auto Mode 44 Digital Picture Effects 45 Scene Menu Program AE 46 Playback Using the Time Code 47 Editing 48 Recording from an External Source 49 Using the Camcorder...

Page 15: ...rd 58 Playback Card Playback 59 Delete Protection 60 Deleting Stored Images 61 Print Order 63 Transferring Data on Card to Computer 65 Installing the USB driver 65 Slide Show Playback 67 Picture Backlight Adjustments 68 Turning off the Confirmation Sound 69 Useful Information 70 Demonstration Mode 79 Before Requesting Service 80 Specifications 82 Guía de operación rápida en español 83 Visualizacio...

Page 16: ...s For details on the use of each part refer to the page number indicated in brackets Front view Lithium battery compartment door p 14 Stereo microphone Zoom lens Cassette holder p 12 Cassette compartment door p 12 Cassette compartment door release p 12 DC input jack pp 10 11 ...

Page 17: ...SB terminal pp 65 66 DV terminal pp 50 51 AV jack pp 25 48 50 Media Selection switch TAPE CARD selection switch p 19 Operation button Jack cover pp 25 48 51 65 Power Zoom Wide angle Telephoto control p 21 VOLume control p 23 LCD monitor ...

Page 18: ...9 Battery mounting surface p 9 Tripod adapter socket p 33 GAMMA BRIGHTER button pp 29 30 40 FADE button p 31 SET button p 26 Remote sensor p 38 STILL button pp 33 40 55 Power switch CAMERA VCR select switch p 19 Speaker Card slot cover p 13 MANUAL button p 6 RECord START STOP button p 20 MENU button pp 6 26 ...

Page 19: ...T URN S E T OTH E RS B E E P REMO T E T I ME CODE T C OU T RE T URN E F F E C T P I C S C E NE MENU QK RE T URN GU I D E RE T URN E F F E C T P L A Y B AC K P I C AUD I O DUB AUD I O ANL G DGT L RE T URN S E T S E T T I NG 1 DG T L Z OOM T A P E D I S S PE ED 1 6 9 AUD I O MODE RE TURN E F F E C T P I C S C E NE MENU QK RE T URN GU I D E RE T URN OTH E RS B E E P T I ME CODE T C OU T DEMO L A NGUA...

Page 20: ... F E C T P I C S C E NE MENU S E L F RE T URN GU I D E T I ME R DG T L Z OOM D I S RE C MODE RE TURN OTH E RS FORMAT B E E P DEMO L A NGUAGE RE TURN MODE C L O C K S E T D I S P L A Y S E T T I NG 1 2 H 2 4 H RE TURN E F F E C T P I C S C E NE MENU S E L F RE T URN GU I D E T I ME R E F F E C T P L A Y B AC K P I C S L I D E DE L E T E PRO T E C T SHOW P R I RE T URN ORDE R S E T S E T T I NG 1 S ...

Page 21: ... off White balance screen p 44 Exposure setting screen p 43 Indicators on Each time you press the MENU button the screen changes as shown below The example screens shown are for TAPE CAMERA mode AU T O 3 0 min E F F E C T S E T T I NG P I C S C E NE MENU QK RE T URN GU I D E RE T URN 1 AU T O AU T O E X POSURE AU T O WH I T E BA L AU T O 3 0 min MAN F OCUS AUT O AUT O AUT O MANUAL button MENU butt...

Page 22: ... The tape is about to end Prepare a new cassette see page 12 THE ENDS SOON TAPE DEW LAMP LAMP DEW The tape has reached the end Replace it with a new cassette see page 12 The battery is almost depleted Replace it with a fully charged battery pack see page 9 Dew has formed inside the camcorder Wait a few hours for the dew to dry away see page 76 About 10 seconds after this warning appears the camcor...

Page 23: ... is not compatible with this camcorder Format the card to use it with this camcorder see page 58 The card has not been formatted with this camcorder Format the card see page 58 The card is write protected see pages 13 74 You are trying to delete a protected image Cancel the protection setting see page 60 The selected image cannot be read by this camcorder Format the card to use it with this camcor...

Page 24: ...l not use the camcorder for a long period of time Make sure that the battery pack is firmly attached during operation If it is not the battery pack may come off or camcorder operation may fall because of the poor contact pressure To prevent damage to the battery pack when removing be sure to firmly hold the battery pack while pressing the release Use only SHARP model BT L225 or BT L445 battery pac...

Page 25: ...erature and the condition of the battery pack See page 75 for more information on using the battery pack Caution Charge only SHARP model BT L225 or BT L445 battery packs Other types of battery packs may burst causing personal injury and damage Extending battery pack life Even when the battery pack is not used the capacity of the battery pack will naturally deteriorate over time To limit the deteri...

Page 26: ...C input jack 2 The camcorder is supplied power 3 Hold down the Lock button and set the Power switch to CAMERA or VCR Note When using the AC adapter to power the camcorder the battery pack is not charged Cautions BEFORE REMOVING THE DC PLUG ALWAYS STOP RECORDING OR PLAYBACK AND TURN THE POWER OFF Removing the DC plug while shooting or during playback may damage the tape by causing it to wrap around...

Page 27: ...ment door while the cassette holder is extending or retracting Be careful not to get your fingers caught in the cassette holder Do not apply force to the cassette holder except when pressing the W mark to close it Do not tilt the camcorder or hold it upside down when you are inserting or removing a cassette It may damage the tape Remove the cassette if you will not use the camcorder for a long per...

Page 28: ...the SD Memory Card or the MultiMediaCard see page 71 The supplied card is preformatted for immediate use See pages 73 and 74 for more information on the cards intended for use with this camcorder Caution Do not remove the card from the camcorder while recording data on the card S indicator flashes during recording This may delete the recorded image or damage the card About the write protect switch...

Page 29: ...ss the W mark gently then close the cassette compartment door by pressing the center until it clicks into place Removing Perform steps 1 and 2 above then lift out the battery from the battery holder Notes on the Use of the Lithium battery REPLACE BATTERY WITH TOSHIBA MATSUSHITA OR HITACHI MAXELL TYPE CR2025 ONLY USE OF A DIFFERENT BATTERY MAY PRESENT A RISK OF FIRE OR EXPLOSION X KEEP THIS BATTERY...

Page 30: ...ess l or m on the operation button to select I then press the SET button 3 Press l or m to select LANGUAGE LANGUE or IDIOMA then press the SET button The language selection screen appears 4 Press l or m to select the desired language then press the SET button The menu screen displays in the language selected 5 Press the MENU button to turn off the menu screen Note The operation procedures in the f...

Page 31: ...o select 2003 year then press the SET button 7 Press l or m to select 10 AM hour then press the SET button 8 Press l or m to select 30 minute then press the SET button The internal clock now starts operating 9 Press the MENU button to turn off the menu screen Note If the date and time have been set the SETTING 1 screen T appears in step 2 Select SETTING in the CLOCK SET screen P using the Operatio...

Page 32: ...E TURN 24H 2 1 H 24H Attaching the Wrist Strap Attach the wrist strap to the wrist strap loop as shown below Caution Do not swing the camcorder by the strap Attaching the Lens Hood When recording outdoors on a sunny day or in a location with bright lighting attach the supplied lens hood to the camcorder Turn the lens hood in the direction of the arrow to attach it To remove it turn it in the oppos...

Page 33: ... the thumb rest on the left side of the screen Basic posture Shooting from a high angle Shooting from a low angle Always attach the lens cap over the lens when not using the camcorder When recording hang the lens cap on the wrist strap to keep the cap out of the way Turn the LCD monitor so that the screen faces upward Balance your weight on both legs Turn the LCD monitor so that the screen faces d...

Page 34: ...ode For recording still images on a card 1 Set the Media Selection switch to CARD 2 Hold down the Lock button and set the Power switch to CAMERA TAPE CAMERA mode For recording motion and still images on a tape 1 Set the Media Selection switch to TAPE 2 Hold down the Lock button and set the Power switch to CAMERA CARD VCR mode For playing back still images recorded on a card 1 Set the Media Selecti...

Page 35: ...sumed in Recording Standby mode Turn off the power if you will not be recording again soon If the camcorder remains in Recording Standby mode for more than 5 minutes in TAPE CAMERA mode the power will automatically turn off to save battery power and to protect the tape from being damaged To resume recording set the Power switch to OFF and then back to CAMERA The camcorder will make a confirmation ...

Page 36: ...keep the subject in the center of the scene Notes If no subject is in the center of the scene the focus area will expand and the subject nearest the center will be focused on If no subject is displayed the camcorder will automatically zoom out until a subject comes into the frame Auto Focus may not work in the situations described on page 42 In these situations use the manual focus function Macro ...

Page 37: ...nly lose power The tape has reached the end THE ENDS SOON TAPE TAPE END CHANGE THE CASSE TTE TAPE END Warning indicator Approx remaining time Less than 1 min 3 0 min BAT TERY I S TOO LOW Remaining Recording Time Display Available mode TAPE CAMERA When the camcorder is recording in TAPE CAMERA mode an on screen indicator displays the approximate remaining tape time in minutes Notes The remaining re...

Page 38: ...ou do not intend to record press l to turn the mark off then press m to begin playback This will ensure your previous recording is not erased see pages 49 51 Basic Operations Playback To stop playback Press l VOLUME Volume Control Available mode TAPE VCR When the camcorder is in TAPE VCR mode push the Volume control to the L or side to increase 1 or decrease 2 the volume The volume level indicator...

Page 39: ...ast forward or rewind picture displays 2 If the scene is still rather far from the current tape position release the Operation button to normal fast forward or rewind 3 Repeat steps 1 and 2 above until you find the scene 4 Press m to begin normal playback Notes The sound is off during search You may experience picture noise during search This is not a malfunction Still Available mode TAPE VCR The ...

Page 40: ...3 Turn on the TV and set it to the AV or VIDEO channel See the operation manual of your TV When connecting to a TV via a VCR turn on the VCR and set it to the AV or LINE input channel Operate the TV as you normally do to view the signal from the VCR See the operation manuals of your TV and VCR 4 Set the Power switch on the camcorder to VCR and begin playback see page 23 Notes If your TV or VCR has...

Page 41: ...f the SET button To adjust another menu item press l or m to select RETURN and press the SET button then perform steps 3 to 5 To turn off the menu screen Press the MENU button Notes Certain menu items are common to all camcorder modes If the BEEP menu item for example is set to OFF in TAPE CAMERA mode it will be automatically set to OFF in other modes The menu screen automatically turns off if no ...

Page 42: ... T I NG 1 ON GU I DE To turn off the recording guide Select OFF in step 4 above then press the SET button Note When using manual focus you cannot change the recording guide This function helps you decide on the size of the subject occupying the screen Select one of five recording guides Types Cross A cross mark at the center of the screen for placing the subject at the center Focus Focus brackets ...

Page 43: ...ty decreases when higher digital zoom settings are used 1 In TAPE CAMERA or CARD CAMERA mode press the MENU button until the menu screen appears 2 Press l or m on the operation button to select Y then press the SET button 3 Press l or m to select DGTL ZOOM then press the SET button 4 Press l or m to select 40 or 300 then press the SET button 5 Press the MENU button to turn off the menu screen OF F...

Page 44: ...naffected In TAPE CAMERA or CARD CAMERA mode press the GAMMA BRIGHTER button once GAMMA appears indicating that Gamma Brightness Compensation is now working To obtain a brighter picture Press the GAMMA BRIGHTER button again The x indicator appears Note When the x indicator is displayed the background will become slightly brighter To cancel Gamma Brightness Compen sation Press the GAMMA BRIGHTER bu...

Page 45: ... To obtain a brighter picture Press the GAMMA BRIGHTER button again The e indicator appears To cancel the gain up function Press the GAMMA BRIGHTER button until GAMMA disappears Notes You may experience some picture noise in Gain up mode which increases when the e displays When the e indicator displays you may get a shadow image behind a subject that is moving around a lot Fine brightness adjustme...

Page 46: ...TART STOP button at the point where you wish to stop recording The image and sound fade out as the picture gradually turns white The camcorder then returns to Recording Standby mode To cancel Fade mode Press the FADE button again in Recording Standby mode To use Fade Out only 1 During camera recording in TAPE CAMERA mode press the FADE button to display FADE 2 Press the REC START STOP button at th...

Page 47: ...es To cancel the quick return function while SEARCH is flashing press the SET button twice Quick return will not work if you remove the cassette and reload it after recording or if nothing has been recorded since loading S T AR T S T OP E F F E C T P I C S C E NE MENU QK RE T URN GU I D E RE T URN S E T T I NG 1 SE ARCH Edit Search Available mode TAPE CAMERA The edit search function lets you searc...

Page 48: ...on To cancel the still image Press the STILL button fully Notes Still Recording can also be used during recording by pressing the STILL button fully The picture quality in Still Recording function will be slightly lower than normal pictures Attaching the Supplied Tripod Adapter Attach the supplied tripod adapter when using a tripod with the camcorder 1 Align the tripod adapter with the tripod adap...

Page 49: ...E CAMERA CARD CAMERA The digital image stabilization DIS function allows you to stabilize the image by electroni cally compensating for relatively minor image shaking that is often annoying in close up shots 1 In TAPE CAMERA or CARD CAMERA mode press the MENU button until the menu screen appears 2 Press l or m on the operation button to select Y then press the SET button 3 Press l or m to select D...

Page 50: ... not rotate the monitor section to the self recording position during recording or playback For recording in Self Recording mode be sure to rotate the monitor section NOT the lens section If you hold the camcorder upside down with the lens at the bottom the subject will be recorded upside down More Information on Self Re cording Use the remote control to begin stop recording on tape The screen ima...

Page 51: ...tors are turned on To return to SP mode Select SP in step 4 above S P L P DG T L Z OOM T A P E D I S S PE ED 1 6 9 AUD I O MODE RE TURN S E T T I NG 2 LP TAPE SPEED L P AU T O 4 5 min Notes on the use of LP mode To record in LP mode be sure to use a Mini DV cassette labeled for use with LP mode Frozen images mosaic pattern picture noise audio interruptions or audio loss may occur in the following ...

Page 52: ...ss l or m to select AUDIO MODE then press the SET button 4 Press l or m to select 16bit then press the SET button 5 Press the MENU button to turn off the menu screen The 16 bit audio recording mode indicator only appears when the on screen indicators are turned on To return to 12 bit audio recording mode Select 12bit in step 4 above Note When using Audio Dubbing with 16 bit audio recordings both t...

Page 53: ... button 4 Press l or m to select ON then press the SET button 5 Press the MENU button to turn off the menu screen Operating Aim the remote control at the remote sensor of the camcorder and press the control buttons to operate Notes Do not use old and new batteries together or batteries of different brands together Be careful not to expose the remote sensor to direct sunlight or strong interior lig...

Page 54: ... S E T D I S P L A Y S E T T I NG 1 2 H 2 4 H RE TURN D I SPL AY DATE T IME AU T O 3 0 min 3 0 0 2 2 0 3 M A 0 1 J UN Notes The date or date and time appears when the on screen indicators are turned on Before recording make sure that the date and time have been correctly set If they have not been set the display will be left blank when playing back the recording The display will also be left blank...

Page 55: ...2 AUDIO AUDIO 2 1 2 1 Copying an Image from Tape to Card Available mode TAPE VCR You can capture your favorite image frame from a video tape recording and save it on card 1 Insert the recorded Mini DV cassette and a card in the camcorder 2 Set the camcorder to TAPE VCR mode then begin tape playback 3 Press m on the Operation button at the point where the desired image appears A still picture of th...

Page 56: ...tograph SOLARI The contrast of the subject is enhanced creating a unique artistic image NEGA The blacks and whites of the image are reversed and colors of the image are inverted BLUE The picture is displayed with the effect of playback through a blue filter The example screens shown are for TAPE VCR mode 1 During playback in TAPE VCR or CARD VCR mode press the MENU button until the menu screen app...

Page 57: ...e to focus correctly if the subject is closer than approxi mately 5 feet 1 5 m Set the zoom control to wide angle and try refocusing again If the lens is dirty or fogged the camcorder may not be able to focus correctly When MF is displayed you can manually adjust the focus by pressing l or m even if the focus setting screen is not displayed Fast speed shutter being used under fluorescent lighting ...

Page 58: ...rd a clear image In this case use the manual exposure function to correct the exposure level Background is too bright and subject too dark backlit subject Increase the exposure level to allow more light through the lens Subject is too bright against background Decrease the exposure level to allow less light through the lens 1 In TAPE CAMERA or CARD CAMERA mode press the MANUAL button until the exp...

Page 59: ... the SET button to cancel the procedure and then repeat step 3 4 Press the MANUAL button until the normal screen appears To return to Auto White Balance mode Press the SET button while the white balance setting screen is displayed Note White Balance setting will cancel if a scene setting is selected thereafter Setting the Camcorder to Full Auto mode To easily record good quality images perform cam...

Page 60: ...s displayed OF F B W S E P I A SO L AR I B L U E N E G A E F F E C T P I C S C E NE MENU QK RE T URN GU I D E RE T URN S E T T I NG 1 B W P I C EFFECT Types B W To record in black and white SEPIA To record in sepia color similar to that of an old photograph SOLARI To record with enhanced contrast creating a unique artistic image NEGA To record a picture whose blacks and whites of the image are rev...

Page 61: ...g indicator displays when the on screen indicators are turned on To cancel the scene setting Select OFF in step 4 above Note Scene settings cannot be used when displaying a still image OF F SUNL I GH T SPORT DUS K PAR T Y E F F E C T P I C S C E NE MENU QK RE T URN GU I D E RE T URN S E T T I NG 1 SPORT SCENE MENU SPORT Types SPORT When you want to record a fast moving subject SUNLIGHT When the ba...

Page 62: ...TC D I S P D I S P OF F ON OTH E RS B E E P REMO T E T I ME CODE T C OU T RE T URN Advanced Features Playback 5 Press the MENU button to turn off the menu screen The time code appears when the on screen indicators are turned on To turn off the time code Select DISP OFF in step 4 above Note When the tape reaches an unrecorded section the time code returns to zero TC0 00 00 Once recorded the time co...

Page 63: ...cording 4 Press the Pause Still button on the VCR to pause recording when the source tape reaches the beginning of the sequence to be cut 5 Press the Pause Still or Record button on the VCR to resume recording when the source tape reaches the end of the sequence to be cut POWER TV VCR SET UP CHANNEL REC PLAY STOP EJECT PAUSE STILL To stop editing Press l on the camcorder and press the Stop button ...

Page 64: ...if the picture is properly received 3 Press the REC START STOP button on the camcorder The camcorder enters Recording Standby mode 4 Press m on the Operation button to begin recording Notes To pause recording press m Press m again to resume recording To operate by remote control perform steps 1 and 2 above and press the REC START STOP button then press the PAUSE STILL button g If NO SIGNAL is disp...

Page 65: ...perly received 8 Press the Record button on the digital equipment Notes The camcorder is not guaranteed to work with all digital analog equipment Contact the manufac turer of your equipment for advice If the camcorder outputs a video recording with a copyright signal the digital equipment cannot record or save it The camcorder may not convert some input video recordings properly e g discoloration ...

Page 66: ...ecording when the source tape reaches the beginning of the sequence to be cut 2 Press m to resume recording when the source tape reaches the end of the sequence to be cut Notes Make sure that the video equipment from which you are recording can output dubbing signals via the DV terminal If the video equipment is not set to playback mode or the DV cable is not properly connected NO SIGNAL is displa...

Page 67: ...3 Press l or m on the operation button to select V then press the SET button 4 Press l or m to select AUDIO then press the SET button 5 Press l or m to select the desired audio playback mode then press the SET button 6 Press the MENU button to turn off the menu screen The selected audio playback mode indicator only appears when the on screen indicators are turned on Note The audio playback mode in...

Page 68: ...rding mode 12 bit audio recording The audio is recorded in stereo on Audio 1 Audio 1 Stereo left and right sound Audio 2 No audio 16 bit audio recording The audio is recorded in stereo with the left and right sound on two separate channels Audio 1 Left sound Audio 2 Right sound In Audio Dubbing mode 12 bit audio recording The dubbed audio is recorded on Audio 2 Audio 1 Original stereo left and rig...

Page 69: ...u wish to change the dubbed audio or dub additional scenes 1 Press the MENU button to turn off the audio dubbing screen 2 Repeat steps 1 to 6 above Notes It is recommended that you use Audio Dubbing only with recordings made with this camcorder Use of recordings made with other digital video equipment may result in poor audio quality Audio dubbing will automatically pause if the original audio cha...

Page 70: ...ress the STILL button fully to begin recording The S indicator flashes red while data is being recorded on the card and returns to white when recording completes To record another image release the STILL button and make sure the picture is not frozen in the monitor then perform steps 6 and 7 Notes Recording under insufficient lighting may result in blurred images It is recommended that you use a t...

Page 71: ...icator is also displayed in CARD VCR mode The picture quality indicator displayed during playback is based on the amount of data for that recorded image Since the amount of data differs depending on factors such as image detail sometimes the picture quality indicator displayed during playback may not match the picture quality setting used during recording Note The number of recordable images diffe...

Page 72: ...The self timer operating indicator flashes while the timer counts down The shutter automatically releases after 10 seconds and a still image of the subject is recorded Notes When recording with the self timer stabilize the camcorder in the horizontal plane by attaching it to a tripod etc To cancel the self timer press the STILL button fully again in step 4 above Self timer mode cancels after recor...

Page 73: ...you use the AC outlet for the power supply 1 Insert a card to be formatted into the camcorder 2 In CARD CAMERA mode press the MENU button until the menu screen appears 3 Press l or m on the operation button to select I then press the SET button 4 Press l or m to select FORMAT then press the SET button To cancel formatting press l or m to select NO then press the SET button 5 Press l or m to select...

Page 74: ... the images on the card The search can be very fast so it is recommended that the on screen indicators turns on to display the image number To return to a thumbnail of the images press the SET button again Notes Depending on the amount of data for the recorded image the picture quality indicator displayed during playback may not match the picture quality setting used during recording The images bi...

Page 75: ...mage repeat steps 4 and 5 6 Press the MENU button to finish the setting E X E CU T E 1 4 2 5 3 6 1 0 0 0 0 0 2 1 P A GE 1 NORMA L PROT E C T E F F E C T P L A Y B AC K P I C S L I D E DE L E T E PRO T E C T SHOW P R I RE T URN ORDE R S E T 1 4 2 5 3 6 3 0 0 0 0 0 2 1 P A GE 1 NORMA L PROT E C T To cancel the protection set ting 1 Select the image for delete protection cancellation in step 4 above ...

Page 76: ...the image to be deleted 6 Press the SET button to set the image To cancel deletion press l or m to select NO then press the SET button 7 Press l or m to select YES then press the SET button to delete the image If you want to delete another image repeat steps 5 to 7 8 Press the MENU button to finish the setting Note The protected images cannot be deleted Cancel the protection setting to delete the ...

Page 77: ...he SET button to delete all the images To cancel deletion press l or m to select NO then press the SET button 6 Press the MENU button to finish the setting Notes The protected images cannot be deleted Cancel the protection setting to delete the image see page 60 If a print order is assigned to delete protected images and you perform the procedure above the print order will cancel the protection se...

Page 78: ...DE R S E T 1 4 2 5 3 6 1 0 0 0 0 0 2 1 P A GE 1 NORMA L PR I NT Assigning Print Order to an Image 1 In CARD VCR mode press the MENU button until the menu screen appears 2 Press l or m on the operation button to select S then press the SET button 3 Press l or m to select PRI ORDER then press the SET button 4 Press l or m to select PRI SELECT then press the SET button The PRINT indicator appears 1 4...

Page 79: ... Assigning Print Order to an Image 2 Press l or m to select PRI NONE then press the SET button to cancel the print order for all images The M indicators are turned off 1 4 2 5 3 6 3 0 0 0 0 0 2 1 P A GE 1 0 NORMA L P R I NT P 1 4 2 5 3 6 3 0 0 0 0 0 2 1 P A GE 1 NORMA L P R I NT P R I S E L E C T P R I AL L P R I NON E RE T URN 1 4 2 5 3 6 1 0 0 0 0 0 2 1 P A GE 1 NORMA L P L A YB AC K P P P P P P...

Page 80: ...iver In the examples below the CD ROM drive letter is taken as R Select the correct drive letter according to your operating environ ment Windows 98 98 SE 1 Add New Hardware Wizard appears after performing Preparation 2 Insert the CD ROM containing the USB driver into the CD ROM drive then click Next 3 Select Search for the best driver for your device then click Next 4 Select Specify a location an...

Page 81: ...e the AC adapter as a power source for extended periods of use Windows ME 1 Add New Hardware Wizard appears after performing Preparation 2 Select Automatic search for a better driver 3 Insert the CD ROM containing the USB driver into the CD ROM drive then click Next 4 Select SHARP DVC USB Ver 1 0 located in the WINME folder of the CD ROM drive then click OK to begin installation 5 Click Finish to ...

Page 82: ...to select SLIDE SHOW then press the SET button Beginning from the image selected in step 2 the recorded images will display in full screen one after another in order of recording After playing back all the images on the card once Slide Show Playback automatically stops 6 Press the MENU button to turn off the menu screen then press the SET button to display a thumbnail of images To stop Slide Show ...

Page 83: ...or picture not the recorded image Adjusting the Backlight 1 Press the MENU button until the menu screen appears 2 Press l or m on the operation button to select O then press the SET button 3 Press l or m to select BACKLIGHT then press the SET button 4 Press l or m to select AUTO NORMAL BRIGHT or OFF then press the SET button AUTO The camcorder automatically switches between NORMAL and BRIGHT depen...

Page 84: ...ion sounds ON OF F OTH E RS B E E P T I ME CODE T C OU T DEMO L A NGUAGE RE TURN MODE OFF BEEP 1 Press the MENU button until the menu screen appears 2 Press l or m on the operation button to select I then press the SET button 3 Press l or m to select BEEP then press the SET button 4 Press l or m to select OFF then press the SET button 5 Press the MENU button to turn off the menu screen Note If you...

Page 85: ...ck Use a wide angle setting for fast moving subjects Note It may take longer to focus when zooming and panning are used frequently Lighting For clear good quality recording 500 to 100 000 lux is needed Recording is possible with less light but the picture quality may suffer Adequate lighting is also essential for correct white balance Note The figures in the chart are approximations Situation Lux ...

Page 86: ...y is prohibited Mini DV cassette DV cassette 8 mm cassette Note This camcorder reproduces the highest picture quality when used with an ME tape It is recommended you use an ME tape for high quality recording and playback 8 mm VHS and Beta cassettes cannot be used for playback or recording with this camcorder SD Memory Card and MultiMediaCard SD Memory card and MultiMediaCard are compact recording ...

Page 87: ...and damage the tape Do not place the Mini DV cassette in direct sunlight near strong heat sources or in areas with excessive steam Store the Mini DV cassette in its case and stand it in an upright position If the tape is not properly wound rewind the tape Do not drop the Mini DV cassette or subject it to excessive shocks To protect recordings against acciden tal erasure Slide the protect tab on th...

Page 88: ...ronment Locations subject to electrical noise or powerful magnetic fields Data on the card may be destroyed erased Locations exposed to direct sunlight Locations subject to high temperature or high humidity Locations where dust gathers in large amounts or blows through the air Corrosive environments Sunlit or enclosed spaces and other such locations subject to high temperature Watch out for conden...

Page 89: ...adapter The adapter is a sealed unit Do not attempt to open or modify it Do not damage drop or subject the adapter to vibration Do not leave the adapter in direct sunlight Avoid using the adapter in humid or ex tremely hot places Protecting your data Set the write protect switch to LOCK Set the switch to the unlocked side when you want to record or edit the card again Do not remove the card or tur...

Page 90: ...mes noticeably shorter with a normal charge the battery pack is at the end of its service life Replace it with a new battery pack If the terminals of the battery pack are dirty wipe the terminals with a soft dry cloth Battery Pack This camcorder uses a lithium ion type battery pack Charging Charge the battery pack immediately or a day before use The battery pack gradually self discharges even if s...

Page 91: ... feature If dew forms the word DEW flashes on the screen and the power will automatically turn off in approximately 10 seconds 1If DEW flashes remove the cassette leave the cassette compartment open and wait for a few hours to allow the camcorder to acclimate to the surrounding tempera ture 2To use the camcorder again turn on the power after waiting for a few hours Be sure that DEW has disappeared...

Page 92: ...s again become clogged with dirt soon after cleaning this might be caused by a damaged tape In this case stop using that cassette immediately 1 Insert a cleaning tape into the camcorder 2 Set the camcorder to TAPE VCR mode The video head cleaning screen appears 3 Press the SET button to begin video head cleaning NOW CLEANING flashes during cleaning After about 20 seconds video head cleaning automa...

Page 93: ...adapter or connecting the camcorder to a TV AC Adapter Supplied Accessory The supplied AC adapter is compatible with 50 Hz and 60 Hz electrical systems in the range of 110 V to 240 V AC Use a commercially available AC plug adaptor if necessary depending on the design of the wall outlet Television Signal Standards In any country you can always watch the video picture by using the LCD monitor screen...

Page 94: ...s l or m to select OFF then press the SET button 5 Press the MENU button to turn off the menu screen Note The demonstration will pause if you press the MENU button If you leave it for 60 seconds or turn the power off temporarily and then set the Power switch to CAMERA the demonstration will begin again OFF DEMO MODE Watching the Demonstration 1 Remove the Mini DV cassette from the camcorder see pa...

Page 95: ... lens to some subject or set zoom to widest angle before shooting p 21 Set DEMO MODE menu item to OFF p 79 Select video input channel or TV channel properly p 25 Connect audio video cable properly p 25 Connect DV cable or audio video cable properly pp 49 51 Possible cause Power source is not properly con nected Battery pack is not charged Dew in camcorder Safety function is in effect Erasure prote...

Page 96: ... protected Power source is not properly con nected Battery pack is not charged Camcorder is recording Backlight has been turned off Fluorescent lamp has burned out Inappropriate picture adjustments AC adapter or battery pack may have malfunctioned Audio video cable is not properly connected REMOTE menu item is set to OFF Remote control battery has run down Remote control used beyond operat ing ran...

Page 97: ... 4 V Power Consumption 4 3 W during camera recording in Full Auto mode with zoom motor off and backlight in normal mode Operating Temperature 32 F to 104 F 0 C to L40 C Operating Humidity 30 to 80 Storage Temperature 4 F to 140 F 20 C to L60 C Dimensions approx 5 9 16 W K 3 11 32 H K 2 5 16 D 141 1 mm W K 85 1 mm H K 58 5 mm D Weight approx 1 03 lbs 465 g without battery pack lithium battery video...

Page 98: ...ATILLA ANCHA EN LA RANURA ANCHA E INTRODUZCA COMPLETAMENTE LA CLAVIJA PRECAUCION Si el adaptador de CA se extravía o tiene que ser cambiado adquiera otro del mismo tipo en el centro de servicio SHARP de su concesionario PARA TIRAR LA BATERÍA CONTIENE BATERÍA DE IONES DE LITIO ÉSTA DEBE RECICLARSE O TIRARSE DE LA FORMA APROPIADA PÓNGASE EN CONTACTO CON LAS AGENCIAS LOCALES PERTINENTES PARA OBTENER ...

Page 99: ...luminación El calor producido por las luces incandescentes puede deformar la videocámara o hacer que ésta funcione mal Respete siempre las prohibiciones o restricciones relacionadas con la utilización de equipos electrónicos en vuelos comerciales o en otras áreas susceptibles Tenga cuidado con la temperatura y la humedad Podrá utilizar su videocámara a temperaturas de entre 32 F y 104 F 0 C y L40 ...

Page 100: ...te la antena o el sistema de cable Esto impedirá que el producto se estropee debido a las tormentas eléctrica o a la sobretensión en la línea de alimentación 1 Lectura de las instrucciones Antes de utilizar este producto deberán leerse todas las instrucciones de seguridad y manejo 2 Conservación de las instrucciones Las instrucciones de seguridad y manejo deberán guardarse para poder consultarlas ...

Page 101: ...r las cubiertas puede exponerse a una tensión peligrosa o a otros peligros Solicite las reparaciones al personal de servicio cualificado 19 Daños que requieren ser reparados Desenchufe este producto de la toma de corriente y solicite las reparaciones al personal de servicio cualificado cuando se produzcan las condiciones siguientes a Cuando el cable de alimentación o su clavija estén estropeados b...

Page 102: ...o de la flecha hasta que quede completamente bloqueada en su lugar 2 Carga de la batería 1 Coloque la batería en la videocámara y asegúrese de que el interruptor de alimentación esté en OFF 2 Enchufe el adaptador de CA en una toma de corriente 1 y luego inserte la clavija de CC en la toma de entrada de CC 2 El indicador de carga se enciende El indicador de carga se apaga cuando se carga la batería...

Page 103: ...en posición produciendo un chasquido Después del sonido de confirmación el portavideocasete se introducirá automáticamente 4 Espere a que el portavideocasete se pliegue completamente Cierre la puerta del compartimiento presionando sobre el centro hasta que quede cerrada haciendo un ruido seco SAVE R E C Inserción de una tarjeta Para almacenar imágenes fijas podrá utilizar una tarjeta de memoria SD...

Page 104: ... alimentación en VCR 3 Pulse j o k del botón de operación para rebobinar o avanzar rápidamente la cinta hasta el punto deseado 4 Pulse m para iniciar la reproducción AU T O REC Grabación fácil con la videocámara en una cinta 1 Inserte un casete en la videocámara 2 Ponga el conmutador selector de medio en TAPE 3 Mantenga pulsado el botón de bloqueo y ponga el interruptor de alimentación en CAMERA L...

Page 105: ...ueará el enfoque 6 Pulse completamente el botón STILL para iniciar la grabación El indicador S parpadea en rojo mientras los datos están siendo grabados en la tarjeta y cambia a blanco cuando termina la grabación Reproducción de tarjeta 1 Ponga el conmutador selector de medio en CARD 2 Mantenga pulsado el botón de bloqueo y ponga el interruptor de alimentación en VCR Las imágenes grabadas en la ta...

Page 106: ... RE TORN O R E PRO OT ROS R EMOT O P I T I DO C Ó D T I EMPO RE TORNO SAL I DA CT R E L O J RE TORNO A J U S T E A J U S T E L C D L U Z F O NDO BR I LL O LC D C OL OR L CD RE TORNO I MAG E N A J US T E E F CO P A UD I O AUD I O ANA D I G RE TORN O R E PRO AU T OM 3 0m GU Í A O T ROS A J US T E 1 A J US T E 2 I MAG EN E F ME NÚ E S C E RE TOR RE TORNO R Á P Z OOM C I N T A V E L D I G I ES T 1 6 9...

Page 107: ... G EN OT ROS F ORMA TO P I T I DO DEMO RE TORNO MODO I D I OMA A J U S T E L C D L U Z F O NDO BR I LL O LC D C OL OR L CD RE TORNO A J U S T E R E L O J MOS T RAR MOS TRAR A J U S T E 1 2 H 2 4 H RE TORNO I MAG E N A J US T E E F D I A POS I T BORR AR PRO T E G E R ORDE N I MP RE TORN O R E PRO OT ROS REMOT O P I T I DO RE TORNO A J U S T E L C D L U Z F O NDO BR I LL O LC D C OL OR L CD RE TORNO...

Page 108: ...DE L A NG U E RE T OUR DEMO R E GL R E GL L C D RE T RO E C L A I L UM I N LCD COU L E UR LCD RE T OUR HOR LOGE A F F I C HAGE RE G L AGE 1 2 H 2 4 H RE T OUR I MA GE RE G L E ME NU DOUB SON AUD I O ANLG NUMR RE T OUR L E C T D I V E RS B I P T E L E C OM CODE HOR SORT I E CH RE T OUR R E GL L C D RE T RO E C L A I L UM I N L CD COU L E URLCD RE T OUR R E GL HOR LOGE A F F I C HAGE RE T OUR R EG L...

Page 109: ...RS F ORMA T B I P L A NG U E RE T OUR MODE DEMO R E GL L C D RE T RO E C L A I L UM I N LC D COU L E UR LC D RE T OUR R E GL HOR LOGE A F F I C HAGE RE G L AGE 1 2 H 2 4 H RE TOUR I MAGE RE GL E ME NU D I AP O P R E S E F F AC E R PRO T E GE R ORD I MPRE S RE TOUR L E C T I MAGE RE GL E ME NU D I AP O P R E S E F F AC E R PRO T E GE R ORD I MPRE S RE TOUR L E C T D I V E RS T E L E C OM B I P RE T...

Page 110: ...Note ...

Page 111: ......

Page 112: ...ll constitute complete fulfillment of all liabilities and responsibilities of Sharp to the purchaser with respect to the Product and shall constitute full satisfaction of all claims whether based on contract negligence strict liability or otherwise In no event shall Sharp be liable or in any way responsible for any damages or defects in the Product which were caused by repairs or attempted repairs...

Reviews: