background image

Slow Motion Playback (with the
remote control)

 Press the SLOW button on the remote control

during playback.
Press the SLOW   or   button (to the right of the
SLOW button) to vary the slow motion playback
speed between   and 

 of the normal playback

speed.

 Press the PLAY/X2 button to resume normal

playback.

Still Picture and Frame Advance

 Press the PAUSE/STILL button during playback.

This will freeze the picture on your TV.

 If noise bars appear on the screen during still

picture, set your VCR to the slow mode and press
the CHANNEL 

 buttons to make the noise

disappear. Then press the PAUSE/STILL button
again.

 Press the PAUSE/STILL button during still mode

for frame advance.

Press the PLAY/X2 button again to resume normal
playback.

Double Speed Playback

 Press the PLAY/X2 button during playback. The

tape will be played back at twice the normal

speed.

 Press the PLAY/X2 button to resume normal

playback.

 NOTES:

Sound is muted during video search, slow motion, still

picture, frame advance, and double speed playback.

To avoid damage to the tape, your VCR will resume

normal playback after about 5 minutes of slow motion
playback and still picture.

During slow motion, still, frame advance and double

speed playback with a tape recorded in the LP mode,
the upper part of the picture may be skewed to one
side.

Auto Rental Mode

The convenient auto rental mode lets you enjoy
playback with ease. When you insert a cassette with the
erasure protection tab removed (rental videos, etc.),
your VCR automatically turns on the power, winds the
tape forward to find the recorded section, and plays
back the tape. When the tape reaches the end of
recorded section, the VCR automatically rewinds the
tape, ejects it and turns off the power.

 NOTES:

If there is more than a 10 second unrecorded section

between

recorded sections,

the tape will

automatically stop and rewind. To watch the next
recorded section, press the STOP button, fast forward
to that section and play the tape.

If the erasure protection hole is covered, press the

  2   b u t t o n   a f t e r   t h e   p o w e r   t u r n s   o n

automatically.

Auto Tracking Control System

This function automatically adjusts the tracking to
match the recorded tape. Auto tracking engages in the

following cases:

When you insert the cassette and begin playback.

*When you press the CHANNEL   and   buttons at

the same time.

When the VCR has been playing back an unrecorded

section of tape, and then reaches a recorded tape
segment.

When auto tracking engages, 


 the VCR display

flashes for a few seconds.

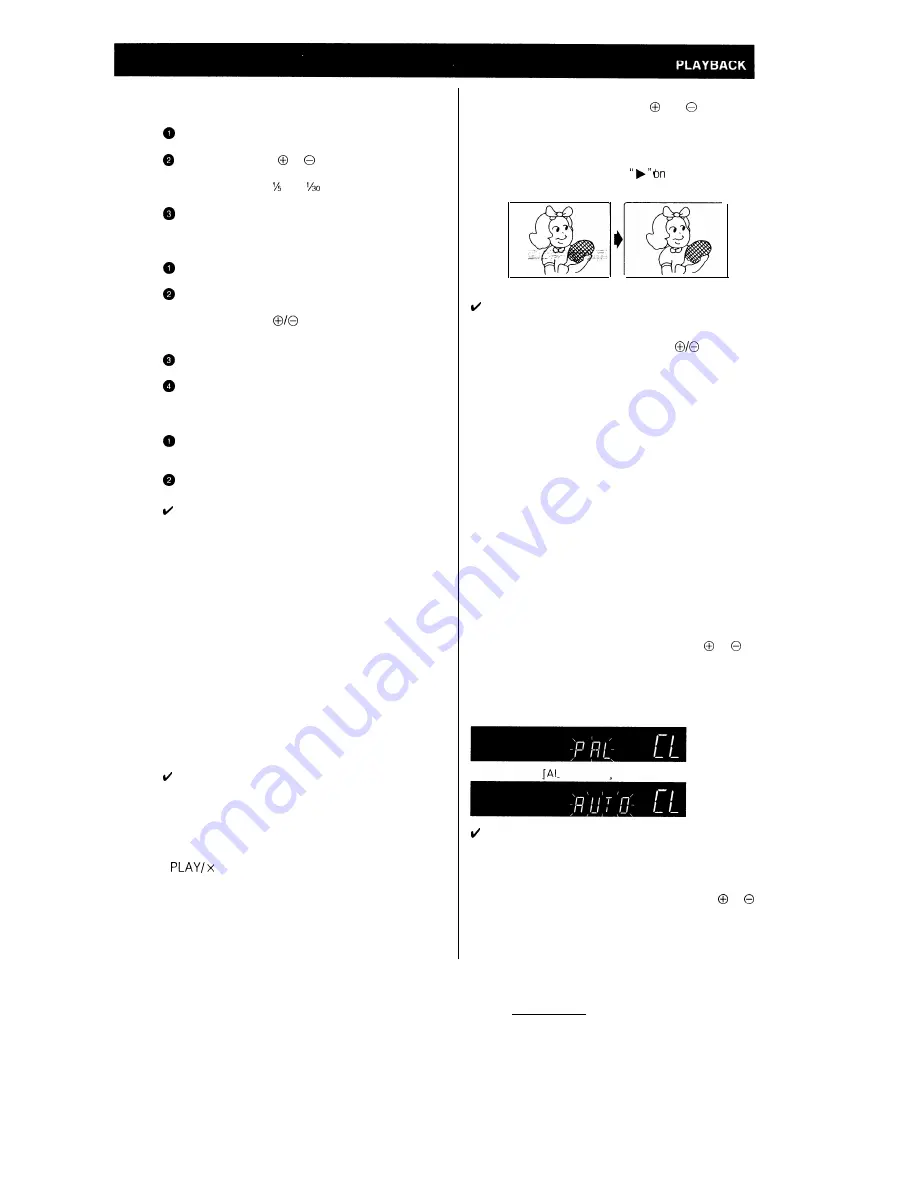
Poor tracking

 NOTE:

Normal picture

When a poorly recorded tape is played back, auto

tracking may not operate normally. In this event,
manually adjust the tracking with the 

 buttons to

make any noise disappear.

Auto Head Cleaning System

When the tape is inserted or ejected, this system
automatically cleans the drum and heads with a special
roller before recording or playback begins, protecting
the heads and drum from dirt and preserving beautiful
sound and picture quality.

Quick Start with Full Loading

Mechanism

Your VCR has a standby function (full loading
Mechanism) to allow immediate recording and
playback.
After pressing the REC or PLAY/X2 button, it takes
about 2 seconds until recording or playback is
engaged when in the standby mode.

Colour mode

If a colour recording’s quality is poor, the picture may

turn black and white. In this event, press the MODE
button for about 2 seconds and then press   or   to
select PAL (strict PAL colour mode). (“PAL CL” is
displayed on the display.) Then press the MODE button
again. Normally, the colour mode should be set to
“AUTO CL” mode.

[Strict PAL mode]

TO model

 NOTE:

When the colour mode is set to fixed colour mode

while the VCR is playing back a black and white tape
or is receiving a black and white broadcast, the

picture may be coloured. In this event, press the
MODE button for about 2 seconds and press   or 
button to select the auto mode. Then press MODE
button.

13

Summary of Contents for VC-A136X

Page 1: ......

Page 2: ...ciden ta change l Auto Repeat Plays back the entire tape repeatedly POWER SUPPLY The voltage supply of this VCR is AC 240 V 50 Hz CASSETTE TAPE This VCR uses ml standard video signals Use only video cassetc tapes that carry the Ivus PA Fr LH mark GENERAL INFORMATION l IMPORTANT SAFEGUARDS AND PRECAUTIONS 2 MAJOR COMPONENTS OF YOUR VCR 4 REMOTE CONTROL 5 SETTING UP 1 l CONNECTIONS 6 TUNING THE TV T...

Page 3: ...ining water or other liquids on the VCR In the event that liquid should enter the cabinet unplug the VCR immediately and contact the retailer or a service centre approved by Sharp immediately Do not remove the VCR cabinet Touching parts inside the cabinet could result in electric shock and or damage to the VCR For service and adjustment inside the cabinet call a qualified dealer or service centre ...

Page 4: ... of the copyright is prohibited by law Sharp is not in a position to authorize the recording of copyright works and nothing in this operation manual should be read or implied as giving that authority This VCR is not equipped with a mains power switch Accordingly nominal current to drive the clock is drawn at all times when the AC power cord is plugged into a wall socket If the VCR is not to be use...

Page 5: ...E l When the VCR is ON this indicator where a channel position number is usually displayed will light up When the power is OFF this part will not be lit Eil Cassette In Indicator 5 jn R p When AC power cord is first plugged in REM Tape Remaining Play Double speed playback 1 Slow Cl J Simple recording timer 44 REW Video Search Rewind II Frame Advance TIMER Timer standby mode ä FF Video Search Forwa...

Page 6: ...to select the TV control mode Use the following buttons on your remote control to operate your TV set TV function TV POWER 01 TV CHANNEL UP DOWN TV VOLUME UP DOWN NOTE l This Remote Control can control many of SHARP s TVs Inserting the Batteries First install the batteries properly Fit two R6 UM SUM 3 AA 1 5 volt batteries included or equivalent If the remote control stops working fit new batterie...

Page 7: ... to the output of your VCR factory preset to UHF channel 37 Refer to the TV operation manual c NOTE l TUNE THE TV NOT THE VCR 0 Select an unused channel on your TV and press the OPERATE button on the VCR to turn on the power 0 Set the TEST SIG switch to ON Adjust the tuning of the selected TV channel until the test pattern two vertical bars appears on the screen This channel becomes the VIDEO CHAN...

Page 8: ...996 I CLOCK MOIIF And then press the CLOCK button CLOCK MODE d NOTES l If you press the CLOCK button while the VCR is operating you cannot change channel positions until you have finished setting the clock l If you make a mistake repeat the steps above to set the time again l If the precise clock time is required within a second after setting the year after completing step 9 do not press the CLOCK...

Page 9: ...hannels l When a high frequency channel is selected the band indicator and the tuning indicator change automatically l Channel position numbers 1 3 4 8 11 to 27 and 29 to 46 have been factory set to be skipped when the channel 0 or button is used l If the picture is not clear if you want a different channel from the one preset or if you wish to reset a skipped channel reset the channel as follows ...

Page 10: ...roadcast channel you tuned the VCR to is VHF 7 select channel 7 using the TV tuner 0 Select the video channel on your TV again 4f the channel you tuned the VCR to and the one on the TV do not match repeat steps through 0 9 ...

Page 11: ...el on your TV Press the OPERATE button to turn on the VCR 1 Example Reset Channel Position 12 CLOCK MODE 0 0 LCtiSETJ 0 Press the CLOCK button and MODE button at the same time for about 2 seconds to select the channel setting mode Select manual mode with the 0 or 0 button 0 Press the CHANNEL 010 buttons to select the channel position number you want to reset CLEAR Press the CLEAR button on the rem...

Page 12: ...pe to the beginning eject the cassette and turn off the power FF REW STOP S H A R P VlW OCM8EWEMCORDCR Video Search with the remote control Use the following procedure to quickly find the section you want while viewing the picture 0 During playback press the FF button for forward video search or the REW button for reverse search There are 2 search speeds in each direction The VCR switches between ...

Page 13: ... or right locks the VCR in VSF Video Search Forward or VSR Video Search Reverse mode Press the PLAY X2 button to return to regular playback DURING STILL MODE Variable Slow Motion 0 12 During still mode turn the ring to the right for slow motion playback Select from two speeds by turning the ring more or less Release the ring the shuttle ring returns to centre to return to still Turning the ring al...

Page 14: ...watch the next recorded section press the STOP button fast forward to that section and play the tape l If the erasure protection hole is covered press the PLAY x 2 button after the power turns on automatically Auto Tracking Control System This function automatically adjusts the tracking to match the recorded tape Auto tracking engages in the following cases l When you insert the cassette and begin...

Page 15: ...uncovered the cassette will be ejected To pause during recording press the PAUSE STILL button To resume recording press the PAUSE STILL button again To stop recording press the STOP button NOTES l The pause mode disengages automatically after about 5 minutes and the VCR enters stop mode l To record audio and video from an external source through the AUDIO VIDEO socket on the rear of the VCR press ...

Page 16: ...NOTES l Each press of the REC button increases the stop time by 10 minutes l If necessary press the CHANNEL or button to change the minutes setting Press the OPERATE button to turn off the power Ex Present time 10 28 d NOTES l After the Simple Recording Timer is set the channel position cannot be changed l To confirm the starting time and the ending time first press the OPERATE button to turn on t...

Page 17: ...for timer recording with the If you want to record only once press the PROG button and go to step Otherwise select D to record at the same time each day or W to record at the same time each Set the start time with the numeric buttons y one minute digit 0 Set the stop time using numeric buttons 0 to 9 and then press the PROG button 0 To record in the LP Long Play mode press the TAPE SPEED button on...

Page 18: ... positions are not possible For regular VCR operation clock setting and setting cancelling confirming timer positions press the TIMER ON OFF button to disengage the timer TIMER disappears and then turn on your VCR l During timer recording the timer cannot be set or checked l To terminate timer recording press the STOP button during timer recording l If no buttons are pressed within one minute whil...

Page 19: ... the index number of the desired programme using the DPSS a or B button on the remote control Search starts immediately after you release the button When a signal is located the displayed number decreases When the selected index signal encoded section is found playback begins automatically NOTES l DPSS may not function properly if the index signals are too close together within 3 minutes of each o...

Page 20: ... times the button is pressed it is possible to set the reverse video search time to approx 20 40 60 or 80 seconds of recorded material Any selected mode on the VCR can be locked in to prevent accidental change to another mode by simply pressing the button on the remote control All modes remain locked including power off until the Child proof lock is dis engaged except when the VCR is in the full a...

Page 21: ...the CLEAN PICTURE function light during operation when using the VCR as a dubbing source The 0 and 0 buttons can be used instead of the numeric buttons to set the clock or the timer As you continue pressing the or 0 button the minute digits will stop changing after 00 has been displayed twice and the hour digits only will begin to change First set the hour digits and then the minute digits As you ...

Page 22: ... When you start recording or playback the VCR will begin the computation However this may take some time When computation is completed tape remaining will be shown on the VCR display for 5 seconds l If the REM mode is selected with the DISPLAY button the tape will automatically fast forward or rewind for a few seconds and then the VCR will begin computing the amount of tape remaining l During comp...

Page 23: ...Horizontal resolution Audio input phono type output phono type Dimensions Weight Supplied accessories VHS PAL standard Two rotary heads helical scan PAL colour or monochrome signals 625 lines 480 min with E 240 video cassette in LP mode 12 7 mm 23 39mmlsec SP 11 70 mmlsec LP 75 Ohm unbalanced VHF channel 0 to 12 UHF channel 28 to 69 UHF channel 31 40 preset to 37 AC 240 V 50 Hz 16 W approx 5 C to ...

Page 24: ...e sure the cassette is properly positioned and reinsert Picture does not change even though l Make sure the VCR is not in the timer setting or clock setting mode CHANNEL buttons are pressed l Make sure the VCR is not in the channel setting mode CH is lit on the VCR display Desired channel position cannot be The channel has been set to be skipped Cancel the skip mode for selected that channel NO CO...

Page 25: ...SHARP CORPORATION Osaka Japan SHARP CORPORATION OF AUSTRALIA PTY LIMITED A C N 003 039 405 1 Huntingwood Drive Huntingwood Blacktown N S W 2148 Printed in Malaysia TINS 2558AJZZ T1190 A ...

Reviews: