background image

101

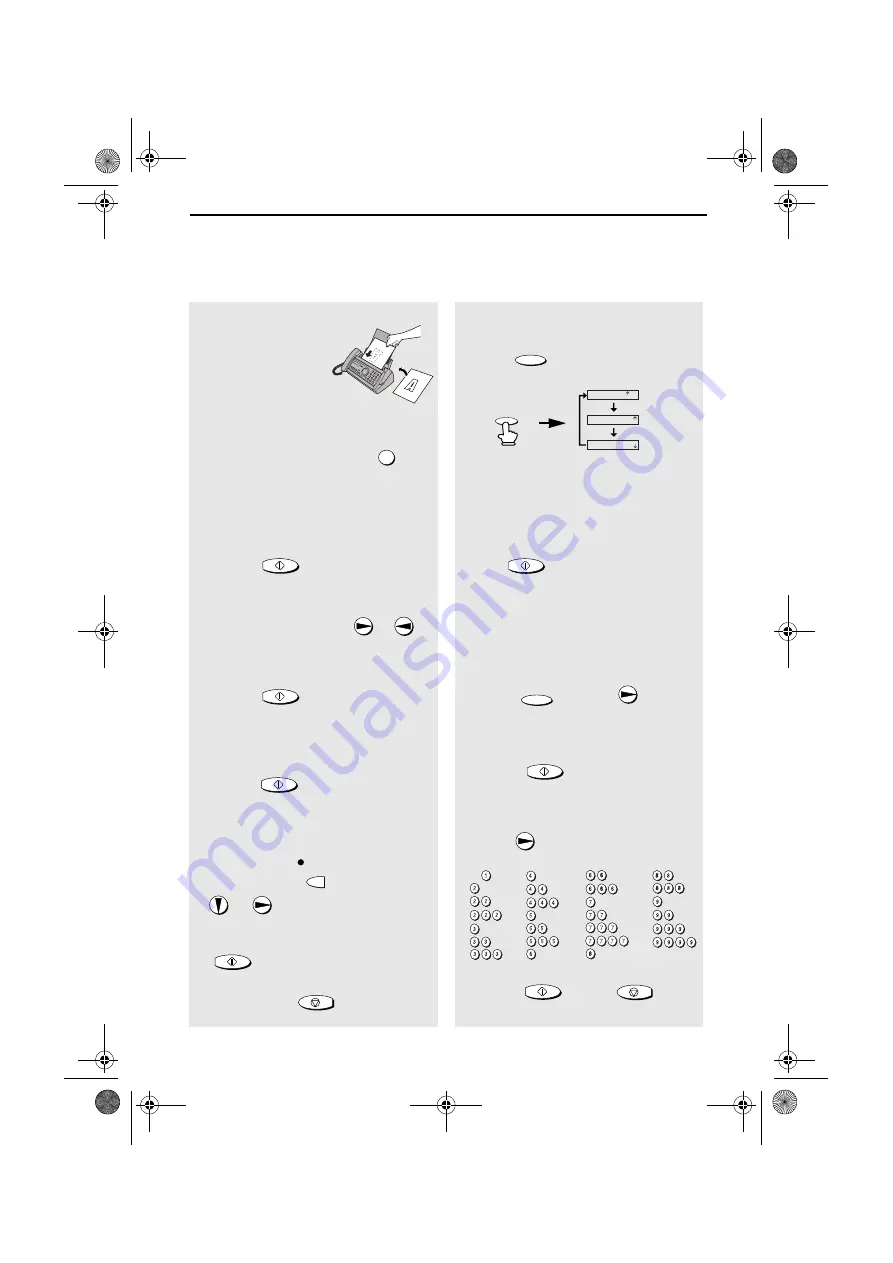
Guía de referencia rápida

Transmisión de mensajes telefax

Coloque el original 
(hasta 10 páginas) cara 
abajo en el alimentador 
de documentos.

Marcación normal


1.

Levante el auricular u oprima:


.

2.

Marque el número de telefax.


3.

Espere hasta escuchar el tono de 
recepción (si contestara una persona, 
pídale oprimir su tecla Start). 

4. 

Oprima:


.

Marcación automática

1. Oprima la tecla de flecha 

 o 


hasta que en el visor aparazca el destino 
deseado.

2. 

Oprima:


.

Marcación directa por teclado  

1.

Marque el número de fax. 

2.

Oprima:


.

Grabacion de un mensaje de 
bienvenida

1. 

Oprima

 la tecla 

, tecla de flecha 

, y 

.

2. Levante el auricular, 

oprima

 la tecla  

 y hable en el microtel

é

fono.

3. 

Oprima

 la tecla 

 cuando haya 

finalizado.

SPEAKER

START/MEMORY

START/MEMORY

START/MEMORY

REC/
MEMO

START/MEMORY

STOP

Recepción de mensajes telefax

Oprima


hasta que la flecha que 

hay en el display señale hacia el número de 
recepción deseado

Modo FAX

: El aparato telefax contesta y 

transmite automáticamente mensajes telefax.

Modo TEL:

 Responda a todas las llamadas 

(incluso mensajes de fax), levantando el 
auricular. Para iniciar la recepción de fax, 

oprima


.

Modo TAD: 

Seleccione este modo cuando 

salga para recibir tanto mensajes hablados 
como telefax.

Memorizar números marc. 
automática

1. 

Oprima


una vez y


dos veces.

2.

Introduzca el número de telefax/teléfono 
completo.

3.

Oprima:


.

4. 

Ingrese el nombre oprimiendo las teclas 

numéricas. (Para ingresar sucesivamente 
dos letras que requieren la misma tecla, 

oprima


después de ingresar la 

primera letra).

5. 

Oprima


y luego


.

RESOLUTION/

RECEPTION MODE

START/MEMORY

FUNCTION

START/MEMORY

START/MEMORY

STOP

FAX

TEL

JAN-01 10:30

FAX

TEL

JAN-01 10:30

FAX

TEL

JAN-01 10:30

TAD

TAD

TAD

RESOLUTION/

RECEPTION MODE

A =

B =

C =

D =

E =

F =

G =

H =

I  =

J =

K =

L =

M =

N =

O =

P =

Q =

R =

S =

T =

U =

V =

W =

X =

Y =

Z =

SPACE =

all.book

Page 101

Tuesday, October 9, 2001

6:14 PM

Summary of Contents for UX-A255

Page 1: ...DEL UX A255 OPERATION MANUAL FACSIMILE 1 Installation 2 Setting Up and Using OpenLCR 3 Sending Faxes 4 Receiving Faxes 5 Making Copies 6 Special Functions 7 Printing Lists 8 Maintenance 9 Troubleshooting ...

Page 2: ...rcuit different from that to which the receiver is connected Consult the dealer or an experienced radio TV technician for help ABOUT THE TELEPHONE CONSUMER PROTECTION ACT OF 1991 The Telephone Consumer Protection Act of 1991 makes it unlawful for any person to use a computer or other electronic device to send any message via a telephone facsimile machine unless such message clearly contains in a m...

Page 3: ...of voice messages including OGMs with no documents in memory Modem speed 14 400 bps with automatic fallback to lower speeds Transmission time Approx 6 seconds only when ECM is on Resolution Horizontal 203 pels inch 8 pels mm Vertical Standard 98 lines inch 3 85 lines mm Fine Halftone 196 lines inch 7 7 lines mm Super fine 391 lines inch 15 4 lines mm Automatic document feeder 10 pages max letter A...

Page 4: ...anual feeding Width 5 8 to 8 5 148 to 216 mm Length 5 5 to 23 6 140 to 600 mm Effective scanning width 8 3 210 mm max Effective printing width 8 3 210 mm max Contrast control Automatic Dark selectable Reception modes TEL FAX TAD Copy function Single Multi 99 copies page Telephone function Yes cannot be used if power fails Power requirements 120 V AC 60 Hz Operating temperature 41 95 F 5 35 C Humid...

Page 5: ...low anything to rest on the power cord and do not install the machine where people may walk on the power cord This machine must only be connected to a 120 V 60 Hz grounded 3 prong outlet Connecting it to any other kind of outlet will damage the machine and invalidate the warranty Never insert objects of any kind into slots or openings on the machine This could create a risk of fire or electric sho...

Page 6: ...ording an Outgoing Message 33 Operating the Answering Machine 34 Optional Answering Machine Settings 38 Transfer Function 40 Override Ringing 43 Remote Operations 45 4 Sending Faxes 51 Transmittable Documents 51 Loading the Document 52 Adjusting the Resolution and Contrast 53 Sending a Fax by Normal Dialing 55 Sending a Fax by Automatic Dialing 56 Sending a Fax From Memory 63 5 Receiving Faxes 65 ...

Page 7: ... to Service 78 Blocking Reception of Unwanted Faxes 79 8 Printing Lists 80 9 Maintenance 84 10 Troubleshooting 87 Problems and Solutions 87 Messages and Signals 91 Clearing Paper Jams 94 Ordering Parts 96 FCC Regulatory Information 97 Quick Reference Guide 100 Guía de referencia rápida 101 Index 102 all book Page 5 Tuesday October 9 2001 6 14 PM ...

Page 8: ... Number keys Use these keys to dial numbers and enter numbers and letters when storing auto dial numbers Panel release Press this release to open the operation panel STOP key Press this key to cancel an operation before it is completed COPY HELP key When a document is in the feeder press this key to make a copy of a document At any other time press this key to print out the Help List a quick refer...

Page 9: ... Enlarge reduce setting When making a copy of a document press these keys to select an enlarge reduce setting Volume setting When a document is not in the feeder press these keys to change the handset volume when the handset is lifted the speaker volume when the SPEAKER key has been pressed or the ringer volume at any other time FUNCTION key settings Press these keys after pressing the FUNCTION ke...

Page 10: ...e it is possible that condensation may form on the scanning glass preventing proper scanning of documents for transmission To remove the condensation turn on the power and wait approximately two hours before using the machine Paper tray Paper tray extension Operation manual Gears 2 Handset Handset cord Telephone line cord Imaging film initial starter roll If any are missing contact your dealer or ...

Page 11: ...machine Use the handset to make ordinary phone calls or to transmit and receive faxes manually Connecting the power cord Plug the power cord into a 120 V 60 Hz grounded AC 3 prong outlet Caution Do not plug the power cord into any other kind of outlet This will damage the machine and is not covered under the warranty The machine does not have a power on off switch so the power is turned on and off...

Page 12: ...is set for tone dialing If you are on a pulse dial line you must set the fax machine for pulse dialing Press the keys on the operation panel as follows 1 Press once and twice 2 Press once and twice 3 Press once 4 Select the dial mode TONE PULSE 5 Press to exit FUNCTION 1 2 STOP TEL LINE Display The display briefly shows your selection then OPTION SETTING DIAL MODE DISTINCTIVE 1 TONE 2 PULSE all bo...

Page 13: ...is not compatible with digital telephone systems If your area experiences a high incidence of lightning or power surges we recommend that you install surge protectors for the power and telephone lines Surge protectors can be purchased at most telephone specialty stores Attach the paper tray and paper tray extension Attach the paper tray and paper tray extension Note The paper tray extension has a ...

Page 14: ...peration panel press 2 Remove the used film and empty spool 3 Remove the two green gears from the spools DO NOT DISCARD THE TWO GREEN GEARS 1 2 When replacing the film use a roll of Sharp UX 5CR imaging film One roll can print about 150 letter size pages The initial starter roll of imaging film included with your fax can print about 30 letter size pages If you are loading the imaging film for the ...

Page 15: ...ars 6 Insert the film into the print compartment 7 Rotate the front gear as shown until the film is taut 8 Close the operation panel press down on both sides to make sure it clicks into place Fit ends of rolls onto hubs Make sure the gears fit into the slots in the ends of the rolls 1 slot 2 slots Thick roll to rear all book Page 13 Tuesday October 9 2001 6 14 PM ...

Page 16: ...aper that has already been printed on or paper that is curled Loading Printing Paper You can load letter or legal size paper in the paper tray Recommended paper weight is 20 lb Copy Bond The maximum number of sheets is as follows Letter size Approx 50 sheets 20 Ib copier paper at room temperature maximum stack height should not be higher than the line on the tray Legal size 5 sheets Note If at any...

Page 17: ... selection then 1 Press once and twice 2 Press once and 3 times 3 Press once 4 Select the print contrast NORMAL LIGHT 5 Press to return to the date and time display FUNCTION 1 2 STOP Display The display briefly shows your selection then PAPER SIZE SET COPY CUT OFF OPTION SETTING PRINT CONTRAST PAPER SIZE SET 1 LETTER 2 LEGAL 1 NORMAL Display OPTION SETTING Setting the paper size The fax has been s...

Page 18: ...T MEMORY STOP Important FCC regulations require that your name telephone fax number and the date and time appear on each fax message you send Enter your name and fax number here and set the date and time as explained in the following section to have the fax machine include this information automatically at the top of your fax messages 1 Press once and 3 times 2 Press once 3 Press once FUNCTION 1 9...

Page 19: ...xample SHARP 7777 44 2 777 7 To enter two letters in succession that require the same key press after entering the first letter To clear a mistake press To enter a lower case letter continue pressing the key for the letter until the lower case letter appears To enter one of the following symbols press or repeatedly _ 7 Press 8 Press to return to the date and time display SPEAKER START MEMORY SPEAK...

Page 20: ...0 1 0 5 The date and time appear in the display and are printed at the top of every page you fax Set the date and time as shown below FUNCTION STOP 1 9 4 5 6 7 8 0 2 3 Display The currently set date appears example Do not set the date and time if you are using OpenLCR OpenLCR automatically sets the date and time each time your fax calls OpenLCR and receives rate data To ensure accurate use of the ...

Page 21: ... end of Daylight Saving Time Follow these steps 6 Enter the year four digits Example 2001 7 Enter a two digit number for the hour 01 to 12 and a two digit number for the minute 00 to 59 Example 9 25 8 Press to select A M or to select P M 9 Press to start the clock 10 Press to return to the date and time display 2 0 0 1 0 9 2 5 START MEMORY STOP The currently set time appears example TIME 12 19 PM ...

Page 22: ...chine to answer all calls Voice messages will be recorded and fax messages will be received automatically TAD stands for Telephone Answering Device Setting the reception mode Make sure a document is not loaded in the document feeder and then press until the arrow in the display points to the desired mode RESOLUTION RECEPTION MODE Note TAD mode cannot be selected unless a general outgoing message h...

Page 23: ...olume of the speaker handset and ringer using the up and down arrow keys 1 Press 2 Press or until the display shows the desired volume level Press again to turn off the speaker SPEAKER SPEAKER Speaker 1 9 4 5 6 7 8 0 2 3 SPEAKER all book Page 21 Tuesday October 9 2001 6 14 PM ...

Page 24: ...ppear in the display 2 If you selected RINGER OFF OK press SPEAKER START MEMORY 1 When talking through the handset press or until the display shows the desired volume level Note The volume reverts to MIDDLE each time you replace the handset Ringer Display Handset Display RINGER HIGH RINGER MIDDLE RINGER LOW RINGER OFF OK RECEIVER HIGH RECEIVER MIDDLE RECEIVER LOW all book Page 22 Tuesday October 9...

Page 25: ...fax machine If you have any questions call OpenLCR at 970 206 1207 OpenLCR uses Caller ID for identification purposes when your fax calls OpenLCR to receive rate information Even if you have requested your telephone company to withhold your Caller ID information when you place calls your fax will still automatically transmit this information only when it calls OpenLCR It is possible to register fo...

Page 26: ...NLOAD OK and then revert to the date and time Your fax will print out the registration form to confirm that it was received OpenLCR will also program the date and time and your fax number in your fax machine OpenLCR 5 START MEMORY Registering by phone To register by phone follow these steps Registering by fax To register by fax fill in the Fax Transmission Test and OpenLCR Line Activation Form and...

Page 27: ...ert to the date and time OpenLCR will also program the date and time and your fax number in your fax machine START MEMORY Registering through OpenLCR s Web site You can also register at OpenLCR s Web site www OpenLCR com After registering you will need to receive the rate data manually service is not activated until your fax receives the rate data See Downloading receiving the rate data manually o...

Page 28: ...he power you will need to manually download the rate data Press and to call OpenLCR and initiate downloading Downloading lasts one or two minutes During this time the display will show LCR DOWNLOADING When downloading is completed the display will briefly show DOWNLOAD OK and then revert to the date and time OpenLCR will also program the date and time and your fax number in your fax machine Using ...

Page 29: ...ee page 26 The rate data in the fax is no longer correct and the fax cannot connect to OpenLCR to obtain new data See What to do if E appears in the display on page 29 OpenLCR has been temporarily turned off See Temporarily turning off OpenLCR below Rate data was not yet available when your fax called OpenLCR Your fax will automatically call OpenLCR again when the rate data is available Until that...

Page 30: ... 4 Press NO to turn off OpenLCR Press YES to turn OpenLCR back on When you turn off OpenLCR the highlighted C in the display will change to 5 Press to return to the date and time display FUNCTION 2 1 STOP To stop using OpenLCR If you want to stop using the Open LCR feature press this sequence of keys Calls will not be routed by OpenLCR and the fax machine will not call OpenLCR to update data To re...

Page 31: ... rate data in the fax is out of date and the fax is unable to obtain new data When this happens OpenLCR routing will not take place OpenLCR 3 START MEMORY E indicates that the rate data is out of date TAD FAX TEL JAN 19 02 16 This will only occur if the fax machine is unable for some reason to make its periodic call to OpenLCR to receive new rate data First try downloading the rate data manually b...

Page 32: ...ll allow you to connect to OpenLCR Register using one of the procedures described at the beginning of this chapter FUNCTION 1 2 START MEMORY STOP OpenLCR 2 To obtain the correct phone number call OpenLCR at 970 206 1207 and then program the number into the fax machine as explained below Note The number that you will obtain is the number for manually downloading rate data dialed by pressing the Ope...

Page 33: ...al LONG TIME setting is 4 minutes If desired you can change these settings as explained on the following page The short long time selection will remain in effect for all calls until you change it OpenLCR FUNCTION 1 2 Changing the SHORT TIME and LONG TIME settings The initial SHORT TIME setting is 2 minutes and the initial LONG TIME setting is 4 minutes If the typical durations of your short and lo...

Page 34: ...6 Press to begin receiving the rate data for the new settings Your fax calls OpenLCR and receives the data This lasts one or two minutes Note If you do not press to receive new data the settings will revert to their previous state FUNCTION START MEMORY START MEMORY Display The display briefly shows your selection then The display briefly shows your selection If the settings were changed it will th...

Page 35: ...e plays after answering a call to inform callers that they can leave a message or send a fax Follow the steps below to record a message Example Hello You ve reached ______ No one is available to take your call right now Please leave a message after the beep or press your facsimile Start key to send a fax Thank you for calling Display OGM1 GENERAL LIFT HANDSET OR PLAY PLAYBACK To use the answering ...

Page 36: ...s press until the arrow in the display points to TAD TAD stands for Telephone Answering Device PLAY RESOLUTION RECEPTION MODE 4 Press and speak into the handset to record a message The outgoing message can be up to 60 seconds long While recording the display will show the time left to record 5 When finished replace the handset or press START MEMORY STOP RESOLUTION RECEPTION MODE The outgoing messa...

Page 37: ...f rings on which the machine answers incoming calls in TAD mode depends on whether the Toll Saver function is turned on and if it is on whether you have messages The Toll Saver function is initially turned on ON OFF No received messages 4 Rings Received messages 2 Rings Toll Saver Toll Saver NOTHING Hello Hi Hi Ring Ring Ring Ring Ring Ring Ring Ring Ring Ring Answer according to NUMBER OF RINGS s...

Page 38: ...ing will appear briefly in the display If no messages were received NO MESSAGES will appear Repeat To listen to a message a second time press before playback of that message ends To move back to the previous message press within 3 seconds of the beginning of the current message Skip To skip forward to the next message press Note Playback will stop if you receive a call lift the handset or press PL...

Page 39: ...Y DELETE Recording reminders and messages for other users You can record reminders for yourself and messages for other users of the machine These will be played back together with incoming messages when the key is pressed PLAY 1 Press once and once 2 Pick up the handset press and speak into the handset 3 When you have finished speaking replace the handset or press REC MEMO START MEMORY STOP Record...

Page 40: ... 30 or 60 seconds Display T A D SETTING RECORDINGTIME 1 2 3 4 The display briefly shows your selection then REMOTE CODE Fax reception on TAD failure If the memory for recording incoming messages becomes full while you are out the answering machine will no longer be able to record messages The ON TAD FAILURE setting is used to choose the response of the machine to incoming calls when this happens A...

Page 41: ...to your messages and then erase them see Remote Operations on page 45 Automatic fax reception is set to NO at the factory before shipping If you want to set it to YES press the panel keys as follows Display T A D SETTING 1 YES 2 NO The display briefly shows your selection then OGM ONLY MODE OGM only mode If needed you can turn off recording of incoming messages In this case your outgoing message w...

Page 42: ...ocation To use the Transfer function you must first program the number that you wish the machine to call the transfer number and record the transfer message that plays when you answer the phone at the remote location When you go out and wish to use the transfer function turn it on When you return and no longer wish to use the transfer function turn it off Programming the transfer number To use the...

Page 43: ...er the telephone and informs you that the call is a transfer call It can be up to 15 seconds long To record a transfer message follow the steps below The following is an example Hello This is a transfer call for YOUR NAME Enter your remote code number now 1 Press once and twice 2 Press once 3 Lift the handset If you have already recorded a message you can press to listen to the message or press to...

Page 44: ... the above procedure and then press to check the message or to erase the message PLAY DELETE Turning the Transfer function on and off When you go out and wish to use the Transfer function turn it on as follows 1 Press once and once 2 Press once and 3 times 3 Press 4 Press to turn on the Transfer function Press to turn the function off 5 Press to return to the date and time display FUNCTION 1 2 STO...

Page 45: ...ang up during message playback first enter and to stop playback then enter twice 0 Override Ringing This function allows selected callers using a touch tone telephone to override the answering machine s outgoing message and cause the machine to make a special ringing sound alerting you that they are calling This is useful when you are near the machine but only want to talk with certain callers tak...

Page 46: ...begins they should press the key on their telephone The caller will hear a short beep and the outgoing message will stop 2 The caller should enter the override code and by pressing the appropriate keys on their telephone If an incorrect code is entered the caller will hear four beeps He or she must re enter the correct code within 10 seconds or the line will be disconnected 3 Your machine will mak...

Page 47: ... been set to 001 at the factory If you wish to use a different number follow these steps Display T A D SETTING REMOTE CODE Toll Saver When you call the machine to listen to your messages it will answer after two rings if it has received at least one message or after four rings if it has not received any messages This allows you to save money on telephone charges particularly if you are calling lon...

Page 48: ...phone You will hear a short beep and the outgoing message will stop 2 Enter your remote code number and then press You will hear a series of beeps equal to the number of messages recorded or one long beep if four or more messages have been received The machine will then play back the messages beeping once at the end of each message When all messages have been played back you will hear a long beep ...

Page 49: ...g and and then press and Erase a message To erase the message you are currently listening to press and before it ends 4 When you have finished listening to your messages you can do any of the following Erase all messages Press and Repeat playback Press and Perform other operations You can enter any of the commands described in the following section Other remote operations Hang up If you do not era...

Page 50: ...g If you pause for longer than 10 seconds before entering a command or make two errors while entering your remote code number the line will be disconnected This prevents unauthorized people from attempting to guess your remote code number Other remote operations After listening to your messages you can perform any of the following operations by pressing the appropriate keys on the telephone Note T...

Page 51: ...r you finish speaking you will hear a beep and the new message will be played back 4 Turning the Transfer function on or off To turn Transfer on Press and on the telephone To turn Transfer off Press and on the telephone 9 1 9 2 Changing the transfer telephone number 1 Press and on the telephone 2 After you hear a short beep enter the new telephone number When finished press To insert a pause betwe...

Page 52: ...ress and on the telephone 2 When you hear a short beep speak into the telephone to record the new message The time for the transfer message is fixed at 15 seconds After 15 seconds or earlier if the machine detects silence after you finish speaking you will hear a beep and the new message will be played back automatically 9 3 OGM only mode To turn on OGM only mode Press and on the telephone Your ou...

Page 53: ... area will not be scanned 8 5 216 mm 23 6 600 mm 14 lbs 52 g m 42 lbs 157 g m 11 279 mm 8 5 216 mm 21 5 lbs 80 g m Loading one page at a time Minimum size Maximum size Minimum weight Maximum weight Minimum size Maximum size Minimum weight Maximum weight 14 lbs 52 g m Loading up to 10 pages at once 5 5 140 mm 5 8 148 mm 5 5 140 mm 5 8 148 mm The illustration shows the scanning margins for letter si...

Page 54: ... in the feeder at one time The pages will automatically feed into the machine starting from the bottom page If you need to send or copy more than 10 pages place the additional pages gently and carefully in the feeder just before the last page is scanned Do not try to force them in as this may cause double feeding or jamming If your document consists of several large or thick pages which must be lo...

Page 55: ...n FINE Use FINE for documents containing small letters or fine drawings SUPER FINE Use SUPER FINE for documents containing very small letters or very fine drawings HALF TONE Use HALF TONE for photographs and illustrations The original will be reproduced in 64 shades of gray You must adjust the settings each time you don t want to use the default settings The default resolution setting is STANDARD ...

Page 56: ... or more times until the desired resolution and contrast settings appear in the display The first time you move through the list of resolution settings the contrast setting AUTO will appear next to each resolution setting The second time you move through the list the contrast setting DARK will appear RESOLUTION RECEPTION MODE Display STANDARD AUTO FINE AUTO SUPER FINE AUTO HALF TONE AUTO STANDARD ...

Page 57: ... pressed pick up the handset to speak with them This causes the receiving machine to issue a fax tone RESOLUTION RECEPTION MODE SPEAKER SPEAKER or Sending a Fax by Normal Dialing With Normal Dialing you pick up the handset or press and dial by pressing the number keys If a person answers you can talk with them through the handset before sending the fax If you pressed you must pick up the handset t...

Page 58: ...the fax or voice number by pressing the number keys Note A space cannot be entered To clear a mistake press If a pause is required between any of the digits to access a special service or an outside line press The pause appears as a hyphen two seconds per pause Several pauses can be entered in a row 4 Press FUNCTION SPEAKER FUNCTION START MEMORY 5 When you hear the fax tone press Replace the hands...

Page 59: ... one of the following symbols press or repeatedly _ 6 Press 7 Return to Step 2 to store another number or press to return to the date and time display START MEMORY STOP A B C D E F G H I J K L M N O P Q R S T U V W X Y Z SPACE Display Note The fax machine uses a lithium battery to keep automatic dialing numbers and other programmed information in memory when the power is turned off Battery power i...

Page 60: ...to move the cursor to the digit or digits you wish to change and then enter the new digit The new digit will replace the old digit If you do not wish to change the number go directly to Step 6 6 Press 7 Make the desired changes to the name Press or to move the cursor to the letter or letters you wish to change and then press the appropriate number key repeatedly until the desired letter appears se...

Page 61: ... a fax or make a phone call 1 If you are sending a fax load the document s If desired press to set the resolution and or contrast 2 Press or until the name of the other party appears in the display if no name was stored the number will appear 3 If you are sending a fax press Dialing and transmission begins If you are making a phone call lift the handset Dialing begins RESOLUTION RECEPTION MODE STA...

Page 62: ...er the number of the receiving machine by pressing the number keys If a pause is required between any of the digits to access a special service or an outside line press The pause will appear as a hyphen two seconds per pause Several pauses can be entered in a row 3 Check the display If the number of the receiving machine shown is correct press If the number is not correct press to backspace and cl...

Page 63: ...edure can be used to send a fax or make a phone call Automatic redialing If you use automatic dialing including Direct Keypad Dialing to send a fax and the line is busy the fax machine will automatically redial the number The fax machine will make three redial attempts at an interval of five minutes During this time RECALLING will appear in the display followed by a two digit number assigned to th...

Page 64: ...eceptions and is only effective when the other fax machine has ECM as well If desired you can turn ECM off This will increase slightly the amount of memory available for memory transmission and reception 1 Press once and twice 2 Press once and 6 times 3 Press once 4 Press to select YES or to select NO 5 Press to return to the date and time display FUNCTION 1 2 STOP OPTION SETTING ECM MODE 1 YES 2 ...

Page 65: ...ust one operation When sending to multiple locations only auto dial numbers can be used to dial the numbers of the receiving machines 1 Load the document s If desired press to set the resolution and or contrast 2 Press 3 Press or until the name of the number appears in the display if no name was stored the number will appear 4 Press to select the number 5 Repeat Steps 3 and 4 for each of the other...

Page 66: ...nd then dial using one of the following methods Press the number keys to enter the fax number and then press Press repeatedly to select an auto dial number and press Press once to select the last number dialed and press START MEMORY START MEMORY START MEMORY START MEMORY If the memory becomes full If the memory becomes full while the document is being scanned MEMORY IS FULL and SEE MANUAL will alt...

Page 67: ...EL Mode on page 66 4 rings Fax reception 5 Receiving Faxes Using FAX Mode RESOLUTION RECEPTION MODE Changing the number of rings If desired you can change the number of rings on which the fax machine answers incoming calls in FAX mode Any number from 2 to 5 can be selected 1 Press once and twice FUNCTION Display FAX TEL TAD OPTION SETTING To select FAX mode press until the arrow in the display poi...

Page 68: ...ss of the above setting 3 STOP Using TEL Mode The display briefly shows your selection then To select TEL mode press until the arrow in the display points to TEL RESOLUTION RECEPTION MODE When the reception mode is set to TEL you must answer all calls by picking up the fax machine s handset or an extension phone connected to the same line RESOLUTION RECEPTION MODE FAX TAD TEL NUMBER OF RING TRANSA...

Page 69: ...fax press after speaking Press before the sender presses their Start key When RECEIVING appears in the display hang up START MEMORY Answering on an extension phone connected to the same line Answering with the fax s handset Note If you have set the Fax Signal Receive setting to NO press to begin reception START MEMORY Beep START MEMORY 1 Answer the extension phone when it rings RECEIVING RECEIVING...

Page 70: ...Y Pronounced high pitched tones Beep Optional Reception Settings Fax Signal Receive Your fax will automatically begin reception if you hear a soft fax tone after answering a call on your fax or an extension phone If you use a computer fax modem to send documents on the same line you must turn this function off in order to prevent your fax from mistakenly attempting to receive documents from the co...

Page 71: ...it on the printing paper the remainder will be printed on a second page In this case the cut off point may occur in the middle of a line Automatic reduction may not be possible if the received document is too large contains too many fine graphics or images or is sent at high resolution In this case the remainder of the document will be printed on a second page 1 Press once and twice 2 Press once a...

Page 72: ...ernating with ADD PAPER PRESS START KEY or CHECK FILM CHECK COVER CHECK PAPER JAM When you add paper and press replace the imaging film or clear the jam the stored documents will automatically print out If you received documents in memory because the fax ran out of paper be sure to add paper which is the same size as the paper previously used If not the document print out size may not match the si...

Page 73: ...0 Example Press twice Number of copies per original Press the number keys to enter a number from 1 to 99 The default setting is 1 Example Press for five copies 3 When you are ready to begin copying press RESOLUTION RECEPTION MODE 5 COPY HELP READY TO SEND RATIO 125 5 If MEMORY IS FULL appears If the memory becomes full while a document is being scanned MEMORY IS FULL and SEE MANUAL will alternatel...

Page 74: ...display FUNCTION 1 2 STOP Display The display briefly shows your selection then OPTION SETTING COPY CUT OFF NUMBER OF RING 1 YES 2 NO Copy Cut off When making a copy of a document that is longer than the printing paper use the copy cut off setting to select whether the remaining part of the document will be cut off or printed on a second page The initial setting is YES cut off the remainder To cha...

Page 75: ...ion service from your telephone company Your fax may not be compatible with some caller identification services 1 Press once and twice 2 Press once and 5 times 3 Press once 4 Press YES to turn on Caller ID To turn off Caller ID press and go to Step 8 5 Press to select SET To clear a previously programmed area code press and go to Step 8 6 Enter the three digits of your area code FUNCTION 1 2 1 2 D...

Page 76: ...One of the following messages will appear while the fax rings if caller information is not available NO SERVICE No caller information was received from your telephone company Make sure that the telephone company has activated your service CALLER ID ERROR Noise on the telephone line prevented reception of caller information OUT OF AREA The call was made from an area which does not have a caller ide...

Page 77: ...Follow the steps below to view the Caller ID List in the display If desired you can immediately dial a number when it appears 1 Press twice 2 Press or to scroll through the list 3 If you want to dial one of the numbers in the list scroll through the list until the number appears in the display Fax If you want to send a fax load the document and then press Dialing and transmission begin Voice call ...

Page 78: ...rom the caller list press while the call appears in the display If you want to delete all calls from the list hold down for at least 3 seconds while you are viewing any number in the list Priority Call With Caller ID turned on you can set your fax to make a special ringing sound when you receive a call from a designated phone number This lets you know immediately who is calling without having to l...

Page 79: ... voice call or a fax transmission comes in from the number you have specified as a Junk Number your fax will break the connection as soon as it receives the calling phone number from the caller ID service before the second ring To use this function enter the number that you wish to block as explained in Blocking Reception of Unwanted Faxes see page 79 Only one number can be blocked Note This funct...

Page 80: ...r second number is called This allows you to use the second number as an exclusive fax number To have your fax automatically answer when your second number is called follow the steps below 1 Press once and twice 2 Press once and 3 times 3 Press once 4 Press a number from 1 to 3 to select the ring pattern below that matches your second number s ring pattern Or press 4 to have your fax automatically...

Page 81: ...ore an Anti Junk number or to clear a previously stored number if you are clearing a number go to Step 6 5 Enter the fax number by pressing the number keys max 20 digits 6 Press and then press to return to the date and time display FUNCTION 1 2 START MEMORY STOP Blocking Reception of Unwanted Faxes The Anti Junk Fax function allows you to block reception of faxes from a party that you specify This...

Page 82: ...ists are described below To print a list follow these steps 1 Press once and twice 2 Press once 3 Press or until the desired list appears in the display 4 Press once 5 Press to print the list FUNCTION START MEMORY Display LISTING MODE TEL LIST PRESS START KEY all book Page 80 Tuesday October 9 2001 6 14 PM ...

Page 83: ...ecent calls This list is only available if you are using the Caller ID function Telephone Number List This list shows the fax and phone numbers that have been stored for automatic dialing Setup List This list shows your current selections for the FUNCTION key settings The list also shows your name and fax telephone number as entered in the machine and a sample of the header printed at the top of e...

Page 84: ... the following notes will appear under NOTE in the report to indicate whether the transaction was successful and if not the reason for the failure OK Transmission reception was successful P FAIL A power failure prevented the transaction JAM The printing paper or document jammed preventing the transaction BUSY The fax was not sent because the line was busy COM E X Where X is a number A telephone li...

Page 85: ...lay ALWAYS PRINT A report will be printed after each transmission reception or error ERROR MEMORY A report will be printed after an error or a memory operation SEND ONLY A report will be printed after each transmission ERROR ONLY A report will be printed only when an error occurs NEVER PRINT A report will never be printed FUNCTION 1 5 STOP Display The display briefly shows your selection then 1 2 ...

Page 86: ...aging film out of the print compartment and place it on a sheet of paper 3 Wipe the print head with isopropyl alcohol or denatured alcohol Caution Do not use benzene or thinner Avoid touching the print head with hard objects The print head may be hot if your fax machine has just received a large number of documents If this is the case allow the print head to cool prior to cleaning 1 2 Print head a...

Page 87: ...el press down on both sides to make sure it clicks into place Scanning glass and rollers Clean the scanning glass and rollers frequently to ensure the quality of transmitted images and copies Note Remove the paper from the paper tray before cleaning the scanning glass and rollers 1 Open the operation panel press 1 2 all book Page 85 Tuesday October 9 2001 6 14 PM ...

Page 88: ... remove dirt from the scanning glass you can try moistening the swab with isopropyl alcohol or denatured alcohol Take care that no alcohol gets on the rollers 4 Flip down the green levers on each side of the white roller Rotate the front gear until the film is taut and then close the operation panel press down on both sides to make sure it clicks into place The housing Wipe the external parts and ...

Page 89: ...ion again If the error persists check the following Check the connection The cord from the TEL LINE jack to the wall jack should be no longer than six feet Make sure there are no modem devices sharing the same telephone line Check with the other party to make sure their fax machine is functioning properly Have your telephone line checked for line noise Try connecting the fax machine to a different...

Page 90: ...phone line See Dial mode on page 10 The power is on but no transmission takes place Make sure that the receiving machine has paper If the receiving machine is in manual mode with no attendant reception will not be possible Check the display for error messages Pick up the handset and check for a dial tone Nothing is printed at the receiving end Make sure that the document for transmission is placed...

Page 91: ... to select a paper that is appropriate for the thermal transfer printer in your fax We recommend using laser quality paper that has a very smooth finish Copier paper will work but it sometimes tends to yield a lighter print quality The received document is faint Ask the other party to send higher contrast documents If the contrast is still too low your fax machine may need service Make a copy or p...

Page 92: ...5 General problems Problem Solution Auto dial numbers cannot be stored in the fax Make sure the fax is plugged in and the imaging film has been loaded Auto dial numbers cannot be stored if the imaging film has not been loaded See Loading the Imaging Film in Chapter 1 Nothing appears in the display Make sure the power cord is properly plugged into a power outlet Connect another electrical appliance...

Page 93: ...sure the operation panel is completely closed press down on both sides If a paper jam has occurred clear the jam as explained in the following section Clearing Paper Jams CHECK PAPER SIZE The paper size setting is incorrect Change the paper size setting as explained on page 15 DOCUMENT JAMMED The original document is jammed See the following section Clearing Paper Jams Document jams will occur if ...

Page 94: ...nting can continue see Substitute Reception to Memory on page 70 If you are attempting to transmit from memory see If the memory becomes full on page 64 If you are copying see If MEMORY IS FULL appears on page 71 MEMORY PRINTING The fax is preparing to or printing out a document from memory NO DATA This appears if you attempt to search for an auto dial number when none have been stored NO SERVICE ...

Page 95: ...atic redialing on page 61 T A D TRANSFER The answering machine s transfer function has been turned on see page 40 TOTAL MSGS XX This indicates that you have received messages in the answering machine XX is the number of messages TOTAL PAGE S 01 Number of pages transmitted received or copied Audible signals Continuous tone 3 seconds Indicates the end of transmission reception or copying Intermitten...

Page 96: ...esn t feed out remove it as explained below Important Do not try to remove a jammed document without releasing it as explained below This may damage the feeder mechanism START MEMORY 1 Press and slowly open the operation panel until it is half open 2 Flip up the green levers on each side of the white roller 3 Gently and remove the document Be careful not to tear the document 1 2 all book Page 94 T...

Page 97: ...the front gear until the film is taut and then close the operation panel press down on both sides to make sure it clicks into place Clearing jammed printing paper 4 Flip down the green levers on each side of the white roller Rotate the front gear until the film is taut and then close the operation panel press down on both sides to make sure it clicks into place 1 2 all book Page 95 Tuesday October...

Page 98: ...66XH01 NGERH2568XHZZ Part distribution centers Tritronics Inc 1306 Continental Drive Abingdon MD 21009 Tel 1 800 638 3328 Fax 1 800 888 FAXD Tritronics Inc 1015 NW 52nd Street Ft Lauderdale FL 33309 Tel 1 800 365 8030 Fax 1 800 999 FAXD Fox International Ltd 23600 Aurora Road Bedford Heights OH 44146 Tel 1 800 321 6993 Fax 1 800 445 7991 Andrews Electronics 25158 Avenue Stanford Santa Clarita CA 9...

Page 99: ...one company may disconnect your service temporarily If possible they will notify you in advance If advance notice is not practical you will be notified as soon as possible You will also be advised of your right to file a complaint with the FCC Your telephone company may make changes in its facilities equipment operations or procedures that could affect the operation of your equipment If this happe...

Page 100: ... Ingestion NO NO Possible but very unusual Signs and Symptoms of Exposure None Medical Conditions Aggravated by Exposure None POTENTIAL HEALTH EFFECTS Inhalation None Skin Contact None Eye Contact None Ingestion None Section 4 First Aid Measures Inhalation No applicable Skin Contact In case of contact usually special care in not necessary If it dirties skin clear with water and soap Eye Contact In...

Page 101: ... No environmental effect at normal use Section 13 Disposal Consideration Dispose by the same method of ordinary plastic products in accordance with all applicable regulations Any disposal practice must be in compliance with local state and federal laws and regulations If necessary contact government office and ensure conformity with disposal regulations Section 14 Transport Information No specific...

Page 102: ...arrow in the display points to the desired reception mode FAX mode The fax machine automatically answers and receives faxes TEL mode Answer all calls even faxes by picking up the handset To begin fax reception press TAD mode Select this mode when you go out to receive both voice messages and faxes Storing Auto Dial Numbers 1 Press once and twice 2 Enter the full fax phone number 3 Press 4 Enter a ...

Page 103: ...fax Oprima hasta que la flecha que hay en el display señale hacia el número de recepción deseado Modo FAX El aparato telefax contesta y transmite automáticamente mensajes telefax Modo TEL Responda a todas las llamadas incluso mensajes de fax levantando el auricular Para iniciar la recepción de fax oprima Modo TAD Seleccione este modo cuando salga para recibir tanto mensajes hablados como telefax M...

Page 104: ...ion telephone Using 67 F FAX reception mode 20 65 Fax reception on TAD failure 38 Fax Signal Receive 68 H Halftone setting 53 Handset 9 Handset receiver volume 22 Housing cleaning 86 I Imaging film replacing 12 J Jams clearing 94 95 L Letters entering 17 57 Line error 87 Loading paper 14 Loading the document 52 M Memory transmission 64 Memory substitute reception to 70 Message List 81 Messages Era...

Page 105: ...io setting 69 Redialing 61 Remote code number 45 Remote operations 45 Resolution 53 Ringer volume 22 S Scanning glass cleaning 85 Sender s name and number entering 16 17 Setup List 81 Speaker volume 21 T TAD reception mode 20 34 TEL reception mode 20 66 TEL LINE jack 10 Telephone line cord 10 Telephone Number List 81 Time setting 18 19 Toll Saver function 35 Transaction Report 82 Setting print con...

Page 106: ...all book Page 104 Tuesday October 9 2001 6 14 PM ...

Page 107: ...all book Page 105 Tuesday October 9 2001 6 14 PM ...

Page 108: ...all book Page 106 Tuesday October 9 2001 6 14 PM ...

Page 109: ...After listening to your messages you can either hang up to save them or enter one of the commands on the reverse side REMOTE OPERATION CARD The card below is provided as a quick guide to remote operation Cut it out and carry it with you when you go out Remote Operation Guide all book Page 107 Tuesday October 9 2001 6 14 PM ...

Page 110: ...nsfer OGM 9 3 To quickly disconnect OGM ONLY MODE Turn on 1 1 Turn off 1 2 PLAYBACK Play messages 7 Move backward repeat 2 Skip forward 5 Stop 0 Play new messages only 6 first stop playback ERASING MESSAGES Erase single message 3 Erase all messages 3 3 RECORDING A MEMO Start End 0 RECORDING A NEW OGM Start 4 all book Page 108 Tuesday October 9 2001 6 14 PM ...

Page 111: ...rranties beyond the time period described above on behalf of Sharp The warranties described herein shall be the sole and exclusive warranties granted by Sharp and shall be the sole and exclusive remedy available to the purchaser Correction of defects in the manner and for the period of time described herein shall constitute complete fulfillment of all liabilities and responsibilities of Sharp to t...

Page 112: ...PRINTED IN THAILAND TINSE4265XHTZ SHARP ELECTRONICS CORPORATION Sharp Plaza Mahwah New Jersey 07430 2135 SHARP CORPORATION all book Page 110 Tuesday October 9 2001 6 14 PM ...

Reviews: