background image

55

ADF (SF-A17)/RADF (SF-A56)

ADF (SF-A17)/RADF (SF-A56)

OPTIONAL EQUIPMENT

AUTOMATIC DOCUMENT FEEDER (SF-A17)
REVERSING AUTOMATIC DOCUMENT FEEDER (SF-A56)

An automatic document feeder (ADF) and reversing automatic
document feeder (RADF) will handle 5-1/2" x 8-1/2" to 11" x 17"
originals. If an RADF is installed, two-sided originals can be copied
automatically without having to manually turn them over.

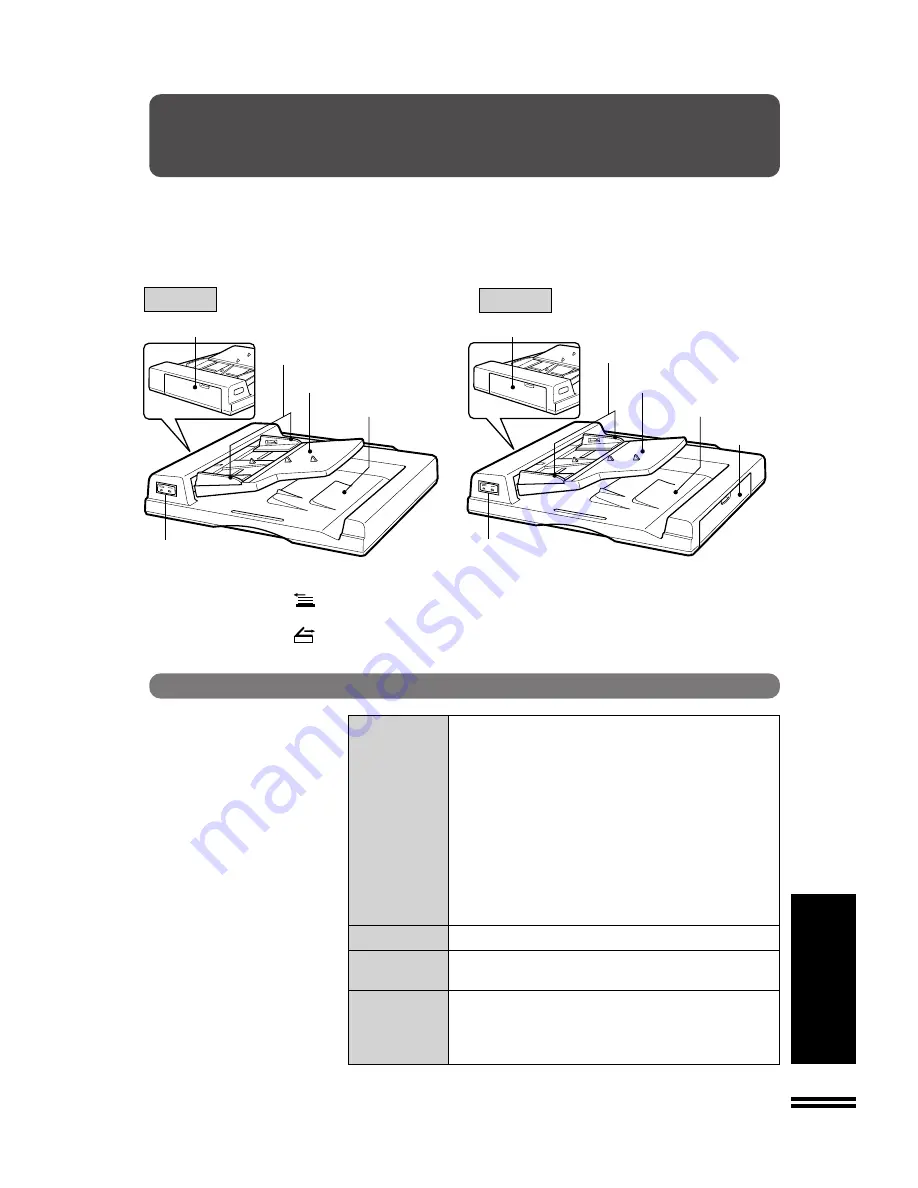
PART NAMES

SF-A17

SF-A56

Document feeder indicators

Original feed indicator

Indicates the originals in the tray will be fed.

Original reminder

Indicates an original is still on the document glass.

Specifications

Acceptable

Weight: Single-sided originals: 14 to 34 lbs.

originals

Two-sided originals (SF-A56 only): 14 to 34
lbs. for 5-1/2" x 8-1/2" and 8-1/2" x 11"
originals.
14 to 29 lbs. for 8-1/2" x 14" and 11" x 17"
originals.

Size: 5-1/2" x 8-1/2" to 11" x 17"

Capacity: Up to 50 sheets for 5-1/2" x 8-1/2" , 8-1/2" x

11", and 8-1/2" x 14" originals provided the
total aggregate thickness does not exceed
1/4" or 6.5 mm  (14 to 20 lbs.) or 3/16" or
5 mm (21 to 34 lbs.)
Up to 30 sheets for 11" x 17" originals

Power supply

Drawn from the copier

Weight

SF-A17: Approx. 22.1 lbs. (10 k

g

)

SF-A56: Approx. 24.3 lbs. (11 k

g

)

Dimensions

SF-A17: 22-31/64" (W) x 20-33/64" (D) x 4-11/32" (H)

(571 mm (W) x 521 mm (D) x 110 mm (H))

SF-A56: 23-5/16" (W) x 20-33/64" (D) x 4-11/32" (H)

(592 mm (W) x 521mm (D) x 110 mm (H))

Specifications are subject to change for improvement without notice.

Feeding roller cover

Feeding roller cover

Original guides

Original guides

Document feeder tray

Document feeder tray

Document feeder cover

Document feeder cover

Exit roller cover

Document feeder indicators

Document feeder indicators

Summary of Contents for SF-2530

Page 1: ... GETTING STARTED MAKING COPIES STATUS INDICATORS GENERAL INFORMATION OPTIONAL EQUIPMENT 2 8 22 30 53 PLAIN PAPER COPIER OPERATION MANUAL MODEL SF 2530 Page SF 2530 PLAIN PAPER COPIER ...

Page 2: ... disconnection pull out the main plug The equipment should be installed near an accessible socket outlet for easy disconnection FOR YOUR RECORDS To protect against loss or theft record and retain for reference the copier s serial number located on the right hand side at the rear bottom corner of the copier Model Number Serial Number Date of Purchase Place of Purchase Authorized Sharp Copier Servic...

Page 3: ...PYING 9 One sided copying 9 Two sided copying with optional duplex module 11 USING THE MANUAL FEED TRAY special paper 12 Two sided copying with manual feed tray 13 REDUCTION ENLARGEMENT ZOOM 14 DUAL PAGE COPYING 16 EDGE ERASE 17 MARGIN SHIFT 18 INTERRUPTING A COPY RUN 19 AUTOMATIC EXPOSURE ADJUSTMENT 20 TONER SAVE MODE 21 GENERAL INFORMATION PART NAMES AND FUNCTIONS 30 Exterior 30 Interior 31 Oper...

Page 4: ...entilated subject to extreme temperature or humidity changes e g near an air conditioner or heater 4 Ensure that the area chosen for the machine location is level 5 Be sure to allow the required space around the machine for servicing and proper ventilation A small amount of ozone is produced within the copier during operation The emission level is insufficient to cause any health hazard NOTE The p...

Page 5: ...e provided on the optional stand 500 sheet paper drawer or stand 1000 sheet paper drawer When moving the machine with the optional stand 500 sheet paper drawer or stand 1000 sheet paper drawer be sure to raise the installation adjusters After moving the machine lower the installation adjusters until they reach the floor to lock the machine in place Fusing unit Photoconductive drum Cautions Lock Re...

Page 6: ...thorized Sharp Service Center The 500 sheet paper drawer can be adjusted for four different paper sizes 8 1 2 x 11 8 1 2 x 11 R 8 1 2 x 14 and 11 x 17 The 1000 sheet paper drawer can be adjusted for three different paper sizes 8 1 2 x 11 8 1 2 x 11 R and 8 1 2 x 14 The paper size for the lower paper tray can be changed by the user 500 sheet paper drawer 1 Gently lift and pull out the paper tray If...

Page 7: ... 5 1 2 x 8 1 2 sized paper the maximum is 250 sheets Do not load paper above the maximum height line Place the cover on the inner cassette which was removed 4 Place the inner cassette into the tray Position the inner cassette so its four protrusions fit into the holes of the paper tray Inner cassettes are available for five different paper sizes 5 1 2 x 8 1 2 8 1 2 x 11 8 1 2 x 11 R 8 1 2 x 14 and...

Page 8: ...dicator is lit copies will gradually become lighter until the copier stops and the indicator begins blinking The indicator may also begin blinking during long copy runs of multiple dark originals even though toner is left If the indicator begins to blink the copier will stop making copies Open and close the front cover After a sufficient amount of toner has been fed the indicator will go out and t...

Page 9: ...oner cartridge until it is empty 8 Slide the empty toner cartridge back along the guides and remove it The cartridge opening will be closed as it is moved back along the guides 9 Slide the toner hopper into the copier and return the toner hopper lock lever into place If the toner hopper is not positioned properly either the copies will come out blank or will blink in the copy quantity display indi...

Page 10: ...the 10 key pad As each digit is entered the dashes in the copy quantity display will disappear After the number is entered the copy quantity display will change to 0 and the START key indicator will light up If an unassigned number is entered will appear again in the copy quantity display indicating that the number was not accepted 2 When a copy run is completed press the key will appear again in ...

Page 11: ...t the desired paper tray is selected Paper matching the size of the original will be automatically selected when the auto paper select function is enabled To copy onto paper of a different size press the TREY SELECT key The auto paper select function can be disabled using user program No 8 If this function is disabled use the TRAY SELECT key to select the desired paper tray See page 34 USER PROGRA...

Page 12: ...ar C key to cancel an entry if a mistake is made 7 Press the START key The number in the copy quantity display will decrease by 1 each time a copy is made To cancel a copy run press the CLEAR ALL key Copying will stop and the number in the copy quantity display will be reset to 0 To repeat the same copy sequence for a different original simply replace the original and press the START key Normal co...

Page 13: ... original and press the START key again to copy onto the other side To stop a copy run during duplex copying press the clear C key To resume copying press the START key To cancel copying press the CLEAR ALL key and manually removeanycopiesremainingintheduplexmodulefollowingthe procedure for removing misfed paper from the duplex module See page 26 To cancel the duplex mode press the ORIGINAL TO COP...

Page 14: ...pen the manual feed tray 3 Set the manual feed tray guides to the width of the copy paper Be sure to extend the tray when feeding 8 1 2 x 14 or 11 x 17 paper 4 Insert the copy paper all the way into the manual feed tray Transparency film labels tracing paper and other special purpose papers must be fed individually Up to 50 sheets of standard copy paper measuring from 5 1 2 x 8 1 2 to 11 x 17 can ...

Page 15: ... cover Make sure the first and second originals are oriented in the same way on the document glass 3 Turn the first copy over without changing its top bottom orientation and place it into the manual feed tray Be sure to feed the copies one sheet at a time 4 Use the TRAY SELECT key to select the manual feed tray 5 Press the START key USING THE MANUAL FEED TRAY special paper Using the manual feed tr...

Page 16: ...s the TRAY SELECT key to select the paper tray with the desired paper size 3 Press the AUTO IMAGE key The copy ratio will be automatically set If the size and orientation of the original do not correspond to standard reduction enlargement ratios for the selected paper tray then the ORIGINAL SIZE indicator will blink 4 Enter the number of copies 5 Press the START key NOTE To cancel the automatic re...

Page 17: ...nd these ratios release the key and then press and hold it again D Same size copying Press the 100 key to reset the copy ratio to 100 3 Ensure that the desired paper tray is selected If the AUTO PAPER SELECT mode is on the appropriate copy paper size will have been automatically selected based on the original size and selected copy ratio If a tray of the required size is not installed use the manu...

Page 18: ...ocument glass 2 Press the DUAL PAGE COPY key 8 1 2 x 11 sized copy paper will be automatically selected To leave a binding margin on the copy press the MARGIN SHIFT key See page 18 The MARGIN SHIFT feature applies only to the left page on the document glass To erase shadows caused by document binding use the EDGE ERASE feature See next page To perform two sided copying when an optional duplex modu...

Page 19: ...sed 4 Make all other desired copier selections and press the START key When using the document glass the area to be erased is simply a specified portion of the copy paper By repositioning the original the portion of it which falls within the area to be erased can be shifted When using an optional document feeder ADF or RADF the original is always fed to the same position on the document glass so t...

Page 20: ...he original face down on the document glass and close the document cover If anoptionaldocumentfeeder ADF or RADF is installed place the originals face up in the document feeder tray 2 Press the MARGIN SHIFT key 3 Ensure that the desired paper tray is selected 4 Enter the desired number of copies 5 Press the START key Margin shift Expanded margin Copy Original Margin is expanded here MARGIN SHIFT D...

Page 21: ...The number of copies of the interrupt copying will be accumulated against this account number See page 8 When an optional document feeder ADF or RADF is being used the copier will stop after completing the copying of the originals which have been fed into the document feeder 2 When the copier stops remove the original s and place the original for interrupt copying on the document glass Close the d...

Page 22: ...he automatic exposure level which has been selected will light up The factory default setting is level 3 4 Press the LIGHT or DARK key to lighten or darken the automatic exposure level as desired 5 Close the front cover This automatic exposure level will remain in effect until you change it again by this procedure IGINAL TO COPY ORIGINALS EVEN NUMBER ODD NUMBER PRE COUNT EXPOSURE AUTO MANUAL PHOTO...

Page 23: ... that the standard toner mode is active 4 To enter the toner save mode press the LIGHT key The exposure indicator marked 1 will light up indicating that the toner save mode is selected 5 Close the front cover and press the EXPOSURE key to select the desired exposure mode To return to the standard mode repeat the procedure but use the DARK key to select exposure level 3 in step 4 IGINAL TO COPY ORI...

Page 24: ...feed locations For misfeeds in optional equipment see the cor responding sections of this manual Misfeed in the manual feed tray 1 Gently pull the misfed paper out 2 Openandclosethefrontcovertocancelthe indicator Misfeed removal MISFEED REMOVAL Fusing unit and exit area P 24 Optional duplex module P 26 Optional document feed area P 60 Transport area P 23 Paper feed area P 22 23 manual feed tray an...

Page 25: ... Misfeed in the transport area 2 Remove the misfed paper Be careful not to tear the misfed paper during removal 3 If the paper cannot be seen from the side pull out the paper tray and remove the misfed paper Be careful not to tear the misfed paper during removal 4 Close the paper tray and the side cover Confirm that the indicator has gone out Misfeed in the transport area 1 Open the front cover ...

Page 26: ...the direction of the arrow to remove the misfed paper 4 Turn the transport lever back into place 5 Close the front cover Confirm that the indicator has gone out MISFEED REMOVAL Misfeed around the fusing unit and exit area 1 Open the front cover Misfeed removal Transport lever Roller rotating knob ...

Page 27: ...ter is installed slide it away from the copier and then open the cover 4 Turn the roller rotating knob in the direction of the arrow and remove the paper If the misfed paper is deep in the fusing unit lift the fusing unit tab and remove any misfed paper CAUTION The fusing unit is hot Be sure to touch only the green tab or the green roller rotating knob 5 Close the exit area cover 6 Close the front...

Page 28: ... below If not a sheet of paper in another location may become torn and difficult to remove 1 Pull out the duplex module 2 Lift up the upper and lower paper guides and remove the misfed paper When a misfeed occurs between the paper guides open the upper paper guide and remove the misfed paper 3 Close the paper guides and push back the duplex module Confirm that the indicator has gone out Misfeed re...

Page 29: ...t regular service call Your authorized Sharp Service Technician will collect the container for disposal 3 Install the new toner collecting container by pushing it down onto the spring loaded tray and then allowing it to move upward and click into place 4 Close the toner collecting container cover Used toner disposal USED TONER DISPOSAL The toner collecting container full indicator will blink when ...

Page 30: ...er should be replaced DEVELOPER REPLACEMENT SHOULD ONLY BE DONE BY AN AUTHORIZED SHARP SERVICE TECHNICIAN Contact your Service Center as soon as possible NOTE If the indicator and the copy quantity display blink simulta neously contact your Service Center Developer required DEVELOPER REQUIRED ...

Page 31: ...INDICATORS MAINTENANCE REQUIRED When the maintenance required indicator lights up service by an authorized Sharp Service Technician is required Contact your Service Center as soon as possible Maintenance required ...

Page 32: ... Special papers including transparency film and copy paper can be fed from the manual feed tray 0 Exit area cover Open to remove misfed paper 1 Power switch Press to turn copier power on and off 2 Duplex module or 500 sheet paper drawer optional The copier can be equipped with either a duplex module or a 500 sheet paper drawer The front of the copier is closed up with a cover when neither of these...

Page 33: ... the photoconductive drum 2 Toner hopper Contains toner 3 Roller rotating knobs Turn to remove misfed paper 4 Toner hopper lock lever Pull down to release the toner hopper 5 Toner collecting container Used toner is collected here Replace when the indicator blinks Accessories Inner cassette installed in the lower paper tray 1 Exit tray 1 Operation manual 1 Document tray 1 Toner collecting container...

Page 34: ...es 4 INTERRUPT key and indicator p 19 Interrupts a copy run 5 SORTER key and indicators p 61 67 Press to select the sorter modes when a sorter or staple sorter is installed Sorters and staple sorters are optional 6 ORIGINAL TO COPY key and indicators Press to select one sided and two sided copy modes Two sided copies from single sided originals Can be selected only when an optional duplex module i...

Page 35: ...S 0 Reduction key p 15 Selects one of four preset reduction copy ratios 50 64 77 or 95 1 Enlargement key p 15 Selects one of four preset enlargement copy ratios 121 129 141 or 200 2 100 key p 15 Press to reset the copy ratio to 100 for same size copies 3 ORIGINAL SIZE indicators Light up to show the selected original size 4 AUTO PAPER SELECT indicator Paper of the proper size will automatically be...

Page 36: ...off mode after any operation is made See page 43 4 Auto power save Enables or disables the automatic power save control function control See page 43 5 Stream feeding Enables or disables the stream feeding mode when an optional mode automatic document feeder is installed See page 56 6 Override sorter bin Cancels limit control of operation in case of bin capacity overflow capacity limit 7 Sorter bin...

Page 37: ...rogram numbers are shown in the table below For example to change the setting of the auto power shut off timer press key 3 Program name Program No Auto clear time 1 Preheat mode 2 Auto power shut off timer 3 Auto power save control 4 Stream feeding mode 5 Override sorter bin capacity limit 6 Sorter bin access mode 7 Auto paper select mode 8 Auto power shut off setting 9 3 Press the START key The e...

Page 38: ...ve control 0 e OFF 1 e ON Stream feeding mode 0 e OFF 1 e ON Override sorter bin 0 e OFF 1 e ON capacity limit Sorter bin access mode 0 e OFF 1 e ON Auto paper select 0 e OFF 1 e ON setting Auto power shut off 0 e OFF 1 e ON setting Factory default settings are indicated with an asterisk NOTE If you select 0 OFF in a program the corresponding function will be disabled 5 Press the START key The rig...

Page 39: ...ore an auditing program can be used The auditing manager must remember this number Only this registered number will allow access to the auditing programs This number is registered as below NOTE If an optional Auditor SF EA12 is installed the internal auditor cannot be used In this case setting for the auditing programs must be selected by using an optional Counter Commander SF EA13 The operation o...

Page 40: ...o exit the auditing programs press the CLEAR ALL key AUDITING PROGRAMS Auditing programs Setting for auditing accounts Setting for auditing programs varies with the program number For setting of all programs first follow steps 1 and 2 in Auditing code number on page 37 Press the clear C key the INTERRUPT key and the clear key again Enter the auditor code number using the 10 key pad Then enter the ...

Page 41: ...ram No 11 is used to register accounts When program No 11 is entered will appear in the copy quantity display If the number of accounts has reached the upper limit 49 1E will appear in the copy quantity display for approximately 5 seconds Enter another program number or press the key to exit the auditing program 1 Enter a 3 digit account number using the 10 key pad Any 3 digit number except 000 an...

Page 42: ... number To exit the auditing program mode press the key Program No 13 Account number deletion Program No 13 is used to delete accounts When program No 13 is entered 0 will blink on the right side of the copy quantity display If no account number has been registered 3E will appear in the copy quantity display for approximately 5 seconds Enter another program number or press the key to exit the audi...

Page 43: ...ainst the specified account numberwillbe displayed Thenumberwillappearinthree steps each with two digits the first digit is while the 0 key is pressed Example 1 234 copies The upper limit for the number of copies is 49 999 If the number of copies made reaches 50 000 the number will be reset to 0 and counting will start again from 0 3 Repeat steps 1 and 2 for other account numbers 4 To continue wit...

Page 44: ...ear in the copy quantity display Proceed to step 3 If you have pressed key 1 the number of copies against all account numbers will be reset Proceed to step 5 3 Use a ZOOM key to select the account number to be reset 4 Press the START key The number of copies against the specified account number will be reset 5 To continue with the same or other auditing programs enter the desired program number To...

Page 45: ...ready condition or begin copying within 30 seconds after any key input is made Auto power shut off mode If the auto power shut off mode is enabled the copier will auto matically turn off the power once a programmed length of time has elapsed without any copier operation after the last copy of a run is made or the power is first turned on The power switch will auto matically be turned to the OFF po...

Page 46: ... will enter first the preheat mode and then the auto power shut off mode when no copier operation is made If the time set for the preheat mode is not shorter than that for the auto power shut off mode the copier will enter only the auto power shut off mode when the time set for the auto power shut off mode has elapsed after any copier operation If the auto power shut off time is changed using user...

Page 47: ...m being copied onto the copies Document glass and document cover Wipe the document glass and document cover with a soft clean cloth If necessary dampen the cloth with water Do not use thinner benzene or similar volatile cleaning agents If an optional document feeder ADF or RADF is installed wipe the transport belt with a soft clean cloth ...

Page 48: ...iginal placed face down Place the original face down on the on the document glass document glass Paper too heavy Use copy paper within the specified range See page 49 Copies smear if rubbed Paper damp Replace with dry copy paper Be sure to store copy paper in a dry location Use standard paper Non standard paper used If using special papers feed the paper through the manual feed tray Paper misfeeds...

Page 49: ...nter as soon as possible See page 29 Wait until warm up is complete Is the START key indicator off Warm up time is approximately 60 seconds Is the indicator on Copy paper is needed See page 4 LOADING COPY PAPER Power is on but copying 1 Check the covers including those of is not possible optional equipment to ensure that Is steadily lit in the copy they are all closed quantity display 2 If an opti...

Page 50: ...nking Toner collecting container is full See page 27 USED TONER DISPOSAL If a problem persists after checking the above please consult your authorized Sharp Service Center Self diagnostic function An automatic self diagnostic function is built into this copier Should the copier malfunction the self diagnostic function will locate the problem and stop the copier to prevent damage An alphanumeric co...

Page 51: ... paper can only be set in the lower paper tray with an optional inner cassette and in the manual feed tray 8 1 2 x 11 is the maximum size that can be manually fed for paper weighing from 28 to 34 lbs SPECIAL PAPERS Special papers must be fed one sheet at a time through the manual feed tray See page 12 Labels Tracing paper Transparency film 5 1 2 x 8 1 2 11 x 17 15 lbs 20 lbs 5 1 2 x 8 1 2 11 x 17 ...

Page 52: ...may curl or become damp resulting in paper misfeeds Photoconductive drum The SF 2530 Copier has advanced process control technology which improves copy quality uniformity This feature stabilizes copy quality throughout the life of the photoconductive drum by automatically compensating for changes in drum characteristics due to wear operator use patterns and environmental conditions The automatic a...

Page 53: ...copy Max 99 copies subtractive counter First copy time Approx 4 1 sec Warm up time Approx 60 sec Copy ratio Variable 50 to 200 in 1 increments total 151 steps Fixed presets 50 64 77 95 100 121 129 141 200 Exposure system Moving optical source slit exposure stationary platen with automatic exposure function Copy paper feed Choice of one or two 500 sheet automatic feed paper trays one manual feed tr...

Page 54: ...er SF CV13 Automatic document feeder SF A17 Reversing automatic document feeder SF A56 10 bin sorter SF S18 20 bin sorter SF S15 10 bin staple sorter SF S54N 20 bin staple sorter SF S56 Stand 500 sheet paper drawer SF D20 Stand 1000 sheet paper drawer SF D21 Duplex module SF DM11 500 sheet paper drawer SF CM11 Cassette SF IC11 Auditor SF EA12 Counter commander SF EA13 Personal counter SF 71A 71B D...

Page 55: ...Part names 61 Using a sorter 62 Sorter capacities 63 Misfeed removal 64 Specifications 66 10 BIN STAPLE SORTER SF S54N 20 BIN STAPLE SORTER SF S56 67 Part names 67 Using a sorter 68 Sorter capacities 69 Staple sort 70 Manual stapling SF S56 only 72 Staple cartridge replacement 73 Staple jam removal 76 Misfeed removal 79 Specifications 81 STAND 500 SHEET PAPER DRAWER SF D20 STAND 1000 SHEET PAPER D...

Page 56: ...F A56 Sorters SF S18 SF S15 SF S54N and SF S56 Stand 500 Sheet Paper Drawer SF D20 and Stand 1000 Sheet Paper Drawer SF D21 For the Auditor SF EA12 and the Counter Commander SF EA13 see their manual Reversing automatic document feeder SF A56 Automatic document feeder SF A17 Cassette SF IC11 500 sheet paper drawer SF CM11 Document cover SF CV13 Stand 1000 sheet paper drawer SF D21 20 bin sorter SF ...

Page 57: ...5 1 2 x 8 1 2 and 8 1 2 x 11 originals 14 to 29 lbs for 8 1 2 x 14 and 11 x 17 originals Size 5 1 2 x 8 1 2 to 11 x 17 Capacity Up to 50 sheets for 5 1 2 x 8 1 2 8 1 2 x 11 and 8 1 2 x 14 originals provided the total aggregate thickness does not exceed 1 4 or 6 5 mm 14 to 20 lbs or 3 16 or 5 mm 21 to 34 lbs Up to 30 sheets for 11 x 17 originals Power supply Drawn from the copier Weight SF A17 Appr...

Page 58: ...desired paper tray See page 34 USER PROGRAMS To copy onto a different size paper use the TRAY SELECT key to make the selection If an original is left on the document glass the original reminder indicatorwillblink Removetheoriginalfromthedocumentglass in this case Using the ADF or RADF Special originals such as transparency film and tracing paper should not be fed from the ADF and RADF but should b...

Page 59: ...st be installed for 2 sided copying 1 Adjust the original guides to the size of the originals and set the originals face up in the document feeder tray 2 If the number of originals is known use the ORIGINAL TO COPY key to select EVEN NUMBER or ODD NUMBER in the ORIGINAL TO COPY section of the operation panel then proceed to step 3 If the number of originals is not known select PRE COUNT ORIGINALS ...

Page 60: ...F S15 and SF S56 after copying starts in sort mode 4 Press the START key To cancel a copy run during duplex copying press the CLEAR ALL key Manually remove any copies remaining in the duplex module following the procedure for removing misfed paper from the duplex module See page 26 2 sided copies from 2 sided originals SF A56 only An optional duplex module must be installed for 2 sided copying 1 A...

Page 61: ...run during duplex copying press the CLEAR ALL key Manually remove any copies remaining in the duplex module following the procedure for removing misfed paper from the duplex module See page 26 1 sided copies from 2 sided originals SF A56 only 1 Adjust the original guides to the size of the originals and set the originals face up in the document feeder tray 2 Use the ORIGINAL TO COPY key to select ...

Page 62: ...he misfeed location indicator B SF A17 Gently pull the original out SF A56 Open the exit roller cover and gently pull the original out Be sure to open and close the document feeder cover to cancel the misfeed location indicator C Openthefeedingrollercover openthedocumentfeeder cover and remove the original NOTE After misfed originals are removed from locations A B and or C a number may appear in t...

Page 63: ...heet paper drawer SF D20 stand 1000 sheet paper drawer SF D21 or an equivalent stand must be installed The bin intervals of the 10 bin sorter SF S18 are narrow for space conservation When copying from an optional document feeder ADF or RADF is completed or the CLEAR ALL or the sorter bin access key is pressed in the document glass mode the bins will move three at a time and the space between them ...

Page 64: ...ORT mode when copying onto special papers such as transparency film or label stock SORT Press the SORTER key to select the SORT mode SORT is used for automatic copy collating Copies of each original will be sequentially deposited in the sort bins GROUP Press the SORTER key to select the GROUP mode In the GROUP mode all copies of the same original will be deposited in the same bin ORIGINALS EVEN NU...

Page 65: ...0 30 10 BIN SORTER SF S18 20 BIN SORTER SF S15 Sort bins Up to 50 per bin in the SORT mode Up to 30 per bin in the GROUP mode NOTES If the specified number of copies is more than the maximum number of copies that can be set the copy quantity display will change to the corresponding number in the above table in the SORT or GROUP mode after copying starts When making single sided copies from two sid...

Page 66: ...10 bin sorter 1 Pull the sorter lock lever and carefully slide the sorter away from the copier 2 Removethemisfedpaperfromthesorterorfromtheexit area of the copier 3 Slide the sorter back toward the copier and latch it into place Confirm that the indicator has gone out If the indicator is still blinking check the inside of the copier and remove any remaining misfed paper 10 BIN SORTER SF S18 10 bin...

Page 67: ...t 3 If the indicator is still blinking or the misfed paper cannot be seen from the top slide the sorter carefully away from the copier 4 Open the side cover and remove any misfed paper 5 Close the side cover and push the sorter back against the copier Confirm that the indicator has gone out If the indicator is still blinking check the inside of the copier and remove any remaining misfed paper ...

Page 68: ...are subject to change for improvement without notice 10 BIN SORTER SF S18 20 BIN SORTER SF S15 Specifications SF S18 No of bins 10 Bin capacity NON SORT 100 sheets top bin SORT 30 sheets 5 1 2 x 8 1 2 8 1 2 x 11 8 1 2 x 11 R 15 sheets 8 1 2 x 14 11 x 17 GROUP 20 sheets 5 1 2 x 8 1 2 8 1 2 x 11 8 1 2 x 11 R 15 sheets 8 1 2 x 14 11 x 17 Paper size Max 11 x 17 Min 5 1 2 x 8 1 2 Power supply Drawn fro...

Page 69: ...ximum is exceeded NOTES To install the 20 bin staple sorter SF S56 an optional stand 500 sheet paper drawer SF D20 stand 1000 sheet paper drawer SF D21 or an equivalent stand must be installed ThebinintervalsofstaplesorterSF S54Narenarrow for space conservation When copying from an optional ADF or RADF is completed or the clear all key or the sorter bin access key is pressed in the document glass ...

Page 70: ...es SORT STAPLE SORT or GROUP is selected the copier is in the NON SORT mode In this mode all copies will be deposited in the top bin of the sorter Be sure to use the NON SORT mode when copying onto special papers such as transparency film or label stock SORT mode Press the SORTER key to select the SORT mode SORT is used for automatic copy collating Copies of each original are sequentially deposite...

Page 71: ...TAPLE SORT or GROUP mode after copying starts When making single sided copies from two sided originals the maximum number of originals that can be copied is half the number shown in the above table If the sorter bin capacity control is enabled the copier will stop when the number of originals exceeds the maximum number in the SORT or STAPLE SORT mode If the sorter bin capacity control is canceled ...

Page 72: ...per the copies will not be stapled SF S56 If the number of copies to be delivered into each bin is more than 50 for 8 1 2 x 11 or 8 1 2 x 11 R paper or 25 for 8 1 2 x 14 or 11 x 17 paper the copies will not be stapled 2 Press the SORTER key to select the STAPLE SORT mode Make sure that there is no paper in any sort bin before selecting the STAPLE SORT mode 3 Set the number of copies Up to 10 sets ...

Page 73: ...ch bin is more than 50 for 8 1 2 x 11 or 8 1 2 x 11 R paper or 25 for 8 1 2 x 14 or 11 x 17 paper the copies will not be stapled 2 Press the SORTER key to select the STAPLE SORT mode Make sure that there is no paper in any sort bin before selecting the STAPLE SORT mode 3 Set the number of copies Up to 10 sets SF S54N or 20 sets SF S56 can be made 4 Press the START key When copying and sorting are ...

Page 74: ...rt bins If there is the manual staple key will not light up Upto50sheetsofpapercanbestapledtogether Exceedingthis maximum may result in damage to the stapler 3 Press the manual staple key when it lights up The set of copies will be stapled Manual stapling SF S56 only To use the stapling feature only without using the STAPLE SORT mode follow the procedure below Stapling location Copies 20 bin stapl...

Page 75: ...he stapler A few staples will be left in the cartridge Remove and discard them 3 Check that the first staple in the new cartridge is at the tip of the cartridge If the first staple is not at the tip pull it to the tip If any staples are protruding past the cartridge tip tear them off at the STAPLE TEAR line and align the first staple with the tip A cartridge holds 5 000 staples 4 Push the new stap...

Page 76: ...artridge from inside the staple box 4 Insert the new staple cartridge into the box until it clicks in place Insert the new cartridge by aligning the arrows on the cartridge with those on the box Check that the cartridge locks in place by pulling it slightly A cartridge holds 5 000 staples NOTE Be sure not to remove the rear paper and tape before inserting the cartridge 20 bin staple sorter SF S56 ...

Page 77: ...r 8 Place a sheet of paper into the top bin Press the manual staple key on the staple sorter when it lights up Check to see whether the sheet is stapled If it is not stapled press the manual staple key again If the stapler does not operate properly even after replacement a staple may be jammed in it See page 77 Staples for the staple sorter are available from your Sharp dealer 20 BIN STAPLE SORTER...

Page 78: ...ve the jammed staples in the manner described below SF S54N 10 bin staple sorter 1 Open the stapler cover 2 Close the stapler cover Jammed staples will be removed automatically 3 Remove all copies from the bins of the staple sorter To check that the stapler works properly copy an original and staple it 10 bin staple sorter SF S54N 10 BIN STAPLE SORTER SF S54N ...

Page 79: ...release lever and pull out the staple box Lift the release lever to unlock the staple box Then pull out the box 3 Lower the lever at the end of the staple box and remove the jammed staples 4 Return the lever to its original position 20 BIN STAPLE SORTER SF S56 20 bin staple sorter SF S56 ...

Page 80: ... unit until it clicks in place 6 Close the stapler cover 7 Following the stapling procedure on page 72 staple a copy to check that the stapler works properly If it does not repeat this procedure until it does 20 bin staple sorter SF S56 20 BIN STAPLE SORTER SF S56 ...

Page 81: ...ter lock lever and carefully slide the staple sorter away from the copier 2 Remove the misfed paper from the staple sorter or from the exit area of the copier 3 Slide the staple sorter back toward the copier and latch it into place 4 Open and close the front cover to cancel the indicator If the indicator is still blinking check the inside of the copier and remove any remaining misfed paper 10 BIN ...

Page 82: ...e guides away from the copier 2 Removethemisfedpaperfromthesorterorfromtheexit area of the copier 3 Slide the sorter back toward the copier and latch it into place If the indicator is still blinking check the inside of the copier and remove any remaining misfed paper 20 bin staple sorter SF S56 20 BIN STAPLE SORTER SF S56 ...

Page 83: ...56 No of bins 20 Bin capacity NON SORT 100 sheets top bin 60 sheets for 8 1 2 x 14 and 11 x 17 SORT 50 sheets 5 1 2 x 8 1 2 8 1 2 x 11 8 1 2 x 11 R 25 sheets 8 1 2 x 14 11 x 17 STAPLE 50 sheets SORT 8 1 2 x 11 8 1 2 x 11 R 25 sheets 8 1 2 x 14 11 x 17 GROUP 30 sheets 5 1 2 x 8 1 2 8 1 2 x 11 25 sheets 8 1 2 x 11 R 8 1 2 x 14 11 x 17 Paper size Max 11 x 17 Min 5 1 2 x 8 1 2 Power supply Drawn from ...

Page 84: ... is available with a 500 sheet paper drawer alone or with an optional auxiliary 500 sheet paper drawer for the additional flexibility of two feeds with a total capacity of 1 000 sheets The SF D21 is available with a 1000 sheet paper drawer alone or in combination with an optional auxiliary 500 sheet paper drawer for a total capacity of 1 500 sheets PART NAMES SF D20 SF D21 Stand 500 sheet paper dr...

Page 85: ... not load paper above the maximum height line 3 Push the paper drawer firmly back into the copier Loading copy paper The size of the copy paper for the paper tray will be set by Sharp service personnel according to your request when you purchase the copier If a different paper size setting is required contact your authorized Sharp Service Center SF D20 The 500 sheet paper drawer is available in fo...

Page 86: ...any misfed paper STAND 500 SHEET PAPER DRAWER SF D20 STAND 1000 SHEET PAPER DRAWER SF D21 3 Close the paper drawer and the side cover Confirm that the indicator has gone out STAND 500 SHEET PAPER DRAWER SF D20 STAND 1000 SHEET PAPER DRAWER SF D21 Misfeed removal The copier will stop when a misfeed occurs The misfeed indicator will blink and blinking red misfeed location indicators will indicate th...

Page 87: ...ith an optional 500 sheet paper drawer installed Weight Approx 60 lbs 27 2 kg Dimensions 23 5 8 W x 24 39 64 D x 17 49 64 H 600 mm W x 625 mm D x 451 mm H SF D21 Paper size 8 1 2 x 11 to 8 1 2 x 14 Paper capacity 1 000 sheets of 20 lb bond paper Total of 1 500 sheets of 20 lb bond paper with an optional 500 sheet paper drawer installed Weight Approx 73 2 lbs 33 2 kg Dimensions 23 5 8 W x 24 39 64 ...

Page 88: ...86 OPTIONAL EQUIPMENT MEMO ...

Page 89: ... number must be entered when accessing the Auditing Programs for the first time See page 37 NOTE The Auditor Code Number is an important security number allowing the auditing manager to configure the auditor s settings The manager should register this code number different from the factory setting above immediately after your copier is installed NOTE Detach this page and store it in a safe place ...

Page 90: ...99C DSC3 CINSE1807FC51 ...

Page 91: ...d its own warranty to you on terms that are no less favorable than those given to the dealer by Sharp You should be aware however that Sharp does not itself extend any warranties either express or implied directly to you the end user and no one is authorized to make any representations or warranties on behalf of Sharp Specifically SHARP DOES NOT EXTEND TO YOU THE END USER ANY EX PRESS WARRANTY OR ...

Page 92: ...PRINTED IN HONG KONG 99A KSq TINSE1807FCZZ SF 2530 SHARP ELECTRONICS CORPORATION Sharp Plaza Mahwah New Jersey 07430 2135 SHARP CORPORATION SF 2530 PLAIN PAPER COPIER ...

Reviews: