background image

E-17

SD-AT1000W_LAG_E2.fm

04/7/21

SD-AT1000W

ENGLISH

TINSZA121AWZZ

Pr

epara

tion f

o

r Us

e

- Ge

ne

ra

l c

o

ntr

o

l -

General control

"

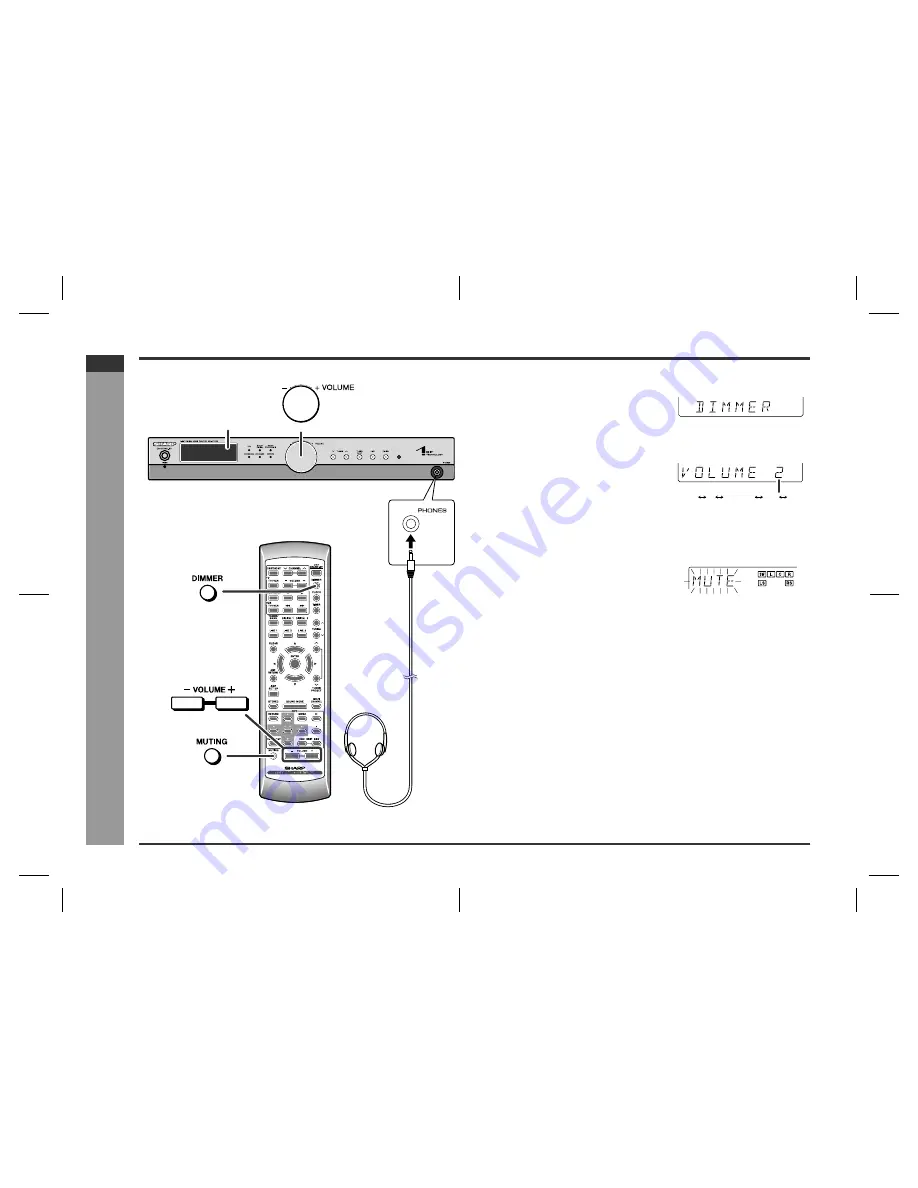
To change the display brightness (2 levels)

"

Volume control

"

Muting

"

Headphones

!

Before plugging in or unplugging the headphones, reduce the volume.

!

Be sure your headphones have a 6.3 mm (1/4") diameter plug and are between 16
ohms and 50 ohms impedance. The recommended impedance is 32 ohms.

!

Plugging in the headphones disconnects the speakers automatically. Adjust the
volume using the VOLUME control.

!

You cannot use the surround feature with headphones.

!

Do not plug in or unplug headphones whilst recording. The sound may skip.

Display

You can switch the display brightness by press-
ing the DIMMER button.

Dimmed

Main unit operation:

When the VOLUME control is turned clockwise, 
the volume will increase. When it is turned anti-
clockwise, the volume will decrease.
 

Remote control operation:

Press the  button to increase the vol-
ume and the VOLUME - button for decreasing.

The volume is muted temporarily when pressing 
the MUTING button on the remote control.
Press again to restore the volume.

0

1

2

39

40

.....

Summary of Contents for SD-AT1000W

Page 1: ...1 BIT DIGITAL HOME THEATER SISTEMA 1 BIT PARA HOME THEATER SD AT1000W MODEL MODELO SD AT1000W_LAG_FRONT TINSZA121AWZZ OPERATION MANUAL MANUAL DE MANEJO Please refer to pages E 1 to E 32 ENGLISH Consulte las páginas S 1 a S 32 ESPAÑOL ...

Page 2: ...ipping or splash ing No objects filled with liquids such as vases should be placed on the appara tus Contents Page General Information Accessories 2 Precautions 2 Controls and indicators 3 8 System connections Speaker connection 9 10 Aerial connection 10 Audio connections to DVD players VCRs TVs etc 11 12 Connecting the AC power lead 13 Preparation for Use Setting the AM FM interval 14 System inst...

Page 3: ...y The ventilation should not be impeded by covering the ventilation openings with items such as newspapers tablecloths curtains etc No naked flame sources such as lighted candles should be placed on the appa ratus Attention should be drawn to the environmental aspects of battery disposal This unit should only be used within the range of 5 C 35 C 41 F 95 F Warning The voltage used must be the same ...

Page 4: ...ect Button 21 13 Remote Sensor 16 14 Headphone Socket 17 15 Sound Mode Indicators 22 23 24 1 2 5 3 4 6 7 9 10 11 12 13 8 10 11 13 14 12 1 1 2 3 4 5 6 15 2 3 4 5 7 6 8 9 1 Subwoofer Indicator 2 Left Front Speaker Indicator 3 Front Left Signal Indicator 4 Centre Signal Indicator 5 Centre Speaker Indicator 6 Front Right Signal Indicator 7 Right Front Speaker Indicator 8 Low Frequency Effect Signal In...

Page 5: ...ckets 11 12 11 Optical Digital Audio Input Socket 11 2 3 1 4 5 6 7 9 8 10 11 The rating label is located on the bottom of the unit Cooling fan This unit is fitted with a cooling fan at the rear for improved cooling Do not cover the opening in this section with any obstacles Cooling fan Caution The unit will get warm whilst being used Do not touch the warm areas of the unit for prolonged periods to...

Page 6: ... Cursor Buttons 18 25 7 Amplifier Return Button 25 8 Amplifier Initial Setting Button 25 9 2 channel Stereo Sounds Select Button 24 10 DVD Operation Buttons 6 11 Muting Button 17 12 On Stand by Button 16 13 Dimmer Button 17 14 Clock Button 18 15 Timer Button 27 16 Tuning Up and Down Buttons 14 19 17 Tuner Preset Up and Down Buttons 20 18 Enter Button 14 19 Sound Mode Select Button 23 20 Multi Chan...

Page 7: ... up the TV volume VCR Operation Buttons 1 VCR ON STAND BY 4 VCR Sets the VCR power to ON or STAND BY Stops the cassette 2 VCR 5 VCR Rewinds the cassette quickly Plays the cassette 3 VCR TV VCR 6 VCR Switches the input to TV or VCR Advances the cassette quickly 1 2 3 4 5 6 1 2 3 4 5 6 DVD Operation Buttons 1 DVD 7 DVD MENU Selects the DVD menu Displays the DVD menu 2 DVD RETURN 8 DVD Goes back to t...

Page 8: ...flex Duct 2 Speakers 3 Speaker Terminals 4 Mounting Holes for Stand or Bracket Centre speaker 1 1 Bass Reflex Duct 2 Speakers 3 Mounting Holes for Bracket 4 Speaker Terminals Surround speaker 2 1 Bass Reflex Duct 2 Speaker 3 Speaker Terminals 4 Mounting Holes for Stand or Bracket Subwoofer 1 1 Bass Reflex Duct 2 Woofer 3 Speaker Terminals 1 3 4 2 1 4 3 2 1 3 2 4 1 2 3 ...

Page 9: ...ions supplied to the bottom of the speakers to prevent them from slid ing or falling due to vibration A sheet of speaker cushions 20 pcs is supplied with this product Use 4 cushions per speaker Carrying the subwoofer When carrying the subwoofer be careful not to touch the subwoofer located near bot tom It may be damaged Be sure to hold the unit by its base Front speaker Reproduces left and right s...

Page 10: ...ect the speaker and the unit by matching the colours For speaker installation refer to page 15 Subwoofer Front speaker left Centre speaker Front speaker right Surround speaker right Surround speaker left Blue White Red Green Green Purple Blue Black Red Black Red Black Red Red Black Red White Black Red Grey Black Red Instead of the supplied sub woofer you can connect sepa rately available woofer to...

Page 11: ...rnal AM aerial be sure to keep the wire of the AM loop aerial connected Make sure to leave the AC power lead disconnected when connecting the speakers Do not let the bare speaker wires touch each other Do not stand or sit on the speakers You may be injured Insert the speaker plug fully with the rising side facing up Hold the speaker plug when removing it from the main unit Pulling the lead may cau...

Page 12: ... sockets emit signals from the LINE 2 IN LINE 3 IN and the built in tuner Signals from the DIGITAL IN and LINE 1 IN are not emitted Connect TV directly to the DVD player VCR or digital tuner to watch programmes refer to the operation manual of each equipment Digital audio cable commercially available Optical digital cable commercially available TV TV Digital tuner etc DVD player CD player etc To o...

Page 13: ...ing the supplied subwoofer disconnect the speaker wire from the main unit The speaker delay and level settings are applied to the subwoofer connected to the SUBWOOFER PRE OUT socket see pages 25 and 26 Caution Turn off all other equipment before making this connection Notes Refer to the operation manual of the equipment to be connected Insert the plugs fully to avoid fuzzy pictures or noise TV To ...

Page 14: ...ly plug the AC power lead of this unit into the wall socket Note Unplug the AC power lead from the wall socket if the unit will not be in use for a pro longed period of time To turn the power on Press the ON STAND BY button If the power does not turn on check the AC power lead is plugged in properly To set the unit to stand by mode Press the ON STAND BY button again Wall socket AC 220 240 V 50 60 ...

Page 15: ...AM FM tuning interval span used in your area To change the AM FM tuning interval Note The AM FM tuning interval will not change unless you press the ENTER button within 6 seconds Caution When the unit is left for a few hours after the span has been switched and the AC power lead disconnected the AM span will be automatically returned to 10 kHz FM span to 100 kHz If this happens set the span again ...

Page 16: ... centre and subwoofer speakers may be placed beside or near the TV as they are magnetically shielded However discolouration may occur depending on the TV type If colour variation occurs Turn off the TV from the power switch After 15 30 minutes turn the TV on again If the colour variation is still present Move the speakers further away from the TV Refer to the user s manual of the TV for details No...

Page 17: ...tteries UM SUM 3 R6 HP 7 or similar Periodically clean the transmitter on the remote control and the sensor on the unit with a soft cloth Exposing the sensor on the unit to strong light may interfere with operation Change the lighting or the direction of the unit Keep the remote control away from moisture heat shock and vibrations Test of the remote control Check the remote control after checking ...

Page 18: ...automatically Adjust the volume using the VOLUME control You cannot use the surround feature with headphones Do not plug in or unplug headphones whilst recording The sound may skip Display You can switch the display brightness by press ing the DIMMER button Dimmed Main unit operation When the VOLUME control is turned clockwise the volume will increase When it is turned anti clockwise the volume wi...

Page 19: ...NTER button 2 Press the or button to select the 24 hour or 12 hour display and then press the ENTER button Note that this can only be set when the unit is first installed or it has been reset see page 31 12 00 AM The 12 hour display will appear AM 12 00 PM 11 59 AM 0 00 The 12 hour display will appear AM 0 00 PM 11 59 0 00 The 24 hour display will appear 0 00 23 59 3 Press the or button to adjust ...

Page 20: ...ress the ON STAND BY button to turn the power on 2 Press the TUNER BAND button repeatedly to select the desired frequency band 3 Press the TUNING or button to tune in to the desired station Manual tuning Press the TUNING button as many times as required to tune in to the desired station Auto tuning When the TUNING button is pressed for 0 5 seconds or more scanning will start automatically and the ...

Page 21: ...er the preset tuning saving mode 3 Within 5 seconds press the TUNER PRESET or button to select the preset channel number Store the stations in memory in order starting with preset channel 1 4 Within 5 seconds press the ENTER button to store that station in mem ory 5 Repeat steps 1 4 to set other stations or to change a preset sta tion When a new station is stored in memory the station previously m...

Page 22: ... automatically sets the unit to the power stand by mode if you set the volume level too high If this happens lower the volume level 1 Turn on the connected equipment 2 Press the ON STAND BY button to turn the power on 3 Select the source by pressing the DIGITAL or LINE button repeat edly You can select the source directly on the remote control 4 Press the play button of the connected equipment 5 A...

Page 23: ...s videos or 2 channel stereo sounds recorded in Dolby Digital the Dolby Pro Logic function reproduces the sound in 5 1 channel digital sur round sound ensuring more natural sound effects One of the digital audio systems for theatrical use As the sound quality is emphasised you can enjoy the realistic sound effect in the home theatre system One of the digital audio systems for theatrical use You ca...

Page 24: ...LTI CHANNEL button A maximum of 5 1ch surround sound is re produced to provide three dimensional ef fect Dolby Pro Logic expands 2 channel stereo sound of CDs etc to 5 1 ch Surround types can be changed in this mode Press the SOUND MODE button Each press of the button changes the mode The bass level is increased for powerful sound effect You can enjoy the original sound as it is You can enjoy live...

Page 25: ... the centre speaker in the STANDARD or SURROUND mode If played in the STEREO mode the same sound is repro duced from the right and left speakers Whilst the disc is playing press the STEREO button You can enjoy the great acoustic effects of the front speakers and subwoofer Bass frequencies can be switched in this mode Press the SOUND MODE button to turn the BASS ON or BASS OFF Each press of the but...

Page 26: ...lightly increase the level of the right surround speaker as it is a little farther than others see page 26 3 In Test tone check the sound from each speaker see page 26 4 When you complete the settings press the AMP RETURN button twice FL FR SL Default setting 2 m SR SW CT FL FR SL SR SW CT 3 m Right surround speaker You can return to the previous menu dur ing operations 1 Press the AMP SET UP butt...

Page 27: ...he desired speaker 3 Within 10 seconds press the or button to adjust the level You can adjust the level at 1 dB intervals To adjust the levels of other speakers repeat the operation from step 2 Speaker type Level range Default setting FL Front speaker Left 6 dB to 6 dB 0 dB CT Centre speaker 6 dB to 6 dB 0 dB FR Front speaker Right 6 dB to 6 dB 0 dB SR Surround speaker Right 6 dB to 6 dB 0 dB SL S...

Page 28: ...orrect time if TIMER STANDBY does not appear 2 Within 10 seconds press the or button to select TIMER SET and press the ENTER button 3 Press the or button to adjust the hour and then press the ENTER button 4 Press the or button to adjust the minutes and then press the ENTER button The start time is set and the finish time 1 hour later will be displayed automati cally 5 Set the time to finish as in ...

Page 29: ...fter the setting contents are displayed in order Cancelling the timer playback Timer playback is cancelled by turning the power on whilst in the timer playback stand by mode The same operation can be performed in the following procedure without turning the power on 1 Press the TIMER button TIMER CANCEL will appear 2 Within 10 seconds press the ENTER button Timer playback will be cancelled the cont...

Page 30: ...the TIMER button 2 Within 10 seconds press the or button to select SLEEP SET and press the ENTER button 3 Press the or button to select the time Maximum 2 hours Minimum 1 minute 2 hours 5 minutes 5 minute intervals 5 minutes 1 minute 1 minute intervals 4 Press the ENTER button SLEEP will appear 5 The unit will enter the power stand by mode automatically after the preset time has elapsed The volume...

Page 31: ... plug from the wall socket or did a power failure occur Reset the clock and timer P 18 The display on the unit is dark Is the display in the dimmer mode P 17 The power is not turned on Is the unit unplugged P 13 The protection circuit may be acti vated Unplug and plug in the power lead again after 5 minutes or more P 31 Symptom Possible cause Reference page The radio makes unusual noises continuou...

Page 32: ...instructions supplied with stands The appearance of optional accessory may differ from the illustration above 1 Set the unit to the stand by mode and turn the power on again 2 If the unit is not restored in the previous operation unplug and plug in the unit and then turn the power on 1 Unplug the unit 2 Whilst holding down the ON STAND BY button plug in the AC power lead At this time the unit will...

Page 33: ...l input DIGITAL 1 RCA type 1 Optical digital input DIGITAL 2 Square type 1 Analogue input LINE 1 RCA type 1 pair L R Analogue input LINE 2 RCA type 1 pair L R Analogue input LINE 3 RCA type 1 pair L R Audio output terminals Front speakers Centre speaker Surround speakers and Subwoofer 4 ohms Headphones 16 50 ohms recommended 32 ohms Subwoofer Pre Out 10 k ohms Analogue output LINE 1 RCA type 1 pai...

Page 34: ...MEMO MEMORÁNDUM TINSZA121AWZZ SD AT1000W_LAG_memo1 ...

Page 35: ...MEMO MEMORÁNDUM TINSZA121AWZZ SD AT1000W_LAG_memo2 ...

Page 36: ...TINSZA121AWZZ 04G R HK 1 SD AT1000W_LAG_BACK TINSZA121AWZZ SHARP CORPORATION 0401_B5 ...

Reviews: