9
PZ-MR2T
PZ-43MR2U
PZ-50MR2U
preparation
+
+
_
_
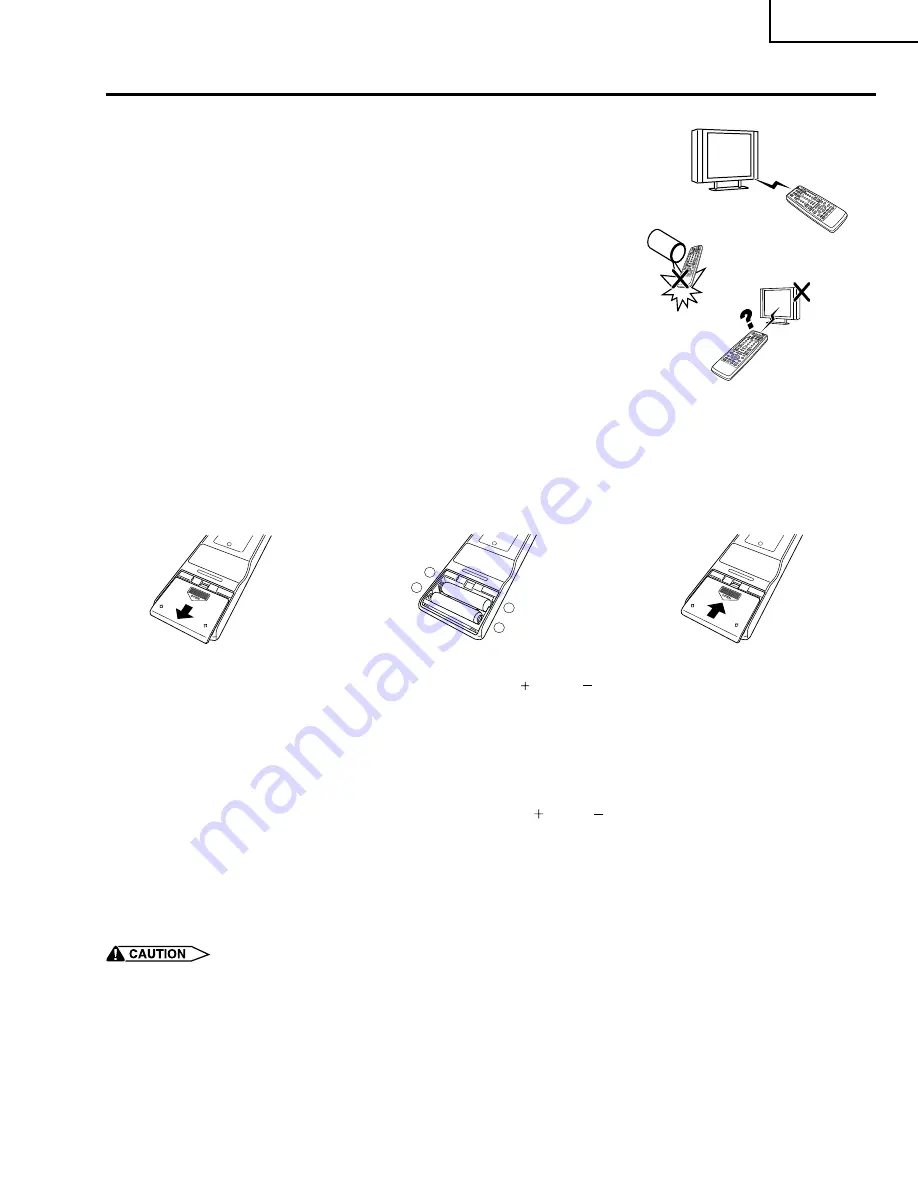
Using the remote control unit
Use the remote control unit by pointing it towards the remote sensor window.
Objects between the remote control unit and sensor window may prevent proper
operation.
Cautions regarding remote control unit
• Do not expose the remote control unit to shock. In addition, do not expose the
remote control unit to liquids, and do not place in an area with high humidity.
• Do not install or place the remote control unit under direct sunlight. The heat
may cause deformation of the unit.
• The remote control unit may not work properly if the remote sensor window of
the Plasma Display TV(Panel Unit) is under direct sunlight or strong lighting.
In such case, change the angle of the lighting or Plasma Display TV(Panel
Unit), or operate the remote control unit closer to the remote sensor window.
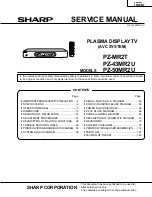
Inserting the batteries
If the remote control unit fails to operate Plasma Display TV functions, replace
the batteries in the remote control unit.
1
Open the battery cover.
2
Insert batteries (two AA size
batteries, supplied with product).
• Place batteries with their terminals
corresponding to the (
) and (
)
indicators in the battery compartment.
3
Close the battery cover.
Cautions regarding batteries
Improper use of batteries can result in chemical leakage or explosion. Be sure to follow the instructions below.
• Do not use manganese batteries. When you replace the batteries, use alkaline ones.
• Place the batteries with their terminals corresponding to the (
) and (
) indicators.
• Do not mix batteries of different types. Different types of batteries have different characteristics.
• Do not mix old and new batteries. Mixing old and new batteries can shorten the life of new batteries or cause
chemical leakage in old batteries.
• Remove batteries as soon as they have worn out. Chemicals that leak from batteries can cause a rash. If you
find any chemical leakage, wipe thoroughly with a cloth.
• The batteries supplied with this product may have a shorter life expectancy due to storage conditions.
• If you used the remote control unit for an extended period of time, remove the batteries from it.
• WHEN DISPOSING OF USED BATTERIES, PLEASE COMPLY WITH GOVERNMENTAL REGULATIONS OR
ENVIRONMENTAL PROTECTION GUIDELINES THAT APPLY IN YOUR COUNTRY OR AREA.
Summary of Contents for PZ-43MR2U
Page 13: ...13 PZ MR2T PZ 43MR2U PZ 50MR2U Dimensions Unit mm ...
Page 36: ...36 PZ MR2T PZ 43MR2U PZ 50MR2U Ë VHiTA1318AF 1 ASSY IC604 Sync Processor Block Diagram ...
Page 38: ...38 PZ MR2T PZ 43MR2U PZ 50MR2U Ë VHiPD64082 1S ASSY IC7001 Y C Separate IC Block Diagram ...
Page 40: ...40 PZ MR2T PZ 43MR2U PZ 50MR2U Ë VHiCXD2093Q 1 ASSY IC402 Digital Comb Filter Block Diagram ...
Page 63: ...63 17 16 19 18 15 14 13 12 11 10 PZ MR2T PZ 43MR2U PZ 50MR2U ...
Page 64: ...64 8 7 10 9 6 5 4 3 2 1 A B C D E F G H PZ MR2T PZ 43MR2U PZ 50MR2U POWER BLOCK DIAGRAM ...
Page 65: ...65 17 16 19 18 15 14 13 12 11 10 PZ MR2T PZ 43MR2U PZ 50MR2U ...
Page 71: ...71 17 16 19 18 15 14 13 12 11 10 PZ MR2T PZ 43MR2U PZ 50MR2U ...
Page 74: ...74 8 7 10 9 6 5 4 3 2 1 A B C D E F G H PZ MR2T PZ 43MR2U PZ 50MR2U Ë MAIN UNIT 1 7 ...
Page 75: ...75 17 16 19 18 15 14 13 12 11 10 PZ MR2T PZ 43MR2U PZ 50MR2U ...
Page 76: ...76 8 7 10 9 6 5 4 3 2 1 A B C D E F G H PZ MR2T PZ 43MR2U PZ 50MR2U Ë MAIN UNIT 2 7 ...
Page 77: ...77 17 16 19 18 15 14 13 12 11 10 PZ MR2T PZ 43MR2U PZ 50MR2U ...
Page 78: ...78 8 7 10 9 6 5 4 3 2 1 A B C D E F G H PZ MR2T PZ 43MR2U PZ 50MR2U Ë MAIN UNIT 3 7 ...
Page 79: ...79 17 16 19 18 15 14 13 12 11 10 PZ MR2T PZ 43MR2U PZ 50MR2U ...
Page 80: ...80 8 7 10 9 6 5 4 3 2 1 A B C D E F G H PZ MR2T PZ 43MR2U PZ 50MR2U Ë MAIN UNIT 4 7 ...
Page 81: ...81 17 16 19 18 15 14 13 12 11 10 PZ MR2T PZ 43MR2U PZ 50MR2U ...
Page 82: ...82 8 7 10 9 6 5 4 3 2 1 A B C D E F G H PZ MR2T PZ 43MR2U PZ 50MR2U Ë MAIN UNIT 5 7 ...
Page 83: ...83 17 16 19 18 15 14 13 12 11 10 PZ MR2T PZ 43MR2U PZ 50MR2U ...
Page 84: ...84 8 7 10 9 6 5 4 3 2 1 A B C D E F G H PZ MR2T PZ 43MR2U PZ 50MR2U Ë MAIN UNIT 6 7 ...
Page 85: ...85 17 16 19 18 15 14 13 12 11 10 PZ MR2T PZ 43MR2U PZ 50MR2U ...
Page 86: ...86 8 7 10 9 6 5 4 3 2 1 A B C D E F G H PZ MR2T PZ 43MR2U PZ 50MR2U Ë MAIN UNIT 7 7 ...
Page 87: ...87 17 16 19 18 15 14 13 12 11 10 PZ MR2T PZ 43MR2U PZ 50MR2U ...
Page 88: ...88 8 7 10 9 6 5 4 3 2 1 A B C D E F G H PZ MR2T PZ 43MR2U PZ 50MR2U Ë FRONT UNIT ...
Page 89: ...89 17 16 19 18 15 14 13 12 11 10 PZ MR2T PZ 43MR2U PZ 50MR2U ...
Page 90: ...90 8 7 10 9 6 5 4 3 2 1 A B C D E F G H PZ MR2T PZ 43MR2U PZ 50MR2U Ë AV UNIT 1 3 ...
Page 91: ...91 17 16 19 18 15 14 13 12 11 10 PZ MR2T PZ 43MR2U PZ 50MR2U ...
Page 92: ...92 8 7 10 9 6 5 4 3 2 1 A B C D E F G H PZ MR2T PZ 43MR2U PZ 50MR2U Ë AV UNIT 2 3 ...
Page 93: ...93 17 16 19 18 15 14 13 12 11 10 PZ MR2T PZ 43MR2U PZ 50MR2U ...
Page 94: ...94 6 5 4 3 2 1 A B C D E F G H PZ MR2T PZ 43MR2U PZ 50MR2U Ë AV UNIT 3 3 ...
Page 95: ...95 6 5 4 3 2 1 A B C D E F G H PZ MR2T PZ 43MR2U PZ 50MR2U Ë LED Unit ...
Page 96: ...96 8 7 10 9 6 5 4 3 2 1 A B C D E F G H PZ MR2T PZ 43MR2U PZ 50MR2U Ë SR Unit ...
Page 97: ...97 17 16 19 18 15 14 13 12 11 10 PZ MR2T PZ 43MR2U PZ 50MR2U ...
Page 98: ...98 8 7 10 9 6 5 4 3 2 1 A B C D E F G H PZ MR2T PZ 43MR2U PZ 50MR2U Ë PC I F Unit 1 7 ...
Page 99: ...99 17 16 19 18 15 14 13 12 11 10 PZ MR2T PZ 43MR2U PZ 50MR2U ...
Page 100: ...100 8 7 10 9 6 5 4 3 2 1 A B C D E F G H PZ MR2T PZ 43MR2U PZ 50MR2U Ë PC I F Unit 2 7 ...
Page 101: ...101 17 16 19 18 15 14 13 12 11 10 PZ MR2T PZ 43MR2U PZ 50MR2U ...
Page 102: ...102 8 7 10 9 6 5 4 3 2 1 A B C D E F G H PZ MR2T PZ 43MR2U PZ 50MR2U Ë PC I F Unit 3 7 ...
Page 103: ...103 17 16 19 18 15 14 13 12 11 10 PZ MR2T PZ 43MR2U PZ 50MR2U ...
Page 104: ...104 8 7 10 9 6 5 4 3 2 1 A B C D E F G H PZ MR2T PZ 43MR2U PZ 50MR2U Ë PC I F Unit 4 7 ...
Page 105: ...105 17 16 19 18 15 14 13 12 11 10 PZ MR2T PZ 43MR2U PZ 50MR2U ...
Page 106: ...106 8 7 10 9 6 5 4 3 2 1 A B C D E F G H PZ MR2T PZ 43MR2U PZ 50MR2U Ë PC I F Unit 5 7 ...
Page 107: ...107 17 16 19 18 15 14 13 12 11 10 PZ MR2T PZ 43MR2U PZ 50MR2U ...
Page 108: ...108 8 7 10 9 6 5 4 3 2 1 A B C D E F G H PZ MR2T PZ 43MR2U PZ 50MR2U Ë PC I F Unit 6 7 ...
Page 109: ...109 17 16 19 18 15 14 13 12 11 10 PZ MR2T PZ 43MR2U PZ 50MR2U ...
Page 110: ...110 8 7 10 9 6 5 4 3 2 1 A B C D E F G H PZ MR2T PZ 43MR2U PZ 50MR2U Ë PC I F Unit 7 7 ...
Page 111: ...111 17 16 19 18 15 14 13 12 11 10 PZ MR2T PZ 43MR2U PZ 50MR2U ...
Page 112: ...112 8 7 10 9 6 5 4 3 2 1 A B C D E F G H PZ MR2T PZ 43MR2U PZ 50MR2U Ë POWER and EMC Unit ...
Page 113: ...113 17 16 19 18 15 14 13 12 11 10 PZ MR2T PZ 43MR2U PZ 50MR2U ...
Page 115: ...115 6 5 4 3 2 1 A B C D E F G H PZ MR2T PZ 43MR2U PZ 50MR2U MAIN Unit B Side ...
Page 116: ...116 6 5 4 3 2 1 A B C D E F G H PZ MR2T PZ 43MR2U PZ 50MR2U PC I F Unit A Side ...
Page 117: ...117 6 5 4 3 2 1 A B C D E F G H PZ MR2T PZ 43MR2U PZ 50MR2U PC I F Unit B Side ...
Page 120: ...120 6 5 4 3 2 1 A B C D E F G H PZ MR2T PZ 43MR2U PZ 50MR2U AV Unit Component Side ...


