background image

DEUTSCH

FRANÇAIS

ESPAÑOL

SVENSKA

ITALIANO

NEDERLANDS

ENGLISH

7

Web-site: www.sharp.co.uk/support    Help Line: 0990 274277 (office hours)

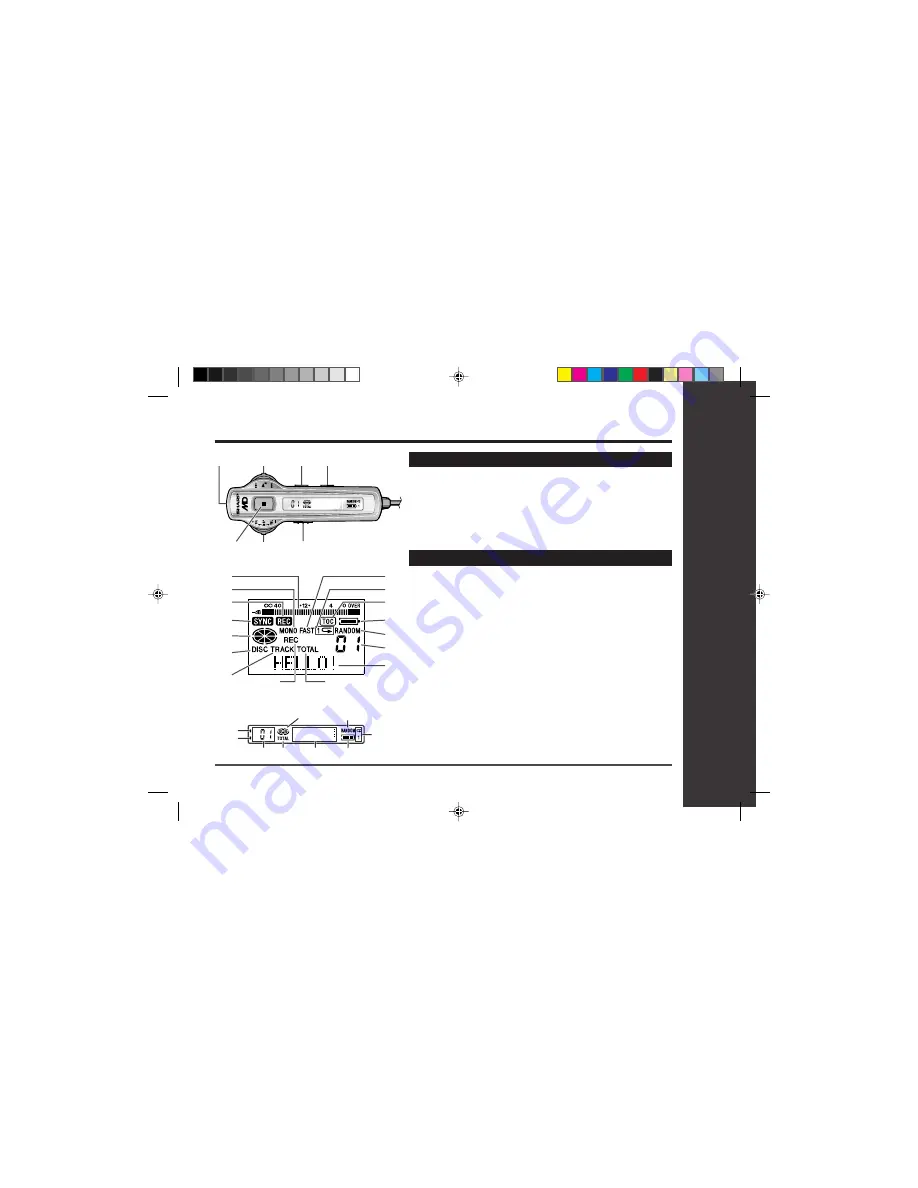
Display panel

Names of Controls and Indicators : continued

1

2

6

5

7

3

4

12
13
14
15
16

10

11

1
2
3
4
5
6

7

8

9

3

4

2

7

6

9

8

1

5

[Main unit]

[Remote control unit]

Important Introduction

– Names of Controls and Indicators –

Remote control unit

1. Earphones Socket (16)
2. Play/Pause/Fast Reverse/

Fast Forward Shuttle Switch (17, 18)

3. Play Mode Button (19)
4. Sound/Track Mark Button (17, 23)

 5. Stop/Power Off Button (17)
 6. Display/Volume Shuttle Switch (17, 28, 29)
 7. Hold Switch (9)

[Main unit]

0

1. Level Meter

0

2. Monaural Long-Play Mode

Indicator

0

3. Record Indicator

0

4. Synchro Recording Indicator

0

5. Disc Mode Indicator

0

6. Disc Name Indicator

0

7. Track Name Indicator

0

8. Remaining Recording Time

Indicator

0

9. Total Track Number Indicator

10. Fast Play Indicator

11. Repeat Indicator

12. TOC Indicator
13. Battery Indicator
14. Random Indicator
15. Track Number Indicator
16. Character/Time Information

Indicator

[Remote control unit]

0

1. Record Indicator

0

2. Synchro Recording Indicator

0

3. Disc Mode Indicator

0

4. Random Indicator

0

5. Repeat Indicator

0

6. Track Number Indicator

0

7. Total Track Number Indicator

0

8. Character/Time Information

Indicator

0

9. Battery Indicator

Summary of Contents for MD-SR75H

Page 1: ... performance read this manual carefully It will guide you in operating your SHARP product MODEL MD SR75H If you require any advice or assistance regarding your Sharp product please visit our web site www sharp co uk support Customers without internet access may telephone 0990 274277 during office hour ...

Page 2: ...e detailed above are not included The AC adaptor may be different from the one in the drawing AC Adaptor Rechargeable Remote Control x 1 Earphones x 1 RADPA8046AWZZ or Nickel Metal Hydride Battery RADPA8039AWZZ x 1 AD N70BT x 1 Battery Carrying Case x 1 Connection Cable Connection Cable Carrying Bag x 1 for analogue recording x 1 for digital recording x 1 2 ...

Page 3: ...tion Recording 14 15 Playback 16 17 Useful Features Advanced Playback 18 19 Advanced Recording 20 24 Recording from a Microphone 25 27 Checking Displays 28 29 Battery Power 30 31 Listening to a MiniDisc Through a Stereo System or a Car Stereo 32 3 Advanced Features Changing Default Settings 33 Titling a MiniDisc 34 37 Editing a Recorded MiniDisc 38 39 References Other Features and Caution 40 MiniD...

Page 4: ...vent of this equipment requiring re pair during the guarantee period you will need to provide proof of the date of purchase to the repairing company Please keep your invoice or receipt which is supplied at the time of purchase Warnings The supplied AC adaptor contains no user ser viceable parts Never remove covers unless qualified to do so It contains dangerous voltages always remove mains plug fr...

Page 5: ...s radiation Notes Recording and playback of any material may require consent which SHARP is unable to give Please refer particularly to the provisions of the Copyright Act 1956 the Dramatic and Musical Performers Protection Act 1958 the Performers ProtectionActs 1963 and 1972 and to any subsequent statutory enactments and orders This equipment complies with the requirements of Directives 89 336 EE...

Page 6: ...Line Output Socket 16 6 Optical Line Input Socket 12 13 7 Microphone Input Socket 25 8 Record Track Mark Button 14 23 9 Stop Power Off Charge Button 15 17 30 33 10 Play Pause Button 14 16 11 Enter Fast Play Synchro Button 19 20 34 39 12 Fast Forward Recording Level Up Name Select Button 14 18 33 34 13 Fast Reverse Recording Level Down Name Select Button 14 18 33 34 14 Bass Delete Button 16 35 15 M...

Page 7: ...6 Display Volume Shuttle Switch 17 28 29 7 Hold Switch 9 Main unit 01 Level Meter 02 Monaural Long Play Mode Indicator 03 Record Indicator 04 Synchro Recording Indicator 05 Disc Mode Indicator 06 Disc Name Indicator 07 Track Name Indicator 08 Remaining Recording Time Indicator 09 Total Track Number Indicator 10 Fast Play Indicator 11 Repeat Indicator 12 TOC Indicator 13 Battery Indicator 14 Random...

Page 8: ...odify the unit Do not drop or subject the unit to shock Do not use the unit near open flames Do not spill liquid on the unit Do not use an external power supply other than the 5V DC supplied with this unit as it may damage it SHARP is not responsible for damage due to improper use Refer all servicing to a SHARP authorised service centre Storing the unit Avoid using or leaving the unit in the follo...

Page 9: ...i rection of the arrow If the hold function is active whilst the power is turned off the power cannot be turned on by mistake and the battery will not be drained The present operation condition can be kept even if other buttons are accidentally pressed in a place such as a crowded train A HOLD switch is on both the remote control and the main unit Various controls are possible depending on the com...

Page 10: ... during playback fast forward will be performed Used for fast reverse or to locate the begin ning of any track Also used to select a track or to change each setting If you move and hold it during playback fast reverse will be performed Used to change the display During recording Elapsed time remaining recording time During playback Track name elapsed time remaining time During stop Disc name remai...

Page 11: ...MiniDisc as shown 4 Close the compartment door 2 1 3 4 Notes Do not place the MiniDisc under the holder If any resistance is felt do not force the MiniDisc into the unit as it may cause damage to the unit If resistance is felt remove the MiniDisc and reload it The lid can not be opend if TOC is displayed refer to the instruction on page 15 Check that the erase protection tab is in the recordable p...

Page 12: ...o Left To the OPTICAL LINE IN socket To a stereo system with AUDIO OUT or LINE OUT sockets See left Analogue connection Note If the audio system has only one pair of sockets they are usually for input only and recording via this connection is not possible AC 230 240V 50 60Hz To connect to a stereo system with AUDIO OUT or LINE OUT sockets You can record your favorite CDs or tapes to an MD ...

Page 13: ...with a DIGITAL OUT or OPTICAL OUT socket To a stereo system with a DIGITAL OUT socket See left Digital connection Compared to analogue connection recording it allows high quality recording Note Some audio systems do not have a DIGITAL OUT socket Check before connecting To the OPTICAL LINE IN socket AC 230 240V 50 60Hz To the wall socket To the DC IN 5V socket ...

Page 14: ... recording level analogue connection only Adjust the recording level so that the maximum sound volume from the source makes the read ing swing somewhere between 4 dB and 0 dB 0dB 4dB For digital connection it is not necessary to ad just the recording level 4 Press the PAUSE button on the stereo sys tem to enter the playback pause mode at the point you wish to start recording Here you can select th...

Page 15: ... recorded contents have been updated on the MiniDisc TOC display About the TOC After any recording or editing function TOC Table Of Contents is displayed To finalize the recording or editing function press the OFF button During this process TOC will flash and TOC EDIT will be displayed During any recording or editing function the MiniDisc unit Lid is locked the MiniDisc can not be removed until th...

Page 16: ...0990 274277 office hours Before Playback Basic Operation Playback Playback To the socket Left channel Right channel As for the details see page 9 Check that the HOLD switch on the back is released The unit does not work if the switch is set to HOLD ...

Page 17: ...earphones plug firmly into the earphones socket on the remote control unit 2 Plug the remote control into the socket on the unit 3 Insert a MiniDisc page 11 4 Press the 06 06 06 06 06 button Playback starts automatically with a playback only MiniDisc or a MiniDisc which is protected against accidental erasure Auto play function Volume control Press the VOL button to increase the volume and the VOL...

Page 18: ...udible fast forward Press and hold down the 4 button during play back For audible fast reverse Press and hold down the 5 button during play back Normal playback will resume when the 5 5 5 5 5 or 4 4 4 4 4 button is released When the end of the last track is reached during fast forward the unit will enter the pause mode When the beginning of the first track is reached during fast reverse the unit w...

Page 19: ...eing played During random play the unit cannot find the beginning of any track which has been played Repeat play lasts until you stop the unit To play at double speed Mono recording only Press the ENTER SYNC button whilst a MiniDisc re corded in the monaural long play mode is being played If a track recorded in the stereo mode is reached during fast playback the fast playback mode will be cancelle...

Page 20: ...begin automatically Playback sound actuated recording Synchronized recording Recording automatically starts or pauses by detect ing sound from the stereo system Synchronized recording To interrupt recording When the stereo system is stopped the unit will enter the synchro recording pause mode When playback is resumed the recording will be resumed If a silence lasts for 3 seconds or more the record...

Page 21: ...g mode will return to the stereo mode automatically If input is from a stereo source the sounds from the left and right channels will be combined Although the monitor sound you hear in the earphones whilst recording is in stereo recording will be monaural MiniDiscs recorded in the monaural long play mode may not play on other MiniDisc players Appears Long play mode Advanced Recording continued Whe...

Page 22: ... 06 06 06 06 button at the point where you want to begin record ing 2 Press the REC button To cancel the operation press the OFF button 3 Press the ENTER SYNC button All of the tracks and track names will be erased following the point where the playback is paused 4 Press the 06 06 06 06 06 button Recording will start Advanced Recording continued Note To keep a track after the point you want to mak...

Page 23: ...an MiniDisc player track numbers will be created automati cally regardless of the setting of the auto marker function Advanced Recording continued Helpful tip when attaching a label When attaching a label to an MiniDisc cartridge be sure to note the following If the label is not attached properly the MiniDisc may jam inside the unit and it may not be pos sible to remove it If the label peels off o...

Page 24: ... rate converter This unit incorporates a sampling rate converter meaning it can record from digital radios or DAT tape recorders Note for digital recording You can not copy a MiniDisc that you recorded from digital inputs to another MiniDisc or DAT It is prevented by the SCMS Serial Copy Management System Recording from analogue inputs is not affected When recording if a programmed playback is per...

Page 25: ...tton whilst recording To resume recording press the 06 button again The track number will be increased by one each time you interrupt a recording To stop recording Press the OFF button To write recorded contents on the MiniDisc Press the OFF button whilst in the stop mode Recording from a Microphone To the MIC IN socket Stereo microphone commercially available 0dB 4dB Level meter indicator Adjust ...

Page 26: ...ton to adjust the recording level 3 Press the ENTER SYNC button to select the recording sensitivity MIC SYNC H Recording starts when the unit detects 24 dB or more The unit can start recording from quiet sounds MIC SYNC L Recording starts when the unit detects 12 dB or more 4 When a sound such as person speaking is picked up by the microphone recording will begin automatically About pause function...

Page 27: ...icrophone continued Example Set to 5 minutes During a mic manual recording Timed auto marks will be created every 5 minutes No automatic track numbers are created A new track number is created every 5 minutes Creating track numbers manually Press the REC button whilst recording During a mic synchro recording If a silence lasts for 3 seconds or more a timed auto mark will be created 5 minutes after...

Page 28: ... time Total playing time Notes If the disc name or the track name was not originally recorded on the MiniDisc NO NAME will be displayed Remaining recording time will not be displayed with a play back only MiniDisc Elapsed playback time and remaining playback time may be different from the actual time To check the elapsed time and remaining time of the track During playback press the DISP button Ea...

Page 29: ...ge the battery or replace the alkaline battery with a new one When the battery has run completely out BATT EMPTY LoBATT will appear Then the power will be discon nected automatically Notes If you use the battery which you stopped charging half way may appear It does not mean that the bat tery is completely charged The battery indicator will not correctly display the remain ing capacity for approxi...

Page 30: ... Slide the battery cover as far as it will go to the outside 2 Lift the battery cover Do not force the battery cover open too far 3 Insert the rechargeable battery from the marked side A rechargeable battery other than the one sup plied or the separately available one AD N70BT cannot be charged 4 Close the battery cover 5 Plug the AC adaptor into the wall socket and then insert the plug on the oth...

Page 31: ... Afterabout3 5hourshavepassed willgoout The battery charging is about 90 complete To charge the battery fully continue charging for about 2 more hours In this case you do not need to press the OFF CHRG button Even if the OFF CHRG button is pressed will not appear Notes This unit should only be used within the range of 0 C 40 C 32 F 104 F Chargethebatterywithintherangeof5 C 35 C 41 F 95 F Charging ...

Page 32: ...car stereo Do not operate this unit whilst you drive a car It may distract your attention and cause a traffic accident Do not use any car adaptor except for the separately available AD CA20X Remove the battery when you power the unit from the car battery Listening through a stereo system Listening through a car stereo To the socket Separately available cassette adaptor AD CT14 Separately available...

Page 33: ...und that beeps when you press a button Auto play You can make the unit not play automatically when you insert a playback only MiniDisc or an accidental erasure protected MiniDisc Auto power save When the unit is used in a place exposed to much vibration sound skipping can be decreased by can celling the auto power save function Battery will drain faster What is auto power save function Auto power ...

Page 34: ...ack names One disc name and up to 255 track names can be created per disc A maximum of 100 characters for the disc and each track name and a total of 1 700 characters can be entered 1 Whilst in the pause mode press the EDIT button repeatedly to select DISC NAME Whilst in the pause mode press the EDIT button repeatedly to select TRACKNAME Disc name Track name Position where the next letter will be ...

Page 35: ...ed to write the updated contents to the MiniDisc press the OFF button You cannot remove the MiniDisc whilst TOC is displayed TOC will not disappear until the re corded contents have been updated Titling a MiniDisc continued Characters symbols To erase a charactor Press the VOL or VOL button to move the cursor to the character you want to erase and then press the BASS button To enter a space Press ...

Page 36: ...c Before stamping When there are 2 MiniDiscs on which the same tracks are recorded you can transfer the character information disc and track names of the Master MiniDisc to another MiniDisc for stamping Titling a MiniDisc continued 1 What is a master MiniDisc A recordable MiniDisc that contains tracks and char acter information You can not transfer the information from a play back only MiniDisc 2 ...

Page 37: ...cks on the newly recorded MiniDisc using the edit operation Use a MiniDisc that was recorded by this unit to make a MiniDisc for stamping Character information may not be transferred if you use a MiniDisc recorded by other equipment In such a case enter at least one charac ter for the disc name or the track names You can trans fer information once you record the TOC Operation of the MiniDisc for s...

Page 38: ...ct ALL ERASE 2 Press the ENTER SYNC button To cancel the operation press the OFF button 3 Press the ENTER SYNC button again All of the tracks will be erased Caution Once a track has been erased it can not be recovered Check the track number before eras ing it To erase tracks one at a time To erase all of the tracks at once 1 Start playing the track to be divided into two Press the 06 06 06 06 06 b...

Page 39: ... The track will be moved and the unit will be paused at the beginning of the track When a track has a name before dividing The two new tracks will have the same name However in theTOC FULLcondi tion the second track may not be named Totalnumberoftracksthatcanbedivided Each disc can hold up to 255 tracks However even if the number of as signed tracks has not reached 254 it might not be possible to ...

Page 40: ...once every three months because of the special quality of this battery The rechargeable battery can be charged approximately 300 times When the operating time is reduced to about half the normal amount of time even after a full charge is per formed replace the battery with a new one AD N70BT When the battery is charged for the first time or is charged after not being used for a long period the ope...

Page 41: ...be recorded regardless of the re cording time If the MiniDisc is recorded or edited repeatedly or if it has scratches record ing skips scratched parts you may not be able to record the maximum tracks above The unit does not count non recorded portions that last 12 or fewer seconds to display the remaining recording time The time may not increase even if you erase short tracks One cluster approxima...

Page 42: ...icroprocessor has reported a system fault and the unit is out of or der The unit is in the hold mode You removed a MiniDisc whilst re cording or editing REMEDY Charge the rechargeable battery or replace the alka line battery or use the AC adaptor for power Replace the disc with a recorded disc Record using the analogue cable Change the stop position of the track and then edit it Reload the disc Re...

Page 43: ...space left for recording character information track names disc names etc The track has been protected from being erased A disc which contains data other than music was played There is an error in the signal re corded on the disc REMEDY Load a disc Connect the digital cable securely If the portable CD player has a function to prevent sound skips deactivate it Playback with the connected unit Repla...

Page 44: ...nit Is the unit being influenced by mechanical shock or by static electricity Is the volume set too low Is the remote control unit or the earphones plugged in Are you trying to play a MiniDisc with data on it instead of a MiniDisc containing music Is the unit in the hold mode Is the battery exhausted Is the remote control unit plug or the earphones plug inserted firmly Is the battery exhausted Is ...

Page 45: ...net finish Do not apply oil to the inside of the unit It may cause malfunctions Cleaning When the unit becomes dirty Clean it with a soft cloth When the unit is excessively dirty use a soft cloth dampened in water external surfaces only Clean the plugs and the connecting socket If the plugs or sockets are dirty noise may be heard Cleaning will prevent noise Maintenance Moisture condensation When t...

Page 46: ...pending on the type and manufacturer of the battery and on the operating temperature Dimensions Width 99 9 mm 3 15 16 Height 22 9 mm 29 32 Depth 77 9 mm 3 3 32 Weight 191 g 0 42 lbs with rechargeable battery Input socket Line optical digital microphone powered by the main unit Output socket Earphones impedance 32 ohms remote control unit MiniDisc Recorder Type Portable MiniDisc recorder Signal rea...

Page 47: ...m play 19 Repeat play 19 To play at double speed 19 Volume control 17 Explanation Auto mark 23 27 Erase prevention tab 23 Resuming auto play 40 TOC 15 Track numbers 24 Editing Disc name 34 Stamping titles 36 37 To add characters 35 To combine tracks 39 To divide a track 38 To erase a character 35 To erase all of the tracks at once 38 To erase tracks one at a time 38 To move a track 39 Track name 3...

Page 48: ...cts caused by accident misuse fair wear and tear neglect tampering with the equipment or any attempt at ad justment or repair other than by a Service Facility ap pointed by Sharp 5 In the unlikely event of a defect occuring the product must be returned to the Company s repair centre with proof of purchase A postage paid label and a fault re port form are supplied with the product for this purpose ...

Reviews: