background image

9

ENGLISH

FRANÇAIS

ESPAÑOL

ENGLISH

Connecting Your TV to a Wireless or Wired Network 

You have the option to connect your TV to a wireless or wired network to access the Internet. For more information about 

the network settings on TV, see 

Network Menu on page 19

.

Connecting to a wireless network


Our built-in wireless LAN adapter supports the IEEE 802.11 b/g/n communication protocols and we recommend that 

you use an IEEE 802.11n router. When you play a video over an IEEEE 802.11 b/g connection, the video may not play 

smoothly.

NOTES

•  You must use the SHARP built-in Wireless LAN Adapter to use a wireless network because the set does not 

support an external USB network adapter.

•  To use a wireless network, your TV must be connected to a wireless IP sharer. If the wireless IP sharer supports 

Dynamic Host Configuration Protocol (DHCP), your TV can use a DHCP or static IP address to connect to the 

wireless network.

•  Select a channel for the wireless IP sharer that is not currently being used. If the channel set for the wireless IP 

sharer is currently being used by another device nearby, this will result in interference and communication failure.

•  If you apply a security system other than the systems listed below, it will not work with the TV.

•  If Pure High-throughput (Greenfield) 802.11N mode is selected and the Encryption type is set to WEP, TKIP 

or TKIP-AES (WPS2 Mixed) for your Access Point (AP), then the SHARP TV will not support a connection in 

compliance with these Wi-Fi certification specifications.

•  If your access point (AP) supports Wi-Fi Protected Setup (WPS), you can connect to the network via Push Button 

Configuration (PBC) or PIN (Personal Identification Number). WPS will automatically configure the SSID 

  and WPA key in either mode.

Connecting to a wired (Ethernet) network

You can attach your TV to your LAN in one of the three following ways:


Option 1

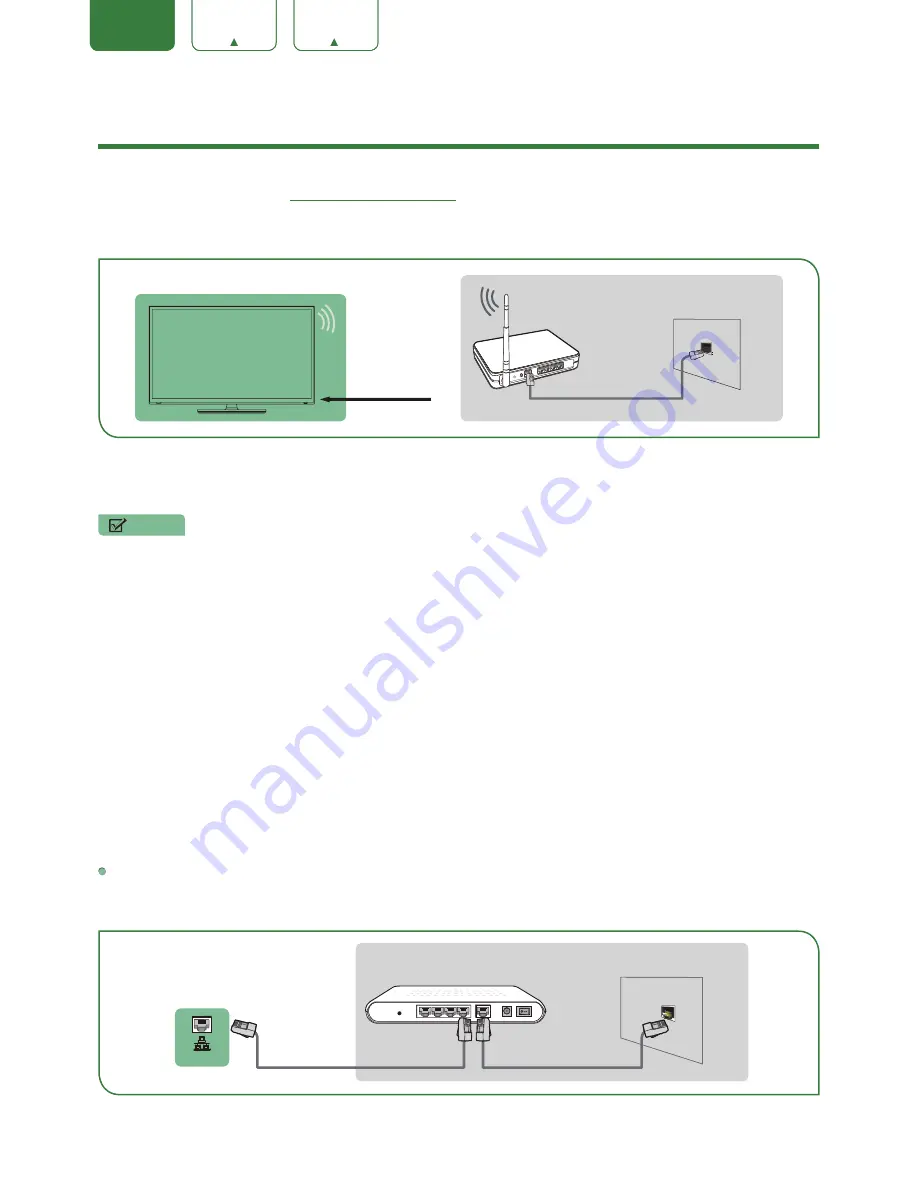
You can attach your TV to your LAN by connecting the LAN port on the back of your TV to an external modem using a 

Cat 5 LAN cable. See the illustration below. 

Wireless Adapter

built-in the TV set 

LAN Cable

Wireless Router

The LAN Port on the Wall

External Modem

(ADSL / VDSL / Cable TV) 

The Modem Port on the Wall

Ethernet Cable 

Modem Cable 

LAN

TV PORT

Summary of Contents for LC-65N5200U

Page 1: ...USER MANUAL Before using the TV please read this manual thoroughly and retain it for future reference ENGLISH FRANÇAIS ESPAÑOL ES G154914 ...

Page 2: ...USER MANUAL Before using the TV please read this manual thoroughly and retain it for future reference ENGLISH ...

Page 3: ...equests for permission to store reproduce transmit or distribute materials may be made in writing to the following address USA Hisense USA Corporation PO Box 3289 Suwanee GA 30024 CANADA Hisense Canada Co Ltd 405 Britannia Rd E Suite 11 Mississauga Ontario L4Z 3E6 MEXICO Hisense Mexico S de RL de CV Boulevard Miguel de Cervantes Saavedra No 301 Torre Norte Piso 2 Colonia Ampliación Granada C P 115...

Page 4: ...d or implied that the Application Service will be uninterrupted or error free including but not limited to vagaries of weather disruption of Service acts of God warranties of title local or regional limitations no infringement NOR IMPLIED WARRANTIES OF MERCHANTABILITY OR FITNESS FOR A PARTICULAR PURPOSE No advice or information given by the licensors or manufacturers providers affiliates or contra...

Page 5: ...rs or other audio receivers 7 Connecting a digital sound bar to use Audio Return Channel ARC 7 Connecting Your TV to a Wireless or Wired Network 9 Connecting to a wireless network 9 Connecting to a wired Ethernet network 9 Using Your TV Remote Control 11 Buttons on your TV remote 11 Remote control range information 11 Begin using your remote 12 Completing the First Time Setup Menu 13 Shortcuts Ins...

Page 6: ... Advanced TV Settings 23 Getting familiar with the Home screen 23 Inputs 23 Media 24 Apps 25 Using Anyview Cast to mirror content from your device to the TV screen 26 Software updates for your TV 26 Quick Problem Solving Tips 27 ...

Page 7: ...BLE port on the side of TV 3 Using your remote press the INPUT button and select TV as the input source Connecting a satellite receiver DVD player or other audio visual AV device with a composite video cable yellow red white To connect an AV device with a composite video cable not provided 1 Use the audio and video cables to connect the composite video audio ports of the external AV device to the ...

Page 8: ... some devices such as a PVR or DVD player require an HDMI signal to be set to Output in the settings of the device Please refer to the User Manual that came with your device for step by step instructions To connect an AV device with an HDMI cable not provided 1 Use an HDMI cable to connect the HDMI output port of the AV device to the HDMI port of the TV 2 Plug the connected devices into the HDMI p...

Page 9: ...second way is to connect the DIGITAL AUDIO OUT port on the back of the TV to the Optical port on the Amplifier After you ve completed one of the two methods then be sure to go into the Advanced Audio Settings of the TV and select RAW to receive the 5 1 channel audio You will need to also go into the sound or audio settings of your device to ensure it is set to 5 1 Channel output It may read Bitstr...

Page 10: ...io Settings 7 Go to the section of the screen that reads TV Speaker ARC and select ARC First NOTE If the device has an Input Selector feature then make sure to change it to TV HDMI ARC HDMI EXTERNAL DEVICE TV PORT Digital Sound Bar HDMI Cable not included ...

Page 11: ...annel set for the wireless IP sharer is currently being used by another device nearby this will result in interference and communication failure If you apply a security system other than the systems listed below it will not work with the TV If Pure High throughput Greenfield 802 11N mode is selected and the Encryption type is set to WEP TKIP or TKIP AES WPS2 Mixed for your Access Point AP then the...

Page 12: ...automatically provide the IP address subnet mask gateway and DNS so you don t have to enter them manually Most home networks are Dynamic Networks Some networks require a Static IP address If your network requires a Static IP address you must enter the IP address subnet mask gateway and DNS values manually on your TV s Cable Setup Screen when you set up the network connection To get the IP address ...

Page 13: ...nels input numbers Media content control function buttons Dash button Select a digital sub channel D pad up down left right navigation buttons Volume up down Mute and restore sound Adjust Sleep timer setting The Gear button for the Quick setup menu Return to the previous place in the menu or app Live TV Infrared transmitter Change TV input source Channel up down Exit the application Turn Closed Ca...

Page 14: ...your new SHARP television please refer to the User s Manual supplied by your Cable or Satellite provider The Cable or Satellite providers User s Manuals should include instructions on how to program their remote to your television A list of SHARP codes for the most common Cable and Satellite providers are listed below Use the SHARP code that is associated with your Cable or Satellite provider if a...

Page 15: ...done then navigate to the Forward arrow and press OK Select Home which appears by default and then navigate to the Forward arrow to press OK NOTE Store Mode should only be selected by Retailers who plan to demonstrate the TV LANGUAGE AND LOCATION Language Country Time Zone United States Eastern English Language Terms Mode Network Input Done TERMS OF SERVICE Accept EULA Accept Terms of Accept all T...

Page 16: ...ust complete the first time setup menu in order to run a channel scan Press the OK button on your remote if you are fine with the selections that appear on the screen Otherwise navigate to the back arrow on the screen to change your selection NETWORK CONNECTION Select a Network Ethernet WiFi A2F4 05 A3F6 01 A6F5 19 A1F2 02 A2F4 03 A2F5 01 R22 Language Terms Mode Network Input Done LIVE TV INPUT SO...

Page 17: ... have connected to your TV To select the input source 1 Turn on your TV then press the INPUT button on the remote the list of Source appears 2 Press the buttons to select the input source 3 Press the OK button to confirm your selection Using the Live TV To view broadcast programs press the Live TV button on your remote Channel search guide When you select TV as input if no TV channels were saved b...

Page 18: ...ll see the channel list display on the right side of the screen Creating a Favorites List To quickly access your most watched channels you can create a Favorites List To create your Favorites List 1 Press the button on your remote 2 Press the button to display the Settings Menu 3 Select Channel Favorites List 4 Using the v v buttons of your remote select a channel and press OK button A heart shape...

Page 19: ...re for a more vibrant image Aspect Ratio Adjust the Aspect Ratio to stretch or zoom in on your picture You can choose from the following settings Normal Zoom Wide Cinema 1 1 PIXEL MAP Panoramic Direct and Auto Backlight Some models have a Dynamic Backlight Control setting that you can turn Off and set to High or Low The Backlight setting enables you to adjust how bright you want images to appear I...

Page 20: ...ost the volume at different frequencies Lip Sync Synchronize the displayed image with the audio output Balance Adjust the left and right speaker strength to optimize audio for a specific location Digital Audio Out Select the digital audio output format that best suits the audio device type For example choose RAW which is uncompressed audio in RAW form if you have 5 1 Channel Surround Sound Speaker...

Page 21: ...imer Set the sleep timer to automatically turn the TV Off within a specified time Off 10 Minutes 20 Minutes 30 Minutes 40 Minutes 50 Minutes 60 Minutes 90 Minutes and 120 Minutes Language Adjust the Menu Language and Preferred Audio Language for the TV Parental Controls Turn On Parental Controls to block children from being able to view certain programs The default password is 0000 For more inform...

Page 22: ...EC Control features do not work Depending on the connected HDMI device the HDMI CEC Control feature may not work Advanced Settings Access the Advanced Settings menu Menu Timeout Set the amount of time that you d like for the menu to display 5s 10s 20s 30s 60s or Off Use Mode Set the TV to use in Home or Store Mode Input Labels Edit the input labels Default LiveTV Source Select the default input se...

Page 23: ...channels and programs during certain periods of time Channel Block Block programs by channels when you turn on the Parental Controls feature Program Block Block certain programs according to their TV or MPAA movie rating when you turne on the Parental Controls feature Input Block Block content from devices that are connected to certain TV ports Change PIN Change your PIN that you use to access Par...

Page 24: ...n little to no violence or sexual content 8 General but inadvisable for young children could contain scenes disturbing to children under eight Recommended for viewing with parent 13 Programming is appropriate for children 13 and older and may contain moderate violence language and some sexual situations 16 Recommended for children 16 and older and may contain strong violence language and sexual co...

Page 25: ...on will display in the top right corner of the screen This location makes it very convenient for you to determine if you still have Internet connectivity as you use the TV If your TV is connected to the Internet then the weather current conditions will display in the top right conner of the screen In addition if you have connected a device such as a thumb drive to a USB port and your TV recognizes...

Page 26: ...um File Format Video avi MPEG2 Divx mkv Divx mpeg MPEG2 wmv Divx XviD Picture JPG Music mp3 Browsing Content To browse through content based on the type that you wish to access 1 Navigate to the appropriate menu tab on the left side of the screen and select Music Video Picture or All The library of items displays on the right side of the screen 2 Navigate to the right side of the screen and click ...

Page 27: ...s on your remote to select the app that you want to remove NOTE The app which has a icon at the upper right conner can be removed 3 Press the OK button on your remote A dialog message displays that asks if you re sure you want to remove the app 4 Click on OK A confirmation message displays and the icon is removed from the Apps list screen NOTE If an app is deleted the information related to that a...

Page 28: ... and install them manually NOTE While your TV is updating please don t interrupt the progress including turn off the Internet connection or the TV Checking for updates automatically In order for your TV to receive software notification updates automatically it must be turned On and connected to the Internet The Auto Firmware Upgrade setting which enables your TV to receive the updates automaticall...

Page 29: ...plug it after 60 seconds Check that the Color is set to 50 or higher Try different TV channels The sound and or picture is distorted or appears wavy An electric appliance may be affecting the TV Turn off any appliances that are nearby and move it farther away from the TV Insert the power plug of the TV set into another power outlet The sound and picture is blurry or cuts out If using an external a...

Reviews: