background image


19

Watching TV

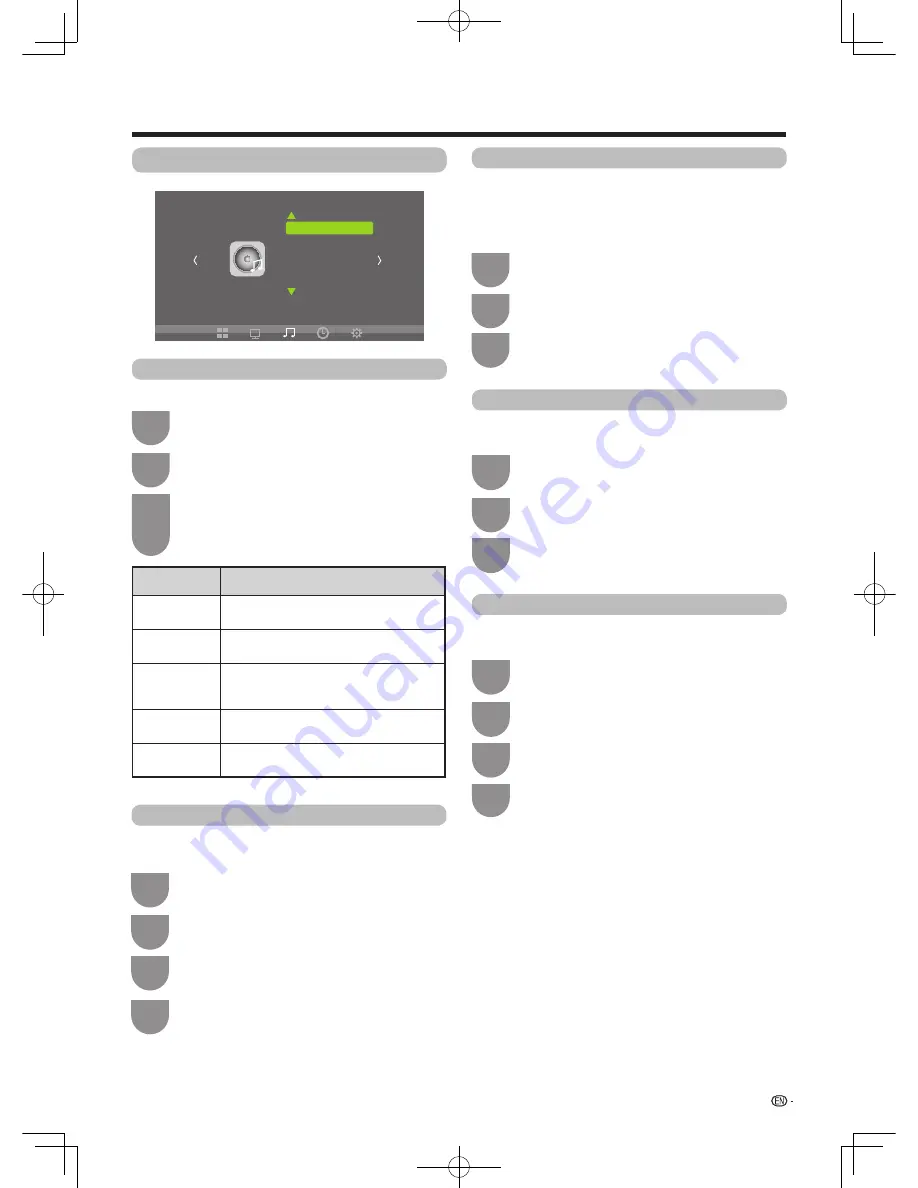
Sound Setting

Sound Mode

You can select sound mode.

Balance

Adjust the balance between left and right speakers to 

adapt to your listening position.

Press 

MENU

 and the MENU screen displays.

Press 

MENU

 and the MENU screen displays.

1

1

Press 

c

/

d

 to select “

SOUND

”.

Press 

c

/

d

 to select “SOUND”.

2

2

Press 

a

/

b

 to select “Balance”, and then 

press 

OK

.

Press 

a

/

b

 to select “Sound Mode”, and then 

press 

OK

.

Or you can press the 

SMODE

 key of the R/C.

Press 

c

/

d

 to adjust the balance between left 

and right speakers.

3

3

4

SPDIF Output

The 

SPDIF output function allows user to select the 

digital audio output mode.

Press 

MENU

 and the MENU screen displays.

1

Press 

c

/

d

 to select “SOUND”.

Press 

a

/

b

 to select  “PCM”, “Auto” or “Off”

.

4

2

Press 

a

/

b

 to select “SPDIF Output”, and 

then press 

OK

.

Surround Sound

The surround sound function produces a surround 

effect from the speakers.

Press 

MENU

 and the MENU screen displays.

1

Press 

c

/

d

 to select “SOUND”.

2

Press 

a

/

b

 to select “Surround Sound”, and 

then press 

OK

 to select  

“Off” or  “Surround”

.

3

3

SOUND

Sound Mode Standard

Balance
Auto Volume
Surround Sound
SPDIF Output

Auto Volume

Press 

MENU

 and the MENU screen displays.

1

Press 

a

/

b

 to select “Auto 

Volume

”, and then 

press 

OK 

to select “On” or “Off”.

3

Press 

c

/

d

 to select “SOUND”.

2

Different sound sources sometimes do not have the

same volume level, such as a programme and its

commercial breaks. The automatic volume control 

(Auto volume) reduces this problem by equalizing 

levels.

Selected item

Description

Standard

Balances treble and bass. This setting is 

good for watching standard TV broadcasts.

Music

Preserves the original sound. This setting 

is good for listening to music.

Movie

Enhances treble and bass for a rich 

sound experience. This setting is good for 

watching DVDs, Blu-ray discs, and HDTV.

Sports

This setting is good for watching sports 

programme.

User

Allows the user manually adjust sound 

settings.

M3H_EN_160126.indd   19

2016/1/27   22:58:50

Summary of Contents for LC-32LE175H

Page 1: ... on the power 10 Connecting external devices 11 Connecting a PC 12 PC compatibility chart 12 Inserting the batteries 13 Using the remote control unit 13 Cautions regarding the remote control unit 13 Turning the TV on off 14 Turning on the power 14 Turning off the power 14 Initial auto installation 14 Watching TV Channel Setting 15 Auto Tuning 15 DTV Manual Tuning 15 ATV Manual Tuning 15 Programme ...

Page 2: ...3 MPX 23 SLEEP 23 DISPLAY 23 CH LIST 23 TIMESHIFT 24 RECORDING 24 PVRLIST 24 TEXT 24 Connecting a USB memory device Connecting a USB memory device 25 Playing back files on a USB memory device 25 List of file formats compatible with USB mode 25 Buttons for USB media operation 26 Other useful features Using a Smartphone with the TV 27 Appendix Troubleshooting 28 Dimensional drawings 29 Specification...

Page 3: ...th some substances Therefore keep it away from volatile substances such as insecticide In addition do not let it come into contact with objects made of rubber resin etc for a long time Maintenance of the LCD panel Before cleaning the LCD panel be sure to turn off the TV set and unplug the power cord from the outlet When cleaning the LCD panel use a dry and soft cloth made of cotton floss etc to cl...

Page 4: ... by broken glass Heat sources Keep the product away from heat sources such as radiators heaters stoves and other heat generating products including amplifiers To prevent fire never place any type of candle or naked flames on the top or near the TV set To prevent fire or shock hazard do not place the AC power cord under the TV set or other heavy items Do not place heavy objects on this product or s...

Page 5: ...f HDMI Licensing LLC in the United States and other countries MHL and the MHL logo are a trademark registered trademark or service mark of MHL LLC in the United States and or other countries MPEG Layer 3 audio coding technology licensed from Fraunhofer IIS and Thomson Manufactured under license from Dolby Laboratories Dolby and the double D symbol are trademarks of Dolby Laboratories The illustrat...

Page 6: ...sult in the TV falling over 2 Attaching the stand unit NOTE To detach the stand unit perform the steps in reverse order The angle of the stand is not adjustable A screwdriver is not supplied with this product During installation please be careful to avoid getting your hand trapped between the TV bottom and the floor 1 Confirm that there are screws with the stand unit Four screws Will be used in st...

Page 7: ...ls that should only be performed by qualified service personnel Customers should not attempt to do the work themselves SHARP bears no responsibility for improper mounting or mounting that results in accident or injury Using a SHARP recommended bracket to mount the TV You can ask a qualified service professional about using a SHARP recommended bracket to mount the TV to the wall Carefully read the ...

Page 8: ...l Headphone AV 1 input terminal 1 AUDIO OUT terminal COAXIAL HDMI 1 terminal HDMI 2 MHL terminal 2 PC IN terminal COMPONENT IN terminal 1 ATV DTV terminal AUDIO IN jack Ø3 5 mm VOL k l Volume up down buttons INPUT button MENU button POWER On Off button 1 The component terminal and AV 1 terminal share the same Audio terminal 2 Mobile High Definition Link MHL can also be used see page 27 CH r Channe...

Page 9: ...ep timer See page 23 24 CH TV input mode Select the channel 25 FAVORITE Display the your favorite channel list See page 16 26 CH LIST Display the channel list of DTV and ATV See page 23 27 SUBTITLE DTV only To Display subtitle language selection menu 28 EPG DTV only To display EPG Electronic Programme Guide screen See page 22 29 Used for the USB Media Player 30 Colour Red Green Yellow Blue Follow ...

Page 10: ...C outlet and keep the power plug within reach Disconnect the AC cord from the AC outlet if the TV will not be used for a long period of time TV rear view Connecting the antenna cable To enjoy a clearer picture use an outdoor antenna The following is a brief explanation of the types of connections that are used for coaxial cable Standard DIN45325 plug IEC169 2 75 ohm coaxial cable round cable Room ...

Page 11: ... select the input source from b on the remote control unit or INPUT on the TV When using component cable commercially available When using composite cable commercially available Digital TV STB VCR Game Console Camcorder DVD Player Digital TV STB VCR Game Console Camcorder DVD Player OR When using HDMI cable commercially available Digital TV STB VCR Game console Camcorder DVD Player PC HDMI3 HDMI1 ...

Page 12: ...ect operation can only be guaranteed if the video card conforms exactly to the VESA 60Hz standard Any variations from this standard will result in picture distortions NOTE NOTE Resolution Horizontal Frequency Vertical Frequency Analogue D Sub Digital HDMI VESA Standard VGA 640 x 480 31 469 kHz 60 Hz 3 3 3 SVGA 800 x 600 37 879 kHz 60 Hz 3 3 3 XGA 1024 x 768 48 363 kHz 60 Hz 3 3 3 WXGA 1360 x 768 4...

Page 13: ... size batteries 3 Close the battery cover Use the remote control unit by pointing it towards the remote sensor window Objects between the remote control unit and sensor window may prevent proper operation Cautions regarding the remote control unit Do not subject the remote control unit to shock In addition do not soak the remote control unit with liquids or place it in an area with high humidity D...

Page 14: ... consumed even the TV is in standby mode or switch off by pressing POWER on the TV If TV loses power in special circumstances such as power outage or grid fluctuations etc TV may not work well when TV is switched on again Please try to power off the TV by the POWER key in the TV s boby or unplug and replug the AC cord to restart the TV It is a normal phenomenon when the TV temperature rises in the...

Page 15: ...the desired menu item and then press OK 4 Press a b to select ATV Manual Tuning and then press OK 3 2 Press c d to select CHANNEL CHANNEL Auto Tuning DTV Manual Tuning ATV Manual Tuning Programme Edit Signal Information Watching TV Press a b to select your desired item and then press c d to adjust the settings Item Description Storage to 1 100 Save programme to your desired channel number Press R ...

Page 16: ... you want to rename Press c d to select the letter and press a b to change the letter Channels with Skip set to On are passed over when using CH on remote or CHr s on TV even if selected while watching the image from the TV Press B Blue to skip the selected channel will be showed on the right side of the program Press B Blue again to cancel the skip will be disappeared w Move w Favorite Change the...

Page 17: ... input Press MENU and the MENU screen displays 1 Press c d to select PICTURE Press c d to select the desired setting There are 4 color temperature modes Cool Medium Warm and User 4 Color Temperature You can adjust the color temperature to your preference 2 Press a b to select Color Temperaure and then press OK 3 PICTURE Picture Mode Standard Color Temperature Aspect Ratio Noise Reduction Screen As...

Page 18: ...ze or Phase and adjust your preference Press MENU and the MENU screen displays Press MENU and the MENU screen displays 1 1 Press c d to select PICTURE Press c d to select PICTURE Press a b to select Off Low Middle or High Press a b c d or OK to select and adjust the horizontal position vertical position size and phase here 4 4 2 2 Press a b to select Noise Reduction and then press OK Press a b to ...

Page 19: ... Press MENU and the MENU screen displays 1 Press c d to select SOUND 2 Press a b to select Surround Sound and then press OK to select Off or Surround 3 3 SOUND Sound Mode Standard Balance Auto Volume Surround Sound SPDIF Output Auto Volume Press MENU and the MENU screen displays 1 Press a b to select Auto Volume and then press OK to select On or Off 3 Press c d to select SOUND 2 Different sound so...

Page 20: ...creen displays Press MENU and the MENU screen displays Press MENU and the MENU screen displays Press MENU and the MENU screen displays 1 1 1 1 1 Press a b to select Clock and then press OK Press a b to select Off Time and then press OK Press a b to select On Time and then press OK Press a b to select Sleep Timer and then press OK Press a b to select Auto Sleep and then press OK to select the Off o...

Page 21: ... 1TB Restore Factory Default If complex adjustments are made and the settings can not be restored to normal you can reset the settings to the factory preset values Blue Screen Allows to set the screen display in blue when there is no signal input OSD Time Out Allows to set the display time of the on screen menu OSD Transparency Allows to set the transparency of OSD menu Press MENU and the MENU scr...

Page 22: ...ing You can schedule a reminder for future programmes Channel will automatically change on time as scheduled Press EPG 1 Press B to display reminder time and mode 3 Press a b to select the programme you want to watch 2 Press a b and c d to set reminder timer and mode and then press OK 4 NOTE The time displayed on the EPG is information sent by the TV station The added instruction for R C buttons F...

Page 23: ...o When receiving a bilingual signal NICAM DUAL I NICAM DUAL II FM mono When receiving a monaural signal NICAM MONO FM mono 1 2 Press SLEEP Remaining time displays when sleep timer has been set Each time you press SLEEP the remaining time switches as shown below 10min 20min 30min 60min 90min 180min 120min 240min Off NOTE When the time has been set countdown automatically starts Thirty seconds befor...

Page 24: ...e showed on the bottom of the screen Press PVRLIST to display the Record List 1 1 1 2 2 2 Press c d to select the desired option and then press OK to execute it Press to play or pause the programme you are recoding from the begining Press H to exit the timeshift mode Press c d to select the desired option and then press OK to execute it Press to play or pause the programme you are recoding Press H...

Page 25: ...memory device to enjoy viewing pictures listening to music and watching videos Connect a commercially available USB to the USB port of the TV Select USB using b INPUT SOURCE on the remote control unit or on the TV 1 Press c d to select the drive where you want to find your files and then press OK Press B blue to select unselect all files Function and its applicable mode in detail please refer to b...

Page 26: ... and start loop playback Press OK to cancel the loop 3 MUTE 3 Play cancel the background music The background music should be saved in the same folder with the photo 3 Playlist Select a file from the playlist to start playback 3 3 3 Display file information 3 3 3 Slow forward Each time you press OK the speed will change 3 Step forward Each time you press OK the picture will change to the next stil...

Page 27: ...es you to connect the TV to a smartphone that supports Mobile High Definition Link MHL using an MHL compatible cable To connect the TV to your MHL compatible smartphone be sure to use an MHL compatible cable Commercially available You can view pictures and video on a large screen You can play back music files MHL compatible cable Commercially available HDMI 2 MHL terminal M3H_EN_160126 indd 27 201...

Page 28: ...enly turned off The unit s internal temperature has increased Remove any objects blocking the vent or clean Is the sleep timer off time or Auto Sleep set See pages 20 and 23 No picture Is the connection to external equipment correct See pages 11 and 25 Is the correct input selected See pages 9 11 and 25 Is the picture adjustment correct See pages 17 and 18 Is the antenna connected properly See pag...

Page 29: ...29 Dimensional drawings Appendix Unit mm 1 Active area 2 Thinnest part LC 32LE175H 698 393 223 100 100 731 471 436 258 313 159 51 79 52 22 M3H_EN_160126 indd 29 2016 1 27 22 58 53 ...

Page 30: ...O OUTPUT Coaxial Out Bottom USB 1 USB 2 0 HDMI 1 HDMI HDMI input 480i 576i 480p 576p 720p 50Hz 720p 60Hz 1080i 50Hz 1080i 60Hz 1080p 50Hz 1080p 60Hz 1080p 24Hz HDMI 2 MHL HDMI HDMI input 480i 576i 480p 576p 720p 50Hz 720p 60Hz 1080i 50Hz 1080i 60Hz 1080p 50Hz 1080p 60Hz 1080p 24Hz MHL is not applicable PC INPUT D Sub 15 Pin COMPONENT INPUT COMPONENT in 480i 576i 480p 576p 720p 50Hz 720p 60Hz 1080i...

Reviews: