US
10
Preparation
4
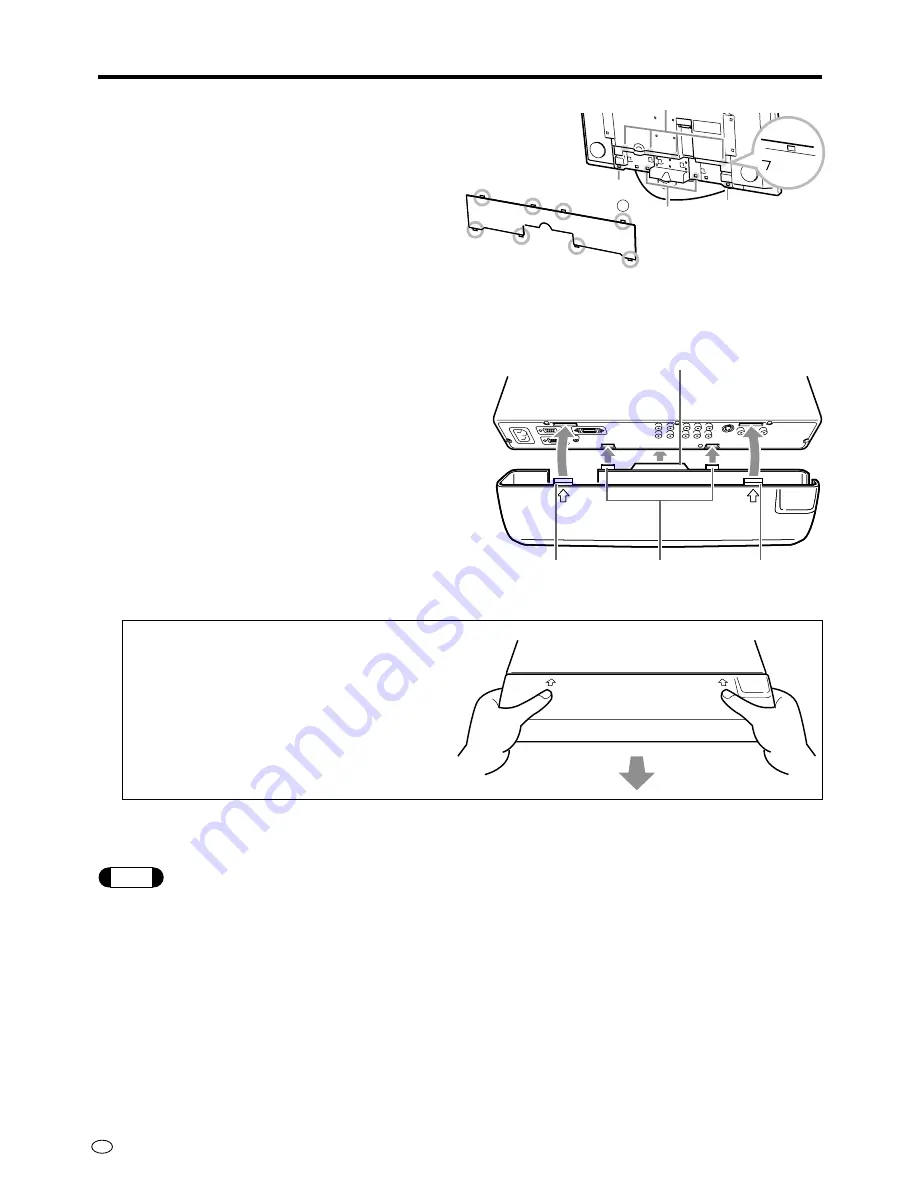
Mount the back cover of the display and the
system cable cover.
1
Insert the four tabs on the upper side of the
cover (
1
) into the grooves on the rear of
the display.
2
Press the two tabs on the lower side of the
cover (
2
) into the grooves on the rear of
the display until they produce a click sound.
3
Press the two tabs on the lower side of the
cover (
3
) into the grooves on the rear of
the display until they produce a click sound.
5
Connect desired external equipment (e.g. DVD
player: See page 12).
6
Mount the supplied AVC system terminal cover.
1
Align the protruding part in the center of the
cover (
1
) with the outside of the AVC
system.
2
Align the two tabs on the lower side of the
cover (
2
) with the two grooves in the lower
side of the AVC system and push them
gently in.
3
Align the two tabs on the upper side of the
cover (
3
) with the two grooves in the upper
side of the AVC system and push them
gently in.
Removing the AVC system terminal cover
1
Press both of your thumbs against the
arrow marks (2 locations) on the upper side
of the cover and pull out gently to release
the tabs on the upper side.
2
Now pull away the entire cover to release
the tabs on the lower side.
Note
• Before connecting the power cord, be sure to set the MAIN POWER button on the top-of display to “OFF”.
• When not using the unit for extended periods of time, be sure to always unplug the power cord.
• The display and the AVC system do not operate independently. Be sure to always plug-in both AC power cords in
order to operate the display.
• When connecting external equipment to the AVC system, be sure to always make the necessary connections before
plugging in the power cords.
• Do not remove the system cable while operating the unit. Doing so can cause a malfunction.
• Do not place anything over the ventilation openings on the top of the AVC system.
3
2
1
3
1
1
1
1
2
3
3
2
2
3
2
1


