background image

Connecting external devices

In order to receive coded digital stations, a Common 
Interface Module (CI Module) and a CA Card must be 
inserted in the CI slot of your TV set� 
The CI Module and the CA Card are not supplied 
accessories� They are usually available from your dealer�

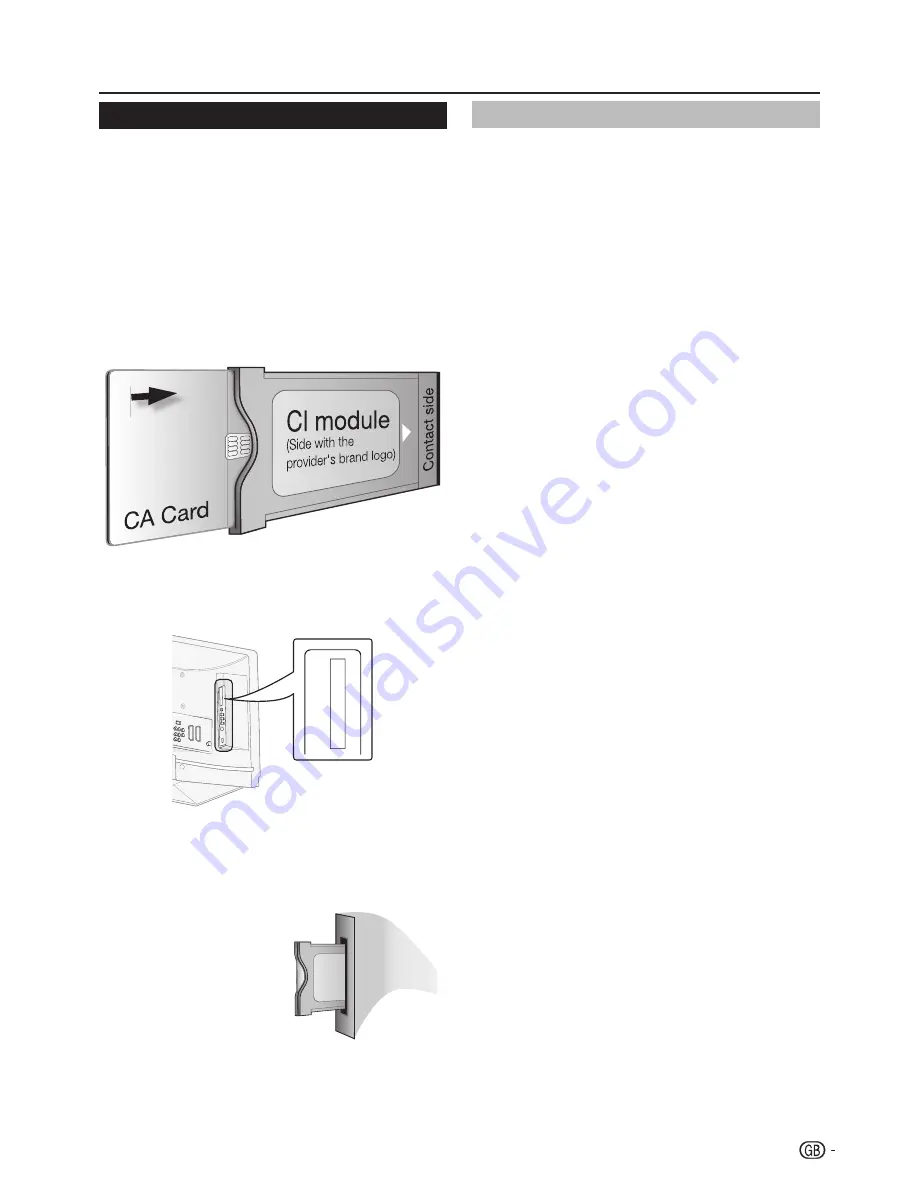
inserting the Ca Card into the Ci module

With the side with the gold coloured contact chip 

1� 

facing the side of the CI Module marked with 
the provider’s logo, push the CA Card into the CI 
Module as far as it will go. Note the direction of 
the arrow printed on the CA card.

Inserting the CI Module in the CI slot

2� 

C.I.

Carefully insert the CI Module in the CI slot 

3� 

with the contact side 
forward. The logo on 
the CI Module must be 
facing forward from the 
rear of the TV. Do not use 
excessive force. Make 
sure the module is not 
bent in the process.

access Ci module service

After inserting and activating the CI Module,
make sure the input source is 

tV

Press 

1� 

menu

 on the remote control.

Go to 

2� 

Features

 > 

Common interface

.

This menu option is only available if the CI Module is 
correctly inserted and activated� On-screen applications 
and content are provided by your digital TV service 
operator�

inserting a Ca Card


15

Summary of Contents for LC-26SB25E

Page 1: ...ION Printed in China Gedruckt in China Imprimé en Chine Stampato in Cina Afgedrukt in China Impreso en China Impresso na China LC 26SB25E LC 32SB25E LC 42SB55E LC 26SB25S LC 32SB25S LC 42SB55S OPERATION MANUAL BEDIENUNGSANLEITUNG MODE D EMPLOI MANUALE DI ISTRUZIONI GEBRUIKSAANWIJZING MANUAL DE MANEJO MANUAL DO UTILIZADOR 1 OPERATION MANUAL BEDIENUNGSANLEITUNG MODE D EMPLOI MANUALE DI ISTRUZIONI GE...

Page 2: ... the colours of the wires in the mains lead of this product may not correspond with the coloured markings identifying the terminals in your plug proceed as follows The wire which is coloured blue must be connected to the plug terminal which is marked N or coloured black The wire which is coloured brown must be connected to the plug terminal which is marked L or coloured red Ensure that neither the...

Page 3: ... Adjust sound settings 19 Features 19 Adjust feature settings 19 User timers 19 Automatically switch the TV to standby Sleeptimer 20 Automatically switch the TV on Start time 20 Automatically switch the TV off Stop time 20 Lock TV channels or connected devices Auto Lock 20 To set or change the Auto Lock code 20 To enter the Auto Lock menu 20 To unlock all channels and connected devices 20 To set p...

Page 4: ...n be careful not to be injured by broken glass Heat sources Keep the product away from heat sources such as radiators heaters stoves and other heat generating products including amplifiers To prevent fire never place any type of candle or naked flames on the top or near the TV set To prevent fire or shock hazard do not place the AC cord under the TV set or other heavy items Do not display a still ...

Page 5: ...channel MUTE Press to toggle audio on and off You can also press i to restore the previous volume level DISPLAY Press to display the current signal status including input source channel audio mode MENU Press to activate the LCD TV OSD Press again to exit the LCD TV OSD EXIT Press to exit LCD TV OSD OK Press to activate a setting oœpπ Press oœpπ to navigate and confirm your selection R G Y B COLOUR...

Page 6: ...IO 6 Component Video and L R Audio input 7 SPDIF Output Digital audio out 8 AV L R Audio Output 9 SCART 1 CVBS Tuner out 10 SCART 2 CVBS Monitor out 11 Tuner Input 12 COMMON INTERFACE slot 13 Earphone Output 14 Composite AV IN AV LR 15 S Video 16 HDMI 3 For 32 and 42 only TV Front view TV Rear view 4 Remote control sensor B Standby On indicator MENU button i k l Volume buttons P r s Program channe...

Page 7: ...umn to the TV by using a cross head screwdriver not supplied Detach the stand from the bottom of the TV 3 3 3 3 3 W H TV screen size Inches VESA compatible wall bracket millimeters W x H Screw type 26 200 x 100 mm Metric 6 x 10 mm 32 200 x 200 mm Metric 6 x 10 mm 42 400 x 200 mm Metric 6 x 10 mm Supplied accessories Mount the TV Stand Wall mounting 5 Remote control unit g1 AAA battery X2 Cable cla...

Page 8: ...ash If you find any chemical leakage wipe thoroughly with a cloth The batteries supplied with this product may have a shorter life expectancy due to storage conditions If you will not be using the remote control unit for an extended period of time remove the batteries from it Note on disposing batteries The batteries provided contain no harmful materials such as cadmium lead or mercury Regulations...

Page 9: ... Česky Dansk Deutsch Ελληνικά English Español Français 4 Country setting TV Installation Please select your country Next Previous Slovakia Slovenia Spain Sweden Switzerland Turkey UK Ukraine Congratulations Now you can watch TV Enjoy your television If latter on you still want to change a setting you can go to the menu Finish Previous If necessary adjust the antenna to attain maximum signal recept...

Page 10: ...revious TV Installation Please select your country Next Previous Slovakia Slovenia Spain Sweden Switzerland Turkey UK Ukraine System searching may take up to 20 minutes to 3 complete Please wait until system searching is completed and then press the Green button to next step TV Installation System searching Please wait Digital channels found Analogue channels found Auto programming may take up to ...

Page 11: ...tandby by pressing B on the remote control E Switching on from standby From standby press B on the remote control Selecting external video source Once the connection is made press b to display the INPUT SOURCE screen and then press to switch over to the appropriate external source with OK Selecting Sound mode Press Dual button on the remote control Select Mono Stereo DUAL I and DUAL II for ATV cha...

Page 12: ...on about the current program is displayed 0 Use the colour buttons on the remote control to 2 activate available actions Viewing date Thu 03 Jan Televsion I EPG Current time Thu 03 Jan 16 52 1 2 7 10 11 12 13 801 BBC CHO BBC i BBC NE BBC PAR BBC Kno MTK_OAD BBC ONE BBC TWO 17 00 17 25 Children s Next day Prev day Detail 17 00 The Blue Peter Quest CBBC 16 30 The Wild Thornberrys CBBC Use the colour...

Page 13: ...ected signal type is RGB Buttons for teletext operations Buttons Description P r s Increase or decrease the page number Colour R G Y B Select a group or block of pages displayed in the coloured brackets at the bottom of the screen by pressing the corresponding Colour R G Y B on the remote control unit 0 9 Directly select any page from 100 to 899 by using 0 9 MIX Press this button to activate Telet...

Page 14: ... OUT PC IN COMPONENT 75Ω SERVICE VGA Y L R L R Pb Pr AUDIO SPDIF OUT AUDIO OUT PC IN COMPONENT 75Ω SERVICE SPDIF OUT Y L R Pb Pr COMPONENT L R L R S VIDEO VIDEO L R AV IN VIDEO L R AV IN S VIDEO O L R L R The TV is equipped with the terminals as shown below Find the cable corresponding the TV s terminal and connect the device When using S video cable you also need to connect an audio cable R L Int...

Page 15: ... DVI HDMI conversion Using an DVI HDMI adapter cable the digital video signals of a DVD can also be played via the compatible HDMI connection The sound must be fed in additionally Both HDMI and DVI use the same HDCP copy protection method Supported video signal 576i 576p 480i 480p 1080i 720p 1080p See page 26 for PC signal compatibility You will enjoy accurate colour reproduction and high quality ...

Page 16: ... L R Pb Pr SPDIF OUT COMPONENT L R AUX1 IN L R AUX OUT NOTE In cases when the decoder needs to receive a signal from the TV make sure to select the appropriate input source Do not connect the decoder to the SCART 2 You cannot connect the VCR with Decoder using a fully wired SCART cable under the SCART 2 source E When using the SCART 2 Half SCART which transmits S Video or CVBS in and CVBS monitor ...

Page 17: ...te the direction of the arrow printed on the CA card Inserting the CI Module in the CI slot 2 C I Carefully insert the CI Module in the CI slot 3 with the contact side forward The logo on the CI Module must be facing forward from the rear of the TV Do not use excessive force Make sure the module is not bent in the process Access CI Module service After inserting and activating the CI Module make s...

Page 18: ...n item Press oœpπ to select adjust the desired menu and adjust the item to the desired level and then press OK E Selecting in the Menu Operation without a remote control This function is useful when there is no remote control within your reach Press 1 MENU briefly to display the direct control screen Press 2 P r s instead of or i k l instead of to select the item Press 3 MENU to confirm the select...

Page 19: ...lected Press to enter the select menu Press or to move to the item Press OK to change to the selected colour temperature Normal balanced Warm redder Cool bluer Picture format See Section Change picture format Noise reduction Filters and reduces the noise in the picture Select On to enable or Off to disable this function Use smart pictures Apart from manually adjusting picture settings you can use ...

Page 20: ... 14 9 Not for HD Scales the classic 4 3 format to 14 9 Movie expand 16 9 Not for HD Scales the classic 4 3 format to 16 9 NOTE Constant use of the 16 9 picture format can cause screen distortion Wide screen Stretches the classic 4 3 format to 16 9 Subtitle zoom Scales the classic 4 3 format to 16 9 When source input is PC mode only 4 3 and Wide screen are available For 4 3 PC input signal picture ...

Page 21: ...work if DTV has audio description language You can use Audio language menu to check if DTV has audio description language Audio language Available for digital channels only when multiple languages are broadcasted Lists available audio languages Dual I II If available choose between different audio languages Mono Stereo If stereo broadcasting is available choose between mono or stereo Auto volume l...

Page 22: ...Timer Stop time Press 2 to enter the Stop time menu Use 3 or or to select and enter the menu items to set Press 4 OK to confirm Press 5 MENU to exit Lock TV channels or connected devices Auto Lock Lock TV channels or connected devices with a four digit code to prevent children from watching unauthorised content To set or change the Auto Lock code Press 1 MENU on the remote control and select Featu...

Page 23: ...btitle language on a digital TV channel as described below the preferred subtitle language set in the Installation menu is temporarily overruled Press 1 MENU on the remote control and select Features Subtitle Language Press 2 to enter the list of available languages Press 3 or to select a subtitle language Press 4 OK Listen to digital radio channels If digital broadcasting is available digital rad...

Page 24: ...settings Primary subtitle language Selects one of the available subtitle languages as your primary subtitle language Secondary subtitle language Selects one of the available subtitle languages as your secondary subtitle language For more information see Section Select a subtitle language on digital TV channels Hearing impaired If available select On to display the hearing impaired subtitle with yo...

Page 25: ...tings are correct Press 1 MENU on the remote control and select Installation Channel installation Analogue Manual installation Press 2 to enter the System list Channel installation Analog Manual installation Search Fine tune Store current channel System Installation update Digital Test reception Analog Manual installation Rearrange Clear program list Automatic installation TV Menu I Installation P...

Page 26: ...h NOTE Delete all characters by pressing the yellow button Delete only the highlighted character by pressing the blue button Uninstall or reinstall channels You can uninstall a stored channel or reinstall an uninstalled channel Press 1 MENU on the remote control and select Installation Channel installation Rearrange Press 2 to enter the Rearrange list Press 3 or to select the channel you want to u...

Page 27: ...ital broadcasts If using DVB T digital broadcasts your TV automatically receives software updates If you receive a message on screen prompting you to update your software Select Accept recommended to update the software immediately Select Reject to exit the update not recommended Select Remind me later to be reminded to update the software later NOTE To scan all carriers for upgrade availability p...

Page 28: ...lution Refresh rate 640 x 480 60Hz 800 x 600 56Hz 800 x 600 60Hz 1024 x 768 60Hz 1280 x 720 60Hz 1280 x 768 60Hz 1360 x 768 60Hz 1280 x 1024 60Hz 42 only 1920 x 1080 60Hz 42 only Video formats Resolution Refresh rate 480i 60Hz 480p 60Hz 576i 50Hz 576p 50Hz 720p 50Hz 60Hz 1080i 50Hz 60Hz 1080p HDMI Component only 50Hz 60Hz 24Hz 26 PC PC HDMI cable DVI HDMI conversion cable Ø 3 5 mm stereo mini jack...

Page 29: ...t channels through antenna Please use the Channel scan function to increase the number of channels not included in memory No colours Please adjust the colour setup Blinking picture accompanied by ghost image 1 Check the connection of antenna signal cable 2 Check if channel is in play mode 3 Press signal source and change input mode Broken lines or segments Adjust antenna Keep the TV away from nois...

Page 30: ...gital source DTV sound only PC IN VGA pin AV input Ø 3 5mm jack Audio input Component Y Pb Cb Pr Cr RCA pin L R SPDIF Digital audio output AUDIO OUT RCA pin L R HDMI 1 HDMI 2 C I Common Interface EN50221 R206001 Headphones Ø 3 5mm jack Audio output AV IN RCA pin AV input RCA pin L R S VIDEO Y C input HDMI 3 For 32 and 42 only OSD language Bulgarian Croatian Czech Danish Dutch English Finnish Frenc...

Page 31: ...es use of freely distributed software and software components whose copyrights are held by third parties These include software components covered by a GNU General Public License hereafter GPL a GNU Lesser General Public License hereafter LGPL or other license agreement Obtaining source code Some of the open source software licensors require the distributor to provide the source code with the exec...

Page 32: ... equipment can be returned free of charge to the dealer even if you don t purchase a new product Further collection facilities are listed on the homepage of www swico ch or www sens ch B Information on Disposal for Business Users 1 In the European Union If the product is used for business purposes and you want to discard it Please contact your SHARP dealer who will inform you about the take back o...

Reviews: