1 – 10
FO-77U
UX-66U
[6] Quick setup guide (UX-66U only)
2
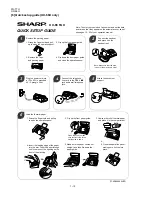
Connect the handset
and place it on the
handset rest.
QUICK SETUP GUIDE
1
Remove the packing paper.
3
Plug the power cord into
a 120 v, 60Hz, grounded
AC (3-prong) outlet.
4
Connect the telephone
line cord to the TEL. LINE
jack and a wall telephone
jack.
5
Attach the document
support.
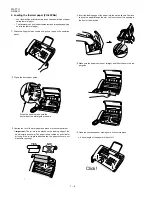
Load the thermal paper.
1. Grasp the finger hold and pull up
to open the operation panel.
3. Unwrap the roll of thermal paper
and place it in the compartment.
YES
NO!
5. Make sure the paper comes out
straight, and then flip down the
paper guide.
2. Flip up the front paper guide.
6. Close the operation panel,
making sure it clicks into
place.
6
(TCADZ2869XHZZ)
Note: Make sure that the area
in front of the machine is clear.
4. Insert the leading edge of the paper
into the slot. Push the paper through
until it comes out the opening on the
front of the machine.
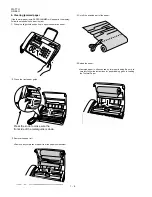
1. Grasp the finger hold and pull
up to open the operation panel.
2. Flip up the front paper guide.
3. Remove the tape
and packing paper.
4. Flip down the front paper guide
and close the operation panel.
TEL.
LINE
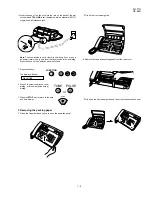
Note: To enter your name and fax number and set the date
and time so that they appear on the automatic cover sheet,
see pages 19 - 25 of your operation manual.
UX-66 FAX
Press the knob to make
sure the front side of the
metal guide is down.
Summary of Contents for FO-77
Page 65: ...FO 77U UX 66U Control PWB parts layout Top side 6 7 ...
Page 66: ...FO 77U UX 66U Control PWB parts layout Bottom side 6 8 ...
Page 69: ...FO 77U UX 66U TEL LIU PWB parts layout Top side 6 11 ...
Page 70: ...FO 77U UX 66U 6 12 TEL LIU PWB parts layout Bottom side ...
Page 72: ...FO 77U UX 66U Power supply PWB parts layout 6 14 RDENT2142XHZZ F2 ...
Page 97: ...FO 77U UX 66U 14 M E M O ...


