GB
76
Editing a Play List (HDD/DVD)
5
Adding a Title or Chap-
ter
1
1
1
1
1
Select “ADD CHAPTER/TITLE”,
then press
SET/ENTER
.
2
2
2
2
2
Select a title (chapter) at the
title (chapter) list, then press
SET/ENTER
. Go to step
9
.
Specifying and Adding a
Scene
•
Select “SPECIFY SCENE TO
ADD”, then press
SET/ENTER
.
Go to step
6
.
6
Press
'
/
"
/
\
/
|
to select title
(chapter) to edit, then press
SET/
ENTER
.
• The selected title (chapter) pauses.
7
1
1
1
1
1
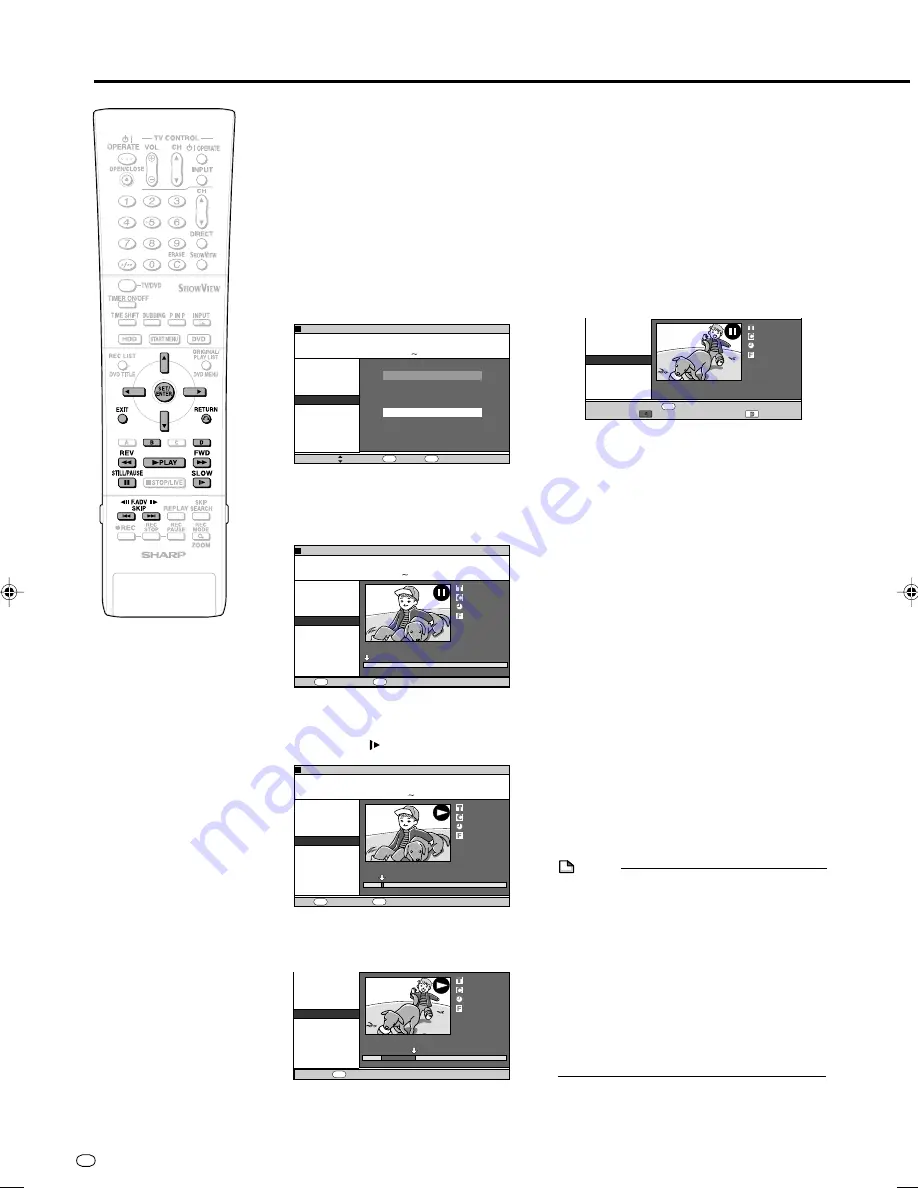
Press
|
PLAY to start playback.
• Find the scene to add using
F
STILL/
PAUSE
,
J
FWD
,
G
REV
,
K
,
L
, or
SLOW
.
2
2
2
2
2
Press
SET/ENTER
at the start
point of the scene you want to
add.
• If you fast reverse to a scene prior to
the start point, the start point will be
cancelled.
ERASE SCENE
CHANGE TITLE NAME
CHANGE THUMBNAIL
DIVIDE CHAPTER
ADD SCENE
MOVE TITLE
ADD CHAPTER/TITLE
SELECT ORIGINAL TITLE/CHAPTER AND ADD IT
SELECT A SCENE FROM ORIGINAL VIDEO AND
ADD IT
SPECIFY SCENE TO ADD
8
2
:
0
1
2
1
/
5
2
SELECT
ENTER
RETURN
ENTER
n
EDIT(HDD PLAYLIST)
0
1
/
N
O
M
4
E
L
3
3
T
I
T
R
P
:
O
F
N
I
:
E
L
T
I
T
E
N
I
F
9
0
4
1
:
0
2
:
0
2
ERASE SCENE
CHANGE TITLE NAME
CHANGE THUMBNAIL
DIVIDE CHAPTER
ADD SCENE
MOVE TITLE
SPECIFY RANGE
TO ADD.
8
2
:
0
1
2
1
/
5
2
01
04
2
00 : 00 : 00
EDIT(HDD ORIGINAL)
SET START POINT
PLAYBACK
ENTER
PLAY
0
1
/
N
O
M
4
E
L
3
3
T
I
T
R
P
:
O
F
N
I
:
E
L
T
I
T
E
N
I
F
9
0
4
1
:
0
2
:
0
2
ERASE SCENE
CHANGE TITLE NAME
CHANGE THUMBNAIL
DIVIDE CHAPTER
ADD SCENE
MOVE TITLE
SPECIFY RANGE
TO ADD.
SET END POINT
ENTER
01
09
2
00 :00: 32
ERASE SCENE
CHANGE TITLE NAME
CHANGE THUMBNAIL
DIVIDE CHAPTER
ADD SCENE
MOVE TITLE
CONFIRM CONTENT?
01
09
2
00: 00: 32
RETURN
n
CONFIRMING
ADD
ERASE SCENE
CHANGE TITLE NAME
CHANGE THUMBNAIL
DIVIDE CHAPTER
ADD SCENE
MOVE TITLE
SPECIFY RANGE
TO ADD.
8
2
:
0
1
2
1
/
5
2
01
00
2
00 : 00 :12
SET START POINT
PLAYBACK
ENTER
EDIT(HDD ORIGINAL)
PLAY
0
1
/
N
O
M
4
E
L
3
3
T
I
T
R
P
:
O
F
N
I
:
E
L
T
I
T
E
N
I
F
0
0
4
1
:
0
2
:
0
2
• When the start point is set to near the
beginning of a chapter, the beginning
of the chapter will be selected as the
start point. To make the original
designated start point effective, set it
again after combining up with the
chapter just before. (page
72
)
8
Press
SET/ENTER
at the end of
the scene you want to add.
• Press
RETURN
to reselect the start
point of the scene. You can press
RETURN
to reselect the end point
even after it is already set.
• When the end point is set to near the
end of a chapter, the end of the
chapter will be selected as the end
point. To make the original
designated end point effective, set it
again after combining up with the
chapter just before. (page
72
)
9
Press
Red (B)
(CONFIRMING) to
confirm the content.
Press
Yellow (D)
(ADD) to add.
• If you press
Red (B)
(CONFIRMING),
you can test play the added scene,
from the start point to the end point. It
may take about one minute for the
confirm screen to appear.
• Press
Yellow (D)
(ADD) to add.
10
1
1
1
1
1
Press
\
/
|
to select “YES”.
2
2
2
2
2
Press
SET/ENTER
.
• The scene is added after the selected
title, and stored as a new title of the
play list.
11
Press
EXIT
to exit from EDIT
mode.
• A chapter mark is automatically set at
the start point where the scene is
added.
NOTE
• When adding a scene, select a scene
which continues for at least 3 seconds.
Scenes shorter than 3 seconds cannot be
added.
• Scenes can only be added and erased a
maximum of 50 times per title.
• If you press
G
REV
or
K
and reverse
beyond the start point after setting a start
point, the start point will cancel.
• If scenes have been added or erased 51 or
more times to a single title in a disc using
another DVD recorder, Editing (Recording)
may not function.
DV-HR300S-074-078
04.1.14, 4:30 PM
76


