background image

E-10

The following functions are the same as CD
operations:

Page

Direct track search  . . . . . . . . . . . . . . . . . . . . . . . . . . . . 7
Repeat play. . . . . . . . . . . . . . . . . . . . . . . . . . . . . . . . . . . 7
Random play  . . . . . . . . . . . . . . . . . . . . . . . . . . . . . . . . .

8

Programmed play (MP

3

/WMA) . . . . . . . . . . . . . . . . . . .

8

Note:

If USB memory device is not connected, “USB No
Media” will be shown on the display.

Notes:

This unit only supports “MPEG-1 Audio Layer-3”
format. (Sampling Frequency is 32, 44.1, 48kHz)

Playback order for MP3 files may differ depending on
the writing software used during file download.

Bitrate which is supported by MP3 is 32~320 kbps,
WMA is 64~160 kbps.

For MP3/WMA files, please put “.MP3” “.WMA”
extension. Files cannot be played back if there is no
MP3/WMA extension.

Playlists are not supported on this unit.

This unit can display Folder Name or File Name up to
32 characters.

Maximum total number of MP3/WMA files is 65025. 

Total number of folders read is 999 including folder with
non-playable file. However, the display shows only
folder with MP3 files. 

The display playback time may not be displayed
correctly when playing back a variable bitrate file.

The ID3TAG information supported are TITLE, ARTIST
and ALBUM only. Title name, artist name and album
name can be displayed by pressing the DISPLAY
button during file playback or pause mode.

WMA meta tag also supports title, artist and album
name which are recorded in WMA files. Copyright
protected WMA files cannot be played back.

Notes:

When radio interference occurs, auto scan tuning may
stop automatically at that point.

Auto scan tuning will skip weak signal stations.

To stop the auto tuning, press the TUNING (

 or 

)

button again.

To receive an FM stereo transmission:

Press the TUNER button to select stereo mode and
“ST” indicator will be displayed. “

” and “ ” will

appear when an FM broadcast is in stereo.

If the FM reception is weak, press the TUNER button to
extinguish the “ST” indicator. The reception changes to
monaural, and the sound becomes clearer.

You can store 40 AM and FM stations in memory and recall
them at the push of a button. (Preset tuning)

Note:

The backup function protects the memorized stations for a 
few hours should there be a power failure or the AC power 
cord becomes disconnected.

Press the PRESET (


or 

) button for less than 0.5

seconds to select the desired station.

The stations saved in the memory can be scanned
automatically. (Preset memory scan)

Advanced USB playback

Listening to the radio
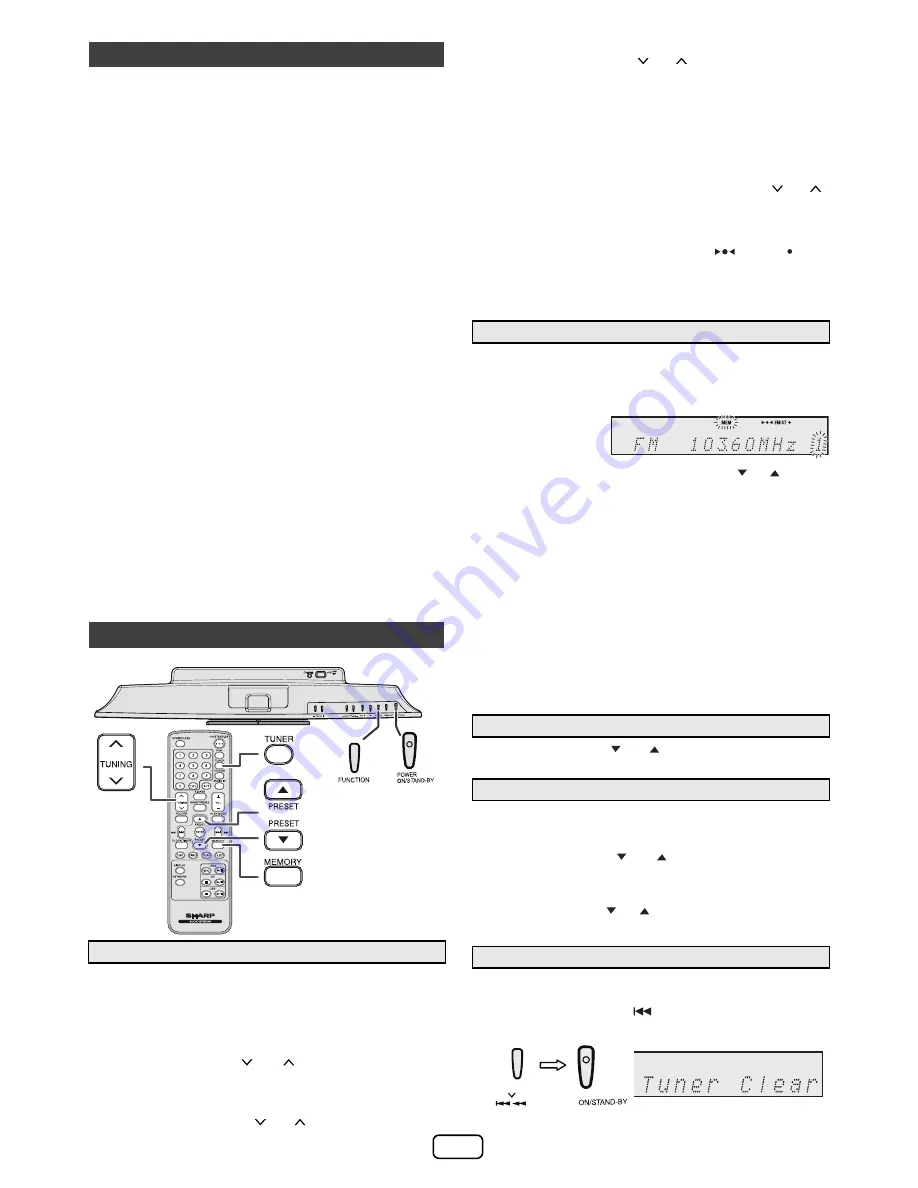
Tuning

1

Press the POWER ON/STAND-BY button to turn the power on.

2

Press the FUNCTION button on the main unit or
TUNER button on the remote control repeatedly to
select FM Stereo, FM Mono or AM.

3

Press the TUNING (

 or 

) button on the remote

control to tune in to the desired station.

Manual tuning:

Press the TUNING (

 or 

) button repeatedly to

tune in to the desired station.

Auto tuning:

When the TUNING (

 or 

) button is pressed for

more than 0.5 seconds, scanning will start
automatically and the tuner will stop at the first
receivable broadcast station.

Memorizing a station

1

Perform steps 2 - 3 in “Tuning”.

2

Press the MEMORY 
button.

3

Within 30 seconds, press the PRESET (


or 

) button

to select the preset channel number. Store the stations
in memory, in order, starting with preset channel 1.

4

Within 30 seconds, press the MEMORY button to store
that station in memory. If the “MEMORY” and preset
number indicators disappear before the station is
memorized, repeat the operation from step 2.

5

Repeat steps 1 - 4 to set other stations, or to change a
preset station. When a new station is stored in the
memory, the station previously memorized for that
preset channel number will be erased.

To recall a memorized station

To scan the preset stations

1

Press the PRESET (

 or 

) button for more than 0.5

seconds. The preset number will flash and the programmed
stations will be tuned in sequentially, for 5 seconds each.

2

Press the PRESET (

 or 

) button again when the desired

station is located.

To erase entire preset memory

1

Press the POWER ON/STAND-BY button to enter the stand-by mode.

2

While pressing down the 

 button, press the POWER ON/

STAND-BY button until “Tuner Clear” appears.

TUNING

POWER

Summary of Contents for DK-KP95P

Page 1: ... with this product in revenue generating broadcast systems terrestrial satellite cable and or other distribution channels revenue generating streaming applications via Internet intranets and or other networks other revenue generating content distribution systems pay audio or audio on demand applications and the like or on revenue generating physical media compact discs digital versatile discs semi...

Page 2: ...ack or batteries installed shall not be exposed to excessive heat such as sunshine fire or the like Notes concerning use Replace the battery if the operating distance is reduced or if the operation becomes erratic Purchase an AA size battery UM SUM 3 R6 HP 7 or similar Periodically clean the transmitter on the remote control and the sensor on the unit with a soft cloth Exposing the sensor on the u...

Page 3: ...1 PresstheBASS TREBLEbuttontoselect Treble 2 Within5 seconds press the VOLUME or buttonto adjustthe treble When the FUNCTION button on main unit is pressed the current function will change to different mode Press the FUNCTION button repeatedly to select desired function Note The backup function will protect the memorized function mode for a few hours should there be a power failure or the AC power...

Page 4: ...r devices manual 8 Select your router from the list of available networks Enter your network password if required 9 Continue with step 8 to 9 in Direct wireless connection Note WPS process network search takes about 2 minutes If fail to connect the display will show Cannot connect to Network Repeat step 4 to retry 1 Press the POWER ON STAND BY button 2 Press the NETWORK button on the remote contro...

Page 5: ...ectly do the Network reset refer page 14 Various function can be controlled from the remote control or your AirPlay DLNA device Notes For DLNA compatible devices the function control may vary depending on DLNA application used To enable this unit to control iTunes software the setting below is required On Network Stand by mode is enable During stand by mode if select DK KP95 speakers through AirPl...

Page 6: ... Once the calls are answered the conversation can only be heard through the built in iPhone speaker Turn on the iPhone speaker or undock the iPhone to start conversation Caution Unplug all accessories from the iPod or iPhone before inserting it into the dock Note Docking station is not recommended for iPad connection For iPod nano or iPod touch For additional support apply dock spacer supplied as ...

Page 7: ...iPod iPhone or iPad continued iPod or iPhone playback 1 Press the POWER ON STAND BY button to turn the power on 2 Press the iPod button on the remote control or FUNCTION button repeatedly on the main unit to select iPod function 3 Insert iPod or iPhone unit into the dock of main unit DOCK OK will appear 4 Press the iPod button to start playback Navigating the iPod iPhone or iPad menus 1 Press the ...

Page 8: ...l Repeat One appears Press the CD button To repeat all tracks Press the PLAY MODE button repeatedly until Repeat All appears Press the CD button To repeat desired tracks Perform steps 1 4 in Programmed play section on page 8 and then press the PLAY MODE button repeatedly until Repeat All appears Caution After performing repeat play be sure to press the CD button Otherwise the disc will play contin...

Page 9: ... Numeric button on the remote control to select the desired track Note To select track number 10 or higher refer Direct track search 3 Repeat step 2 for other tracks Up to 32 tracks can be programmed If you want to check the programmed tracks press the MEMORY button repeatedly If you make a mistake the programmed tracks can be cleared by pressing the CLEAR button 4 Press the CD button to start pla...

Page 10: ...o various unforeseen reasons from some devices Should this happen turn off the unit and then turn it on again During CD function MP3 player will not be charging Listening to USB mass storage device MP3 player To play back USB MP3 player with folder mode off 1 Press the CD USB button on the remote control or FUNCTION button repeatedly on main unit to select USB function Connect the USB memory devic...

Page 11: ...y and recall them at the push of a button Preset tuning Note The backup function protects the memorized stations for a few hours should there be a power failure or the AC power cord becomes disconnected Press the PRESET or button for less than 0 5 seconds to select the desired station The stations saved in the memory can be scanned automatically Preset memory scan Advanced USB playback Listening t...

Page 12: ...r button once to advance the time by 1 hour Hold it down to advance continuously 6 To adjust the minutes press the or button and then press the ENTER button Press the or button once to advance the time by 1 minute Hold it down to advance the time by 5 minutes interval 1 Clear all the programmed contents Refer to Factory reset clearing all memory on page 14 for details 2 Perform Setting the clock f...

Page 13: ...perates at the same time every selected day It will continue until the daily timer setting is canceled Cancel the daily timer when it is not in use 1 Turn the power on and press and hold down the CLOCK TIMER button 2 Within 10 seconds press the or button to select Once or Daily and press the ENTER button 3 Within 10 seconds press the or button to select Timer Call and press the ENTER button 1 Turn...

Page 14: ... sound is heard Is the volume level set to Min Are the headphones connected CD player Symptom Possible cause Playback does not start Playback stops in the middle or is not performed properly Is the disc loaded face down Does the disc satisfy the standards Is the disc distorted or scratched Playback sounds are skipped or stopped in the middle of a track Is the unit located near excessive vibrations...

Page 15: ... away from direct sunlight heat and excessive moisture Always hold the CDs by the edges Fingerprints dirt or water on the CDs can cause noise or mistracking If a CD is dirty or does not play properly clean it with a soft dry cloth wiping straight out from the centre along the radius Troubleshooting chart continued Wi Fi connection Symptom Possible cause Wi Fi network connection failed Is your rout...

Page 16: ...ifier Output power RMS Total 50 W 25 W per channel into 6 ohms at 1 kHz 10 T H D FTC 22 W minimum RMS per channel into 6 ohms from 100 Hz to 20 kHz 10 T H D Output terminals Headphones 16 ohms recommended 32 ohms Input terminals Audio In audio signal 500 mV 47 k ohms CD player Type Single disc multi play compact disc player Signal readout Non contact 3 beam semiconductor laser pickup D A converter...

Reviews: