background image


04/1/28

DKCL6N_EN


8


General control 


Press the ON/STAND-BY button to turn the power on.

Press the SNOOZE/DIMMER button to adjust the brightness of LCD
display.

If you turn off and on the main unit with the volume set to 17 or 
higher, the volume starts at 16 and fades in to the last set level.

When the EQUALIZER/-PROG button is pressed, the current mode
setting will be displayed. To change to a different mode, press the
EQUALIZER/-PROG button repeatedly until the desired sound
mode appears.

Note:

The backup function will protect the memorized function mode for a
few days should there be a power failure or the AC power cord
becomes disconnected.


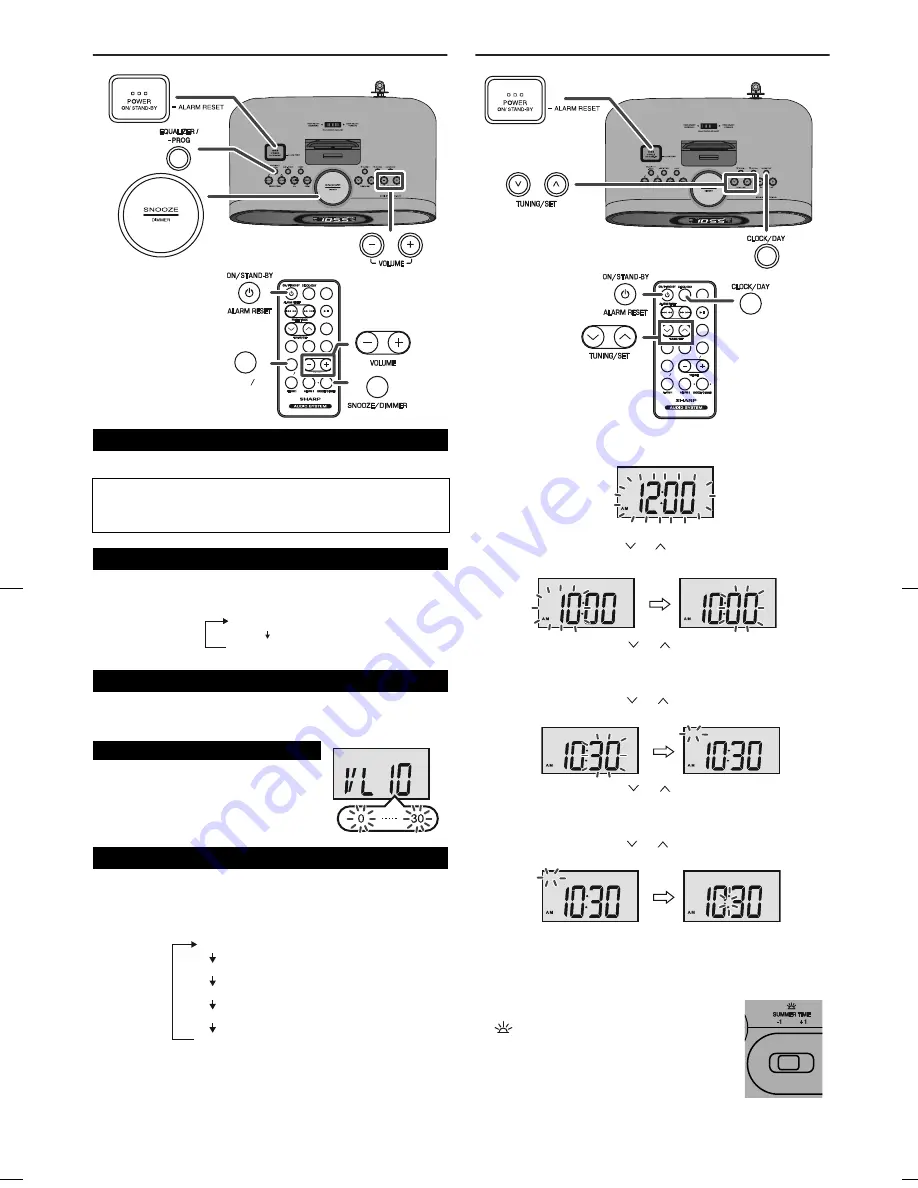
Setting the clock and day


Summer Time:


The Summer Time switch is located on the rear of the unit.


To turn the power on


After use:


Press the ON/STAND-BY button to enter the power stand-by
mode. The STAND-BY indicator will turn on.


Display brightness control (DIMMER)


Display bright

Display dim


Volume auto fade-in


Volume control


Main unit and remote control operation:


Press the VOLUME (+ or –) button to
increase or decrease the volume.


Equalizer

SLEEP

SLEEP

MENU

MENU

ENTER

ENTER

BAND

BAND

RADIO

RADIO

iPod

iPod

AUX   -TV OUT

AUX   -TV OUT

EQUALIZER

EQUALIZER


-PROG

-PROG

EQUALIZER

EQUALIZER


-PROG

-PROG

FLAT

ROCK

CLASS

POP

JAZZ

No equalization.

For rock music.

For classical music.

For pop music.

For jazz music.


1


Press the CLOCK/DAY button for more than 2 seconds. The
clock time display will flashing.


2


Press the TUNING/SET (

 or 

) button to adjust the hour and

then press the CLOCK/DAY button.

Press the TUNING/SET (

 or 

) button once to advance the

time by 1 hour. Hold it down to advance continuously.
“AM” or “PM” indicator will interchange after each 12 hour cyclic.


3


Press the TUNING/SET (

 or 

) button to adjust the minutes

and then press the CLOCK/DAY button.

Press the TUNING/SET (

 or 

) button once to advance the

time by 1 minute. Hold it down to change the time in 5-minutes
interval.


4


Press the TUNING/SET (

 or 

) button to adjust the day and

then press the CLOCK/DAY button.

Two beeps will indicate clock and day setting is complete.


1


Slide the Summer Time switch to +1 to
advance the time 1 hour.

 indicator will appear.


2


Slide the Summer Time switch to -1 to turn the
clock back 1 hour.

SLEEP

SLEEP

MENU

MENU

ENTER

ENTER

BAND

BAND

RADIO

RADIO

iPod

iPod

AUX   -TV OUT

AUX   -TV OUT

EQUALIZER

EQUALIZER


-PROG

-PROG

MON

THU

MON

Summary of Contents for DK-CL66N

Page 1: ...BACKWARD DOCK ADJU ST DOCK ADJU ST FO RWARD FO RWARD iPod DOCK ADJUST iPod DOCK ADJUST S N O O Z E D I M M E R D I M M E R B A N D B A N D P O W E R P O W E R O N S T A N D B Y O N S T A N D B Y V O L U M E V O L U M E SLEEP SLEEP MENU MENU ENTER ENTER BAND BAND RADIO RADIO iPod iPod AUX TV OUT AUX TV OUT EQUALIZER EQUALIZER PROG PROG iPod is a registered trademark of Apple Inc registered in the U...

Page 2: ... exit from the apparatus 11 Only use attachments accessories specified by the manufacturer 12 Use only with the cart stand tripod bracket or table specified by the manufacturer or sold with the apparatus When a cart is used use caution when moving the cart apparatus combination to avoid injury from tip over 13 Unplug this apparatus during lightning storms or when unused for long periods of time 14 R...

Page 3: ...cted to the product be sure the antenna or cable system is grounded so as to provide some protection against voltage surges and built up static charges Article810 of the National Electrical Code ANSI NFPA 70 provides information with regards to proper grounding of the mast and supporting structure grounding of the lead in wire to an antenna discharge unit connection to grounding electrodes and req...

Page 4: ...Up Button 8 General Please ensure that the equipment is positioned in a well ventilated area and ensure that there is at least 4 10 cm of free space along the sides top and back of the equipment Use the unit on a firm level surface free from vibration Keep the unit away from direct sunlight strong magnetic fields excessive dust humidity and electronic electrical equipment home computers facsimiles...

Page 5: ...and Down Buttons 10 4 Tuning Set Up and Down Buttons 8 10 11 5 Menu Button 8 10 11 6 Equalizer Program Button 8 10 11 7 Alarm 1 Button 10 13 8 Clock Day Button 8 9 Sleep Button 8 10 10 iPod Play Pause Button 10 11 Radio Band Button 10 12 Enter Button 10 13 Auxiliary TV Out Button 8 11 14 Volume Up and Down Buttons 8 15 Snooze Dimmer Button 8 12 16 Alarm 2 Button 10 13 2 1 3 4 5 6 7 8 9 10 Display ...

Page 6: ...t iPod unit to either NTSC or PAL to match your TV signal Please visit Apple s home page for further information Customer should also refer iPod operation manual before making video out setting Notes Unplug the AC DC adaptor from the AC outlet if the unit will not be used for a prolonged period of time Connecting the AC DC adaptor to the unit disconnects the batteries Use only the supplied AC DC a...

Page 7: ...ed Replace only with the same or equivalent type Batteries battery pack or battery installed shall not be exposed to excessive heat such as sunshine fire or the like Installing the battery incorrectly may cause the unit to malfunction Notes concerning use Replace the battery if the operating distance is reduced or if the operation becomes erratic Purchase CR 2032 3 V coin lithium battery Periodica...

Page 8: ...Equalizer SLEEP SLEEP MENU MENU ENTER ENTER BAND BAND RADIO RADIO iPod iPod AUX TV OUT AUX TV OUT EQUALIZER EQUALIZER PROG PROG EQUALIZER EQUALIZER PROG PROG FLAT ROCK CLASS POP JAZZ No equalization For rock music For classical music For pop music For jazz music 1 Press the CLOCK DAY button for more than 2 seconds The clock time display will flashing 2 Press the TUNING SET or button to adjust the ...

Page 9: ...Pod that does not have an iPod 30 Pin connector you can use an audio cable to connect it to the AUX IN jack iPhone is not supported by this system Auto power on function When you press any of the following buttons the unit turns on in iPod function and playback the last track button on the main unit or remote control DK CL6N only 1 Turn the iPod dock adjuster dial to move slide door backwards unti...

Page 10: ...ause Press in the playback mode Track up down Press in the playback or pause mode If you press the button in the pause mode press the button to start the desired track Fast forward reverse Press and hold down in the playback mode Release the button to resume playback AUX TV OUT Aux function Press for more than 2 seconds to toggle the video out display between iPod or TV Menu ____ Press to view the...

Page 11: ...onds on the main unit or remote control DK CL6N only to enter the preset tuning saving mode 3 Within 1 minute press the or button to select the preset channel number Store the stations in memory in order starting with preset channel 1 4 Within 1 minute press the EQUALIZER PROG button on remote control to store that station in memory If the preset number indicators disappear before the station is m...

Page 12: ...times and source 2 Within 2 seconds press again to activate or deactivate the alarm function 1 beep sound will indicate the alarm is activated or deactivated When activate the alarm setting time wake up source and alarm icon 1 or 2 appear on display Snooze function Sleep operation 1 Playback the desired sound source 2 Press the SLEEP button on the main unit or remote control DK CL6N only to select...

Page 13: ...to turn the power on 3 Press the AUX TV OUT button on main unit or remote control DK CL6N only 4 Play the connected equipment Headphones Audio cable Fixed to main unit To the line output jack Computer Portable audio player General Symptom Possible cause The clock is not set to the correct time Is the Summer Time switch set to the correct setting Refer to page 8 Did a power failure occur Reset the ...

Page 14: ...nit with iPod left docked might damage both the unit and the iPod Maintenance Periodically wipe the unit with a clean soft cloth Caution Do not use chemicals for cleaning gasoline paint thinner etc It may damage the unit finishing Do not apply oil to the inside of the unit It may cause malfunctions Specifications As part of our policy of continuous improvement SHARP reserves the right to make desi...

Page 15: ...MEMO ...

Page 16: ...be the sole and exclusive remedy available to the purchaser Correction of defects in the manner and for the period of time described herein shall constitute complete fulfillment of all liabilities and responsibilities of Sharp to the purchaser with respect to the Product and shall constitute full satisfaction of all claims whether based on contract negligence strict liability or otherwise In no ev...

Reviews: