background image

9

XL-MP2H

Preparation for Use

„

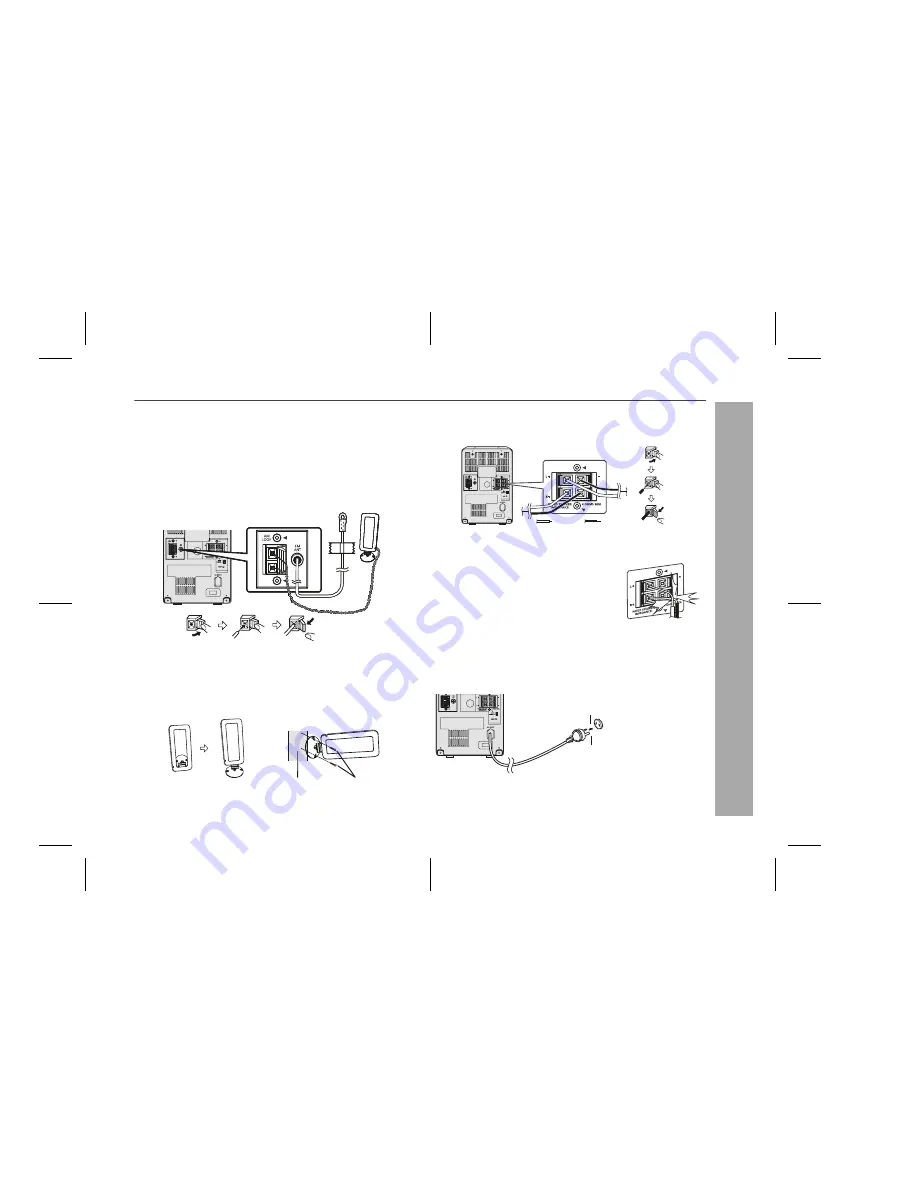
Aerial connection

Attached FM aerial:

Position the FM aerial wire in the direction where the strongest signal
can be received.

Supplied AM loop aerial:

Connect the AM loop aerial to the AM loop aerial socket. Position the
AM loop aerial for optimum reception. Place the AM loop aerial on a
shelf, etc., or attach it to a stand or a wall with screws (not supplied).

Note:

Placing the aerial on the unit or near the AC power lead may cause
noise pickup. Place the aerial away from the unit for better reception.

Installing the AM loop aerial:

„

Speaker connection

Connect the black wire to the minus (-) terminal, and the red wire to
the plus (+) terminal.

Caution:

„

AC power connection

After checking all the connections have been made correctly, plug
the AC power lead of this unit into the wall socket.

Note:

z

Unplug the AC power lead from the wall socket if the unit will not
be in use for a prolonged period of time.

< Assembling >

< Attaching to the wall >


Wall   Screws (not supplied)

z

Use speakers with an impedance of 4 ohms or more, as lower 
impedance speakers can damage the unit.

z

Do not mistake the right and the left 
channels. The right speaker is the one on the 
right side when you face the unit.

z

Do not let the bare speaker wires touch 
each other.

z

Do not allow any objects to fall into or to be 
placed in the bass reflex ducts.

z

Do not stand or sit on the speakers. You may 
be injured.

Black

Red

Incorrect

Wall socket
(AC 220 - 240V, 50/60 Hz)

Summary of Contents for CP-MP2H

Page 1: ... obtain the best performance from this product please read this manual carefully It will guide you in operating your SHARP product MICRO COMPONENT SYSTEM XL MP2H Micro Component System consisting of XL MP2H main unit and CP MP2H speaker system MODEL OPERATION MANUAL XL MP2H ...

Page 2: ... broadcasting of copyright materials and nothing in this OPERATION MANUAL should be implied as giv ing that authority For other countries Audio visual material may consist of copyrighted works which must not be recorded without the authority of the owner of the copyright Please refer to the relevant laws in your country CAUTION This product is classified as a CLASS 1 LASER product Use of controls ...

Page 3: ... technology licensed from Fraunhofer IIS and Thomson Accessories Please confirm that the following accessories are included Note Only the above accessories are included Contents Page General Information Precautions 4 Controls and indicators 5 7 Preparation for Use System connections 8 9 Remote control 10 Basic Operation General control 11 Setting the clock 12 CD or MP3 WMA disc Playback Listening ...

Page 4: ... to the environmental aspects of battery disposal The apparatus is designed for use in moderate climate This unit should only be used within the range of 5 C 35 C 41 F 95 F Warnings The voltage used must be the same as that specified on this unit Using this product with a higher voltage other than that which is specified is dangerous and may result in a fire or other type of ac cident causing dama...

Page 5: ... 13 12 Tuner Band Button 21 13 Tape Button 22 14 Stop Button 23 15 Disc Track Up or Fast Forward Tuner Preset Up Time Up Button 12 17 21 26 16 Equaliser Button 11 17 Extra Bass Button 11 18 Disc Track Down or Fast Reverse Tuner Preset Down Time Down Button 12 17 21 26 19 Volume Control 11 20 Cassette Compartment 22 21 Tape Record Button 24 22 Tape Play Button 23 24 23 Tape Rewind Button 23 24 Tape...

Page 6: ...27 12 Sleep Indicator 28 13 Equaliser ROCK CLASSIC POPS JAZZ Indicator 11 14 Extra Bass Indicator 11 15 FM Stereo Mode Indicator 21 16 FM Stereo Receiving Indicator 21 Rear panel Reference page 1 AM Loop Aerial Sockets 9 2 FM Aerial Wire 9 3 Speaker Terminals 9 4 Beat Cancel Switch 25 5 Reset Button 30 6 AC Input Socket 9 Speaker system MEMORY SLEEP TRACK ROCK CLASSIC POPS JAZZ X BASS ST WMA MP3 k...

Page 7: ...er Preset Down Time Down Button 12 17 21 26 6 Tuning Down Folder Down Button 21 7 Tuning Up Folder Up Button 21 8 Disc Direct Search Buttons 13 15 9 Sleep Button 28 10 Clock Timer Button 12 26 11 Tuner Band Button 21 12 Disc Stop Button 13 13 Tape Button 22 14 Random Button 16 15 Memory Disp Button 17 21 26 16 Volume Up and Down Buttons 11 17 Repeat Button 16 18 Extra Bass Button 11 19 Equaliser B...

Page 8: ...NA FM 75 OHMS AM GND Left speaker Right speaker Speaker connection see page 9 AM loop aerial FM aerial Make sure to unplug the AC power lead before any connections Aerial connection see page 9 AC power connection see page 9 Wall socket AC 220 240V 50 60 Hz ...

Page 9: ...l and the red wire to the plus terminal Caution AC power connection After checking all the connections have been made correctly plug the AC power lead of this unit into the wall socket Note z Unplug the AC power lead from the wall socket if the unit will not be in use for a prolonged period of time Assembling Attaching to the wall Wall Screws not supplied z Use speakers with an impedance of 4 ohms...

Page 10: ...eries UM 4 R03 HP 16 or similar Periodically clean the transmitter on the remote control and the sensor on the unit with a soft cloth Exposing the sensor on the unit to strong light may interfere with operation Change the lighting or the direction of the unit if this occurs Keep the remote control away from moisture heat shock and vibrations Test of the remote control After installing the unit see...

Page 11: ...lume will increase When it is turned anti clockwise the volume will decrease Remote control operation Press the VOLUME or button to increase or decrease the volume Equaliser When the EQUALIZER button on the main unit or remote control is pressed the current mode setting will be displayed To change to a different mode press the EQUALIZER button repeatedly until the desired sound mode appears X BASS...

Page 12: ... 0 00 or time will flash when the AC power supply is restored after a power failure or unplugging the unit or when reset button is pressed Readjust the clock as follows To readjust the clock Perform Setting the clock from beginning 1 In STAND BY condition 2 Press the CLOCK TIMER button for more than 2 seconds 3 Within 10 seconds press the PRESET or button to set hour 4 Press the CLOCK TIMER button...

Page 13: ...cant compression from the original audio source with very little loss in sound quality The MP3 track indicator will light up when an MP3 track is read This system supports MPEG 1 Layer 3 and VBR files During VBR file playback time counter in the display may differ from its actual playback time Bitrate which is supported by MP3 is 32 320 kbps WMA WMA files are ASF Advanced System Format audio files...

Page 14: ...e display Keep foreign objects out of the disc compartment Subjecting the unit to shock or vibration may cause mistracking When the unit is not being used be sure to close the disc com partment If it is left open the lens may be covered with dust and the unit may not operate properly If TV or radio interference occurs during disc operation move the unit away from the source of the interference 1 P...

Page 15: ...rch buttons on the remote control to select the desired track whilst playing or in the stop mode Selected track number The direct search buttons allow you to select up to number 9 When selecting number 10 or higher use the 10 button A For example to choose 13 1 Press the 10 button once 2 Press the 1 button 3 Press the 3 button B For example to choose 130 1 Press the 10 button twice 2 Press the 1 b...

Page 16: ...32 44 1 48kHz MPEG 2 Audio Layer 3 MPEG 2 5 Audio Layer 3 and MP1 MP2 format are not supported Playback order for MP3 files may differ sometimes depending on the writing software used during file download Bitrate which is supported by MP3 is 32 320 kbps WMA is 64 160 kbps For MP3 WMA files please put MP3 WMA extension Files cannot be played back if there is no MP3 WMA extension Playlists are not s...

Page 17: ... stand by mode or change the function from CD to another During the programme operation press the RANDOM button will automatically cancelled the programme 1 Whilst in the stop mode press the MEMORY DISP button to enter the programming save mode 2 Press the direct search buttons on the remote control to select the desired tracks You can also select a track by pressing the or button 3 Press the MEMO...

Page 18: ...ogramme operation press the RANDOM button will automatically cancelled the programme 1 Whilst in the stop mode press the MEMORY DISP button to enter the programming save mode 2 Press the TUNING FOLDER or button on the remote control to select the desired folder You can also select a folder by pressing the TUNING FOLDER or button on the main unit Then press the or button on the remote con trol to s...

Page 19: ...r if MP3 WMA format files are recorded as below figure The folder and file order information which is recorded on the disc depends on the writing software There maybe possibilities that this unit will playback the files not according to our expected playback order All the files inside the selected folder will be played back In case Folder D is selected file 4 5 and 6 will be played back File 7 and...

Page 20: ...ck in the folder mode press the TUNING FOLDER or button and the desired folder can be select ed even though it is in playback mode It will continue playback mode in the 1st track of the selected folder Total number of folders Total number of tracks WMA MP3 FOLDER FOLDER indicator MP3 indicator WMA indicator FOLDER number Track number WMA MP3 FOLDER FOLDER indicator 3 Select desired track to be pla...

Page 21: ...al and the sound becomes clearer Note This product can receive FM stereo FM monaural and AM monaural broadcasts AM stereo broadcasts will not be played in stereo 1 Press the ON STAND BY button to turn the power on 2 Press the TUNER BAND button to select the desired fre quency band FM or AM 3 Press the TUNING FOLDER or button to tune into the desired station Manual tuning Press the TUNING FOLDER or...

Page 22: ... s on the remote control can be used to pre set the station In this example press 9 after the step 2 above 4 Press the MEMORY DISP button In this example 103 25 MHz FM station is preset on FM channel 9 5 Repeat steps above to add more preset stations When presetting a new station the previous preset station is cleared 1 Press the TUNER BAND button to select FM or AM 2 Press the PRESET or button to...

Page 23: ...he fast forward or re wind operations are in progress The REWIND or F FWD button will not be released when the tape end is reached Once this occur press the STOP EJECT button Before changing from one tape operation to another press the STOP EJECT button 1 Press the ON STAND BY button to turn the power on 2 Press the TAPE button to select TAPE function TAPE appears 3 Press the STOP EJECT button to ...

Page 24: ...ovable tabs that prevent accidental recording or erasing To protect the recorded sound remove the tab after recording Cover the tab hole with adhesive tape to record on the tape with out the tab Side A Tab for side B Tab for side A 1 Press the ON STAND BY button to turn the power on 2 Load a blank cassette 3 Select CD function 4 Load the disc to be recorded Select the track number if required For ...

Page 25: ...ding on AM station move the AM loop aerial Erasing recorded tapes 1 Tune in to the desired station See page 21 2 Load a blank cassette 3 Press the RECORD button to start recording 4 Press the STOP EJECT button to stop recording 1 Load the tape to be erased into the cassette compartment with the side to be erased facing towards you 2 Press the TAPE button until TAPE appears on the dis play When ope...

Page 26: ...LOCK TIMER button 4 Press the PRESET or button to set hour then press the CLOCK TIMER button 5 Press the PRESET or button to set minute and then press the CLOCK TIMER button 6 Switch input with the PRESET or button to select TMR OFF and then press the CLOCK TIMER button 7 Press the PRESET or button to set hour and then press the CLOCK TIMER button 8 Press the PRESET or button to set minute and the...

Page 27: ...e TUNER BAND button and then press the CLOCK TIMER button 12 Select the band by pressing the PRESET or button and then press the CLOCK TIMER button to set the sta tion selected OR OR 13 To select a preset channel number press the PRESET or button and then press the CLOCK TIMER button 14 Press the SLEEP button for more than 2 seconds to activate timer function The TIMER indicator lights up and the ...

Page 28: ...o select the time Maximum 90 minutes Minimum 10 minutes 3 Release the SLEEP button SLEEP will appear 4 The unit will enter the power stand by mode automatically after the preset time has elapsed SLEEP SLEEP MHz 1 Whilst SLEEP is indicated press the SLEEP button z The remaining sleep time is displayed for about 10 seconds z You can change the remaining sleep time whilst it is displayed by pressing ...

Page 29: ...eral CD player Symptom Possible cause The clock is not set to the correct time Did a power failure occur Reset the clock Refer to page 12 When a button is pressed the unit does not respond Set the unit to the power stand by mode and then turn it back on If the unit still malfunctions reset it Refer to page 30 No sound is heard Is the volume level set to 0 Are the headphones connected Are the speak...

Page 30: ...ossible about 1 hour Wipe off any condensation on the transmitter with a soft cloth before operating the unit Clearing all the memory reset 1 Press the ON STAND BY button to enter the power standby mode 2 Push the RESET switch Caution This operation will erase all data stored in memory including clock timer setting tuner preset and CD programme Symptom Possible cause The radio makes unusual noises...

Page 31: ...e jams Clean these parts with a cotton swab moistened with com mercial head pinch roller cleaner or isopropyl alcohol When cleaning the head pinch roller etc unplug the unit which contains high voltages After long use the deck s head and capstan may become magne tised causing poor sound Demagnetise these parts once every 30 hours of playing recording time by using a commercial tape head demagnetis...

Page 32: ...ensions Width 138 mm 5 7 16 Height 212 mm 8 11 32 Depth 218 mm 8 19 32 Weight 2 6 kg 5 6 lbs Output power PMPO 26 W total MPO 13 W 6 5 W 6 5 W 10 T H D RMS 10 W 5 W 5 W 10 T H D Output terminals Speakers 4 ohms Headphones 16 50 ohms recommended 32 ohms Frequency range FM 87 5 108 0 MHz AM 522 1 620 kHz Type Compact disc player Signal readout Non contact 3 beam semiconductor laser pickup D A conver...

Page 33: ...MEMO MEMO 11 16 05 4 41 PM 1 ...

Page 34: ...MEMO MEMO 11 16 05 4 41 PM 2 ...

Page 35: ...AUSTRALIA PTY LTD LOCAL CALL COST APPLY WITHIN AUSTRALIA FOR LOCATION ENQUIRIES WITHIN NEW ZEALAND REGARDING YOUR LOCAL SHARP CORPORATION OF NEW ZEALAND LIMITED VISIT OUR WEBSITE AT SHARP CUSTOMER SERVICES TELEPHONE 09 573 0111 FACSIMILE 09 573 0113 SHARP APPROVED SERVICE CENTRE www sharp net nz CONTACT YOUR SELLING DEALER RETAILER OR CALL SPform019 JUNE 2004 XL_MP2H Back 8 11 06 5 23 PM 1 ...

Page 36: ...d in no way limits varies or excludes any express and implied rights and remedies under any relevant legislation in the country of sale For your reference please enter the particulars of your purchase below and retain with your purchase documentation Model No Serial No Date of Purchase Retailer IMPORTANT NOTICE This warranty applies only to products sold in Australia New Zealand SHARP CORPORATION ...

Reviews: