background image

E-20

ENGLISH

8

CD-MPX880H

CD or MP3/WMA disc Playback


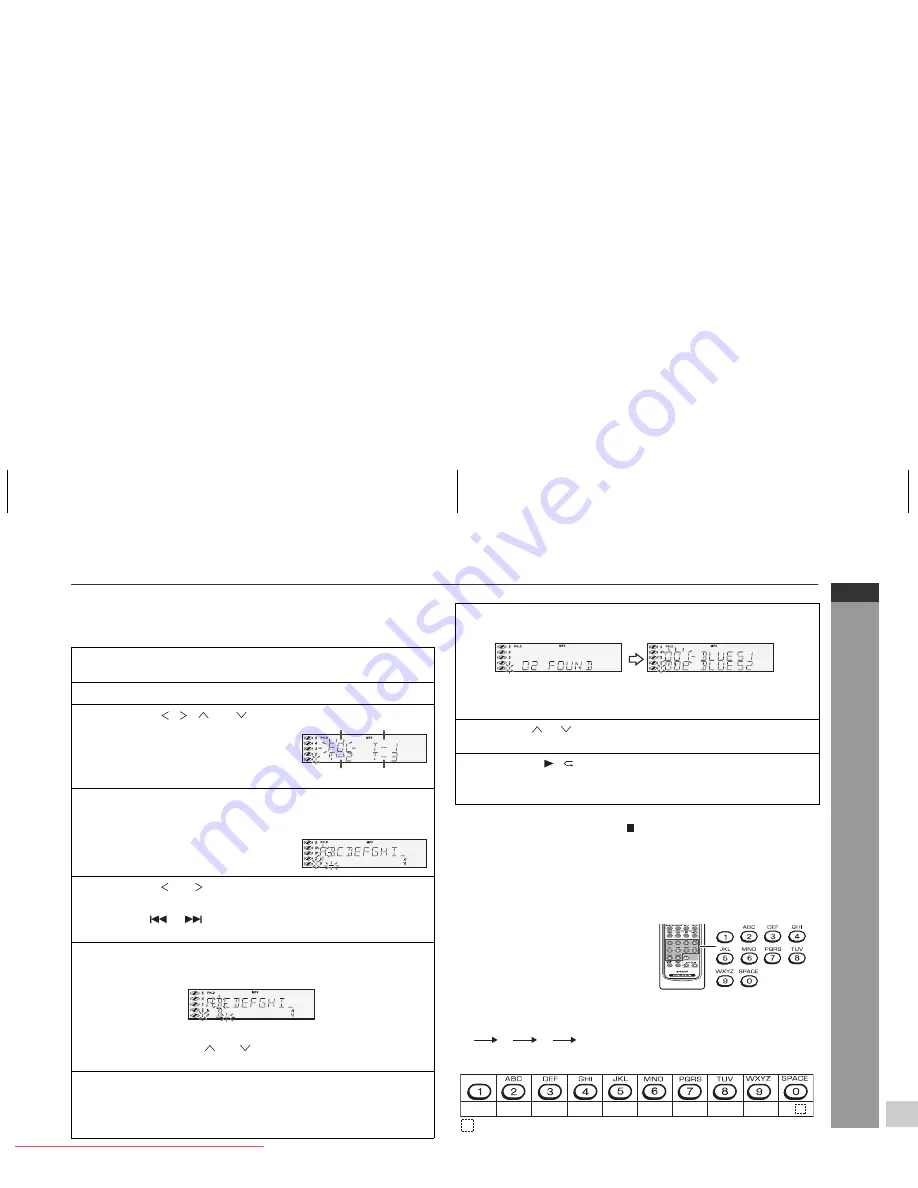
Character search (for folder or title 1/2/3)

By entering a name, you can search files by folder or title 1/2/3 within
one MP3/WMA disc.

To exit the MP3/WMA navigation mode:

In the stop mode, press the CD   button.

Notes:

The unit searches regardless of the case, and names found will
appear in uppercase.
Some symbols do not appear properly.

Character entry with direct buttons:

For example, press “2” four times to enter “C”.

1

Perform steps 1 - 3 in “File search (by folder or title 1/2/3)”
on page 19.

2

Press the NAVIGATION button.

3

Press the  ,  ,   or   cursor
button on the remote control to
select “FOL”, “T-1”, “T-2” or “T-3”.
To search files by folder name,
select “FOL” (will flash).

4

Press the CHARACTER button for 2 seconds.

The display will be ready for editing characters.

1st row: String table

2nd row: Input editor (8 digits)

5

Press the   or   cursor button to select the desired
alphabet.

Press the 

 or 

 button to go to the next page of character

display.

6

Press the CHARACTER button and the active character will
be entered in the 2nd row of the display.

To delete an entered character, move the cursor to the
character with the   or   button and press the CLEAR/
DIMMER button on the remote control.

7

Repeat steps 5 and 6 to enter characters.

In the folder (or title) name search, you do not have to enter the
full name. The unit searches for names beginning with the
entered characters.

Folder

Title 1

Title 2 Title 3

8

  When finished, press the ENTER button. The unit searches  
  for the same name within folders (or titles).

If the search word is not in the folder (or title) name, “NOT
FOUND” appears and the menu returns.

9

  Use the   or   cursor button to scroll and select a folder 
  (or title).

10

  Press the   /   button to start playback.

All files in the selected folder (or title) are played, and the
previous display returns.

The direct buttons on the remote
control can also be used for
character entry.
In step 5 on the left, use buttons 0 - 
9 to enter alphabets.
Alphabet types change as you
press a button.

2

A

B

C

1

2 ABC

3 DEF

4 GHI

5 JKL

6 MNO 7 PQRS 8 TUV 9 WXYZ

0     

: Indicates a space.

Characters:

Downloaded from 

www.Manualslib.com


manuals search engine


Downloaded From Disc-Player.com Sharp Manuals

Summary of Contents for cd-mpx880

Page 1: ...880H Mini Component Systeem bestaande uit CD MPX880H hoofdunit en CP MPX880H luidsprekersysteem CD MPX880H Mini Component System consistindo de CD MPX880H unidade principal e CP MPX880H sistema de alto falante CD MPX880H Mini Component System consisting of CD MPX880H main unit and CP MPX880H speaker system Siehe Seiten i bis viii und D 1 bis D 42 Se reporter aux pages i à viii et F 1 à F 42 Consul...

Page 2: ...ndo no se use el aparato durante un largo período de tiempo När ON STAND BY knappen är i läge STAND BY finns nätspänning i apparaten Med ON STAND BY knappen i läge STAND BY kan apparaten startas med timerfunktion eller fjärrkontrollen Varning Apparaten innehåller inga delar som kan åtgärdas av kunden Höljet får endast öppnas av kvalificerad personal Apparaten innehåller farliga spänningar Stickkon...

Page 3: ...ug i laengere tid DENNA APPARAT ÄR ANSLUTEN TILL 230 V VÄXELSTRÖM NÄR STICKPROPPEN ÄR INSKJUTEN I VÄGGUTTAGET FÖR ATT FULLSTÄNDIGT KOPPLA IFRÅN APPARATEN V G DRAG UT STICKPROPPEN Audio visuelles Material kann Urheberrechte umfassen die ohne Genehmigung des Eigentümers dieser Urheberrechte nicht aufgenommen werden dürfen Siehe die entsprechenden nationalen Gesetze Le matériel audio visuel peut comp...

Page 4: ...possessore eggi in vigore sul beschermd door orden opgenomen hthouder Zie voor n in het land van balhos de direitos m autorização do s leis vigentes em ghted works which of the owner of the our country Downloaded From Disc Player com Sharp Manuals ...

Page 5: ...iv 18 3 08 880h_COM fm CD MPX880H Downloaded From Disc Player com Sharp Manuals ...

Page 6: ...lateurs veuillez les mettre séparément et préalablement au rebut conformément à la législation locale en vigueur En veillant à la mise au rebut correcte de ce produit vous contribuerez à assurer le traitement la récupération et le recyclage nécessaires de ces déchets et préviendrez ainsi les effets néfastes potentiels de leur mauvaise gestion sur l environnement et la santé humaine 2 Pays hors de ...

Page 7: ...ny liknande enhet Kontakta kommunen för vidare information Om utrustningen innehåller batterier eller ackumulatorer ska dessa först avlägsnas och hanteras separat i enlighet med gällande miljöföreskrifter Genom att hantera produkten i enlighet med dessa föreskrifter kommer den att tas om hand och återvinnas på tillämpligt sätt vilket förhindrar potentiella negativa hälso och miljöeffekter 2 Länder...

Page 8: ...uur batterijen of accumulatoren bevat dan moet u deze afzonderlijk conform de plaatselijke voorschriften weggooien Door dit product op een verantwoorde manier weg te gooien zorgt u ervoor dat het afval de juiste verwerking terugwinning en recycling ondergaat en potentiële negatieve effecten op het milieu en de menselijke gezondheid worden voorkomen die anders zouden ontstaan door het verkeerd verw...

Page 9: ...tors please dispose of these separately beforehand according to local requirements By disposing of this product correctly you will help ensure that the waste undergoes the necessary treatment recovery and recycling and thus prevent potential negative effects on the environment and human health which could otherwise arise due to inappropriate waste handling 2 In other Countries outside the EU If yo...

Page 10: ...etails please visit http mp3licensing com MPEG Layer 3 audio coding technology licensed from Fraunhofer IIS and Thomson Accessories Please confirm that only the following accessories are included Contents Page General Information Precautions 2 Controls and indicators 3 5 Preparation for Use System connections 6 8 Remote control 9 Basic Operation General control 10 Setting the clock Remote control ...

Page 11: ...it on a firm level surface free from vibration Keep the unit away from direct sunlight strong magnetic fields excessive dust humidity and electronic electrical equipment home computers facsimiles etc which generate electrical noise In case of an electrical storm unplug the unit for safety TIMER CD 4 3 1 5 4 5 3 2 1 PHONES RECORD PLAYBACK PLAYBACK PLAY STOP 2 AUDIO IN 10 cm 4 10 cm 4 10 cm 4 10 cm ...

Page 12: ...23 24 25 34 10 Tuning Down Button 18 22 11 Tape 1 Cassette Compartment 27 12 Headphone Socket 38 13 Audio In Socket 38 14 Remote Sensor 9 15 Volume Control 10 16 CD Play or Repeat Tape Play Button 12 14 24 25 17 Disc Tray Open Close Button 12 18 Disc Number Select Buttons 12 19 CD Track Up or Fast Forward Tape 2 Fast Forward Tuner Preset Up Time Up Button 11 14 23 24 25 34 20 Tuning Up Button 18 2...

Page 13: ...tor 19 15 Daily Timer Indicator 35 16 FM Stereo Mode Indicator 22 17 FM Stereo Receiving Indicator 22 18 Tape Play Indicator 24 19 Memory Indicator 17 23 20 Extra Bass Indicator 10 21 Disc Repeat Play Indicator 16 22 Disc Pause Indicator 14 23 Disc Play Indicator 13 Rear panel Reference page 1 Cooling Fan 8 2 AC Power Lead 8 3 FM 75 Ohms Aerial Socket 7 4 AM Aerial Earth Terminal 7 5 AM Loop Aeria...

Page 14: ...ory Button 11 17 23 34 18 Disc Pause Button 14 19 Disc Play or Repeat Button 12 16 20 Tape Play Button 24 21 Tape 2 Record Pause Button 26 22 Tuning Up Cursor Up Button 18 22 23 Disc Track Up or Fast Forward Tape 2 Fast Forward Tuner Preset Up Time Up Cursor Right Button 11 14 23 25 34 24 Disc Track Down or Fast Reverse Tape 2 Rewind Tuner Preset Down Time Down Cursor Left Button 11 14 23 25 34 25...

Page 15: ...peaker FM aerial Wall socket AC 220 240 V 50 Hz Left speaker AM loop aerial AC power connection see page 8 Aerial connection see page 7 Speaker connection see page 7 Make sure to unplug the AC power lead before making any connections Downloaded From Disc Player com Sharp Manuals ...

Page 16: ... AM loop aerial Connect the AM loop aerial to the AM and GND terminals Position the AM loop aerial for optimum reception Place the AM loop aerial on a shelf etc or attach it to a stand or a wall with screws not supplied Assembling Attaching to the wall Wall Screws not supplied FM aerial AM loop aerial Use speakers with an impedance of 6 ohms or more as lower impedance speakers can damage the unit ...

Page 17: ... an external FM aerial is used disconnect the supplied FM aerial wire Cooling fan The main unit is built with a cooling fan at the rear of the unit for improved cooling Please do not cover the opening of the fan with any obstacles as this will block proper ventilation AC INPUT Wall socket AC 220 240 V 50 Hz AC INPUT The first time the unit is plugged in the unit will enter the demonstration mode Y...

Page 18: ...7 or similar Periodically clean the transmitter on the remote control and the sensor on the unit with a soft cloth Exposing the sensor on the unit to strong light may interfere with operation Change the lighting or the direction of the unit Keep the remote control away from moisture heat shock and vibrations Test of the remote control Check the remote control after checking all the connections see...

Page 19: ...DE button repeatedly until the desired sound mode appears After use Press the ON STAND BY button to enter the power stand by mode TIMER CD 4 3 1 5 4 5 3 2 1 2 VOL VOL ON STAND BY Main unit operation When the VOLUME control is turned clockwise the volume will increase When it is turned anti clockwise the volume will decrease Remote control operation Press the VOLUME or button to increase or decreas...

Page 20: ... hour or 12 hour display 1 Press the ON STAND BY button to turn the power on 2 Press the CLOCK TIMER button 3 Within 10 seconds press the or button to select CLOCK and press the MEMORY button 4 Press the or button to select 24 hour or 12 hour display and then press the MEMORY button 0 00 The 24 hour display will appear 0 00 23 59 AM 12 00 The 12 hour display will appear AM 12 00 PM 11 59 AM 0 00 T...

Page 21: ...anced System Format files that include audio files which are compressed with Windows Media Audio codec WMA is developed by Microsoft as an audio format file for Windows Media Player MP3 or WMA indicator will light up after the unit reads information on an MP3 or WMA disc Bitrate which is supported by WMA is 64 160 kbps Auto power on function When you press any of the following buttons the unit tur...

Page 22: ...R CD21 will appear on the display for 3 seconds and the unit will not function If this occurs press the ON STAND BY button to enter the power stand by mode and then turn the power on again If TV or radio interference occurs during CD operation move the unit away from the TV or radio If a disc is damaged dirty or loaded upside down the disc will skip or not play 1 Press the ON STAND BY button to tu...

Page 23: ...use Press in the playback mode Press the button to resume playback from the paused point Track up Track down Press in the playback or stop mode If you press the button in the stop mode press the button to start the desired track Fast forward Fast reverse Press and hold down in the playback mode Release the button to resume playback PRESET PRESET PRESET PRESET Track up track down is possible only w...

Page 24: ...ed press the button to start the desired track on the current disc Notes A track number higher than the number of tracks on the disc cannot be selected During random play direct search is not possible 1 Press one of the 1 5 buttons to select the desired disc Selected disc number 2 Within 5 seconds press the button on the main unit TIMER CD 4 3 1 5 4 5 3 2 1 2 Use the direct search buttons on the r...

Page 25: ...n does not allow you to move to the previous track The beginning of the track being played will be located In random play the unit will select and play tracks automatically You cannot select the order of the tracks Caution After performing repeat or random play be sure to press the CD button Otherwise the disc s will play continuously To repeat one disc Press the button twice To repeat all tracks ...

Page 26: ... to enter the stand by mode or change the function from CD to another the programmed selections will not be cleared During the programme operation random play is not possible 1 Whilst in the stop mode press the MEMORY button to enter the programming save mode 2 Press one of the 1 5 buttons to select the desired disc Selected disc number 3 Press the direct search buttons on the remote control to se...

Page 27: ...words with hyphens This product recognises the first word as title 1 second one as title 2 and third one as title 3 Up to three words can be recognised Notes MP3 files must have the extension mp3 WMA files must have the extension wma Up to 100 folders or 300 files can be read on the unit If either limit is exceeded no more folders files are displayed This unit recognises and displays up to 48 char...

Page 28: ...playback NAVI READ appears and the display shows the total number of folders and files on the selected disc 4 Press the NAVIGATION button 5 Press the or cursor button on the remote control to select FOL T 1 T 2 or T 3 To search files by folder name select FOL will flash The following steps describe file search by folder 6 Press the ENTER button The total number of folders or titles appears for 2 s...

Page 29: ...play 6 Press the CHARACTER button and the active character will be entered in the 2nd row of the display To delete an entered character move the cursor to the character with the or button and press the CLEAR DIMMER button on the remote control 7 Repeat steps 5 and 6 to enter characters In the folder or title name search you do not have to enter the full name The unit searches for names beginning w...

Page 30: ...button If you press the RANDOM button in the stop mode the MP3 WMA navigation mode will be cancelled If tracks are programmed using track numbers see Programmed play on page 17 In the MP3 WMA navigation mode only programme by folder or title name are played When you exit the mode the programme by folder or title name are cleared When you exit the MP3 WMA navigation mode programme by track number a...

Page 31: ... stereo transmission Press the TUNER BAND button to select stereo mode and ST indicator will be displayed will appear when an FM broadcast is in stereo If the FM reception is weak press the TUNER BAND button to extinguish the ST indicator The reception changes to monaural and the sound becomes clearer TIMER CD 4 3 1 5 4 5 3 2 1 PHONES RECORD PLAYBACK PLAYBACK PLAY STOP 2 AUDIO IN ON STAND BY TUNER...

Page 32: ...el 1 4 Within 30 seconds press the MEMORY button to store that station in memory If the MEMORY and preset number indicators go out before the station is memorised repeat the operation from step 2 5 Repeat steps 1 4 to set other stations or to change a preset station When a new station is stored in memory the station previously memorised for that preset channel number will be erased Press the PRESE...

Page 33: ...the cassette compartment tighten the slack with a pen or a pencil TIMER CD 4 3 1 5 4 5 3 2 1 PHONES RECORD PLAYBACK PLAYBACK PLAY STOP 2 AUDIO IN ON STAND BY 1 Press the ON STAND BY button to turn the power on 2 Open the cassette compartment by pushing the area marked 3 Load a cassette into the TAPE 1 compartment or TAPE 2 compartment with the side to be played facing towards you 4 Press the TAPE ...

Page 34: ...op mode TAPE 2 only PRESET PRESET Before recording When recording important selections make a preliminary test to ensure that the desired material is properly recorded SHARP is not liable for damage or loss of your recording arising from malfunction of this unit The volume and sound controls can be adjusted with no effect on the recorded signal Variable Sound Monitor For recording use only normal ...

Page 35: ...partment with the side to be recorded on facing you Wind past the leader of the tape on which recording cannot be performed 4 Press the button Recording will be paused 5 Press one of the 1 5 buttons to select the desired disc 6 Within 5 seconds press the button to start recording Recording is started from the selected disc When the playback of the last track is finished or the end of the tape is r...

Page 36: ...ssette compartment with the side to be recorded on facing you Wind past the leader of the tape on which recording cannot be performed 3 Press the button Recording will be paused 4 Press the TAPE button to start recording 1 Press the ON STAND BY button to turn the power on 2 Load a prerecorded cassette into the TAPE 1 cassette compartment Insert a blank tape into the TAPE 2 cassette compartment It ...

Page 37: ...ies traffic information and TA Traffic Announcement will appear whilst a traffic information is on air PTYI Dynamic PTY Indicator will appear whilst the Dynamic PTY station is received You can control the RDS by using the buttons on the remote control only Information provided by RDS Each time the RDS DISPLAY button is pressed the display will switch as follows When tuning in to a station other th...

Page 38: ... 4 5 3 2 1 PHONES RECORD PLAYBACK PLAYBACK PLAY STOP 2 AUDIO IN TUNER BAND 1 Press the TUNER BAND button to select the FM band 2 Press and hold down the RDS ASPM button on the remote control for at least 3 seconds 1 After ASPM has flashed for about 4 seconds scanning will start 87 50 108 00 MHz 2 When an RDS station is found RDS will appear for a short time and the station will be stored in memory...

Page 39: ...is faulty PS NO PS and a station name appear alternately and the unit does not operate properly If a particular station is not broadcasting properly or a station is conducting tests the RDS reception function may not work properly When you receive an RDS station whose signal is too weak information like the station name may not be displayed NO PS NO PTY or NO RT will flash for about 5 seconds and ...

Page 40: ...tton to select the FM 2 Press the RDS PTY button on the remote control SELECT and PTY TI will appear alternately for about 6 seconds 3 Within 6 seconds press the PRESET or button to select the programme type Each time the button is pressed the programme type will appear If the button is held down for more than 0 5 seconds the programme type will appear continuously 4 Whilst the selected programme ...

Page 41: ...te control to select a desired station 3 The station name will be displayed for 6 seconds Then the display will change NEWS Short accounts of facts events and publicly expressed views reportage and actuality AFFAIRS Topical programme expanding or enlarging upon the news generally in different presentation style or concept including debate or analysis INFO Programmes whose purpose is to impart advi...

Page 42: ...deas and opportunities Not for use for announcements about problems delays or roadworks affecting immediate travel where TP TA should be used LEISURE Programmes concerned with recreational activities in which the listener might participate Examples include Gardening Fishing Antique collecting Cooking Food Wine etc JAZZ Polyphonic syncopated music characterised by improvisation COUNTRY Songs which ...

Page 43: ...me only at a preset time For example if you are away but want to record a programme on a radio station Daily timer Daily timer play or daily timer recording works at the same preset time every day For example set the timer as a wake up call every morning 1 Set the daily timer pages 34 36 2 Set the once timer pages 34 36 1 minute or more Daily timer Once timer Start Start Stop Stop 1 Check that the...

Page 44: ...finish as in steps 6 and 7 above White Red 9 Switch input with the or button and then press the MEMORY button To select the timer playback source CD TUNER TAPE 1 or TAPE 2 To select the timer recording source TUNER When you select the tuner select a station by pressing the or button and then press the MEMORY button If a station has not been programmed NO PRESET will be displayed and timer setting ...

Page 45: ...utomatically however the connected unit will not turn on or off During timer playback or timer recording TIMER indicator light and timer indicator on the display r will blink To stop the blinking follow step Cancelling the timer setting in the timer stand by mode on the right hand side of this page 1 Press the CLOCK TIMER button 2 Within 10 seconds press the or button to select ONCE or DAILY and p...

Page 46: ...thin 10 seconds press the or button to select SLEEP and press the MEMORY button 4 Press the or button to select the time Maximum 3 hours Minimum 1 minute 3 hours 5 minutes 5 minute intervals 5 minutes 1 minute 1 minute intervals 5 Press the MEMORY button SLEEP will appear 6 The unit will enter the power stand by mode automatically after the preset time has elapsed The volume will be turned down 1 ...

Page 47: ...6 and 50 ohms The recommended impedance is 32 ohms Plugging in the headphones disconnects the speakers automatically Adjust the volume using the VOLUME control 1 Connect a portable audio player etc to the front AUDIO IN socket 2 Press the ON STAND BY button to turn the power on 3 Press the AUDIO IN button 4 Play the connected equipment If volume level of the connected device is too high sound dist...

Page 48: ... or stopped in the middle of a track Is the unit located near excessive vibrations Is the disc very dirty Has condensation formed inside the unit Symptom Possible cause Cannot record Is the erase prevention tab removed Cannot record tracks with proper sound quality Is it a normal tape You cannot record on a metal or CrO tape Cannot erase completely Sound skipping Is there slack in the tape Cannot ...

Page 49: ...ring all the memory reset 1 Press the ON STAND BY button to enter the power stand by mode 2 Whilst pressing down the button and the button press the CD button until CLEAR ALL appears Caution This operation will erase all data stored in memory including clock timer settings tuner preset and CD programme Before transporting the unit Remove all CDs from the unit Make sure there is no CD in the disc t...

Page 50: ...Cleaning the CD pickup lens In order to ensure proper operation of the CD player preventative maintenance cleaning of the laser pickup lens should be performed periodically Lens cleaners are commercially available Contact your local CD software dealer for options Cleaning the cabinet Periodically wipe the cabinet with a soft cloth and a diluted soap solution then with a dry cloth Caution Do not us...

Page 51: ... 4 kg 16 31 lbs Output power PMPO 880 W MPO 440 W 220 W 220 W 10 T H D RMS 280 W 140 W 140 W 10 T H D RMS 200 W 100 W 100 W 1 T H D Output terminals Front Speakers 6 ohms Headphones 16 50 ohms recommended 32 ohms Input terminals Audio In audio signal 250 mV 47 k ohms Frequency range FM 87 5 108 0 MHz AM 522 1 620 kHz Type 5 disc multi play compact disc player Signal readout Non contact 3 beam semi...

Page 52: ...03 12 17 8800_BACK fm TINSZA355AWZZ 08D R AS 1 P ELECTRONICS Europe GmbH nninstraße 3 D 20097 Hamburg Downloaded From Disc Player com Sharp Manuals ...

Page 53: ...CD MPX880H MINI COMPONENT SYSTEM U P DOWN Downloaded From Disc Player com Sharp Manuals ...

Reviews: