


AR-MS1 UNPACKING AND INSTALLATION 4-2
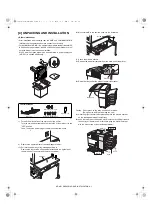
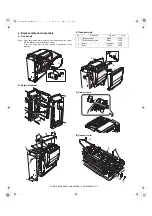
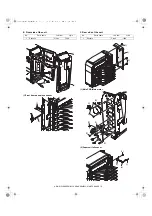
<5>Open the front cover of the mail-bin stacker and fix the stacker with
three screws A at the positions shown in the illustration.
<6>Then, close the front cover and close the paper tray of the stand/
paper drawer.
<7>Attach the mounting plates to the positions shown in the illustration
and fix them with screws A.
Caution: Insert the mounting plate under the desk frame.
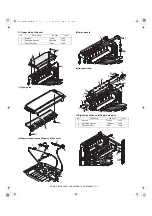
4) Attach the tray.
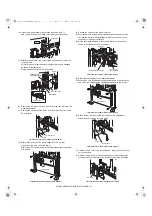
Steps 5) and after are the procedure to be carried out when a multi
purpose drawer has been installed.
If a stand/MPD & 2000 sheet paper drawer or a stand/3 x 500 sheet
paper drawer has been installed, carry out steps 8) and after.
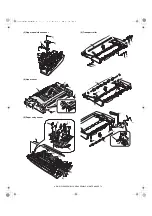
5) Process the AC inlet cover attached to the rear cabinet of the stand/
paper drawer.
<1>Remove the two screws that secure the rear cabinet and remove the
rear cabinet.
<2> Remove the screw that fixes the AC inlet cover and then remove the
AC inlet cover.
Process the AC inlet cover as shown in the illustration.
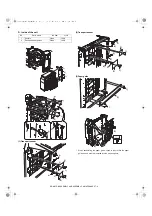
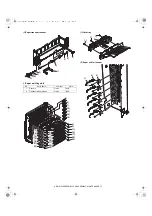
6) Attach the power supply unit.
Attach the power supply unit to the hanging portions and secure it
using the supplied three screws.
7) Connect the power supply unit harness to the PCU PWB of the main
unit of the printer.
<1>Connect the power supply unit harness to the PCU PWB of the main
unit of the printer.
Screw A
Screw A
(Front side)
Mounting plate
Screws A
(Rear side)
Desk frame
Mounting plate
Tray
Cut out.
AC inlet cover
Screw
Screw
Screw
Rear
cabinet
Optional power supply unit
Screws
Screw
Hanging portion
Hanging portion
Harness cover
Screw
* "# $%&'()


