background image

1-3

1

MAIN FEATURES

The digital multifunction copier is capable of performing a variety of functions. This page shows features related to
the copy function.

Sort mode 

 See page 1-3

Group mode 

 See page 1-3

2-sided Copy 

 See page 1-3

(When the duplex module is installed.)

Exposure Adjustments 

 See page 1-3

Reduction/Enlargement 

 See page 1-4

XY Zoom 

 See page 1-4

Margin Shift 

 See page 1-4

Erase 

 See page 1-4

Dual Page Copy 

 See page 1-4

Pamphlet Copy 

 See page 1-4

Job Build 

 See page 1-5

Tandem Copy 

 See page 1-5

Covers/inserts 

 See page 1-5

Transparency Insert 

 See page 1-5

Multi Shot 

 See page 1-5

Book Copy 

 See page 1-5

Card Shot 

 See page 1-6

Job programs 

 See page 1-6

Mirror Image 

 See page 1-6

B/W Reverse 

 See page 1-6

Date  

 See page 1-6

Stamp 

 See page 1-6

Page numbering 

 See page 1-7

Text 

 See page 1-7

Interrupting a copy run 

 See page 1-7

Offset mode 

 See page 1-7

(When the Finisher or Saddle stitch finisher is installed.)

Staple sort mode 

 See page 1-7

(When the Finisher or Saddle stitch finisher is installed.)

Saddle stitch 

 See page 1-7

(When the Saddle stitch finisher is installed.)

Hole punching 

 See page 1-8

(When the Saddle stitch finisher and Punch
Module are installed.)

Document filing function 

 See page 1-8

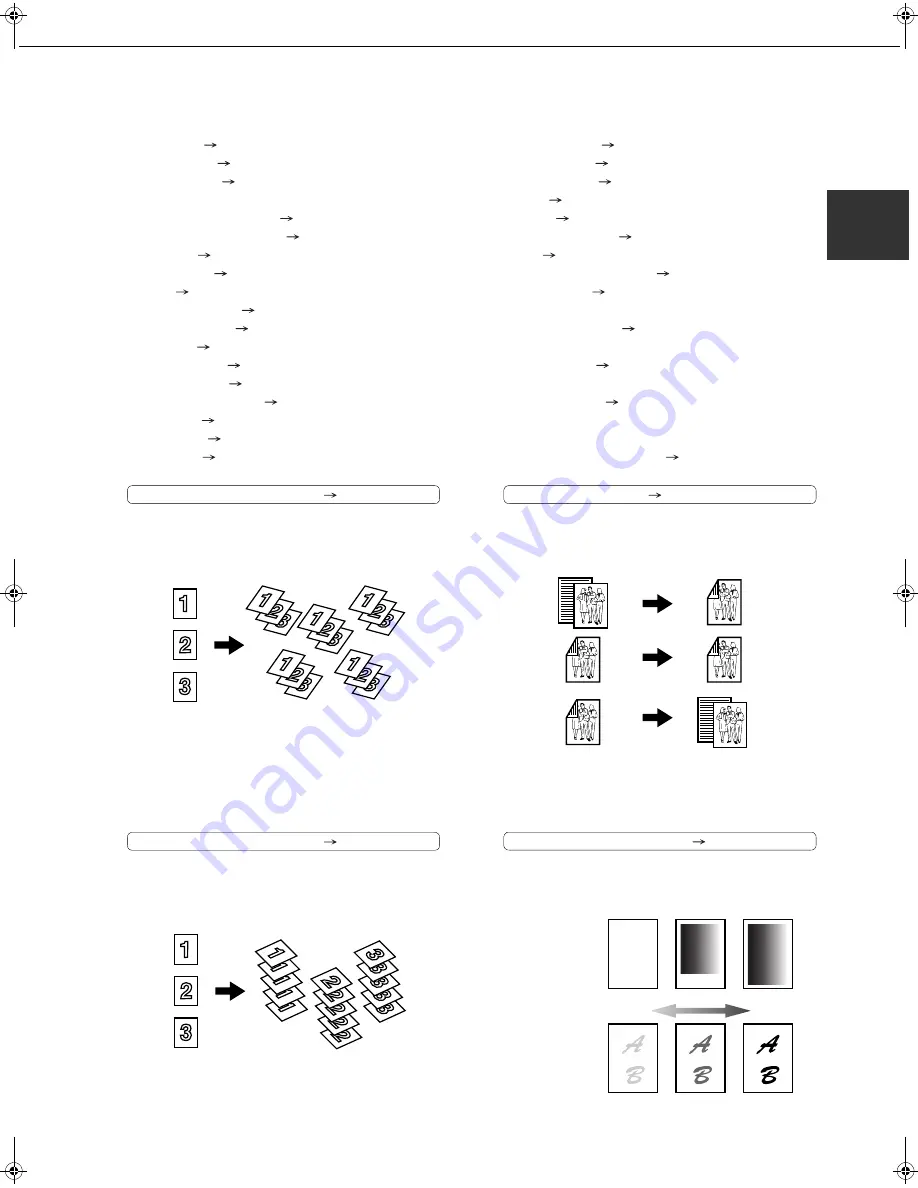
Sort mode

See page 4-9

Copies can be collated.

Group mode

See page 4-9

Copies can be grouped by page.


2-sided Copy

See pages 4-10, 4-13

Copy onto both sides of the paper using the document
glass or the automatic document feeder.

Exposure Adjustments

See page 4-14

The desired image type for the original can be
selected.

Original

Copy

Original

Copy

Original

Copy

*  When the duplex module is installed.

Exposure

Text

Text/Photo

Photo

Resolution

ABCDE

ABCDE

Darker

Lighter

Copy_EX.book  3 

ページ


2004年9月28日 火曜日 午後9時54分

Summary of Contents for AR-M351N

Page 1: ...nd copier operation MODEL AR M351N AR M451N LASER PRINTER Be sure to become thoroughly familiar with this manual to gain the maximum benefit from the product Before installing this product be sure to read the installation requirements and cautions sections Be sure to keep all operation manuals handy for reference including this manual the Operation manual for general information and copier operati...

Page 2: ...type Should the fuse need to be replaced a BSI or ASTA approved fuse to BS1362 marked or and of the same rating as the one removed from the plug must be used Always refit the fuse cover after replacing the fuse on the moulded plug Never use the plug without the fuse cover fitted In the unlikely event of the socket outlet in your home not being compatible with the plug supplied either cut off the m...

Page 3: ...Part 1 General Information ...

Page 4: ......

Page 5: ...puter install the printer driver for Windows and configure the printer driver settings Operation manual for printer This manual explains the procedures for using the machine as a printer Operation manual for network scanner This manual explains the procedures for using the machine as a network scanner when connected to a computer To use the network scanner function the AR NS3 network scanner expan...

Page 6: ...d or very dusty exposed to direct sunlight poorly ventilated subject to extreme temperature or humidity changes e g near an air conditioner or heater 4 Be sure to allow the required space around the machine for servicing and proper ventilation A small amount of ozone is produced within the machine during operation The emission level is insufficient to cause any health hazard NOTE The present recom...

Page 7: ...oney Stamps Bonds Stocks Bank drafts Checks Passports Driver s licences The part indicated in the illustration is only to be handled by a service technician Absolutely do not touch this part The machine includes the document filing function which stores document image data on the machine s hard disk Stored documents can be called up and printed or transmitted as needed If a hard disk failure occur...

Page 8: ...SER RADIATION WHEN OPEN INTERLOCKS DEFEATED AVOID EXPOSURE TO BEAM VORSICHT UNSICHTBARE LASERSTRAHLUNG WENN ABDECKUNG GEÖFFNET UND SICHERHEITSVERRIEGELUNG ÜBERBRÜCKT NICHT DEM STRAHL AUSSETZEN ADVARSEL USYNLIG LASERSTRÅLNING VED ÅBNING NÅR SIKKERHEDSBRYDERE ER UDE AF FUNKTION UNDGÅ UDSAETTELSE FOR STRÅLNING VAROITUS LAITTEEN KÄYTTÄMINEN MUULLA KUIN TÄSSÄ KÄYTTÖOHJEESSA MAINITULLA TAVALLA SAATTAA A...

Page 9: ... the paper feed area 2 20 REMOVING AN ORIGINAL MISFEED 2 22 Removing a misfed original from the automatic document feeder 2 22 TROUBLESHOOTING 2 23 CHAPTER 3 PERIPHERAL DEVICES DUPLEX MODULE 3 2 Part names 3 2 Specifications 3 2 Loading paper in the bypass tray 3 3 Troubleshooting concerning the duplex module 3 4 MAIL BIN STACKER 3 5 Part names 3 5 Specifications 3 5 Misfeed in the mail bin stacke...

Page 10: ...eaning the document glass and the automatic document feeder 6 2 Cleaning the main charger of the photoconductive drum 6 2 TROUBLESHOOTING 6 3 CHAPTER 7 DOCUMENT FILING FUNCTION OVERVIEW 7 2 Document filing function 7 2 TO USE THE DOCUMENT FILING FUNCTION 7 4 A look at the operation panel 7 4 Saving files 7 4 Main screen of document filing 7 5 Document filing icons 7 5 SAVING A DOCUMENT IMAGE FILE ...

Page 11: ...ng the product Page INTRODUCTION 1 2 MAIN FEATURES 1 3 PART NAMES AND FUNCTIONS 1 9 Exterior 1 9 Interior 1 10 Part names and functions of peripheral devices 1 11 Operation panel 1 13 Touch panel 1 14 TURNING THE POWER ON AND OFF 1 17 AUDITING MODE 1 18 Using the machine when the auditing mode is enabled 1 18 ...

Page 12: ...ows use of standard sizes in both the AB and inch systems These are shown in the tables below The meaning of R in original and paper size indications Some original and paper sizes can be placed in either the portrait or landscape orientations To differentiate between landscape and portrait the landscape orientation size indication will contain an R These are indicated as A4R B5R 8 1 2 x 11 R 5 1 2...

Page 13: ...amp See page 1 6 Page numbering See page 1 7 Text See page 1 7 Interrupting a copy run See page 1 7 Offset mode See page 1 7 When the Finisher or Saddle stitch finisher is installed Staple sort mode See page 1 7 When the Finisher or Saddle stitch finisher is installed Saddle stitch See page 1 7 When the Saddle stitch finisher is installed Hole punching See page 1 8 When the Saddle stitch finisher ...

Page 14: ...pages of a book can be successively copied onto separate sheets Pamphlet Copy See page 5 6 One sided or two sided pamphlet style copies can be made Original Enlargement Reduction Copy Original Copy Image shifted to the right Image shifted to the left Margin Margin One sided copying Original Two sided copying Original Image shifted to the right Margin Image shifted to the left Margin Or Original Co...

Page 15: ...n be automatically inserted between transparencies Multi Shot See page 5 23 Multiple original pages can be copied onto a single sheet of paper in a uniform layout Book Copy See page 5 25 Books and other bound originals can be copied pamphlet style 50 sheets 100 sheets 50 sheets 100 sets of copies 50 sets of copies 50 sets of copies Front cover Back cover Originals Insert sheets Insert sheets Origi...

Page 16: ...rogram saves you the trouble of selecting those settings each time you wish to use them Mirror Image See page 5 28 A mirror image copy can be made B W Reverse See page 5 28 White and black can be inverted on a copy to produce a negative image Date See page 5 32 The date can be added to copies Stamp See page 5 33 Reverse text can be added to copies stamp Original Example Portrait A4 8 1 2 x11 size ...

Page 17: ...3 16 Sets of copies can be automatically stapled Saddle stitch See page 3 14 When a saddle stitch finisher is installed copies can be automatically folded in half and stapled at the fold Use with the pamphlet function see page 5 6 or book copy function see page 5 25 October 2004 Meeting AUTO AUTO AUTO A4 ORIGINA EXPOSUR INTERRUPT ORIGINAL A4 Offset mode Non Offset mode When the Finisher or Saddle ...

Page 18: ...ction In this mode power is shut off to the fusing unit and the touch panel In this state more energy is saved than in the preheat mode but the time to recover to the ready condition will be longer The preset time to enter this mode can be set by a key operator program When this product is used as a printer and either of the above modes is active the mode will be deactivated automatically by an in...

Page 19: ...r output area Centre tray Finished sheets are deposited here 6 Upper exit tray extension Provides support for large size paper 7 Operation panel 8 Front cover Open to add toner 9 Power switch Press to turn power on and off 10 Paper tray 1 11 Stand 3 x 500 sheet paper drawer 12 Stand MPD 2000 sheet paper drawer See page 2 11 13 Multi purpose drawer See page 2 8 1 2 4 6 11 12 and 13 are peripheral d...

Page 20: ...has occurred in the main unit 17 Toner cartridge drum toner cartridge The toner cartridge must be replaced when indicated on the operation panel See page 2 15 18 Photoconductive drum Images are formed on the photoconductive drum 19 Cartridge lock lever When replacing the drum toner or developer cartridge turn down this lever and pull it out 14 15 16 17 18 19 CAUTION The fusing unit is hot Take car...

Page 21: ...into the mail bins 5 Stand MPD 2000 sheet paper drawer AR D28 This paper feed unit contains an upper multi purpose drawer see item 6 and a lower drawer which can hold a maximum of 2000 sheets of 80 g m2 20 lbs paper 6 Multi purpose drawer AR MU2 Up to 500 sheets of 80 g m2 20 lbs paper can be loaded Also special papers such as envelopes standard sizes only and postcards can be set 7 Stand 3 x 500 ...

Page 22: ...ibility of PostScript level 3 to the printer Facsimile expansion kit AR FX12 This kit is required to add fax function Additional fax memory 8MB AR MM9 Network scanner expansion kit AR NS3 This kit is required to add the network scanning feature Some peripheral devices cannot be installed together while others may require the installation of one or more others to be functional See page 8 4 LIST OF ...

Page 23: ...STATUS key Press to display the current job status See page 1 15 5 CUSTOM SETTINGS key This is used to store edit and delete user names and folder names for the document filing function and to configure the key operator programs and printer configuration settings See page 7 21 6 Numeric keys Use to enter numeric values for various settings 7 key ACC C key This key is used in copy mode document fil...

Page 24: ... in a setting screen at the time the screen appears the OK key can be pressed to store the selection without further operation Example 2 A function in the special functions screen is selected by touching the key so that it is highlighted To cancel the selection touch the highlighted key once again Example 3 A corresponding icon representing the feature will appear on the touch panel and on the mai...

Page 25: ...printed if possible until the required paper is loaded Other jobs will not be printed if the paper runs out during printing If you need to change the paper size because the specified paper size is not available touch the current job key to select it and then touch the DETAIL key described in 10 2 Mode select key This switches the job list display between JOB QUEUE and COMPLETE JOB QUEUE Shows stor...

Page 26: ... received Internet faxes cannot be cancelled or deleted 9 PRIORITY key Touch this key after selecting a stored job in this JOB QUEUE list to print the job ahead of the other jobs Note that a job in progress cannot be interrupted if it is an interrupt copy job or if it is a list print job 10 DETAIL key This shows detailed information on the selected job Files saved using the FILE and QUICK FILE fun...

Page 27: ...power switch or unplugging the power cord while the lights are blinking may damage the hard disk and cause the data being stored or received to be lost NOTES Turn both switches off and unplug the power cord if you suspect a machine failure if there is a bad thunderstorm nearby or when you are moving the machine If the fax function has been added always keep the fax power switch turned on Faxes can...

Page 28: ...is displayed Check the number in the display and touch the OK key 2 Follow the appropriate steps to perform the copy job When copying is begun the following message will appear To perform an interrupt copy job page 5 43 touch the INTERRUPT key and then enter your account number as explained in step 1 The following message will appear 3 When the copy job is finished press the key ACC C key NOTES Wh...

Page 29: ...ns multi purpose drawer 2 10 Loading paper in the stand 3 x 500 sheet paper drawer 2 10 Specifications stand 3 x 500 sheet paper drawer 2 10 Loading paper in the stand MPD 2000 sheet paper drawer 2 11 Specifications stand MPD 2000 sheet paper drawer 2 11 CUSTOM SETTINGS 2 12 General procedure for custom settings 2 12 About the settings 2 14 REPLACING THE TONER CARTRIDGE 2 15 STORAGE OF SUPPLIES 2 ...

Page 30: ...e length and width of the paper The guide plates A and B are slidable Adjust them to the paper size to be loaded while squeezing their lock levers 3 Load paper into the tray 4 Gently push tray 1 into the machine Push the tray firmly all the way into the machine 5 Set the paper size Be sure to set the paper size and paper type referring to Setting the paper type and paper size page 2 5 If this is n...

Page 31: ... be used with the automatic detection function A4 A4R B5 B5R If AUTO INCH is selected in setting the paper type and paper size page 2 5 the following paper sizes can be used with the automatic detection function 8 1 2 x 11 8 1 2 x 11 R Non standard sizes See the remarks for special paper on the next page Postcard Japanese official postcard Envelopes can only be fed from the multi purpose drawer Ap...

Page 32: ...8 1 2 x 11 thick paper ranging from 60 to 105 g m2 or 16 to 28 lbs can be used Other thick papers Index stock 176 g m2 or 65 lbs can be used Cover stock 200 to 205 g m2 or 110 lbs can be used but only for A4 8 1 2 x 11 paper in the portrait orientation For A5 or 5 1 2 x 8 1 2 paper the orientation must be landscape Transparency film labels and tracing paper Use SHARP recommended paper Do not use l...

Page 33: ...n To store or edit a user type name or set tray attributes see Programming and editing paper types on page 2 7 NOTE To automatically switch to a tray with the same size and type of paper if there is one in the event that the paper tray runs out of paper display the last screen with the key and select AUTO TRAY SWITCHING PAPER TRAY SETTINGS TA ORWARD RINT PRINTER CONDITION TRAY SETTINGS PAPER TRAY ...

Page 34: ...ing the paper type and paper size see page 2 6 AUTO INCH key Select when you have loaded an inch based size of paper AUTO AB key Select when you have loaded an AB size of paper SIZE INPUT key Select to directly enter a paper size see page 2 6 NON STANDARD SIZE checkbox Select when you have loaded a non standard size of paper see page 2 6 POST key Select this when you have loaded postcards NOTE Siz...

Page 35: ... PAPER TYPE FIXED PAPER SIDE TYPE NAME PAPER TYPE REGISTRATION No 01 USER TYPE 1 DISABLE STAPLE DISAB DISAB FIXED PAPER SIDE TYPE NAME PAPER TYPE REGISTRATION No 01 USER TYPE 1 DISABLE STAPLE DISAB DISAB FIXED PAPER SIDE Select when paper is to be loaded print side down in the tray Make sure a checkmark does not appear when paper is to be loaded print side up If the two sided function is prohibite...

Page 36: ...postcards print side up to the rear left of the tray as shown Loading envelopes Envelopes can only be printed on the address side Be sure to place envelopes with the address side up and the top of the envelope to the rear Printing onto envelopes or postcards Attempting to print onto both sides of envelopes or postcards may result in misfeeds or poor prints Do not use paper that has already been pr...

Page 37: ...mage to the envelopes or smudges on prints may occur even if envelopes within specification are used In this case the problem may be reduced by shifting the fusing unit pressure adjusting levers from the normal position to the lower pressure position Follow the procedure below 1 Unlatch the duplex module and slide it to the left Unlatch the module and gently move the module away from the machine I...

Page 38: ...oading paper is the same as for paper tray 1 in the main unit See the description page 2 2 Specifications stand 3 x 500 sheet paper drawer Name Multi purpose drawer Paper size weight See specifications of paper trays on page 2 3 Paper capacity 500 sheets 80 g m2 20 lbs of paper 40 envelopes 40 postcards 40 sheets of transparency film Dimensions 654 mm W x 567 mm D x 144 mm H 25 3 4 W x 22 21 64 D ...

Page 39: ... table holds approximately 800 sheets After loading paper be sure to return the paper guide 3 Gently push the large capacity paper tray into the machine Push the tray firmly all the way into the machine 4 Set the paper type If you have changed the paper size from the AB system to the inch system or vice versa select the relevant type referring to Setting the paper type and paper size on page 2 5 5...

Page 40: ...to 7 25 Key operator programs These are programs that are used by the key operator administrator of the machine to configure machine settings A key appears for these settings in the custom settings menu screen For information on these settings see the key operator s guide 1 These settings can be configured in a system where the facsimile or network scanner function is available 2 These settings ca...

Page 41: ...LAST 2004 10 20 MON 14 27 DD MM YYYY ME ON OK T 12 HOUR CUSTOM SETTINGS LIST PRINT FAX DATA RECEIVE FORWARD PAPER TRAY SETTINGS EXIT DEFAULT SETTINGS SENDER CONTROL KEY OPERATOR PROGRAMS ADDRESS CONTROL TOTAL COUNT DOCUMENT FILING CONTROL PRINTER CONDITION More information on setting procedures In the following type of screen a setting is selected by touching the key so that a checkmark appears Th...

Page 42: ...iguration Keyboard 2 AZERTY configuration Keyboard 3 ABCDEF configuration The default setting is Keyboard 1 Example Character entry screen when Keyboard 3 is selected List print This is used to print lists of machine settings and a test page to check resident fonts The following lists and pages are available All custom setting list Shows the hardware status software status printer configuration se...

Page 43: ...cartridge lock lever 8 Close the front cover NOTE To view the approximate amount of toner remaining hold down the COPY key during printing or when the machine is on standby The percentage of toner remaining will appear in the display while you hold down the key When the percentage falls to 25 0 obtain a new toner cartridge and keep it ready for replacement NOTE Shake the toner cartridge well to en...

Page 44: ...ter shaking the cartridge vigorously and will remain inside the cartridge without flowing out For best copying results be sure to use only Sharp Genuine Supplies which are designed engineered and tested to maximize the life and performance of Sharp products Look for the Genuine Supplies label on the toner package GENUINE SUPPLIES Supply and Consumables The supply of spare parts for a repair of the...

Page 45: ...multi purpose drawer page 2 21 Misfeed in the stand MPD 2000 sheet paper drawer page 2 21 Misfeed in the stand 3 x 500 sheet paper drawer page 2 21 Misfeed in the document feeder page 2 22 Misfeed in the finisher page 3 12 Misfeed in the duplex module page 2 19 Misfeed in the bypass tray page 2 19 Misfeed in the saddle stitch finisher page 3 22 Misfeed in the multi purpose drawer page 2 21 NOTE Pr...

Page 46: ...open tab to open the fusing unit and remove the misfed paper If paper is misfed in the exit area remove it as shown while taking care not to tear the paper If the duplex module is equipped with an exit tray and paper is misfed in the exit area remove the misfed paper as shown in the illustration 3 Gently close the duplex module If the machine is not equipped with a duplex module close the side cov...

Page 47: ...gently remove it while taking care not to tear the paper If paper is misfed at the lower part of the duplex module gently remove it while taking care not to tear the paper 4 Close the cover of the duplex module and lower the exit tray 5 Gently close the duplex module After closing the duplex module confirm that the misfeed message is cleared and the normal display appears Misfeed in the bypass tra...

Page 48: ...cking the partially fed paper may tear and leave torn pieces in the machine increasing the difficulty of removal NOTE The paper may not be extending out far from inside the machine but must be removed if it is possible to grasp it If it is not possible to grasp it go to the next step NOTE If paper drops beyond the rear side of the paper tray that has been pulled out remove the paper tray and then ...

Page 49: ... multi purpose drawer shown to the left to remove the misfed paper Misfeed in the stand MPD 2000 sheet paper drawer For misfeed removal in the upper tray follow the procedure of Misfeed in the multi purpose drawer shown to the left to remove the misfed paper For misfeed removal in the lower large capacity tray follow the procedure below 1 Follow steps 1 to 4 of Misfeed in the multi purpose drawer ...

Page 50: ...pen the document feeder and turn the green rotating knob in the direction of the arrow to remove any misfed originals 2 Open and close the document feeder Opening and closing the cover clears the misfeed display Copying cannot be resumed until this step is performed However this step is not necessary after a misfeed is removed from location B A message may appear indicating the number of originals...

Page 51: ...d that requires service In this event stop using the machine unplug the power cord and contact your Sharp dealer Note Letters and numbers appear in When you contact your Sharp dealer please tell your dealer what letters and numbers appear Problem Check Solution or cause The machine does not operate Machine plugged in Plug the machine into a grounded outlet The power switch are not turned on Turn o...

Page 52: ... When using a special size of paper set the correct paper size as explained in Setting the paper type and paper size on page 2 5 If the paper size setting is not correct part of the image may be cut off or the image may not print Paper misfeeds frequently Is paper other than SHARP recommended paper being used Use SHARP recommended paper Page 2 16 Paper curled or damp Do not use curled or crimped p...

Page 53: ... the wrong side of the paper The paper is loaded in the tray with the print side face down Face up if the paper type is PRE PRINTED PRE PUNCHED or LETTER HEAD Load paper in the tray with the print side face up However if the paper type is PRE PRINTED PRE PUNCHED or LETTER HEAD load the paper with the print side face down If the two sided function has been prohibited using DISABLING OF DUPLEX in th...

Page 54: ......

Page 55: ...ications 3 5 Misfeed in the mail bin stacker 3 6 FINISHER 3 7 Part names 3 7 Specifications 3 7 Finisher functions 3 8 Using the finisher functions 3 9 Staple cartridge replacement 3 10 Misfeed in the finisher 3 12 Troubleshooting finisher problems 3 13 SADDLE STITCH FINISHER 3 14 Part names 3 14 Specifications 3 14 Saddle stitch finisher functions 3 15 Using the saddle stitch finisher 3 18 Staple...

Page 56: ...per weight for duplex copy 1 60 to 105 g m2 or 16 to 28 lbs Reference paper position Centre Bypass tray paper capacity 2 100 sheets A4 or 8 1 2 x 11 size 80 g m2 or 20 lbs Dimensions Duplex module 115 mm W x 412 mm D x 416 mm H 4 17 32 W x 16 15 64 D x 16 25 64 H Duplex module bypass tray 3 441 mm W x 436 mm D x 416 mm H 17 23 64 W x 17 11 64 D x 16 25 64 H Weight Duplex module Approx 5 kg 11 1 lb...

Page 57: ...TES When using A5 paper 5 1 2 x 8 1 2 paper or postcards be sure to load them with their shorter edge into the feed slot as shown in the illustration When loading plain paper other than SHARP standard paper special media other than postcards SHARP recommended transparency film or paper to be printed on the back the paper must be loaded one sheet at a time Loading more than one sheet at a time will...

Page 58: ...ass tray are skewed Does the number of sheets exceed the limit Set paper within the allowable range Paper guides properly set Set the paper guides properly to the paper size A paper misfeed occurs in the bypass tray Paper size and type set properly When using non standard size paper or special paper be sure to set the paper size and type See pages 2 3 to 2 5 Does the number of sheets exceed the li...

Page 59: ...of trays 8 Top tray and seven mail bins Paper output Print face down Tray type Top tray normal tray Mail bins mail bin tray Tray capacity Top tray 250 sheets A4 or 8 1 2 x 11 size 80 g m2 or 20 lbs Mail bins 100 sheets each A4 or 8 1 2 x 11 size 80 g m2 or 20 lbs Paper sizes Top tray same as the specifications of paper for feeding in the main unit Mail bins A3 B4 A4 A4R B5 B5R 11 x 17 8 1 2 x 14 8...

Page 60: ...l not to tear the misfed paper during removal After removing the paper press down on the top cover to close it 3 If the misfed paper is not found in step 2 open the front cover 4 Turn the roller rotating knob in the direction of the arrow to remove the misfed paper 5 Open the paper guide Unlatch the paper guide and open it in the direction of the arrow 6 Remove the misfed paper Be careful not to t...

Page 61: ...ame as the specifications of paper for feeding in the main unit Lower tray Max A4 or 8 1 2 x 11 Min B5 Paper weight Top tray same as the specifications of paper for feeding in the main unit Lower tray 60 to 128 g m2 or 16 to 34 lbs Paper types Top tray same as the specifications of paper for feeding in the main unit Lower tray plain paper only Tray full detection Provided in both the top tray and ...

Page 62: ...ze for stapling and stapling capacity are shown below Original Printouts Offset mode Non offset mode Original Printouts Stapling positions Top left corner of printouts Centre left two positions of printouts Lower left corner of printouts Portrait orientation Landscape orientation Available paper sizes A4 B5 and 8 1 2 x 11 Stapling capacity Up to 30 sheets for any available sizes Same as above Same...

Page 63: ...delivered 4 Icon display An icon representing a selected function sort staple sort or group is displayed 5 OFFSET key See page 3 8 If Offset is checked offset is enabled If not checked offset will not function If staple sort is selected the check mark of offset will be automatically cancelled If the staple sort function is selected the checkmark in the offset checkbox is automatically removed 6 OF...

Page 64: ...he arrow of the staple cartridge with that of the staple box When reinstalling the staple box push it in until it clicks into place 6 Remove the tape from the staple cartridge by pulling it straight 7 Reinstall the staple box Push the staple box in until it clicks into place 8 While pushing the staple unit release lever to the left rotate the staple unit to face down 9 Close the front cover NOTES ...

Page 65: ...it to face up 6 Pull the release lever for the staple box and remove the box 7 Raise the lever at the end of the staple box Remove the top staple if it is bent If bent staples remain a staple jam will occur again 8 Return the lever to its original position 9 Reinstall the staple box Push the staple box in until it clicks into place 10While pushing the staple unit release lever to the left rotate t...

Page 66: ...he tab in the direction of the arrow as shown in the illustration to open the top cover 3 Remove the misfed paper Be careful not to tear the misfed paper during removal After removing the paper press down on the top cover to close it 4 Open the finisher compiler Release the latch to open the finisher compiler 5 Raise the paper guide and remove the misfed paper Be careful not to tear the misfed pap...

Page 67: ...piler Stapling cannot be performed Is a CHECK THE STAPLER UNIT or CHECK STAPLER POSITION OR STAPLER JAM message displayed Check the staple unit See page 3 11 Is a message ADD STAPLES displayed Replace the staple cartridge See page 3 10 Different size paper included Stapling cannot be performed onto different size paper Stapled sets are not stacked correctly or some sheets in a set are not stapled ...

Page 68: ...1 or smaller sizes 80 g m2 or 20 lbs max 30 stapled sets and max 500 sheets for B4 or 8 1 2 x 13 or larger sizes 80 g m2 or 20 lbs Lower tray Stapled print capacity is 6 10 sheets x 10 sets or 1 5 sheets x 20 sets Paper size Upper tray A3 B4 A4 A4R B5 B5R A5R 11 x 17 8 1 2 x 14 8 1 2 x 13 8 1 2 x 11 8 1 2 x 11 R 7 1 4 x 10 1 2 5 1 2 x 8 1 2 R Lower tray max A3 B4 A4R 11 x 17 8 1 2 x 11 R Paper wei...

Page 69: ...can only be used in the offset tray Stapled sets will not be offset Stapling capacity A4 or 8 1 2 x 11 or smaller size 50 sheets 80 g m2 or 20 lbs B4 or 8 1 2 x 14 or larger size 25 sheets 80 g m2 or 20 lbs Up to two sheets of 128 g m2 or 34 lbs paper can be included as covers Staples Upper tray Single staple can be placed in the top left or lower left corners or two staples can be centred on the ...

Page 70: ...rientation Available paper sizes A4 B5 and 8 1 2 x 11 Stapling capacity Up to 50 sheets for any sizes Same as above Same as above Available paper sizes A3 B4 A4R 11 x 17 8 1 2 x 14 8 1 2 x 13 and 8 1 2 x 11 R Stapling capacity Up to 50 sheets for A4R B5R and 8 1 2 x 11 R and up to 25 sheets for other sizes Available paper sizes A3 B4 A4R 11 x 17 8 1 2 x 14 8 1 2 x 13 and 8 1 2 x 11 R Stapling capa...

Page 71: ...age rotation will not function when the hole punching function is used Two or three holes can be punched depending on the paper size See paper sizes for hole punching on page 4 4 If the punching function is enabled for a paper size that cannot be punched the paper will be output without being punched For paper sizes that can be punched see the specifications on page 3 15 When using the punching fu...

Page 72: ...d the offset will not function If the staple sort is selected the check mark of offset will be automatically selected 6 CENTRE TRAY key If the centre tray is selected output paper will be delivered to the exit tray 7 OK key Press to close the OUTPUT screen and to return to the main screen 8 OFFSET key See page 3 15 When the offset tray is selected copies will be delivered to the offset tray When s...

Page 73: ... unlock the staple box cover and remove the staple cartridge 6 Insert a new staple cartridge into the staple box After inserting the staple cartridge press down on the staple box cover to lock the cartridge in place 7 Remove the tape from the staple cartridge by pulling it straight 8 Insert the staple box Push the staple box in until it clicks into place 9 Push the stapler section back into the fi...

Page 74: ... shown in the illustration until the blue indication is seen 4 Remove the paper from the stapler compiler 5 If saddle stitch was selected open the saddle stitch section cover 6 Remove the misfed paper Be careful not to tear the misfed paper during removal 7 Close the saddle stitch section cover 8 Open the front cover and pull out the stapler unit Roller rotating knob C Blue ...

Page 75: ...ace 14Push the stapler section back into the finisher 15Close the front cover 16Push the saddle stitch finisher back against the machine Disposal of hole punch scrap 1 Unlatch the saddle stitch finisher and slide it away from the machine 2 Pull out the punch scrap collecting container and empty it Empty the punch debris into a plastic bag or other container for disposal taking care not to spill an...

Page 76: ... rotate it Only when an optional punch unit is installed Rotating roller rotating knob B releases the caught paper 4 Open the top cover 5 Remove the misfed paper Remove the paper gently taking care not to tear it 6 Close the top cover 7 Remove any misfed paper from the stapler compiler Remove the paper gently taking care not to tear it 8 Open the cover of the saddle stitch section 9 Remove the mis...

Page 77: ... in the direction of the arrow 12Remove any misfed paper from the saddle stitch tray Remove the paper gently taking care not to tear it 13Close the cover of the saddle stitch section 14Close the front cover 15Push the saddle stitch finisher back onto the machine Roller rotating knob D ...

Page 78: ...alled See page 3 20 Different size paper included Stapling cannot be performed onto different size paper Stapled sets are not stacked correctly or some sheets in a set are not stapled Paper heavily curled Paper may be curled heavily depending on the paper type and quality Remove paper from the paper tray or the bypass tray turn it upside down and load it again Punching does not take place in the c...

Page 79: ...Part 2 Copier Operation ...

Page 80: ......

Page 81: ... size 4 5 STORING DELETING AND USING ORIGINAL SIZES 4 6 Storing or deleting an original size 4 6 NORMAL COPYING 4 7 Making copies with the automatic document feeder 4 7 Automatic two sided copying using the automatic document feeder 4 10 Copying from the document glass 4 11 Automatic two sided copying from the document glass 4 13 ADJUSTING THE EXPOSURE 4 14 REDUCTION ENLARGEMENT ZOOM 4 15 Automati...

Page 82: ... specified range may cause an original misfeed Before loading originals into the document feeder tray be sure to remove any staples or paper clips If originals have damp spots from correction fluid ink or glue from pasteups be sure they are dried before they are fed If not the interior of the document feeder or the document glass may be soiled Do not use the following originals These originals may...

Page 83: ...l in the appropriate position for its size as shown above NOTE Do not place any objects under the original size detector because they may damage it or the original size may not be detected properly Original size detector Original scale mark Original scale mark A5 or 5 x 8 A4 or 8 x11 A3 or 11x17 B4 or 8 x14 A4R or 8 x11R NOTE Original size detection function One of the four groups of standard orig...

Page 84: ... automatically rotated 90 and copied When an image is rotated a message will be displayed If a function is selected that is not suitable for rotation such as enlarging the copy to greater than A4 8 1 2 x 11 size or staple sorting with the saddle stitch finisher rotation will not be possible Example This function operates in both the auto paper select or auto image mode Rotation copy setting can be...

Page 85: ...ndard size original is placed in the document feeder or on the document glass touch the SIZE INPUT tab and then enter the X width and Y length dimensions of the original X is initially selected Enter the X dimension width and then touch the Y key and enter the Y dimension length X can be from 64 to 432 mm and Y can be from 64 to 297 mm If you frequently use originals that are the same non standard...

Page 86: ...the original with the keys X width is initially selected Enter X and then touch the key to enter Y A width of 64 to 432 mm can be entered in X and a length of 64 to 297 mm can be entered in Y 6 Touch the OK key The original size entered in step 5 is stored in the key selected in step 4 To exit touch the ORIGINAL key 7 When you touch a key that shows an original size in step 4 a message screen appe...

Page 87: ...PAPER will appear If the message appears load paper in a paper tray with paper of the required size Even if the message above appears copying can be performed onto the currently selected paper The following requirements must be satisfied Originals of a standard size A3 B4 A4 A4R B5 B5R or A5 11 x 17 8 1 2 x 14 8 1 2 x 11 8 1 2 x 11 R or 5 1 2 x 8 1 2R are set and the auto paper select function is ...

Page 88: ...key can be selected When you touch the QUICK FILE key a message asking you to confirm the save will appear Touch the OK key in the message screen and go to the next step If you wish to cancel the save touch the QUICK FILE key after touching the OK key so that the QUICK FILE key is no longer highlighted 10Press the START key If the C key is pressed while originals are being scanned scanning will st...

Page 89: ... when a saddle stitch finisher is installed The screen that appears when a finisher is installed is slightly different SPECIAL MODES 2 SIDED COPY OUTPUT OUTPUT SORT GROUP Original Press the START key Set the number of copies 5 Touch the OUTPUT key Touch the SORT key Five sets of copies When using the automatic document feeder sorting is automatically selected when the original is placed in the doc...

Page 90: ...cument feeder tray pages 4 3 to 4 6 2 Touch the 2 SIDED COPY key 3 Select the desired copy mode The display will vary depending on the equipment installed When making automatic two sided copies of a one sided A3 11 x 17 or B4 8 1 2 x 14 size portrait original or when you wish to invert the top and bottom of the back side of a two sided original touch the BINDING CHANGE key 4 Touch the OK key Perfo...

Page 91: ...e message LOAD xxxxxx PAPER will appear If the message appears load paper in a paper tray with paper of the required size Even if the message above is displayed copying can be performed onto the currently selected paper The following requirements must be satisfied Originals of a standard size A3 B4 A4 A4R B5 B5R or A5 11 x 17 8 1 2 x 14 8 1 2 x 11 8 1 2 x 11 R or 5 1 2 x 8 1 2 R are set and the au...

Page 92: ...pter 7 If the FILE key is greyed out only the QUICK FILE key can be selected When you touch the QUICK FILE key a message asking you to confirm the save will appear Touch the OK key in the message screen and go to the next step If you wish to cancel the save touch the QUICK FILE key after touching the OK key so that the QUICK FILE key is no longer highlighted 7 Press the START key Replace the origi...

Page 93: ...in the appropriate position for its size as shown above 2 Touch the 2 SIDED COPY key 3 Touch the 1 sided to 2 sided copy key When making automatic two sided copies of a one sided A3 11 x 17 or B4 8 1 2 x 14 size portrait original or when you wish to invert the top and bottom of the back side of a two sided original touch the BINDING CHANGE key 4 Touch the OK key Perform steps 3 to 8 on pages 4 11 ...

Page 94: ...nimum background TEXT PHOTO This provides the best balance for copying an original which contains both text and photos This mode is also useful for copying printed photographs PHOTO This mode provides the best copies of photographs with fine details AUTO AUTO A4 ORIGINAL PAPER SELE T EXPOSURE ORIGINAL IMAGE TYPE TEXT AUTO MANUAL 5 3 1 OK TEXT PHOTO PHOTO AUTO AUTO A4 100 ORIGINAL PAPER SELECT COPY...

Page 95: ...CK FILE key can be selected When you touch the QUICK FILE key a message asking you to confirm the save will appear Touch the OK key in the message screen and go to the next step If you wish to cancel the save touch the QUICK FILE key after touching the OK key so that the QUICK FILE key is no longer highlighted 6 Press the START key If you placed the original on the document glass set the output mo...

Page 96: ...Any ratio from 25 to 400 can be set in 1 increments Touch the key to increase the ratio or the key to decrease the ratio If you continue to touch the key the ratio will change automatically After 3 seconds the ratio will change rapidly 5 Touch the OK key NOTE When the original is placed in the document feeder the ratio can be set from 25 to 200 UTO 100 4 PAPER SELECT COPY RATIO AUTO AUTO AUTO A4 O...

Page 97: ...n be selected When you touch the QUICK FILE key a message asking you to confirm the save will appear Touch the OK key in the message screen and go to the next step If you wish to cancel the save touch the QUICK FILE key after touching the OK key so that the QUICK FILE key is no longer highlighted 9 Press the START key If you placed the original on the document glass set the output to Sort and pres...

Page 98: ...ot become highlighted when touched Zoom ratios Any ratio from 25 to 400 can be set in 1 increments Touch the key to increase the ratio or the key to decrease the ratio If you continue to touch the key the ratio will change automatically After 3 seconds the ratio will change rapidly 6 Touch the Y key Original Copy NOTE When the original is placed in the document feeder the ratio can be set from 25 ...

Page 99: ...ELECT key and select the paper size If the AUTO PAPER SELECT mode is on the appropriate copy paper size will have been automatically selected based on the original size and selected copy ratios 10Select any desired copy settings such as the exposure or number of copies and then press the START key ZOOM 50 50 70 Y X 64 70 XY ZOOM CANCEL ZOOM 50 70 Y A OK PA 400 200 100 141 0 AUTO ORIGINAL AUTO EXPO...

Page 100: ...s the currently selected paper type 2 The Y key shows the size of paper loaded in the bypass tray 3 To change the displayed paper type touch the X key before touching the Y key When loading paper if you changed the paper size from an AB size to an inch size or from an inch size to an AB size or if you changed the paper type be sure to change the paper type and size settings as explained in steps 5...

Page 101: ... using special functions 5 2 Margin shift 5 3 Erase 5 4 Dual page copy 5 5 Pamphlet copy 5 6 Job build 5 8 Tandem copy 5 9 Covers inserts 5 11 Transparency film with insert sheets 5 22 Multi shot 5 23 Book copy 5 25 Card shot 5 26 Mirror image 5 28 B W reverse 5 28 Print menu 5 29 STORING USING AND DELETING JOB PROGRAMS 5 41 Storing a job program 5 41 Calling up a job program 5 42 Deleting a store...

Page 102: ... The following special functions can be selected in the 3rd screen 3 3 B W reverse page 5 28 Print menu page 5 29 General procedure for using special functions 1 Touch the SPECIAL MODES key 2 Touch the key for the desired special mode Example Selecting the margin shift function To select a special function in one of the other two screens use the keys to change the screen SPECIAL MODES MARGIN SHIFT...

Page 103: ...copy mode NOTES The initial setting for the margin width can be changed in the key operator programs to any value from 0 to 20 mm 0 to 1 Page 15 of the Key operator s guide When margin shift is selected rotating copying will not operate even if the condition for rotate copying is met Image shifted to the right Image shifted to the left Margin Margin Original Two sided copying Image shifted to the ...

Page 104: ... the amount of erase and touch the OK key Use the and keys to set the erase width to any value from 0 to 10 mm in 1 mm increments 0 to 1 in increments of 1 8 4 Touch the OK key on the special modes screen You will return to the main screen of copy mode NOTE The initial setting for the erasure width can be changed in the key operator programs to any value from 0 to 20 mm 0 to 1 Page 15 of the Key o...

Page 105: ...at 8 1 2 x 11 A4 size paper is selected If A4 8 1 2 x 11 size paper is not selected touch the PAPER SELECT key to select A4 8 1 2 x 11 size paper The dual page copy function can be used only when copying from the document glass The automatic document feeder cannot be used with this function Only A4 8 1 2 x 11 paper can be used Book original Dual page copy To display the special modes screen See Ge...

Page 106: ...l appear The pamphlet copy icon etc will also appear in the upper left corner of the screen to indicate that the function is turned on 2 Designate the type of originals to be copied 1 sided or 2 sided Select the 2 SIDED key if you wish to scan a two sided original using the automatic document feeder 3 Select the binding position left binding or right binding If you wish to insert a different type ...

Page 107: ...nals have been scanned The next step is not needed When using the document glass Replace the original with the next original and press the START key Repeat this operation until all originals have been scanned and then touch the READ END key NOTES Two sided copying is not possible on label sheets and transparency film When copying on a cover do not select a tray that has one of these types of paper...

Page 108: ...ure that the desired paper size is selected select the number of copies or other copy settings and press the START key Scanning of originals will start After scanning of the first set of originals A in the example above is completed remove the scanned originals place the next set of originals set B in the example and press the START key Repeat this operation until all sets of originals have been s...

Page 109: ...he tandem settings should be configured by your network administrator If the server and client machines will alternate server and client roles the IP address of the server machine must also be entered in the client machine The same port number can be set in both machines 1 Touch the TANDEM COPY key on the special modes screen The TANDEM COPY key will be highlighted to indicate that the function is...

Page 110: ...set to 999 and Non staple is selected tandem copying will take place 2 If tandem copying is executed for a two sided copy job with the number of copies set to 999 and Staple is selected tandem copying will not take place because the client machine does not have a finisher After the START key is pressed if the client machine cannot print because it is out of paper or other reason the server machine...

Page 111: ...ations for using covers and inserts Load the cover insert paper in the tray before using the cover insert function Use the same size of paper for the covers inserts as for the copies For the procedures for loading paper see pages 2 2 to 2 7 Before selecting the cover insert function place the originals in the document feeder select one sided or two sided copying and select the number of copies and...

Page 112: ...re only applies to the front cover paper When the back cover paper is selected the selection only applies to the back cover paper 3 The Z key shows the tray selected for the front cover paper in step 3 and the paper size and type 6 Touch the OK key in the screen of step 5 You will return to the screen of step 2 When you return to the screen of step 2 the FRONT COVER key will be highlighted 7 To in...

Page 113: ... possible when the YES key of X has been selected The one sided two sided selection made here only applies to insertion type A paper When insertion type B is selected the selection only applies to insertion type B paper The 2 SIDED key appears when the duplex module is installed 3 The Z key shows the tray selected for insertion type A in step 3 and the paper size and type 6 Touch the OK key in the...

Page 114: ... B key is highlighted the insert settings apply to INSERTION TYPE B SETTING 10Touch the OK key in the screen of step 9 You will return to the screen of step 2 11If you wish to insert a different paper with the INSERTION TYPE B SETTING key repeat steps 2 through 6 Use the INSERTION TYPE B SETTING key instead of the INSERTION TYPE A SETTING key and the INSERTION TYPE B key instead of the INSERTION T...

Page 115: ...he key of the insert that you wish to edit or delete in the page layout screen When the key is touched the CANCEL DELETE or AMEND keys appear To cancel touch the CANCEL key To delete an inserted page touch the DELETE key To edit an inserted page touch the AMEND key The screen of step 9 on page 5 14 appears Edit the insertion page in the screen that appears 4 To edit or delete a cover page touch th...

Page 116: ...g on the settings Type Symbol Meaning Icon appearing in display Type Symbol Meaning Icon appearing in display Front cover Front cover when not copied on Inserts Insert when not copied on Front cover after one sided copying Insert after one sided copying Front cover after one sided copying of a two sided original One page is not copied on Insert after one sided copying of a two sided original One p...

Page 117: ...ing copies Front cover Back cover No copying No copying One sided copying No copying Two sided copying No copying No copying One sided copying No copying Two sided copying One sided copying One sided copying One sided copying Two sided copying Two sided copying One sided copying Two sided copying Two sided copying 1 2 3 4 5 6 1 2 3 4 5 6 1 2 3 4 5 6 1 2 3 4 5 6 1 2 3 4 6 5 1 2 3 4 5 6 1 2 3 4 6 5 ...

Page 118: ...ng copies Front cover Back cover No copying No copying One sided copying No copying Two sided copying No copying No copying One sided copying No copying Two sided copying One sided copying One sided copying One sided copying Two sided copying Two sided copying One sided copying Two sided copying Two sided copying 1 2 3 4 5 6 1 2 3 4 5 6 1 2 3 4 5 6 1 2 3 4 5 6 1 2 3 4 6 5 1 2 3 4 5 6 1 2 3 4 6 5 1...

Page 119: ...nt cover Back cover No copying No copying One sided copying No copying Two sided copying No copying No copying One sided copying No copying Two sided copying One sided copying One sided copying One sided copying Two sided copying Two sided copying One sided copying Two sided copying Two sided copying 1 2 3 4 5 6 1 2 3 4 5 6 1 2 3 4 5 6 1 2 3 4 5 6 1 2 3 4 6 5 1 2 3 4 5 6 1 2 3 4 6 5 1 2 3 4 5 6 1 ...

Page 120: ...s Front cover Back cover No copying No copying One sided copying No copying Two sided copying No copying No copying One sided copying No copying Two sided copying One sided copying One sided copying One sided copying Two sided copying Two sided copying One sided copying Two sided copying Two sided copying 1 2 3 4 5 6 1 3 4 5 6 1 2 3 4 5 6 1 2 3 4 6 1 2 3 4 6 5 1 3 4 6 1 3 4 6 5 1 2 3 4 6 1 2 3 4 6...

Page 121: ... page of the insert is set to page 3 1st page 2nd page 3rd page 4th page 5th page 6th page 1 2 3 4 5 6 Copying on insert Resulting copies one sided copying Resulting copies two sided copying No copying One sided copying Two sided copying 1 2 3 4 5 6 1 2 3 4 5 6 1 2 3 4 5 6 1 2 3 4 5 6 1 2 3 4 5 6 1 2 3 4 5 6 1st page 2nd page 3rd page 1 2 3 4 5 6 Copying on insert Resulting copies one sided copyin...

Page 122: ... Touch the TRAY SETTINGS key 5 Touch the key to display the tray settings screen of tray 2 6 Touch the TYPE SIZE key 7 Touch the TRANSPARENCY key 8 Touch the OK key If the paper size was changed from an AB size to an inch size or from an inch size to an AB size be sure to set the paper type and size as explained on steps 5 to 6 on page 2 5 and steps 7 to 10 on page 2 6 Insert sheets Example Insert...

Page 123: ... right top see the next page When using the multi shot function place the originals select the desired paper size and select the copying mode before selecting the multi shot function on the special modes screen When using the multi shot function the appropriate copy ratio will be automatically set based on the original size paper size and the number of originals to be copied onto one sheet The min...

Page 124: ...ns in which the images are arranged 4 Touch the OK key inside OK key on the multi shot setting screen You will return to the special modes screen 5 Touch the OK key in the special modes screen You will return to the main screen of copy mode To display the special modes screen See General procedure for using special functions on page 5 2 TRANSPARENCY INSERTS MULTI SHOT MIRROR IMAGE CARD SHOT SPECIA...

Page 125: ... the book copy setting screen You will return to the special modes screen 3 Select any desired cover settings If you wish to use a different type of paper for the cover perform steps 4 to 12 on pages 5 6 to 5 7 If you do not wish to use a different type of paper continue from step 4 4 Touch the OK key in the special modes screen You will return to the main screen of copy mode 5 Place the originals...

Page 126: ...riginal with the keys X width is initially selected Enter X and then touch the Y key to enter Y To return the X and Y values to the initial settings configured in the key operator programs touch the SIZE RESET key CARD SHOT SETTINGS on page 15 of the key operator s guide To have the images enlarged or reduced by a suitable ratio based on the entered original size so that the front and back sides f...

Page 127: ...1 7 Press the START key The front side of the card is scanned 8 Place the back side of the original face down on the document glass see step 5 9 Press the START key The back side of the card is scanned 10Touch the READ END key SIZE RESET CANCEL OK OK FIT TO PAGE NOTE The original must be placed on the document glass The document feeder automatic document feeder cannot be used To cancel the card sh...

Page 128: ...display the special modes screen See General procedure for using special functions on page 5 2 TRANSPARENCY INSERTS MULTI SHOT MIRROR IMAGE CARD SHOT About the steps that follow If an automatic document feeder is being used see pages 4 7 through 4 10 If the document glass is being used see pages 4 11 through 4 13 To cancel the mirror image function touch the MIRROR IMAGE key in the special modes s...

Page 129: ...ober 2004 Meeting Top left Top right Top centre Bottom left Bottom right Bottom centre Print menu Printing area Maximum number of settings DATE A One position only STAMP B 6 positions PAGE NUMBERING A One position only TEXT A 6 positions NOTES A part that overlaps the printed text will not be copied If the set text content overlaps the print content of another position the central print content wi...

Page 130: ...ge 5 2 Not selected print menu setting has not been selected Selected during selection of the print menu setting Not selected print menu setting has already been selected PRINT MENU B W REVERSE SPECIAL MODES PRINT MENU LAYOU N OK OK CANCEL LAYOUT DATE STAMP TEXT PAGE NUMBERING 1 2 NOTES If the DATE PAGE NUMBERING or TEXT key is touched when other than a STAMP print menu setting has been selected f...

Page 131: ... the document glass is being used see pages 4 11 through 4 13 2 OK OK LAYOUT CANCEL S WHEN COPYING ON COVERS INSERTS 2 SIDED ORIGINAL TYPE NOTE To cancel print menu Touch the CANCEL key in the screen of step 3 Special modes Printing operation Margin shift Like the copy image the printed contents are shifted in accordance with the set margin Dual page copy The print content is printed on each copy ...

Page 132: ...ar month or day that needs to be changed and then adjust the number with the or key When finished touch the OK key 5 Select the pages to be printed on Select whether to print on only the first page or all pages The touched key is highlighted 6 Touch the OK key 7 Continue from step 4 of Common operation procedure for using the print menu page 5 30 NOTE The date must be previously set in the custom ...

Page 133: ...LARGER is initially selected To make the stamp smaller touch the LARGER SMALLER key Smaller is selected when SMALLER is highlighted 6 Select the pages to be printed on Select whether to print on only the first page or all pages The touched key is highlighted 7 Touch the OK key 8 Continue from step 4 of Common operation procedure for using the print menu page 5 30 CONFIDENTIAL PRIORITY PRELIMINARY ...

Page 134: ...lank it will not be included in the total pages However if COUNT BACK COVER is selected the last page will be counted See step 7 When used in combination with Dual page copy Multi shot or Card shot the number of copied images is the total pages When used in combination with Pamphlet copy or Book copy the number of pages in the book is the total pages PAGE NUMBERING OK OK CANCEL LAYOUT STAMP DATE T...

Page 135: ...e NOTE To cancel a page number setting Touch the CANCEL key in the page number selection screen The screen of step 10 OK LAST NUMBER AUTO COVERS INSERTS COUNTING CANCEL OK TOTAL PAGE AUTO MANUAL PAGE NUMBER NOTES Copying in group mode is not possible when page number printing is selected The mode will automatically switch to sort mode When the page number print position is set to the left or right...

Page 136: ...13 11 15 12 15 13 15 Not printed Not printed PRINTING STARTS FROM SHEET 3 Not printed Not printed 1 3 2 3 3 3 A 1 5 B 2 5 C 3 5 D 4 5 E 5 5 Setting Value 1st page 2nd page 3rd page 4th page 5th page Front Back Front Back Front Back Front Back Front Back TOTAL PAGE AUTO FIRST NUMBER 1 LAST NUMBER AUTO PRINTING STARTS FROM SHEET 1 Printedcontents when settings are changed as follows PRINTING STARTS ...

Page 137: ...ARTS FROM SHEET 3 Not printed count Not printed count Not printed Not printed 1 6 2 6 3 6 4 6 5 6 6 6 A B 1 8 C 2 8 D 3 8 E 4 8 F 5 8 G 6 8 H 7 8 I 8 8 Setting Value 1st page 2nd page 3rd page insert 4th page 5th page TOTAL PAGE AUTO FIRST NUMBER 1 LAST NUMBER AUTO PRINTING STARTS FROM SHEET 1 COUNT INSERTS Not selected Printed contents when copying on inserts and settings are changed as follows P...

Page 138: ...text sequence will appear in each key When 6 keys are displayed up to 22 characters appear in each key 5 Touch the OK key To edit the selected text sequence touch the DIRECT ENTRY key to display the character entry screen The selected text sequence is entered For information on entering characters see page 7 26 When finished touch the OK key to close the character entry screen 6 Select the pages t...

Page 139: ...ouch the AMEND key To delete the text touch the DELETE key When the AMEND key is touched the character entry screen appears The selected text sequence is entered For information on entering characters see page 7 26 When finished touch the OK key to close the character entry screen If you touch the DELETE key the text will be deleted and you will return to the screen of step 4 To cancel editing or ...

Page 140: ...ontent to a position that already has print content set a message will appear asking you if you wish to overwrite the previously set content To overwrite the content touch the YES key To cancel the move and return to the condition before the OK key was touched touch the NO key 6 Touch the OK key NOTE Up to 14 characters of the print text appears in the key OK OK CANCEL STAMP TEXT 1 LAYOUT DATE PAG...

Page 141: ...ed the job program Number keys in which job programs are already stored are highlighted 4 Select the copy settings that you wish to store in the job program The number of copies cannot be stored 5 Touch the OK key The selected settings will be stored in the number key selected in step 3 If a number key is selected in step 3 that has already been programmed A setting confirmation screen will appear...

Page 142: ...as been stored is selected the screen will change to the screen of step 4 on the previous page for storing a job program 4 Touch the DELETE key The selected program is deleted and you return to the screen of step 3 To return to the screen of step 3 without deleting the job program touch the CANCEL key In both cases touch the EXIT key on the screen displayed in the screen of step 3 to exit the job ...

Page 143: ...t the exposure mode paper size number of copies and any other copy settings as needed and then press the START key 4 The previous copy job automatically resumes after the interrupt job finishes NOTES If you touch the INTERRUPT key when auditing mode is enabled the display will prompt you to enter your account number Enter your account number with the numeric keys The copies you make will be added ...

Page 144: ......

Page 145: ...This chapter explains procedures for cleaning the machine and troubleshooting Page USER MAINTENANCE 6 2 Cleaning the document glass and the automatic document feeder 6 2 Cleaning the main charger of the photoconductive drum 6 2 TROUBLESHOOTING 6 3 ...

Page 146: ...n Cleaning the main charger of the photoconductive drum If black or white lines appear even after you have cleaned the document glass and document feeder use the charger cleaner to clean the main charger that charges the drum 1 Switch off the power switch see page 1 17 2 Open the front cover 3 Slowly pull out the green knob charger cleaner 4 Once the knob is pulled out slowly push it back in 5 Clo...

Page 147: ... on a copy An appropriate exposure mode for the original has not been selected Change the exposure mode to TEXT See page 4 14 Smudges appear on copies Document glass or document cover dirty Clean regularly See page 6 2 Black lines appear on copies when the automatic document feeder is used Clean the original scanning area See page 6 2 Original smudged or blotchy Use a clean original Image cannot b...

Page 148: ......

Page 149: ...reen of document filing 7 5 Document filing icons 7 5 SAVING A DOCUMENT IMAGE FILE 7 6 Quick File 7 6 Filing 7 7 Print jobs 7 9 Scan Save 7 10 CALLING UP AND USING A FILE 7 13 Searching for and calling up a saved file 7 13 Calling up and using a saved file 7 15 CUSTOM SETTINGS 7 21 Creating editing and deleting user names and folders 7 21 ENTERING CHARACTERS 7 26 TROUBLESHOOTING 7 28 ...

Page 150: ... QUICK FILE FOLDER File 1 File 2 MAIN FOLDER CUSTOM FOLDER A password can be set Copier printer model A password can be set A password can be set Folder 1 Folder 2 Folder 3 File 1 File 2 Machine hard disk Machine hard disk Print Save to machine s hard disk HDD and Send facsimile expansion kit or network scanner expansion kit required Printing in copy mode Quick File saving page 7 6 Printing from a...

Page 151: ...th the document filing function This prevents a file from being moved or automatically or manually deleted Three attributes are available for saved files SHARING PROTECT and CONFIDENTIAL When saved with the SHARING attribute a file is not protected When saved with the PROTECT or CONFIDENTIAL attribute a file is protected Files saved to the Quick File folder are all SHARING When saving a file to th...

Page 152: ...r a numeric value for a setting 5 C key clear key Use this key if you make a mistake when entering a password or numeric setting This key is also used to cancel scanning of a document 6 CA key Use this key to cancel a setting procedure and return to the main screen The key is also used to cancel a special function 7 CUSTOM SETTINGS key Use this key to store edit or delete a user name or custom fol...

Page 153: ...om folder When the key is touched the files in the main folder or the folders in the custom folder appear 6 QUICK FILE FOLDER key Touch to call up a file from the Quick File folder When the key is touched the files in the Quick File folder appear Document filing icons The following icons may appear added to a main icon or alone HDD STATUS SEARCH SCAN TO HDD FILE FOLDER QUICK FILE FOLDER FILE RETRI...

Page 154: ...ncel the save touch the QUICK FILE key after touching the OK key so that the QUICK FILE key is no longer highlighted 3 Press the START key on the operation panel To prevent accidental saving of the document the warning THE SCANNED DATA IS STORED IN THE QUICK FILE FOLDER appears for 6 seconds after the START key is pressed When copying begins the image is saved 4 The saved image can be called up fr...

Page 155: ...name maximum of 30 characters See page 7 26 to enter characters 7 Touch the STORED TO key 8 Touch the desired folder name in the list of folder names that appears Folder names must be previously stored Creating a custom folder on page 7 24 If a password has been set for the folder a password entry screen will appear Enter the 5 digit password for the folder NOTE As an example the procedure for usi...

Page 156: ...rn to the screen of step 10 The set password is displayed with 15Touch the OK key You will return to the main screen 16Press the START key on the operation panel When copying begins the image is saved 17The saved image can be called up using the file name folder name or user name or from the filing folder To call up the image by entering the file name folder name or user name see Searching for and...

Page 157: ...e QUICK FILE FOLDER key the files in the Quick File folder appear Go to step 4 3 Touch the key of the folder that contains the desired file If a password is set for the selected folder a password entry screen will appear Enter the 5 digit password with the numeric keys 4 Touch the printer icon tab and then touch the key of the desired file The following screen appears if the QUICK FILE FOLDER key ...

Page 158: ... 17 on page 7 11 To set the original size perform steps 7 to 10 To set the resolution perform steps 11 to 13 on page 7 11 To select the exposure perform steps 14 to 16 on page 7 11 If you no not wish to select any of the above settings go to step 17 on page 7 11 7 Touch the ORIGINAL key 8 To set the original size see Manually setting the scanning size on page 4 5 9 If the original is two sided tou...

Page 159: ...re using the document glass touch the READ END key after all pages have been scanned 18The saved image can be called up using the file name folder name or user name or from the filing folder To call up the image by entering the file name folder name or user name see Searching for and calling up a saved file on page 7 13 To call up the image from the filing folder see Calling up and using a saved f...

Page 160: ... in the fax and network scanner manuals It is also equivalent to the Multi shot function in copy mode however only 2in1 is possible for scan save This function reduces two original pages and arranges the images on a single page in a uniform layout 4 JOB BUILD key see page 5 8 When you have more pages than can be placed in the document feeder at once this function allows you to scan the pages in se...

Page 161: ...LDER NAME To search by user name follow steps 3 to 6 To search by file name or folder name perform step 8 To stop searching touch the CANCEL key Searching by user name 3 Touch the USER NAME key 4 Touch the one touch key of the user name that you wish to use to search for the file If you wish to directly enter the user name touch the DIRECT ENTRY key The selected user name is highlighted If you sel...

Page 162: ...26 to enter characters 9 Touch the SEARCH START key 10The results of the file or folder name search appear Touch the desired file name or folder name See page 7 5 for a list of the document filing icons When a file name is touched the operation selection screen appears To perform an operation using the file go to step 5 on page 7 16 When a folder name is touched all files in the folder are display...

Page 163: ...ouched the FILE FOLDER key the files in the main folder or the folders in the custom folder appear If you open the wrong folder touch the MAIN FOLDER key or the CUSTOM FOLDER key and open the correct folder If the desired file is saved in the main folder go to step 4 If the desired file is saved in a custom folder go to step 3 If you touched the QUICK FILE FOLDER key the files in the Quick File fo...

Page 164: ...aved image may cause these keys to have the opposite effect If neither key is selected one sided printing will take place To perform two sided printing the optional duplex module is necessary 4 TANDEM PRINT key If the conditions for tandem printing are met page 5 9 touch this key to enable tandem printing See page 5 9 for more information When printing a file that was saved in copy mode this key c...

Page 165: ...destinations 9 SPECIAL MODES key Touch this key to display the special function menu The functions that can be selected vary depending on the transmission mode Scan to E mail FTP TIMER The transmission time can be specified FAX TIMER The transmission time can be specified FAX OWN ADDRESS SENDING Your sender s information can be included on the fax pages printed out by the receiving machine TRANSAC...

Page 166: ... attribute A file that is set to SHARING can be changed to PROTECT or CONFIDENTIAL However a SHARING file that is saved in the Quick File folder can only be changed to PROTECT A file that is set to PROTECT can be changed to SHARING or CONFIDENTIAL However a PROTECT file that is saved in the Quick File folder can only be changed to SHARING A file that is saved in the Quick File folder cannot be cha...

Page 167: ...is operation is used to delete the selected file Touch the DELETE key in the operation select screen A message asking you to confirm the deletion will appear Touch the YES key to delete the file Only SHARING or CONFIDENTIAL files can be deleted A PROTECT file can be deleted by first using PROPERTY CHANGE to change the attribute to SHARING Detail This operation is used to show detailed information ...

Page 168: ...To view information on the file touch the DETAIL key Use the keys to change screens When you are finished touch the OK key to return to the screen of step 3 5 Touch the CALL key The operation selection screen appears Select and perform the desired operation as explained in Calling up and using a saved file page 7 15 JOB QUEUE DETAIL 1 8 COMPLETE JOBS COMPLETED Suzuki7890123456 14 09 12 09 00 COPY ...

Page 169: ...ey of the operation that you wish to perform Go to the page indicated below for the selected operation 1 USER NAME REGISTRATION key Program a user name See the next page 2 AMEND DELETE USER NAME key Edit or delete a user name See page 7 23 3 CUSTOM FOLDER REGISTRATION key Create a custom folder See page 7 24 4 AMEND DELETE CUSTOM FOLDER key Edit or delete a custom folder See page 7 25 NOTES A prev...

Page 170: ...h to create a new folder or if no folders have been created touch the ADD NEW key If you touched the ADD NEW key program a name for the folder as explained on page 7 24 The user name programmed in step 1 is selected as the user name of the folder 8 Touch the EXIT key You will return to the USER NAME REGISTRATION screen REGISTRATION IS COMPLETED will appear highlighted next to No 9 To exit touch th...

Page 171: ...T key in the screen of step 2 Deleting 6 Touch the DELETE key 7 Touch the YES key You will return to the screen of step 2 To delete another user name repeat steps 2 3 and 6 To exit touch the EXIT key in the screen of step 2 OK AMEND DELETE USER NAME AMEND DELETE CUSTOM FOLDER USER NAME AMEND DELETE SELECT USER NAME TO AMEND DELETE Suzuki Ono Hasegawa Sasaki EXIT UVWXYZ OPQRST JKLMN EFGHI ABCD ALL ...

Page 172: ...in step 1 5 Touch the OK key 6 Touch the USER NAME key You will select a user name that will be associated with the folder name you are programming Selection of a user name cannot be omitted 7 The programmed user names appear Touch the desired user name If you do not wish to use any of the user names that appear touch the ADD NEW key to program a new user name When you touch a user name a password...

Page 173: ...ted to the right of No To stop using a password touch the PASSWORD key and then touch the OK key without entering anything for the password will appear and the password will be cancelled 5 When you have finished editing the items touch the EXIT key To edit another folder repeat steps 2 to 5 Deleting 6 Touch the DELETE key 7 Touch the YES key You will return to the screen of step 2 To delete anothe...

Page 174: ...er You can also press the AB ab 12 key during entry to enter a number or symbol 4 Touch the SPACE key The cursor moves forward and a space is entered 5 Touch the ÃÄÂ ãäâ key 6 Touch the ä key To switch between upper case and lower case touch the ÃÄÂ ãäâ key When ãäâ is highlighted lower case letters are entered 7 Touch the ÃÄÂ ãäâ key 8 Touch the Ä key You can press the ABC abc key during entry to...

Page 175: ...he cursor back one space and then enter the correct character You can continue touching keys to enter characters You can also touch another character type selection key ÃÄÂ ãäâ key or AB ab 12 key to enter characters other than numbers and symbols 3 When you have finished entering characters touch the OK key You will exit the character entry screen and return to the programming screen If you touch...

Page 176: ...file was saved in the Quick File folder that name will be used However if the name is longer than the maximum name length of the Quick File folder 30 characters the excess characters will be discarded Resolution settings are not possible Was the file saved at low resolution A saved file cannot be transmitted at a resolution higher than the resolution at which it was saved A file name cannot be pro...

Page 177: ...8 1 CHAPTER 8 SPECIFICATIONS This chapter contains useful information about the machine Page SPECIFICATIONS 8 2 LIST OF COMBINATION OF PERIPHERAL DEVICES 8 4 INDEX 8 5 ...

Page 178: ... 1 increments total 376 steps Fixed presets 25 50 70 81 86 100 115 122 141 200 and 400 for AB system 25 50 64 77 100 121 129 200 and 400 for inch system Continuous copy 999 copies Dimensions including automatic document feeder 826 mm W x 665 mm D x 1127 mm H 32 33 64 W x 26 11 64 D x 44 23 64 H Weight main unit only Approx 100 kg Approx 220 5 lbs Overall dimensions When tray is extended 963 mm W x...

Page 179: ...n 18 copies min Centre tray specifications Output method Face down output Maximum number of sheets 80g m2 20lbs recommended paper 400 sheets Paper type Plain paper and special paper The maximum number of pages that can be held varies depending on ambient conditions in the installation location the type of paper and the storage conditions of the paper Acoustic Noise Emission measurement according t...

Page 180: ...simile expansion kit Duplex module bypass tray Duplex module Multi purpose drawer Stand 3 x 500 sheet paper drawer Stand MPD 2000 sheet Duplex module bypass tray Duplex module Upper exit tray extension Fax memory 8 MB Saddle stitch finisher Finisher Mail bin stacker Exit tray Punch unit PS3 expansion kit Facsimile expansion kit Upper exit tray extension Fax memory 8 MB Network scanner expansion ki...

Page 181: ...ing up and using a saved file 7 15 Delete 7 19 Detail 7 19 Move 7 19 Print 7 16 Property change 7 18 Send 7 17 Card shot 1 6 5 2 5 26 7 12 Cartridge lock lever 1 10 Centre erase 5 4 Centre tray 1 9 4 9 CENTRE TRAY key 3 18 Changing the paper size in paper tray 2 2 Charger cleaner 6 2 Clear all key 1 13 7 4 Clear key 1 13 7 4 Clock 2 12 Confidential 7 3 Contents 0 5 to 0 6 Continuous copying speed ...

Page 182: ...pass tray 3 3 Multi purpose drawer 2 8 Stand 3 x 500 sheet paper drawer 2 10 Stand MPD 2000 sheet paper drawer 2 11 Tray 1 2 2 Lower cover 3 2 M Mail bins 3 5 Mail bin stacker 1 11 3 5 Main charger 6 2 Main features 1 3 to 1 8 Main folder 7 3 Main screen 5 2 Manual exposure adjustment 4 14 Manual selection 4 16 Margin shift 1 4 5 2 5 3 Meaning of R 1 2 Mirror image 1 6 5 2 5 28 Misfeed 2 17 to 2 2...

Page 183: ...AN TO HDD key 7 5 SEARCH key 7 5 Searching for a file 7 13 to 7 14 Selecting a function 1 14 Selecting the exposure level 4 14 Selecting the exposure mode 4 14 Selecting the output tray 4 9 Sender control 2 12 Sender control list 2 14 Sending address list 2 14 Setting the paper size 2 5 to 2 6 Setting the paper type 2 5 to 2 7 Sharing 7 3 Side cover latch 1 10 Sort 1 3 3 8 3 15 4 9 SORT key 3 9 3 ...

Page 184: ...oubleshooting Copier operation 6 3 Document filing function 7 28 Duplex module 3 4 Finisher 3 13 General information 2 23 to 2 25 Saddle stitch finisher 3 24 Types and sizes of paper 2 3 to 2 4 Types and sizes of paper that can be used 2 3 U Upper exit tray extension 1 9 1 11 Upper paper output area 1 9 User maintenance 6 2 User name 7 21 to 7 23 W Warming up 2 23 X XY Zoom 1 4 4 18 Z Zoom 4 16 ...

Page 185: ......

Page 186: ......

Page 187: ...89 336 EEG en 73 23 EEG gewijzigd door 93 68 EEG Dette udstyr overholder kravene i direktiv nr 89 336 EEC og 73 23 EEC med tillæg nr 93 68 EEC Quest apparecchio è conforme ai requisiti delle direttive 89 336 EEC e 73 23 EEC come emendata dalla direttiva 93 68 EEC Este equipamento obedece às exigências das directivas 89 336 CEE e 73 23 CEE na sua versão corrigida pela directiva 93 68 CEE Este apara...

Page 188: ...opier operation PRINTED IN CHINA 2004J KS1 TINSE2797FCZZ SHARP CORPORATION This manual has been printed using a vegetable based soy oil ink to help protect the environment Printed on 100 post consumer recycled paper LASER PRINTER AR M351N AR M451N ...

Reviews: