


LOADING PAPER
2-11
2
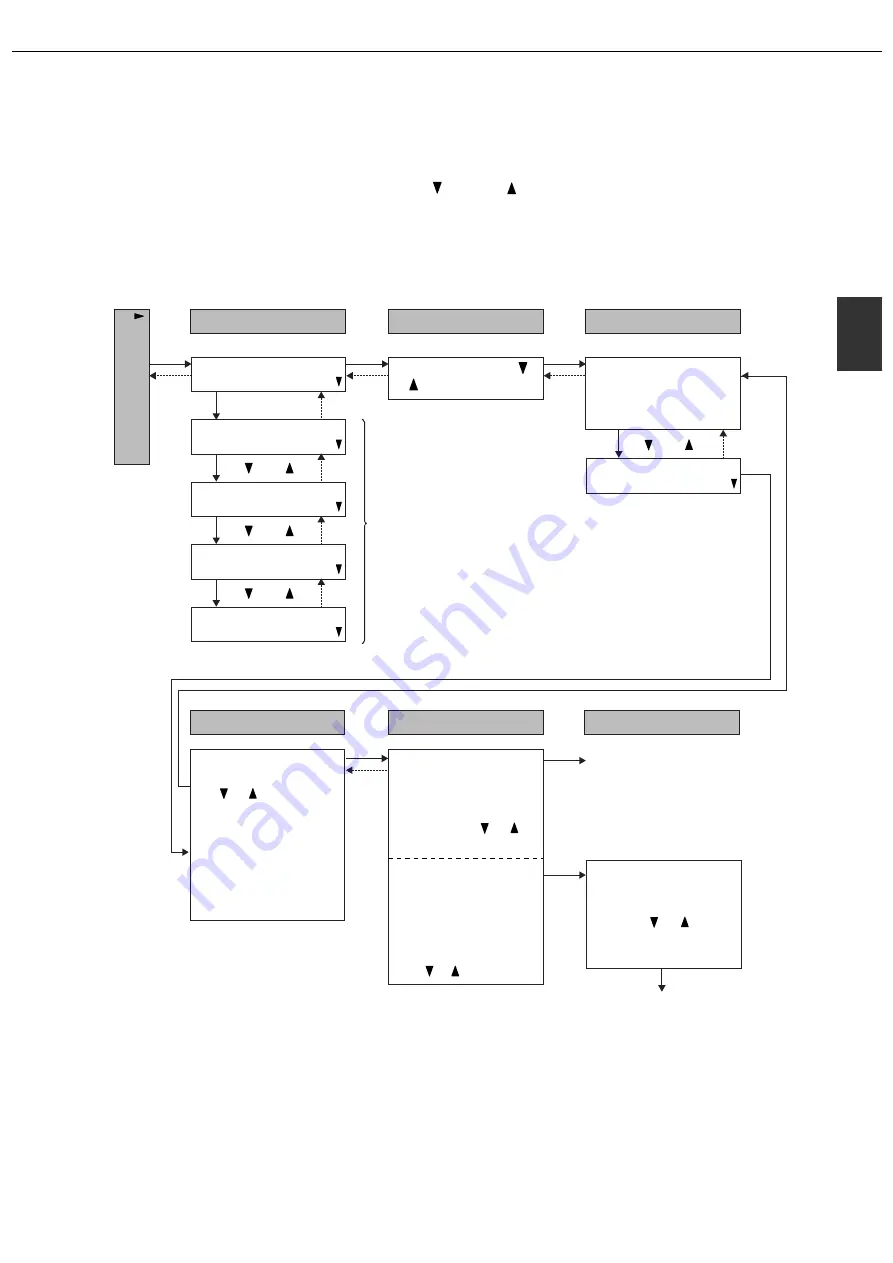
Structure of the tray setting menu (except for
the bypass tray)
"TRAY SETTING" is the first setting in "CUSTOM SETTINGS" (see page 2-18).
"TRAY SETTING" consists of the levels shown below.
To move through the settings on any level, press the [
] key or [
] key.
To select a setting or store a selection for a setting, press the [OK] key.
To move back to the previous level after completing a setting or to cancel selection of a setting, press the [BACK/C]
key.
To correct an accidental selection, press the [BACK/C] key.
LEVEL1
desired tray with the
or key.
The currently set paper
size and paper type of
the selected tray
appear.
These settings are
explained on page 2-17.
The selection is stored
and you return to level 2
The selection is stored
and you return to level 2
• If the tray paper size
setting is "extra" and
an non-standard size
of paper is loaded
(see page 2-9), select
"EXTRA OK?" with
the or key.
Set the X dimension and
then the Y dimension of
the non-standard size
using the or key,
pressing the [OK] key
after each.
• If the tray paper size
setting is "extra" and a
standard size of paper
is loaded, select the
size with the or
key.
CHANGE TRAY X
SETTING OK?
Set the type of paper
loaded in the tray with
the or key.
• PLAIN
• LETTER HEAD
• PRE-PRINTED
• PRE-PUNCHED
• RECYCLED
• COLOUR
LEVEL2
LEVEL3
LEVEL4
LEVEL5
LEVEL6
[OK]
[BACK/C]
[BACK/C]
[OK]
[BACK/C]
[OK]
[BACK/C]
[OK]
[BACK/C]
[OK]
[OK]
[OK]
[ ]
[ ]
[ ]
[ ]
[ ]
[ ]
[ ]
[ ]
AUTO TRAY SWITCHING
PRINT LIST
TOTAL COUNT
CLOCK
TRAY SETTING
CUSTOM SETTINGS
Summary of Contents for AR-C260P
Page 8: ......
Page 58: ......
Page 70: ......
Page 78: ...AR C260P OPERATION MANUAL for general information PRINTED IN JAPAN 2003K KS1 TINSE2196FCZZ ...


