background image

SELECTING PRINTING FUNCTIONS Settings in the [Paper] tab (continued)

2-7

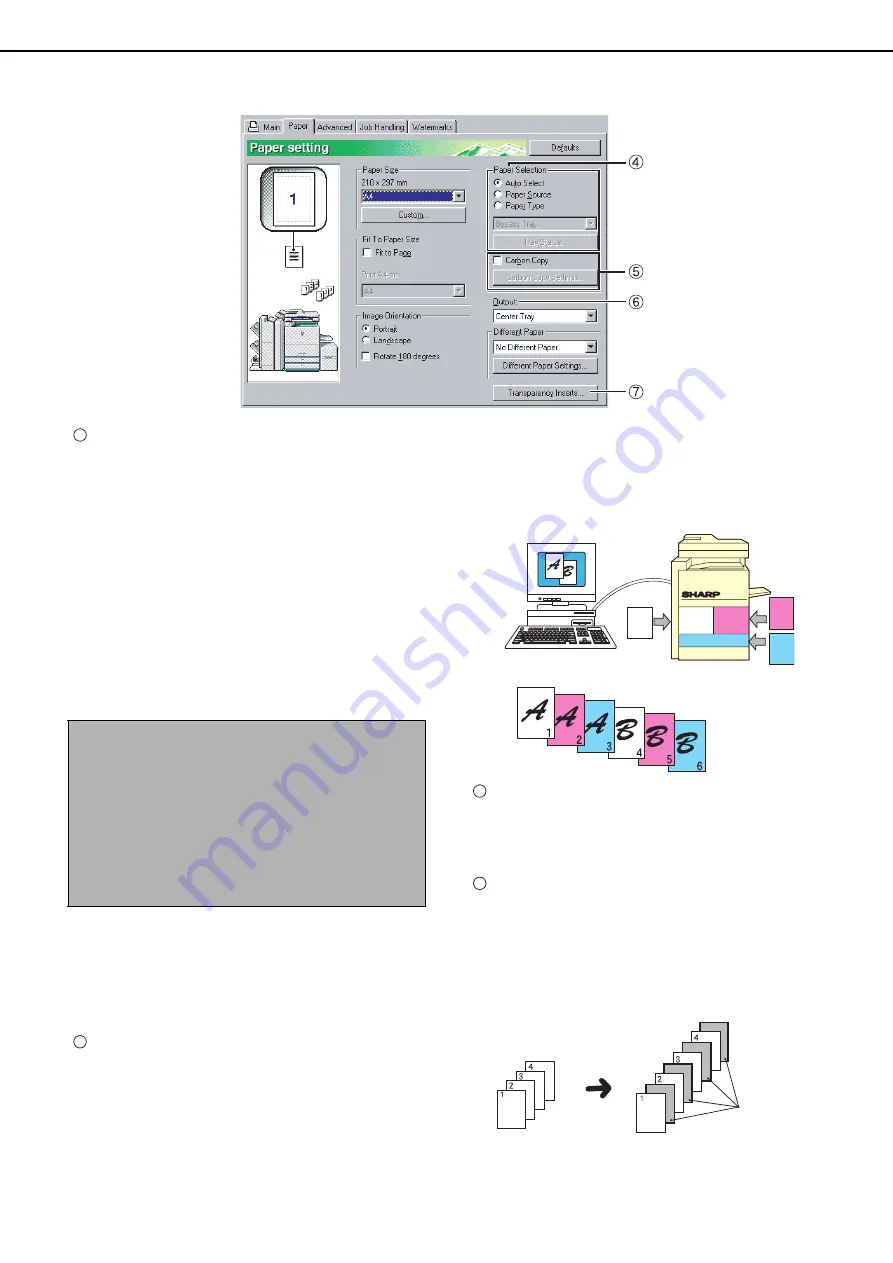
Paper selection

Select the paper tray and paper type in this item.
Default setting: Auto Select

[Auto Select]

When [Auto Select] is selected, the tray containing the
paper specified in [Paper Size] is automatically used.

[Paper Source]

When this is selected, paper is drawn from the
specified tray regardless of the paper size setting.

[Paper Type]

When this selected, paper is fed from the tray that
has the specified type of paper.
There are also 7 user type settings, and a name
can be assigned to each type (maximum of 14
characters).

[Tray Status]

Click this button to display the paper size, paper
type, and paper remaining in the machine's paper
trays.
This function operates when the machine is used
on a network.

Carbon copy

Select this function to print multiple copies of the
same document on paper from different trays. Click
the [Carbon Copy Settings] button to configure the
carbon copy settings. For example, if regular paper
is loaded in tray 1 and coloured paper is loaded in
tray 2, you can print an original and a copy of an
invoice. You can also load regular paper in tray 1
and recycled paper in tray 2 to print a copy for
presentation and a copy for retention.

[Carbon Copy Settings]

Click this button to configure settings in the
[Carbon Copy Settings] window.
Default setting: Not selected

Output

Use this setting to select the output tray. When the
stapling function is selected, the centre tray cannot
be selected.
Default setting: Centre Tray

Transparency Inserts

The printer can be instructed to separate the
transparencies by inserting blank sheets of paper.
Click this button to open the window for selection of
transparency insert settings.
This cannot be selected when two-sided printing,
the staple function, or the punch function is
selected.

NOTE

The size and type of paper and whether or not a tray
can be used for printing are set in "Paper tray
setting" in the machine's custom settings. (See
"Custom Settings" in the Operation manual (for
general information and copier operation.))
If you select [Paper Source] or [Paper Type], be sure
to configure the tray settings in the [Configuration]
tab of the printer driver properties.

4

5

Print job

Result (when [Collate] is selected)

6

7

Inserts

Original

Downloaded from: 

http://www.usersmanualguide.com/

Summary of Contents for AR-550

Page 1: ... installation requirements and cautions sections of the Operation manual for general information and copier operation Be sure to keep all operation manuals handy for reference including this manual the Operation manual for general information and copier operation and operation manuals for any optional equipment which has been installed OPERATION MANUAL for printer Downloaded from http www usersman...

Page 2: ...a trademark of Netscape Communications Corporation Macintosh Power Macintosh Mac OS LaserWriter and AppleTalk are registered trademarks of Apple Computer Inc IBM PC AT and PowerPC are trademarks of International Business Machines Corporation Pentium is a registered trademark of Intel Corporation PCL is a trademark of the Hewlett Packard Company PostScript is a registered trademark of Adobe Systems...

Page 3: ... view Help 3 2 Items in the menu frame of the Web page 3 3 E mail Print 3 7 Directly printing a file on a computer 3 8 Directly printing a file on an FTP server 3 9 CHAPTER 4 PRINTER BASIC SETTINGS MAKING CONFIGURATION SETTING 4 2 Operation procedure common to all printer configuration settings items that can be set from the operation panel 4 2 Printer Default settings 4 4 PCL settings 4 5 PostScr...

Page 4: ...computer and provides basic information on printing Page SETTING THE PRINTER DRIVER 1 2 Printer driver settings in Windows selecting and setting print conditions 1 2 Using the Help file to view explanations of the settings 1 3 Printing 1 4 Using options to print 1 6 Downloaded from http www usersmanualguide com ...

Page 5: ...e OK button Windows NT4 0 2000 XP The procedure for adjusting the settings in Windows XP is explained in the following 1 Select Printers and Faxes from the Start menu 2 Right click the installed printer driver and select Printing Preferences The screen shows the example of selecting SHARP AR M620N PCL6 3 Set each item For setting items see the printer driver help For information on viewing Help se...

Page 6: ...r name and a job name in the Job ID field 5 Click the Apply button 6 Click the OK button The document filing function will now be used each time you print a job Using the Help file to view explanations of the settings To view on screen explanations of the settings in the printer driver open the Help file Opening Help in Windows This window is the SHARP AR M620N PCL6 Properties in Windows Me Click ...

Page 7: ...Paper Advanced Job Handling and Watermarks In Windows XP click the Preferences button to open the printer driver properties 4 Click the desired tab and configure settings 5 To adjust the print contrast follow the procedure below If you do not need to adjust the print contrast go to step 6 on the next page To adjust the print contrast click the Image Adjustment button in the Advanced settings tab T...

Page 8: ...specify the paper feeding method in Paper Selection Normally Auto Select is used When finished click the OK button to close the printer properties window 7 Click the OK button in the Print window in Windows 95 98 Me NT 4 0 or the Print button in Windows 2000 XP Downloaded from http www usersmanualguide com ...

Page 9: ...t Printer select the SHARP AR M620N PCL6 printer icon In Windows 2000 the properties consist of five tabs Main Paper Advanced Job Handling and Watermarks In Windows XP click the Preferences button to open the printer driver properties 4 Click the desired tab and configure settings 1 To use the optional saddle stitch finisher to print configure the settings in the following window To use the pamphl...

Page 10: ...the desired paper type from the list Example Selecting recycled paper 6 Adjust the print contrast settings as needed page 1 4 If you do not need to adjust the print contrast go to step 7 7 In Windows 95 98 Me NT 4 0 click the OK button in the print window In Windows 2000 XP click the Print button NOTE The size and type of paper and whether or not a tray can be used for printing are set in Paper tr...

Page 11: ...ter driver The settings are changed in the software application Page SELECTING PRINTING FUNCTIONS 2 2 Settings in the Main tab 2 2 Settings in the Paper tab 2 6 Settings in the Advanced tab 2 9 Settings in the Job Handling tab 2 13 Settings in the Watermarks tab 2 16 Downloaded from http www usersmanualguide com ...

Page 12: ...r and bind at the top Pamphlet Style 1 Print on both sides of the paper and bind down the middle Default setting 1 Sided 1 Four selections are available for the pamphlet format Tiled Pamphlet Print on paper double the size of the document size selected in the application The page order will be rearranged as required for the middle binding format 2 Up Pamphlet The document size selected in the appl...

Page 13: ...Up is selected When a setting other than 1 Up is selected the layout of the pages on the sheet can be selected Example Changing the layout of 4 Up to Left and Down User Settings The user can store up to 30 sets of settings allowing the settings to be easily changed by simply selecting the desired set Default setting Factory Defaults Save Save the settings under the name that appears in User Settin...

Page 14: ...pling positions paper feed orientations allowed paper sizes and stapling limits are indicated below Possible stapling positions 6 Original image Binding edge Left Left binding Binding edge Right Rignt binding Binding edge Top Top binding 9 11 7 2 4 6 Example Vertical paper feeding One staple at top left corner Possible paper sizes A4 B5 8 1 2 x 11 Staple limit 50 sheets One staple at bottom left c...

Page 15: ...mage rotation function does not operate Paper sizes that can be punched are indicated in the specifications on page 3 3 of the Operation manual for general information and copier operation No Offset Select this when you do not wish sets of collated or grouped pages to be offset from each other Default setting Not selected Offset function Each set of printed pages is offset from the previous set in...

Page 16: ... select the Fit to Page checkbox and then select the size of paper to be used Fit To Page When this checkbox is selected the print image corresponding to the paper size selected in Paper Size is automatically reduced or enlarged to fit the paper selected in Fit To Paper Size Default setting Not selected Image Orientation Set the orientation of the document Click the radio button for Portrait or th...

Page 17: ... can print an original and a copy of an invoice You can also load regular paper in tray 1 and recycled paper in tray 2 to print a copy for presentation and a copy for retention Carbon Copy Settings Click this button to configure settings in the Carbon Copy Settings window Default setting Not selected Output Use this setting to select the output tray When the stapling function is selected the centr...

Page 18: ...e inserted in front of the specified page If 1 Sided is selected the specified page will be printed on the front side of the inserted sheet If 2 Sided is selected the specified page and the following page will be printed on the front side and back side of the inserted sheet Default setting Cover page Paper Selection Paper Source Select this if you wish to specify a paper tray to be used for Insert...

Page 19: ...the brightness of colours The brightness can be set from 0 to 100 Colours will appear closer to white as the number is increased Default setting 50 Contrast The contrast can be set from 0 to 100 The higher the number the higher the contrast Default setting 50 Text To Black Use this setting to have all text other than white text printed in black This setting is useful when printing faint coloured t...

Page 20: ...reated before the function can be used Default setting Not selected Edit Click this button to open the overlay settings window The file selected in this window will be used as the overlay Font Click this button to configure font settings Smoothing Check Smoothing to smooth the edges of text or graphics and reduce jagged lines in order to obtain virtually high resolution Photo Enhancement This mode...

Page 21: ...t be set in Different Paper Settings page 2 8 on the Paper tab The shift can be set from 0 to 20 mm When this setting is not selected tabbed paper can be inserted at specific pages of the print job and text can be printed on each tab Default setting Not selected Position of the first Tab Use this to set the distance to the first tab from the top of the tabbed paper The distance can be set from 0 m...

Page 22: ... where tabbed sheets are to be inserted Separate each page number by a comma Use a hyphen to specify continuous pages Example 1 2 3 5 10 Font Click this button to select font settings Text Enter the text to be printed on the tabs Up to 50 characters can be entered Rotate 180 degrees Select this checkbox to rotate the text on the tabs 180 degrees Example Information Shows the settings selected in T...

Page 23: ...c temporary save folder when printing is finished A user name and job name can assigned to the file page 2 15 however the job cannot be saved as a confidential file with a password page 2 14 Main Folder Select this when you wish to save a print job in the machine s Main Folder A user name and job name page 2 15 can be assigned to the file A confidential print job can be saved in this folder with a...

Page 24: ...et of copies to make sure that the margins staple positions and other aspects of the job are satisfactory the user initiates printing from the operation panel of the machine and the remaining sets are printed The sample set is included in the total number of sets If the sample set is not satisfactory the job can be deleted Pass Code 5 digit number To require that a passcode be entered at the opera...

Page 25: ... appear in the operation panel of the machine Note that if Always Use This User Name and Always Use This Job Name are not selected your Windows login name and the file name selected in the application will be automatically used The names that appear in the dialog box that appears when printing is executed will appear in the operation panel of the machine User Name Use this to set the default user ...

Page 26: ... Click this button to adjust the size or angle of the text of a stored watermark Delete Click this button to delete a stored watermark Text When you wish to create a custom watermark enter the text of the watermark here Up to 100 characters can be entered To store the entered text as a watermark click the Add button explained in above Grey Scale Use this setting to adjust the colour of the font of...

Page 27: ...our computer Page REMOTE OPERATION VIA A NETWORK 3 2 Environment Required to Access the Web Page 3 2 How to access the Web page and view Help 3 2 Items in the menu frame of the Web page 3 3 E mail Print 3 7 Directly printing a file on a computer 3 8 Directly printing a file on an FTP server 3 9 Downloaded from http www usersmanualguide com ...

Page 28: ...e function settings that can be configured remotely via the network using the machine s Web page click the General button or the Document Filing button in Help in the menu frame 1 Start your Web browser on your computer 2 In the Address box in your Web browser enter the IP address that is programmed in the machine To check the IP address see page 5 7 The Web page will open The settings in the Web ...

Page 29: ...devices the device configuration and the network status This page is view only names and locations cannot be changed in the page Device Status Shows the current status of the machine paper trays output trays toner and other supplies and page counts Out of paper and other warnings appear in red Device Configuration Shows what options are installed This includes optional paper sources optional outpu...

Page 30: ...ormation is stored Network Scanning Configure basic settings for the network scanner function Control settings the Scan to E mail subject file names and index names for the touch panel are configured Function This can be used to send print jobs to the machine Submit Print Job A file name can be entered to print a specified file If the file does not include print settings print settings can be sele...

Page 31: ...wer off and then back on When a password is set you will be prompted for the password when you attempt to access a Web page with protected settings For the User name enter user if you are accessing the page as a user or admin if you are accessing the page as an administrator For detailed information on setting passwords refer to General under Help Custom Links Set custom links that appear in the m...

Page 32: ... and SMTP are required for e mail Direct Print Configure settings in the Raw Print and E mail Print screens E mail Print is used to send e mails with attachments to the machine and have the machine print the attachments without the need for the printer driver To use this function the machine s e mail account information must be configured in the machine page 3 7 LDAP LDAP is required when using an...

Page 33: ...ther settings can be specified by entering control commands in the message of the e mail The following control commands can be entered Function Command Values Example Number of copies COPIES 1 999 COPIES 2 Staple JOBSTAPLE STAPLENO STAPLELEFT JOBSTAPLE STAPLENO Two sided printing DUPLEX OFF TOP LEFT RIGHT DUPLEX TOP Account number ACCOUNTNUMBER 5 digit number ACCOUNTNUMBER 11111 File type LANGUAGE...

Page 34: ...his way To directly print a file on a computer follow these steps 1 Click Submit Print Job in the link menu of the menu frame The Submit Print Job page appears 2 Select print settings in Job Detail For explanations of the settings click the General button in the Help in the menu frame 3 Enter the address of the file that you wish to print in Enter Filename You can also click Browse to browse for t...

Page 35: ...u frame The Pull Print Panel page appears 2 Store the FTP server information in FTP Server Setup For more information click the General button in the Help in the menu frame 3 Enter the FTP server information For more information click the General button in the Help in the menu frame 4 Click submit to store the entered information Printing a file on an FTP server from the operation panel of the mac...

Page 36: ...splay touch FILE OR FOLDER NAME 5 Select print settings in the print screen Print settings can be changed in this screen before printing For more information on the print settings see page 7 16 of the operation manual for general information and copier operation The image printed here can be saved in the quick file folder by touching the QUICK FILE key 6 Touch the PRINT key Printing begins When pr...

Page 37: ...tion settings Page MAKING CONFIGURATION SETTING 4 2 Operation procedure common to all printer configuration settings items that can be set from the operation panel 4 2 Printer Default settings 4 4 PCL settings 4 5 PostScript settings 4 5 Downloaded from http www usersmanualguide com ...

Page 38: ... The custom setting menu screen will appear 2 Touch the PRINTER CONDITION key on the custom setting menu screen to display the printer condition setting menu screen 3 Touch the key of the desired item to display its setting screen Detailed descriptions for configuration settings start on the page 4 4 4 Touch the desired setting item on the screen and touch the OK key To set another item repeat ste...

Page 39: ...uch the and keys to move back and forth through the screens To return to the category selection screen touch the OK key C The currently set numerical value is displayed D Numerical values can be set by touching the and keys CUSTOM SETTINGS LINE THICKNESS 5 PLAIN CENTRE TRAY PRINTER DEFAULT SETTINGS DEFAULT PAPER TYPE DEFAULT OUTPUT TRAY 20 1 999 C D A B These keys and indicator are available on se...

Page 40: ...ill be output to the specified tray unless otherwise specified by application software Default setting CENTRE TRAY The trays that can be selected depend on installation of peripheral devices Default paper type The paper type to be used for printing under normal conditions is set Printing will be performed on the specified type of paper unless otherwise specified Default setting PLAIN PLAIN PRE PRI...

Page 41: ...that shows correspondences between numeric values and symbol sets PCL font setting This setting is used to select the font for printing Default setting 0 Courier resident font If the optional extended font kit is installed you can also select from these fonts In addition the PCL INTERNAL FONT LIST in PRINTER TEST PAGE of LIST PRINT see page 2 15 of Operation manual for general information and copi...

Page 42: ... read this chapter to ensure correct use of the key operator programs Page KEY OPERATOR PROGRAMS 5 2 Key operator program list 5 2 Procedure for using key operator programs 5 3 Key operator program menu 5 4 DESCRIPTION OF SETTING PROGRAMS 5 5 Printer settings 5 5 Network settings 5 7 Downloaded from http www usersmanualguide com ...

Page 43: ...tings Hexadecimal dump mode 5 5 I O timeout 5 5 Enable parallel port 5 6 Parallel port emulation switching 5 6 Enable USB port 5 6 USB port emulation switching 5 6 Enable network port 5 6 Network port emulation switching 5 6 Port switching method 5 6 Parallel port ECP setting 5 6 Network settings IP address setting 5 7 Enable TCP IP 5 7 Enable NetWare 5 7 Enable EtherTalk 5 7 Enable NetBEUI 5 7 Re...

Page 44: ... A Check mark boxes are touch keys that show the status of selections A box with a check mark means the function is on enabled and an unchecked box means the function is off disabled Alternate touches of a box will change the on off status B The name of the program category or particular item to be set will appear on the touch key A touch of the key will select the item displayed C If the settings...

Page 45: ...ENSITY LEVEL PROHIBIT TEST PAGE PRINTING A4 LETTER SIZE AUTO CHANGE HEXADECIMAL DUMP MODE I O TIMEOUT ENABLE PARALLEL PORT PARALLEL PORT EMULATION SWITCHING ENABLE USB PORT USB PORT EMULATION SWITCHING ENABLE NETWORK PORT NETWORK PORT EMULATION SWITCHING PORT SWITCHING METHOD PARALLEL PORT ECP SETTING IP ADDRESS SETTING ENABLE TCP IP ENABLE NetWare ENABLE EtherTalk ENABLE NetBEUI RESET THE NIC TAN...

Page 46: ...r in place of 8 1 2 x 11 paper if A4 paper is available 8 1 2 x 11 paper cannot be automatically selected in place of A4 Interface settings These programs are used to control data transmitted to the parallel port USB port or network port of this printer Hexadecimal dump mode This program is used to output the print data from a computer in the hexadecimal dump format with corresponding characters A...

Page 47: ... ports will take place SWITCH AT END OF JOB or SWITCH AFTER I O TIMEOUT can be selected When SWITCH AT END OF JOB is selected the port will be automatically selected after each print job is completed When SWITCH AFTER I O TIMEOUT is selected the port will be automatically selected if the time set in the I O Timeout program elapses Parallel port USB port Network port Parallel port ECP setting This ...

Page 48: ...ram is used to reset all setting items of NIC Network Interface Card of this product to the factory default settings Tandem setting This setting is used to configure the IP address and port number of the client printer when you wish to have two machines which are used as TCP IP network printers print in tandem The factory default setting for the port number is 50001 Unless you experience difficult...

Page 49: ...apter provides solutions to problems you may encounter when using the machine Be sure to read this chapter whenever you encounter a problem Page TROUBLESHOOTING 6 2 Checking the IP address 6 4 Downloaded from http www usersmanualguide com ...

Page 50: ...rectly Install the appropriate printer driver See the SOFTWARE SETUP GUIDE for printer The orientation of the image is incorrect on the print Are the print orientation settings in the printer driver correct Correct the orientation in the printer driver The printed image is cut off An incorrect ratio has been selected Select a suitable ratio when printing The edges of the printed image are missing ...

Page 51: ...oes not operate when an inserter is installed Did you attempt to staple more than the maximum number of pages Check the maximum number of pages that can be stapled page 2 4 The inserter does not operate when an inserter is installed Has use of the inserter been prohibited in the key operator programs Disabling of Inserter has been enabled in the key operator programs Consult the key operator Punch...

Page 52: ...For details see the online manual Print Server Card Users Manual in the Software CD ROM 2 Checking the IP address from the CUSTOM SETTINGS screen of the operation panel 1 Press the CUSTOM SETTINGS key The custom setting menu screen will appear 2 Touch the LIST PRINT key 3 Touch the PRINTER TEST PAGE key 4 Touch the NIC PAGE key PROCESSING PRINT DATA appears in the message screen and printing begin...

Page 53: ...TER 7 APPENDIX This chapter contains product specifications and other technical information Page PRINTER SPECIFICATIONS 7 2 NOTICE PAGE PRINTING 7 3 PRINT AREA 7 4 Downloaded from http www usersmanualguide com ...

Page 54: ...specifications see the manual for the print server card The manual is provided in PDF format in the CD ROM that accompanies the print server card Operating system IBM PC AT or compatible computer Windows 95 98 Me Windows NT 4 0 ServicePack5 or later Windows 2000 Windows XP Macintosh series Mac OS 8 6 to 9 x 10 1 5 and 10 2 to 10 2 8 except 10 2 2 An optional PS3 expansion kit is needed Continuous ...

Page 55: ...n memory When there are other jobs occupying memory notice pages may tend to be printed more frequently even for jobs with small amounts of data When different paper sizes have been selected for printing within a print job and one or more of the sizes cannot be delivered to the selected exit tray or to the stapler compiler In these cases printed paper will be delivered partly to the specified dest...

Page 56: ...6 ISO 6 ASCII 1 Roman 8 2 ISO 8859 1 Latin 1 4 PC 8 Danish Norwegian 3 PC 8 5 PC 850 7 Legal 8 ISO 21 German 9 ISO 17 Spanish 11 ISO 15 Italian 12 ISO 60 Norwegian v1 13 ISO 4 United Kingdom 14 ISO 11 Swedish names 15 PC1004 OS 2 16 DeskTop 17 PS Text 18 Microsoft Publishing 19 Math 8 20 PS Math 10 ISO 69 French symbol set No 25 PC 852 26 PC 775 33 Windows 3 0 Latin 1 28 MC Text 29 Windows 3 1 Lat...

Page 57: ...OPERATION MANUAL for printer ARM550N EX2 PRINTER Downloaded from http www usersmanualguide com ...

Page 58: ... tv dvd and othes Manual users user manuals user guide manual owners manual instruction manual manual owner manual owner s manual guide manual operation operating manual user s manual operating instructions manual operators manual operator manual product documentation manual user maintenance brochure user reference pdf manual Downloaded from http www usersmanualguide com ...

Reviews: