background image

10

BYPASS FEED (including special paper)

The multi-bypass tray can be used to feed standard paper, transparency film, labels, 
envelopes and other special purpose paper. Paper measuring from 3-1/2" x 5-1/2" to 
8-1/2" x 14" and in the weight range of 14 lbs. to 34.5 lbs. can be used in this tray. 
(For paper weighing from 28 lbs. to 34.5 lbs., 8-1/2" x 11" is the maximum size.)
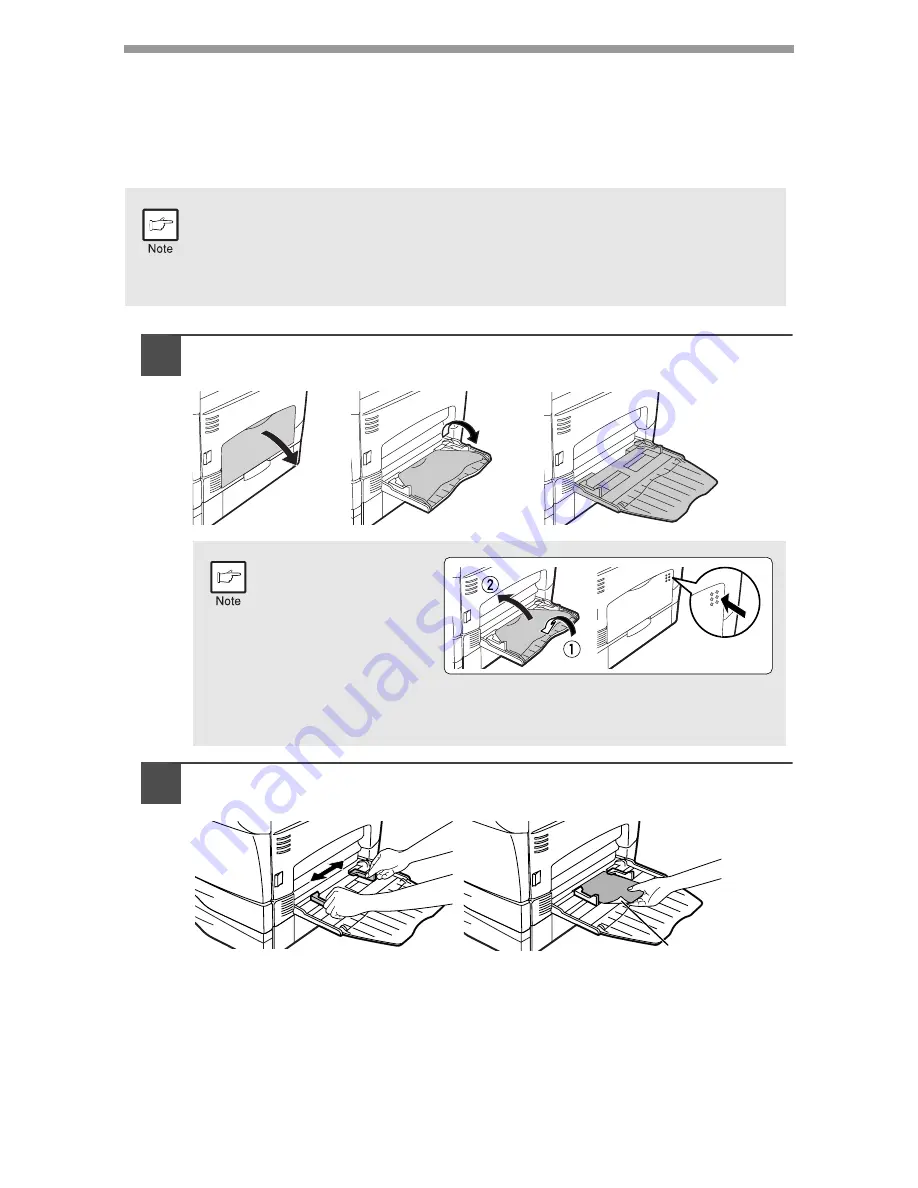
1

Open the multi-bypass tray and extend the tray.

2

Set the paper guides to the paper width. Insert the paper (print 
face down) all the way into the multi-bypass tray.

The multi-bypass tray can hold maximum of 50 sheets of paper. 
(Capacity will vary depending on the type of paper loaded.) 

The original image must be smaller than the paper or media for 
copying. If the original image is bigger than the paper or media, this 
may cause smudges on the edges of the copies.

To close the multi-
bypass tray, 
perform step 1 
and then step 2 in 
the illustration and 
push the round 
projections at the 
right of the tray 
until they click.

Print face

Summary of Contents for AR-153E N

Page 1: ...PERATION MANUAL Page INTRODUCTION 4 AR 153E AR 153E AR 157E MODEL LOADING PAPER MAKING COPIES SPECIAL FUNCTIONS MAINTENANCE TROUBLESHOOTING THE UNIT 7 12 20 25 30 69 OPTIONAL EQUIPMENT 38 APPENDIX INSTALLING THE SOFTWARE 40 AR 157E ...

Page 2: ...S To protect against loss theft record and retain for reference the copier s serial number located on the back of the unit Model Number Serial Number Date of Purchase Authorized Sharp Copier Service Department Number ...

Page 3: ...he power cord from the outlet Do not cover the unit with a dust cover cloth or plastic film while the power is on Doing so may prevent heat radiation damaging the unit Use of controls or adjustments or performance of procedures other than those specified herein may result in hazardous radiation exposure The socket outlet shall be installed near the unit and shall be easily accessible Important poi...

Page 4: ...Business Machines Corporation Adobe and Acrobat are trademarks of Adobe Systems Incorporated All other trademarks and copyrights are the property of their respective owners As an ENERGY STAR Partner SHARP has determined that this product meets the ENERGY STAR guidelines for energy efficiency Safety precautions This Digital Copier is rated Class 1 and complies with 21 CFR 1040 10 and 1040 11 of the...

Page 5: ...CARTRIDGE REPLACEMENT 25 CLEANING THE UNIT 28 6 TROUBLESHOOTING THE UNIT TROUBLESHOOTING 30 STATUS INDICATORS 31 MISFEED REMOVAL 32 DEVELOPER REQUIRED 37 MAINTENANCE REQUIRED 37 7 OPTIONAL EQUIPMENT SYSTEM CONFIGURATION 38 PRINTER SCANNER EXPANSION KIT AR PG2 38 SINGLE PASS FEEDER AR SP5 38 250 SHEET PAPER FEED UNIT AR D16 39 8 INSTALLING THE SOFTWARE SOFTWARE FOR THE SHARP PERSONAL MFP SERIES 40 ...

Page 6: ... are used to provide the user with information pertinent to the use of the unit Warns the user that injury may result if the contents of the warning are not properly followed Cautions the user that damage to the unit or one of its components may result if the contents of the caution are not properly followed Notes provide information relevant to the unit regarding specifications functions performa...

Page 7: ...al guide Original feeder tray Feeding roller cover 5 3 12 Photoconductive drum Original table Operation panel Front cover Paper tray Side cover Side cover open button Bypass paper guides Paper output tray Paper output tray extension 1 2 3 4 5 6 7 8 9 Power switch Handle Power cord Fusing unit release lever Transfer charger Charger cleaner 10 11 12 13 14 15 ...

Page 8: ...elect preset reduction enlargement copy ratios Selected copy ratio is shown by a lit indicator p 18 1 2 3 4 5 6 7 Copy ratio display key p 18 Display Displays the specified copy quantity zoom copy ratio user program code and error code SCANNER key and indicator p 53 p 60 Can be used when the Printer Scanner Expansion Kit AR PG2 is installed ONLINE key and indicator p 53 Can be used when the Printe...

Page 9: ... weighing from 28 lbs to 34 5lbs 8 1 2 x 11 is the maximum size that can be fed through the multi bypass tray Special papers such as transparency film labels and envelopes must be fed one sheet at a time through the multi bypass tray Type of paper feeding Type of media Size Weight Paper tray Standard paper Letter 8 1 2 x 11 Legal 8 1 2 x 14 Invoice 5 1 2 x 8 1 2 15 lbs to 21lbs Multi bypass tray S...

Page 10: ...d length Squeeze the lever of paper guide and slide the guide to match with the width of the paper Move paper guide to the appropriate slot as marked on the tray 3 Fan the paper and insert it into the tray Make sure the edges go under the corner hooks Do not load paper above the maximum height line Exceeding the line will cause a paper misfeed A B Paper guide B Paper guide A ...

Page 11: ...the paper and the guide and check if the guide is not set too narrow causing the paper to bend Loading paper in these ways will result in document skew or a paper jam When not using the unit for an extended period remove all paper from the paper tray and store it in a dry place If paper is left in the unit for an extended period the paper will absorb moisture from the air resulting in paper jams W...

Page 12: ... extend the tray 2 Set the paper guides to the paper width Insert the paper print face down all the way into the multi bypass tray The multi bypass tray can hold maximum of 50 sheets of paper Capacity will vary depending on the type of paper loaded The original image must be smaller than the paper or media for copying If the original image is bigger than the paper or media this may cause smudges o...

Page 13: ...thetic materials Do not use envelopes that are filled with air or envelopes that have labels or stamps attached Envelopes of which the surface is not flat because of embossing may cause the copies prints to become smudged Under high humidity and temperature conditions the glue flaps on some envelopes may become sticky and be sealed closed when copied printed Use only envelopes which are flat and c...

Page 14: ... or multi bypass tray p 10 and check the paper size p 7 If paper is not loaded see page 8 2 Turn on the unit p 13 3 Place the original If you are using the original table see Using the original table p 14 If you are using the RSPF SPF see Using the RSPF SPF p 15 When copying onto paper larger than 8 1 2 x 11 size pull out the paper output tray extension 5 Start copying Press the start key 4 Select...

Page 15: ...tting p 22 elapses after a copy or scanner job is finished or when the clear key is pressed twice The initial settings of the operation panel are shown below When copying is begun in this state the settings in the following table are used The unit will enter a power save mode once the set time has elapsed without any unit operation The settings of the power save modes can be modified See USER PROG...

Page 16: ... centering mark Gently close the original cover RSPF SPF Setting a large original AR 153E The original cover can be removed to allow copying of bulky objects 1 Simply lift the original cover straight up 2 To reattach the original cover reverse the above procedure The original table can read up to 8 1 2 x 14 original Image loss 5 32 can occur at the leading and trailing edges of the copies Also ima...

Page 17: ...ing mode is ON See USER PROGRAMS p 23 Before feeding originals in the original feeder tray be sure to remove any staples or paper clips from them Before placing curled or wavy originals into the original feeder tray be sure to flatten them If not original misfeeds may result The RSPF SPF indicator on the operation panel will light up If this indicator does not light up the originals are not proper...

Page 18: ...opy density manually or to copy photographs the exposure level can be adjusted in five steps manually 1 Press the exposure mode selector key to select the MANUAL mode or PHOTO mode 2 Use the light and dark keys to adjust the exposure level If exposure level 2 is selected the two left handmost indicators for that level will light up simultaneously Also if level 4 is selected the two right handmost ...

Page 19: ...Press and hold down the exposure mode selector key for approximately 5 seconds The PHOTO indicator will go out and the AUTO indicator will begin to blink One or two light and dark indicators corresponding to the automatic exposure level which has been selected will light up 4 Press the light or dark key to lighten or darken the automatic exposure level as desired If exposure level 2 is selected th...

Page 20: ...a zoom ratio When a ZOOM or key is pressed the ZOOM indicator will light up and the zoom ratio will be displayed in the display To verify a zoom setting without changing the zoom ratio press and hold down the copy ratio display key When the key is released the display will return to the copy quantity display To reset the ratio to 100 press the copy ratio selector key repeatedly until the 100 indic...

Page 21: ...tion indicator changes in the following order paper tray 1 paper tray 2 multi bypass tray Paper sizes that can be used in the duplex copy mode are letter legal and invoice When copying from the original table in the duplex copy mode only letter size paper can be used AR 157E The multi bypass tray cannot be used in the duplex copy mode ...

Page 22: ... copies copying orientation can be selected between Turn on Long Edge and Turn on Short Edge When making two sided copies from the original table the paper size must be letter When making two sided copies from the RSPF letter legal and invoice sizes can be used Non standard size paper cannot be used When making two sided copies the multi bypass tray cannot be used When using two sided invoice size...

Page 23: ...ying in the two sided to one sided mode Use the original to copy key to select the two sided to one sided copying mode The originals must have been set in the RSPF in step 3 on page 15 3 Select the copy settings See SET THE COPY QUANTITY p 16 EXPOSURE ADJUSTMENT PHOTO COPYING p 16 and REDUCTION ENLARGEMENT ZOOM p 18 Using the original table If you are using the original table copying is only possi...

Page 24: ... mode the power save indicator will light up and other indicators except the ONLINE indicator will go out The auto power shut off mode saves more power than the preheat mode but requires a longer time before starting copying To copy from the auto power shut off mode press the start key Then make desired copier selections and press the start key using the normal copying procedure Auto clear page 23...

Page 25: ...ower save modes auto clear time stream feeding mode and resolution of AUTO MANUAL mode 1 Press and hold down the light and dark keys simultaneously for more than 5 seconds until all the alarm indicators blink and appears in the display 2 Use the left copy quantity key to select a user program number 1 auto clear time 2 preheat mode 3 auto power shut off timer 4 stream feeding mode 5 auto power shu...

Page 26: ...y for approximately 5 seconds The total number of copies will appear in two steps each with three digits Example Total number of copies is 1 234 Program No Mode Parameters 1 Auto clear time 0 OFF 1 10sec 2 30sec 3 60sec 4 90sec 5 120sec 2 Preheat mode 0 30sec 1 60sec 2 90sec 3 Auto power shut off timer 0 2min 1 5min 2 15min 3 30min 4 60 min 5 120min 4 Stream feeding mode 0 OFF 1 ON 5 Auto power sh...

Page 27: ...and then open the side cover while pressing the side cover open button 2 Push gently on both sides of the front cover to open the cover Be sure to use only genuine SHARP parts and supplies For best copying results be sure to use only SHARP Genuine Supplies which are designed engineered and tested to maximize the life and performance of SHARP copiers Look for the Genuine Supplies label on the toner...

Page 28: ...Pull the shutter out of the toner cartridge as shown in the illustration Discard the shutter After removing the toner cartridge do not shake it or tap on it Doing so may cause toner to leak from the cartridge Put the old cartridge immediately in the bag contained in the box of the new cartridge Dispose of the old toner cartridge in accordance with local regulations Grasp the toner cartridge as sho...

Page 29: ...o close the front cover securely and then close the side cover If the covers are closed in the wrong order the covers may be damaged Even after a new toner cartridge is installed the start indicator may not light up indicating copying cannot be restarted toner is not sufficiently fed In this case open and close the side cover The copier will feed toner again approximately 2 minutes and then copyin...

Page 30: ...or RSPF SPF roller will also be copied Wipe the glass RSPF SPF scanning window cover and RSPF SPF roller with a soft clean cloth If necessary dampen the cloth with a glass cleaner Before cleaning be sure to turn the power switch off and remove the power cord from the outlet Do not use thinner benzene or other volatile cleaning agents Doing so may cause deformation discoloration deterioration or ma...

Page 31: ... by holding the tab Set the charger cleaner onto the right end of the transfer charger gently slide the cleaner to the left end and then remove it Repeat this operation two or three times 4 Return the charger cleaner to its original position Close the side cover by pressing the round projections near the side cover open button 5 Turn the power switch on p 13 Slide the charger cleaner from the righ...

Page 32: ...the unit in the photo exposure mode Cancel the photo exposure mode 16 Dust dirt smudges appear on copies Original table or original cover dirty Clean regularly 28 Original smudged or blotchy Use a clean original Striped copies Is transfer charger clean Clean the transfer charger 29 Paper misfeeds frequently Non standard paper used Use standard paper If using special papers feed the paper through t...

Page 33: ...tor Blinking An original misfeed has occurred in the RSPF SPF Remove the misfed originals referring to the description of E Misfeed in the RSPF SPF 35 Power save indicator is steadily lit The unit is in the preheat mode Press any key to cancel the preheat mode 22 The unit is in the auto power shut off mode Press the start key to cancel the auto power shut off mode 22 The paper tray indicator is bl...

Page 34: ...p 35 1 Open the multi bypass tray and side cover in that order To open the multi bypass tray see BYPASS FEED including special paper p 10 To open the side cover see TONER CARTRIDGE REPLACEMENT p 25 2 Check the misfeed location Remove the misfed paper following the instructions for each location in the illustration below If the misfeed indicator blinks proceed to A Misfeed in the paper feed area p ...

Page 35: ...open button The misfeed indicator will go out and the start indicator will light up B Misfeed in the fusing area 1 Lower the fusing unit release lever The fusing unit is hot Do not touch the fusing unit when removing misfed paper Doing so may cause a burn or other injury Do not touch the photoconductive drum green portion when removing the misfed paper Doing so may cause smudges on copies If the p...

Page 36: ...r See B Misfeed in the fusing area p 33 2 Open the front cover To open the front cover see TONER CARTRIDGE REPLACEMENT p 25 3 Rotate the feeding roller in the direction of the arrow and gently remove the misfed paper from the exit area The fusing unit is hot Do not touch the fusing unit when removing misfed paper Doing so may cause a burn or other injury Do not touch the photoconductive drum green...

Page 37: ...d indicator will go out and the start indicator will light up E Misfeed in the RSPF SPF An original misfeed may occur at one of three locations if the misfed original is seen from the original feeder tray A in the original feeder tray if the misfed original is not seen from the original feeder tray B in the exit area or C under the feeding roller Remove the misfed original following the instructio...

Page 38: ...ction of the arrow while rotating the knob With the RSPF after removing the misfed original from the exit area be sure to insert the reversing tray into the exit area until it locks in place A number may appear in the display after a minus sign indicating the number of the originals that must be returned to the original feeder tray Open and close the RSPF SPF to clear the RSPF SPF misfeed indicato...

Page 39: ... replaced DEVELOPER REPLACEMENT SHOULD ONLY BE DONE BY AN AUTORIZED SHARP SERVICE TECHNICIAN Contact your service center as soon as possible MAINTENANCE REQUIRED When maintenance indicator lights up service by an authorized SHARP service technician is required Contact your service center as soon as possible ...

Page 40: ...functions see INSTALLING THE SOFTWARE p 40 SINGLE PASS FEEDER AR SP5 The single pass feeder SPF holds up to 30 originals for automatic feeding The procedures for placing originals in the SPF cleaning the SPF and removing a misfeed are the same as for the RSPF See Using the RSPF SPF p 15 CLEANING THE UNIT p 28 and E Misfeed in the RSPF SPF p 35 250 sheet paper feed unit AR D16 Single pass feeder AR...

Page 41: ...he printer function To use the AR D16 with the printer function follow these steps to adjust the settings in the printer driver 1 Click the start button 2 Click Control Panel select Printer and Other Hardware and then click Printer and Faxes On Windows 95 98 Me NT 4 0 2000 select Setting and click Printers 3 Click the SHARP AR 153E printer driver icon and from the File menu select Properties On Wi...

Page 42: ...RSONAL MFP SERIES The supplied CD ROM includes software for this unit MFP driver Scanner driver Permits you to operate scanning function of this unit with TWAIN compliant and WIA compliant application Printer driver Enables you to use the printer function of this unit with your computer Print Status Window The print state and information on current printing are displayed on the status monitor wind...

Page 43: ...it s scanner function cannot be used Computer type IBM PC AT or compatible computer equipped with a USB1 1 1 or bi directional parallel interface IEEE 1284 Operating system 2 Windows 95 Windows 98 Windows Me Windows NT Workstation 4 0 ServicePack 5 or later 3 Windows 2000 Professional 3 Windows XP Professional 3 Windows XP Home Edition 3 Display 800 x 600dots SVGA display with 256 colors or better...

Page 44: ...nterface p 47 Parallel Installing onto Windows 95 98 Me NT4 0 2000 Parallel interface p 50 Windows Me USB Installing onto Windows 98 Me 2000 USB interface p 47 Parallel Installing onto Windows 95 98 Me NT4 0 2000 Parallel interface p 50 Windows 2000 USB Installing onto Windows 98 Me 2000 USB interface p 47 Parallel Installing onto Windows 95 98 Me NT4 0 2000 Parallel interface p 50 Windows 95 NT 4...

Page 45: ...e For this description it is assumed that the mouse is configured for right hand operation To print or scan the MFP must be in the online state The scanner feature only works when using a USB interface cable If any error message appears solve the problem following the instructions on the screen After your problem is solved the installing procedure will be continued Depending on your problem you ma...

Page 46: ...le is not connected and click the Next button 3 Click the Next button in the dialog box to install the MFP driver or Cancel to quit the installation The setup program will start to copy the files If the following screen appears while the files are being copied the message may appear more than once click Continue Anyway 4 When the The MFP driver installation is complete dialog box appears click the...

Page 47: ...er will start 8 Begin installation of the Sharpdesk This step will start if it was selected in step 4 1 After confirming the message in the Welcome to Sharpdesk installation window click the Next button 2 Read the message in the Information window and then click the Next button 3 When the Choose Destination Location window appears click the Next button 4 When the Select Program Folder window appea...

Page 48: ...rdware dialog box will appear Click the Continue Anyway button 3 When installation of the driver is completed click the Finish button to finish the scanner driver installation 12 Begin installation of the printer driver 1 SHARP AR xxxx where xxxx is the model name of your MFP will appear in the Found New Hardware Wizard dialog box Select Install the software automatically Recommended and click the...

Page 49: ...ware packages to be installed on the screen and then click the Start button The software packages to be installed will be displayed on the screen If inappropriate packages are displayed click the Back button to select appropriate packages again When any of Hardware Found or Found New Hardware Wizard messages appear during the software installation be sure to click the Cancel button If the language...

Page 50: ... are not using a parallel interface cable for connection to the MFP please click the No button 5 When the The MFP driver installation is complete dialog box appears click the OK button The Button Manager installer will start 7 Begin installation of the Button Manager This step will start if it was selected in step 4 1 After confirming the message in the Welcome window click the Next button 2 Read ...

Page 51: ...continue the Sharpdesk installation 5 Click the Finish button when the message to inform you of the completion of the installation appears 9 Click the Close button when the message to inform you of the completion of the installation appears When the Now connect the MFP interface cable to the PC This will finalize the drivers installation and settings dialog box appears click the OK button 10 Conne...

Page 52: ... connected and click OK 6 Check the contents of the package on the screen and then click the Start button The software packages to be installed will be displayed on the screen If inappropriate packages are displayed click the Back button to select only appropriate software packages When any of Hardware Found or Found New Hardware Wizard messages appear during the software installation be sure to c...

Page 53: ...hen the Model screen will appear Select the model number that is the same as the model name of your MFP and click the Next button Be sure to select the displayed model number that is the same as the MFP s model name If they are not the same the driver will not be installed correctly 5 Establish the printer settings and click the Next button Select LPT1 for the port to be used If LPT1 does not appe...

Page 54: ... start to copy the files If the dialog box asking If you have TIF files saved using Photoshop or Imaging for Windows you should hit Skip appears answer the question to continue the Sharpdesk installation 5 Click the Finish button when the message to inform you of the completion of the installation appears 9 Click the Close button when the message to inform you of the completion of the installation...

Page 55: ...situations During copying or scanning The unit is in the auto power shut off mode When a misfeed or error has occurred ONLINE indicator The ONLINE key is pressed and on line and off line are changed On Indicates the unit is ready for printing or scanning is being performed On line Blinking Printing or data is being received from a computer Off Copying is being performed Off line Power save indicat...

Page 56: ...tray The procedure for loading paper is the same as for loading copy paper See LOADING PAPER p 7 2 Open the document you intend to print and select Print from the application s File menu 3 Make sure that SHARP AR xxxx where xxxx is the model name of your unit is selected as the current printer If you intend to change any print setting click the Preferences button to open the setting dialog On Wind...

Page 57: ...emaining print data will be sent to the unit and printing will resume If copying is being performed when printing is started copying will continue After copying is complete printing will be executed when the clear key is pressed twice the ONLINE key is pressed to switch the unit to the online state or approximately 60 seconds auto clear time elapse The auto clear time varies with a user program se...

Page 58: ...he menu that appears 2 In the Properties screen click the Events tab 3 Click the Select an event button and select ScanMenu SC1 from the pull down menu Select Button Manager SHARP Personal MFP series in Start this program and click Apply 4 Repeat Step3 to set ScanMenu SC2 through ScanMenu SC6 Click the Select an event button and select ScanMenu SC2 from the pull down menu Select Button Manager SHA...

Page 59: ...rough ScanMenu SC6 Click the Scanner events and select ScanMenu SC2 from the pull down menu Select Button Manager SHARP Personal MFP series in Start this program and click Apply Do the same for each ScanMenu through ScanMenu SC6 When the settings have been completed click the OK button to close the screen When the settings have been completed in Windows start the Button Manager Adjust detailed set...

Page 60: ...Flow of the Button Manager setting The Button Manager can directly handle a AR xxxx where xxxx is the model name of your unit series device event and start your selected application according to the scan setting made on the AR xxxx where xxxx is the model name of your unit operation panel SC1 SC2 SC3 SC4 SC5 SC6 This will scan directly into your application from the device This dialog shows the SC...

Page 61: ...indows Me Windows 2000 and Windows XP Windows Platforms provide a mechanism for software to handle external events for a scanner device like the SHARP AR xxxx where xxxx is the model name of your unit series products This mechanism is controlled by the device manager on a device basis Applications that can handle events from a scanner camera device register with the Windows Event Manager and shown...

Page 62: ...nning is not possible during a copy job If the unit is used to begin a scan job during a print job the scan job will be stored and scanning will begin when the print job is completed When scanning an original that has been placed in the RSPF SPF only one original can be placed unless you are using Sharpdesk Application number Application launched SC1 Sharpdesk if installed SC2 E mail your standard...

Page 63: ...n Using the SHARP TWAIN 1 Place the original s you wish to scan on the original table RSPF SPF For the procedure for placing the original see ORIGINAL PLACEMENT p 14 2 After starting Sharpdesk click the File menu and select Select Scanner Scanning is not possible during a copy and print job The method for starting the scanner driver differs depending on the type of application Refer to the manual ...

Page 64: ...r scanning refer to the online manual and help file and click the Scan button Scan is started If you use more than one scanning device select the scanner you want to use through the application The method for accessing the Select Scanner option depends upon the application For more information see the online manual or the help file of your application Click here ...

Page 65: ...maging Tasks 3 The Scanner and Camera Wizard appears Click Next and establish the basic settings for scanning For information on the settings see the Windows XP help file After completing each setting click Next 4 Select a name format and folder for the scanned image For information on the image name file format and folder see the Windows XP help file 5 Scanning begins When scanning ends select th...

Page 66: ...ompleted How to use the online manual Explains how to use the online manual Print Provides information on how to print a document Scan Explains how to scan using the scanner driver and how to adjust the settings for the Button Manager Troubleshooting Provides instructions on how to solve driver or software problems 1 Turn on your computer 2 Insert the supplied CD ROM into your CD ROM drive 3 Click...

Page 67: ... click the CD ROM icon Windows95 98 Me NT4 0 2000 double click My Computer and then double click the CD ROM icon 4 Double click the Acrobat folder and then double click the ar500enu exe icon Follow the on screen instructions to install Acrobat Reader The online manual can be printed out using Acrobat Reader SHARP recommends printing out the sections which you refer to regularly Refer to Help of Ac...

Page 68: ...t icon in the printer dialog box and then click Properties 4 Click the Port tab Details tab on Windows 95 98 Me in the Properties dialog box select FILE in the Print to the following port list box and click the OK 5 Right click the icon of the printer to be used and click Properties 6 Click the Port tab Details tab on Windows 95 98 Me in the Properties window select LPT1 or the currently used port...

Page 69: ...cable into the USB interface connector located on the rear of the unit 3 Insert the other end of the cable into the interface connector of your computer or the USB hub connected to your computer If you intend to use the unit as a scanner it must be connected to your computer with a USB interface cable The scanner function cannot be used if the unit is connected with a parallel cable USB is availab...

Page 70: ...d parallel interface cable 2 Ensure that your computer and unit are turned off 3 Insert the cable into the parallel interface connector located on the rear of the unit and fasten with clasps 4 Insert the other end of the cable into the interface connector of your computer ...

Page 71: ...st copy time Approximately 9 6 seconds paper A4 exposure mode AUTO copy ratio 100 Copy ratio Variable 25 to 400 in 1 increments total 376 steps Fixed 25 64 78 100 129 400 Exposure system Original table Moving optical source slit exposure stationary platen with automatic exposure RSPF Moving original Fusing system Heat rollers Development system Magnetic brush development Light source Cold cathode ...

Page 72: ...idity 20 to 85 Noise level Sound Power Level LwA 1B 10dB Copying 6 0 B Standby 3 7 B Sound Pressure Level LpA bystander positions Copying 46 dB A Standby 23 dB A Noise emission measurement in accordance with ISO 7779 Emission concentration measurement according to RAL UZ 62 Ozone less than 0 02 mg m3 Dust less than 0 075 mg m3 Styrene less than 0 07 mg m3 Optional equipment Printer Scanner Expansi...

Page 73: ...iant bi directional parallel interface Only for printer Acceptable originals Weight 14lbs to 23 9 lbs Size 5 1 2 x 8 1 2 to 8 1 2 x 14 Capacity Up to 30 sheets Power supply Drawn from the unit Weight Approx 6 6 lbs Dimensions 19 6 W x15 0 D x 4 3 H Paper size 5 1 2 x 8 1 2 to 8 1 2 x 14 Paper weight 15 lbs to 21 lbs Paper capacity One paper tray with capacity for 250 sheets of 21 lbs bond paper We...

Page 74: ...68 USB interface cable 67 Conventions used in the manual 4 Copy flow 12 Copy quantity 16 Copy quantity key 6 16 23 Copy ratio display key 6 18 Copy ratio selector indicator 6 18 Copy ratio selector key 6 18 D Dark key 6 16 Developer replacement required indicator 6 31 37 Developer required 37 Display 6 Displaying total number of copies 24 E Exposure adjustment 16 Exposure mode indicator 6 16 Expos...

Page 75: ...m 5 33 34 Power cord 5 Power off 14 Power on 13 Power save indicator 6 53 Power switch 5 13 Preheat mode 23 Printer driver 40 Proper storage for supplies 2 R Reduction enlargement zoom 18 RSPF SPF 15 RSPF SPF indicator 6 15 RSPF SPF misfeed indicator 6 35 S Scanner driver 40 Scanner indicator 6 53 SCANNER key 6 60 Scanning from your computer 61 Scanning with the Scanner and Camera Wizard 63 Sharpd...

Page 76: ... 10 Paper tray 8 Loading the original Original table 14 RSPF SPF 15 Opening the printer driver 54 Power off 14 Power on 13 Printing 54 Removing paper jams Fusing area 33 Lower paper feed area 35 Paper feed area 33 RSPF SPF 35 Transport area 34 Replacing the toner cartridge 25 Scanning Button Manager 56 Scanner and Camera Wizard 63 SHARP TWAIN 61 Selecting the tray 19 Setting the copy quality AUTO ...

Page 77: ...another or over a network 3 Termination This license is effective until terminated You may terminate this License at any time by destroying the Software and related documentation and all copies thereof This License will terminate immediately without notice from SHARP and or SHARP S Licensors if you fail to comply with any provision of this License Upon termination you must destroy the Software and...

Page 78: ...L OR WRITTEN INFORMATION OR ADVICE GIVEN BY SHARP OR A SHARP AUTHORIZED REPRESENTATIVE SHALL CREATE A WARRANTY OR IN ANY WAY INCREASE THE SCOPE OF THIS WARRANTY SHOULD THE SOFTWARE PROVE DEFECTIVE YOU AND NOT SHARP OR A SHARP AUTHORIZED REPRESENTATIVE ASSUME THE ENTIRE COST OF ALL NECESSARY SERVICING REPAIR OR CORRECTION SOME JURISDICTIONS DO NOT ALLOW THE EXCLUSION OF IMPLIED WARRANTIES SO THE AB...

Page 79: ...ealth Hazards Acute oral toxicity LDLo of this toner is over 2 000mg kg Mutagenicity The result of Ames test is negative Carcinogenicity In 1996 the IARC reevaluated carbon black as a Group 2B carcinogen possible human carcinogen This classification is given to chemicals for which there is inadequate human evidence but sufficient animal evidence on which to base an opinion of carcinogenicity The c...

Page 80: ...ve Use of a dust mask is recommended when handling a large quantity of toner or during long term exposure as with any non toxic dust Engineering Control Ventilation Not required Work Hygienic Practice Inhalation should be minimized as with any non toxic dust Steps to be taken in case of Spill or Leak Sweep up or clean up with vacuum cleaner Waste Disposal Method Waste material may be dumped or inc...

Page 81: ...Ingestion No No Possible but very unusual Health Hazards Acute oral toxicity LDLo of this toner which is included in this developer is over 2 000mg kg Mutagenicity The toner which is included in this developer has been tested on Ames test The result is negative Carcinogenicity In 1996 the IARC reevaluated carbon black as a Group 2B carcinogen possible human carcinogen This classification is given ...

Page 82: ...rsonal Protection Information Respiratory Eye Protection and Protective Glove None required under normal use Engineering Control Ventilation Not required Work Hygienic Practice Not required Steps to be taken in case of Spill or Leak Sweep up or clean up with vacuum cleaner Waste Disposal Method Waste material may be dumped or incinerated under conditions which meet all federal state and local envi...

Page 83: ...ed due to environmental considerations For disposal or recycling information please contact your local authorities or the Electronics Industries Alliance www eia org NOTICE BE SURE TO ASK YOUR AUTHORIZED SHARP DEALER ABOUT THE WARRANTY THAT YOUR SELLING DEALER EXTENDS TO YOU In order to assure you the end user of warranty protection Sharp extends a limited warranty to each of its authorized dealer...

Page 84: ...PRINTED IN CHINA KS TINSE0800QSZZ 2002G Printed on Recycled Paper SHARP ELECTRONICS CORPORATION Sharp Plaza Mahwah New Jersey 07430 2135 www sharp usa com 1 ...

Page 85: ......

Page 86: ...g an Image from the Scanner and Camera Wizard Windows XP 18 Outline of Button Manager 21 Button Manager Settings 22 Identifying Unit Problems 23 Check the Connection between the Unit and Computer 24 Check Your Computer 25 Plug and Play Screen does not Appear when the USB is connected 26 Failed to Install the MFP Driver Windows 2000 XP 27 Faint Uneven or Smeared Print Output 28 Characters or Graphi...

Page 87: ... to the desired pages by simply clicking its bookmark How to Print Out the Online Manual In order to print out a hard copy of the Online Manual for your reference go to Acrobat Reader click the File menu and select Print After specifying the printer setting click the Print OK on Windows 95 98 Me NT 4 0 button to print Note In this online manual screen images and operating procedures are mainly for...

Page 88: ... Ensure printing has been completed before turning the power off Do not remove the power cord before turning the unit off Prepare the document you intend to print Send print data from your computer Printing Exit printing Open the printer driver setup screen and set the print preferences Reference Printer Driver Settings Printing a Watermark Fitting the Printed Image to the Paper Printing Multiple ...

Page 89: ...reen On Windows 95 98 Me NT 4 0 click the Properties button Reference Printer Driver Settings Printing a Watermark Fitting the Printed Image to the Paper Printing Multiple Pages on One Page Two sided Printing AR 157E only 4 Click the Print button in the Print dialog box On Windows 95 98 Me NT 4 0 click the OK button Printing starts according to your preferences Note Windows 2000 does not have the ...

Page 90: ...inters and Faxes On Windows 2000 click Printers 3 Click the SHARP AR XXXX where XXXX is the model name of your unit printer driver icon and select Properties from the File menu 4 Click the Printing Preferences button in the General tab The printer driver setup screen will appear Reference Printer Driver Settings Windows 95 98 Me NT 4 0 1 Click the Start button select Settings and then click Printe...

Page 91: ... at N Up Printing Document Style AR 157E only Fit To Paper Size Image Orientation and Watermark are shown in this image The tray selected in Paper Selection in the Paper tab appears in blue You can also click on a tray to select it Cancel button Click this button to exit the dialog box without making any changes to the settings Apply button Click to save your settings without closing the dialog bo...

Page 92: ...ab Reference See Basic Printing for details on how to open the printer driver How to Print a Watermark From the Watermark drop down list select the watermark for example CONFIDENTIAL you wish to print on your document and start printing For details on watermark settings view printer driver Help Reference Printer Driver Settings Print sample Printing a Watermark ...

Page 93: ... Select the paper size for the print data from Paper Size 3 Check the Fit To Page box 4 Select the paper size for Fit To Paper Size which corresponds to the size of paper in the unit Now the printed image will automatically fit the paper set in the unit Note The Fit To Paper Size setting is not available when N Up Printing is selected Reference Printing Multiple Pages on One Page Paper Size Letter...

Page 94: ...er setup screen select 2 Up or 4 Up for N Up Printing on the Main tab If you select the Border checkbox border lines will be printed on each page Note The N Up Printing setting is not available when Fit To Paper Size is selected Reference Fitting the Printed Image to the Paper 2 Up 4 Up Border Border N Up Printing Multiple Pages on One Page ...

Page 95: ...The following example shows the result when portrait data is printed on both sides of the paper Note When using two sided printing select Tray 1 or Tray 2 for the Paper Source in the Paper tab Printing result Print data 2 Sided Book 2 Sided Tablet The pages are printed so that they can be bound at the side The pages are printed so that they can be bound at the top Two sided Printing AR 157E only ...

Page 96: ...rent status of the print job Document Name Displays the name of the active print job Help button Click this button to display help file for the Print Status Window Status icon This icon informs you of the print status Tab Index which allows you to switch between the two setup screens Cancel Job button Click this button during printing to cancel the job that is currently being executed Close button...

Page 97: ...n which the unit s scanning function can be used is subject to certain limitations For details see BEFORE INSTALLATION in the Operation Manual Place the original in the scanning position Reference For more detail refer to the ORIGINAL PLACEMENT in the Operation Manual Start up the Scanner and Camera Wizard from Control Panel in your computer Start up a Twain compliant or WIA compliant application ...

Page 98: ...lect Select Scanner 3 Select SHARP Personal MFP series and click the Select button Click here Note If you are using Windows XP you can also select WIA SHARP AR XXXX where XXXX is the model name of your unit to scan using the WIA driver Reference Scanning an Image from a WIA Compliant Application Depending on your system SHARP Personal MFP series 1 0 32 32 and WIA SHARP AR XXXX 1 0 32 32 where XXXX...

Page 99: ...fter clicking the Scan button press the Esc key on your keyboard When you close the scanner driver after scanning the image data will appear as a new file in Sharpdesk Note If the rotation or angle of the image is different reset the original and click the Preview button again If you set multiple pages in the RSPF SPF the unit previews only the page placed on the top of the originals and then send...

Page 100: ...to your preferences Before clicking the Scan button check if your preferences are set correctly Scanning Mode menu Switch the scanning mode between the Preset and Custom Settings screen For details on each of these settings click the Help button to display Help Note To cancel your scanning job after clicking the Scan button press the Esc key on your keyboard or the clear key on the unit Note Selec...

Page 101: ... Area Adjustment button Click when the preview screen is displayed to automatically set the scanning area Click the Auto Scan Area Adjustment button to adjust the scanning area automatically Entire preview screen Brightness Contrast button Click to change to the Brightness Contrast screen and adjust the brightness and contrast settings for scanning Scanning an Image from a TWAIN Compliant Applicat...

Page 102: ...tion on setting an original for scanning refer to ORIGINAL PLACEMENT in the Operation Manual 2 After starting Paint click the File menu and select From Scanner or Camera The scan screen of the WIA driver will appear Click here Note If you have WIA drivers for other devices installed in your computer the Select Device screen will open Select SHARP AR XXXX where XXXX is the model name of your unit a...

Page 103: ... your application to select a file name and folder for the scanned image and save the image To cancel your scanning job after clicking the Scan button click the Cancel button Note If you select Document Feeder for the Paper source and click the Preview button the top original in the RSPF SPF is previewed The previewed original is sent to the original exit area so you will need to return it to the ...

Page 104: ...ference For information on setting an original for scanning refer to ORIGINAL PLACEMENT in the Operation Manual 2 Click the start button click Control Panel click Printers and Other Hardware and then click Scanners and Cameras 3 Click the SHARP AR XXXX where XXXX is the model name of your unit icon and then click Get pictures in Imaging Tasks The Scanner and Camera Wizard will appear 4 Click the N...

Page 105: ...t and folder for saving the image and then click the Next button JPG BMP TIF or PNG can be selected for the format To begin scanning click the Next button Note If you select Document Feeder for the Paper source and click the Preview button the top original in the RSPF SPF is previewed The previewed original is sent to the original exit area so you will need to return it to the RSPF SPF before star...

Page 106: ...rm and then click the Next button If you are ready to end the session click Nothing I m finished working with these pictures 8 Click the Finish button The Scanner and Camera Wizard closes and the scanned image is saved in the specified folder Scanning an Image from the Scanner and Camera Wizard Windows XP part 3 ...

Page 107: ...ons of Button Manager are shown below You can specify and change your six scan menu options from six functions Refer to Button Manager Settings to specify and change the scan menu options Tab Click to set scan menu options Application Selection area Select the start up application here Help button Click this button to display the help file for Button Manager Apply button Click to save your setting...

Page 108: ...tion Selection area Reference Outline of Button Manager 5 Set up the Color Mode Edge and other scan settings in the Scan Setup area Reference Outline of Button Manager 6 Click the OK button You have completed the settings Note If the Button Manager icon does not appear on the task bar click the start button select All Programs Programs on Windows 98 Me 2000 select SHARP Personal MFP series and the...

Page 109: ...ted to your computer with a USB cable Check Your Computer Plug and Play Screen does not Appear when the USB is connected Failed to Install the MFP Driver Windows 2000 XP Check the Connection between the Unit and Computer A 1 2 B What type of trouble do you have Printing trouble Scanning trouble B A Faint Uneven or Smeared Print Output Characters or Graphics are not Printed in Correct Position Noth...

Page 110: ...puter It is also advisable to ensure that the connector pins are not bent Reference See CONNECTING THE INTERFACE CABLE in the Operation Manual for more details on interface connection CHECK3 Are any other USB peripherals being connected along with the unit If other USB peripherals are connected through the same hub disconnect them to see if the problem still exists If the USB cable becomes disconn...

Page 111: ...se it is recommended to defragment your hard disk You may use the Windows tools or a commercially available hard disk defragmenting tool CHECK3 If your computer is connected to the unit through the parallel port is the parallel port LPT mode set to other than EPP mode The unit may not operate correctly if the parallel port mode is set to EPP mode To set the parallel port mode to a mode other than ...

Page 112: ...s controllers Two items will display your Controller chipset type and Root Hub If these items appear you can use the USB port If the Universal Serial Bus controllers shows a yellow exclamation point or does not appear you must check your computer manual for USB troubleshooting or contact your computer manufacturer 4 When you make sure that the USB port is enabled install the software referring to ...

Page 113: ...then click System On Windows 2000 double click the System icon 3 Click the Hardware tab and then click the Driver Signing button The following dialog box will open 4 Check the What action do you want Windows to take File signature verification on Windows 2000 If the option Block has been selected for your computer then the MFP driver will not be installable Select the option Warn and then install ...

Page 114: ...dicator lights up the developer should be replaced DEVELOPER REPLACEMENT SHOULD ONLY BE DONE BY AN AUTHORIZED SHARP SERVICE TECHNICIAN Contact your service center as soon as possible CHECK5 Is it near time to replace the toner cartridge When it is near time to replace the toner cartridge the toner cartridge replacement required indicator will light up on the unit operation panel When it is time to...

Page 115: ...mage Orientation option is set to your requirements CHECK3 Is the paper loaded correctly If a document is physically damaged when it is output or the image is skewed on the paper discard the damaged sheet reinsert the paper supply and print again Insert the paper so that there is no visible space between the paper and the paper guides Reference See LOADING PAPER in the Operation Manual for more de...

Page 116: ... unit selected correctly in the current application for the print job When choosing Print from the File menu located in applications be sure you have selected SHARP AR XXXX where XXXX is the model name of your unit printer displayed in the Print dialog box CHECK4 Has the printer driver been installed properly Check if the printer driver has been installed following the steps listed below 1 Click t...

Page 117: ...tom Settings screen Reference Scanning an Image from a TWAIN Compliant Application CHECK4 Have you adjusted the brightness and contrast suitably If you are scanning with a TWAIN compliant application and the resulting image has unsuitable brightness or contrast for example it is too bright activate the Auto Brightness Contrast Adjustment setting on the Main tab of the Custom Settings screen Click ...

Page 118: ...the detail on how to set the original CHECK2 Have you set the original correctly on the original table Place the original on the original table in the direction as shown in the illustration below CHECK3 Have you set the original correctly on the RSPF SPF To scan from the RSPF SPF align the guide to the original as shown in the illustration below Align the center of the original with mark Align the...

Page 119: ...d of program timeout after copying To send a scanning job immediately press the clear key twice ONLINE key or SCANNER key on the unit Reference For more detail refer to USER PROGRAMS in the Operation Manual CHECK6 Are you trying to scan multiple originals in the RSPF SPF at once When multiple originals are loaded in the RSPF SPF it depends on your application whether only one original can be scann...

Page 120: ... Panel 2 Click Add or Remove Programs On Windows 95 98 Me NT 4 0 2000 double click the Add Remove Programs icon The following dialog box will open Delete the SHARP MFP driver and the Button Manager SHARP Personal MFP series from the list of applications For more information refer to your operating manual or to the help files for your operating system 3 Restart your computer The deletion of the MFP...

Page 121: ...Preview button Scanner and Camera Wizard 19 TWAIN driver 14 WIA driver 17 Preview Screen 15 Print 2 Print Status Window 10 Printer Driver Settings 5 Printing a Watermark 6 Printing Overview 2 S Scan 11 Scan button TWAIN driver 14 WIA driver 17 Scan Setup 21 Scanner and Camera Wizard 11 Scanning an Image Scanner and Camera Wizard 18 TWAIN driver 12 WIA driver 16 Scanning Mode 14 Scanning Overview 1...

Reviews: