background image

!

#%

VGA

The VGA adjustment is only available 

when the input source is PC and your 

TV is receiving a computer signal. Select 

Auto Adjust

 for adjusting the settings 

automatically, or select 

H. Position

V. Position

Phase

 or 

Clock

 and use 

,.

or 

-

 to adjust your preference.

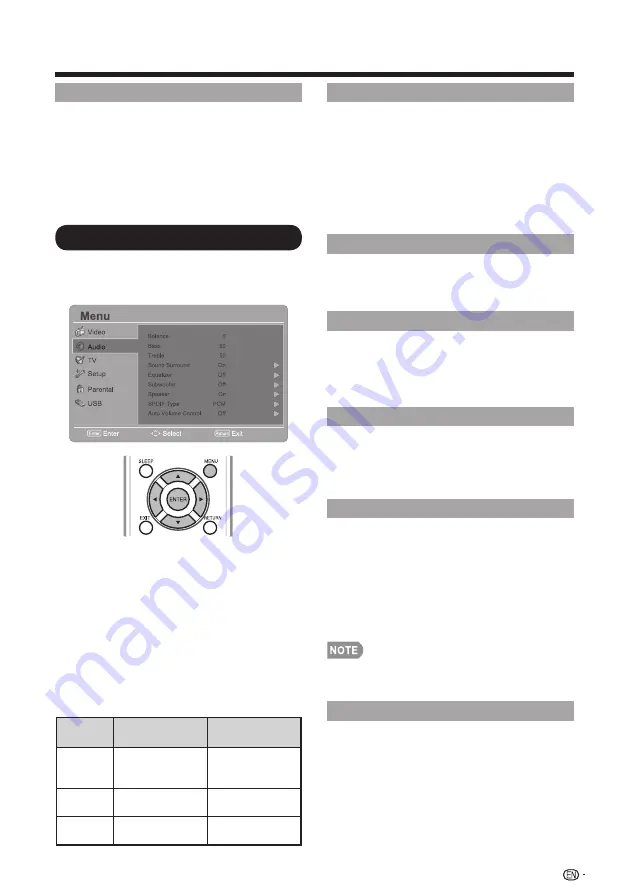
Audio Menu

Adjusts the sound quality to your 

preference with the following settings.

Example

1. 

 Press 

MENU 

to display the MENU 

screen, and then press 

*

/

+

 to select 

“Audio” and press 

ENTER

.

or

.-.

to 

enter it.

2. 

Press 

*

/

+.

to select a specific 

adjustment item and press 

ENTER

.

or

.

-.

to set.

3. 

Press 

,

/

-

 to adjust the desired 

setting.

4. 

 Press 

MENU

 to exit.

Selected 

item

,

.

button

-

.

button

Balance 

Decrease audio 

from the right 

speaker

Decrease audio 

from the left 

speaker

Bass

For weaker 

bass

For stronger 

bass

Treble

For weaker 

treble

For stronger 

treble

Sound Surround

The surround function produces Surround 

effect from the speakers.

On:

 Makes it possible to enjoy natural, 

realistic surround sound.

Off:

 Outputs the normal sound.

•  You can choose Surround by pressing 

SURROUND

 on the remote control 

unit. (See page 27.)

Equalizer

Select the preset audio mode from

 Off, 

Rock, Pop, Live, Dance, Techno, 

Classic,

 or 

Soft

.

Subwoofer

The subwoofer function is dedicated to 

reproducting lower bass frequency effect.
Select the preset audio mode from

 Off, 

Low, Medium, 

or

 High.

Speaker

Choose to turn on or off the TV internal 

speaker. The audio output signals will not 

be turned off even though the TV speaker 

is off. The default setting is On.

SPDIF Type

Select the type of digital audio output. The 

default setting is 

PCM

.

• 

Off:

 Disables digital audio output.

• 

PCM:

 Outputs audio to PCM type.

• 

Dolby Digital:

 Outputs audio to Dolby 

Digital type if the source supports Dolby 

digital audio.

• 

SPDIF Type

 is disabled when HDMI is 

selected from the input source.

Auto Volume Control

Choose On or Off to adjust volume to be 

consistent across programs and channels 

automatically.

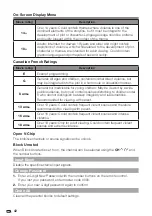
On-Screen Display Menu

Summary of Contents for AQUOS LC-42LE620UT

Page 1: ...PORTANTE Lea este manual de operación antes de comenzar a operar el equipo OPERATION MANUAL MODE D EMPLOI MANUAL DE OPERACIÓN LIQUID CRYSTAL TELEVISION TÉLÉVISEUR ACL TELEVISOR CON PANTALLA DE CRISTAL LÍQUIDO ESPAÑOL FRANÇAIS SHARP ELECTRONICS CORPORATION Sharp Plaza Mahwah New Jersey 07495 1163 SHARP CORPORATION Printed in China Imprimé au Chine Impreso en China Z41G460184301A ...

Page 2: ...XPOSE THIS PRODUCT TO RAIN OR MOISTURE CAUTION RISK OF ELECTRIC SHOCK DO NOT OPEN CAUTION TO REDUCE THE RISK OF ELECTRIC SHOCK DO NOT REMOVE COVER OR BACK NO USER SERVICEABLE PARTS INSIDE REFER SERVICING TO QUALIFIED SERVICE PERSONNEL This bolt of lighting indicates uninsulated material within your unit may cause an electric shock For the safety of everyone in your household please do not remove p...

Page 3: ...and used in accordance with the instructions may cause harmful interference to radio communications However there is no guarantee that interference will not occur in a particular installation If this equipment does cause harmful interference to radio or television reception which can be determined by turning the equipment off and on the user is encouraged to try to correct the interference by one ...

Page 4: ...rovided plug does not fit into your outlet consult an electrician for replacement of the obsolete outlet 10 Protect the power cord from being walked on or pinched particularly at plugs convenience receptacles and the point where they exit from the apparatus 11 Only use attachments accessories specified by the manufacturer 12 Use only with the cart stand tripod bracket or table specified by the man...

Page 5: ...ervicing instructions are for use by qualified service personnel only To reduce the risk of electric shock do not perform any servicing other than that contained in the operating instructions unless you are qualified to do so Outdoor Antenna Grounding If an outside antenna is connected to the television equipment be sure the antenna system is grounded so as to provide some protection against volta...

Page 6: ...amplifiers that produce heat The Liquid Crystal panel is a very high technology product with 2 073 600 pixels LC 42LE620UT LC 46LE620UT LC 55LE620UT giving you fine picture details Occasionally a few non active pixels may appear on the screen as a fixed point of blue green or red Please note that this does not affect the performance of your product Lightning For added protection for this televisio...

Page 7: ...h cotton flannel etc To protect the display panel do not use a dirty cloth liquid cleaners or a chemical cloth wet dry sheet type cloth etc This may damage the surface of the display panel Wiping with a hard cloth or using strong force may scratch the surface of the display panel Use a soft damp cloth to gently wipe the display panel when it is really dirty It may scratch the surface of the displa...

Page 8: ...le watching a program especially on a larger than life flat panel display Care should be taken to place or install the display where it cannot be pushed pulled over or knocked down Care should be taken to route all cords and cables connected to the flat panel display so that they cannot be pulled or grabbed by curious children WALL MOUNTING IF YOU DECIDE TO WALL MOUNT YOUR FLAT PANEL DISPLAY ALWAY...

Page 9: ...taching the Stand Before attaching or detaching the stand unplug the AC cord from the AC INPUT terminal Before performing work spread cushioning over the base area to lay the TV on This will prevent it from being damaged CAUTION Attach the stand in the correct direction Be sure to follow the instructions Incorrect installation of the stand may result in the TV falling over Attaching the Stand of L...

Page 10: ...own on a safe surface that is covered by a soft and smooth cloth 4 Tighten the 4 screws to secure the stand neck to the TV and make the TV attach firmly 5 Put on the neck cover and match the tenons in the right holes Use the screw to fix the neck cover to the stand neck 46 55 5 2 1 4 3 CAUTION To prevent the stand from dropping and the risk of accidents two people are required while attaching the ...

Page 11: ...ewdriver Remove stand cover from the TV set Detaching the Stand of LC 46LE620UT LC 55LE620UT 1 Loosen the 5 screws that secure the stand neck by using a cross head screwdriver Remove stand cover from the TV set 0 1 2 3 44 3 35 4 6 7 8 0 35 3 44 13 9 0 6 349 8 44 1 3 0 9 1344 0 9 5 0 23 6 AB CBDEF CBDEF AB CBDEF CBDEF 46 55 The 4 screws Type B can not be fully detached after the stand neck is separ...

Page 12: ...To detach the neck from the TV safely two people are required while detaching the neck to the TV One man shall hold the base with two hands when the other is loosening the screws To attach the stand neck perform the steps in reverse order Do not force or overtighten and do not install without stand covers ...

Page 13: ...or the television into the AC outlet Speakers cannot be detached from the TV Place the TV close to the AC outlet and keep the power plug within reach This product must only be connected to a 120V 60Hz Connecting it to any other kind of outlet will damage the product and invalidate the warranty TO PREVENT RISK OF ELECTRIC SHOCK DO NOT TOUCH UN INSULATED PARTS OF ANY CABLES WITH THE AC CORD CONNECTE...

Page 14: ... or place the remote control unit under direct sunlight The heat may cause deformation of the remote control unit The remote control unit may not work properly if the remote control sensor on the TV is under direct sunlight or strong lighting In such cases change the angle of the lighting or the TV or operate the remote control unit closer to the remote control sensor IMPORTANT If the POWER indica...

Page 15: ... tools are used it may cause damage to your TV set The breaking of internal circuit etc Preparation Connecting Antenna Cable Connect the antenna cable to the TV using one of the methods in the illustration as shown or F type connector 300 ohm twin lead cable flat F type connector 75 ohm coaxial cable round 75 ohm coaxial cable 300 ohm twin lead cable 75 ohm coaxial cable round 75 ohm coaxial cable...

Page 16: ... can cause a rash If you find any chemical leakage wipe thoroughly with a cloth The batteries supplied with this product may have a shorter life expectancy due to storage conditions If you will not be using the remote control unit for an extended period of time remove batteries from it The batteries batteries installed shall not be exposed to excessive heat such as sunshine fire or the like 1 Open...

Page 17: ...l Unit 18 Introduction to Connections 19 Experiencing HD Images 19 Types of Connection 19 Connecting to External Equipment 20 Connecting a Blu ray Disc HD DVD DVD Player 20 Connecting a VCR Game Console or Camcorder 22 Connecting a PC 22 Watching TV 24 Turning On Off the Power 24 Initial Setup 24 Direct Button Operation 26 On Screen Display Menu 30 Menu Items 30 On Screen Display Menu Operation 32...

Page 18: ...lustrations in this operation manual are for explanation purposes and may vary slightly from the actual operations The examples used throughout this manual are based on the LC 42LE620UT model 1 3 1 2 INPUT 1 AV IN USB INPUT 8 HDMI Earphone Output INPUT 5 6 7 HDMI Antenna Cable in RS 232C IOIOI INPUT 2 3 COMPONENT AUDIO OUT INPUT 4 PC IN AC INPUT terminal Volume buttons VOL MENU button INPUT button...

Page 19: ...sed caption source See page 28 9 AUDIO Display the MTS SAP setting menu See page 27 28 10 FAVORITE CH A B C D Select 4 preset favorite channels in 4 different categories See page 36 for details While watching you can toggle the selected channels by pressing A B C and D 11 DISPLAY Display the current channel or input source information on the screen 12 INPUT Select a TV input source See page 26 13 ...

Page 20: ...ck the output terminals of your external equipment and use its appropriate terminals for higher quality images For connecting the TV to external equipment use commercially available cables The illustrations of the terminals are for explanation purposes and may vary slightly from the actual products Terminal on the TV Cable Terminal on external equipment INPUT 1 AV IN HD Quality Standard Quality Im...

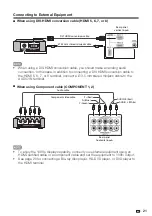
Page 21: ...ing connections Connecting a Blu ray Disc HD DVD DVD Player When using HDMI cable HDMI 5 6 7 or 8 The HDMI High Definition Multimedia Interface terminal is an audio video interface that enables a connection for audio and video signals using a single cable The HDMI terminal supports high resolution video input HDMI OUT HDMI certified cable Rear panel vertical inputs Digital Audio Output can not be ...

Page 22: ... cable to the HDMI 5 6 7 or 8 terminal connect a Ø 3 5 mm stereo minijack cable to the AUDIO IN terminal When using Component cable COMPONENT 1 2 COMPONENT OUT Rear panel horizontal inputs AUDIO R Red AUDIO L White Y Green PB Blue PR Red Audio cable Component video cable To enjoy the 1080p display capability connect your external equipment using an HDMI certified cable or a component cable and set...

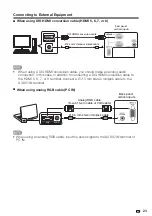
Page 23: ...PC When using HDMI cable HDMI 5 6 7 or 8 HDMI OUT Cable certificado HDMI Entradas verticales panel trasero The HDMI terminals only support digital signal Refer to page 48 for a list of PC signals compatible with the TV When using an HDMI DVI conversion cable input the audio signal to AUDIO terminal of PC IN To enjoy the 1080p display capability connect your Blu ray disc player or other external eq...

Page 24: ...hould make an analog audio connection In this case in addition to connecting a DVI HDMI conversion cable to the HDMI 5 6 7 or 8 terminal connect a Ø 3 5 mm stereo minijack cable to the AUDIO IN terminal When using analog RGB cable PC IN Ø 3 5 mm stereo minijack cable Analog RGB cable D sub 15 pin cable or VGA cable Back panel vertical inputs When using an analog RGB cable input the audio signal to...

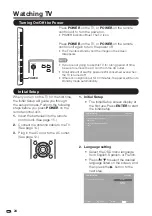
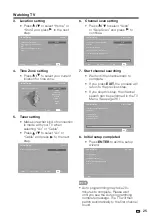
Page 25: ...ing Select the OSD menu language from English Spanish or French Press to select the desired language listed on the screen and then press the button to the next step 8 A 0 4B B C 34 5 6 D 4B B 4B E0 4F 6 G H I3 J K 5 H Press POWER on the TV or POWER on the remote control unit to turn the power on POWER indicator Blue The TV is on Press POWER on the TV or POWER on the remote control unit again to tu...

Page 26: ...ct Scan or Skip Scan and press to continue E 0 R 6 44 Q 41S 0 4 44 5 0 44 4 4 T 32 A K 6 6R 44 4 1 Q 6 02 0 1 4 O 4 34 5 6 N 44 5 4 5 4 5K 6 5 4 UV H I3 J K 5 H 7 Start channel searching Wait until the channel scan to complete If you press EXIT the process will return to the previous step If you skip this step the channel search can be performed in the TV Menu See page 36 44 4 A K 6 5 C 5 44 4B P4...

Page 27: ...g time displays every second Select Off by pressing SLEEP to cancel the sleep timer The TV will enter standby mode power indicator lights red when the remaining time reaches zero Changing Channels You can change channels by pressing CH or 0 9 or DOT Examples To select a 1 or 2 digit channel number e g Channel 5 Press 5 ENT To select a 3 digit channel number e g Channel 115 Press 1 1 5 ENT To selec...

Page 28: ...ayed on the screen disappears AUDIO MTS SAP stereo mode The TV has a feature that allows reception of sound other than the main audio for the program This feature is called Multi channel Television Sound MTS The TV with MTS can receive mono sound stereo sound and Secondary Audio Programs SAP The SAP feature allows a TV station to broadcast other information which could be audio in another language...

Page 29: ...it will be indicated by the appearance of a 3 letter abbreviation that also indicates the language of the Digital Closed Captions ENG English SPA Spanish FRA French or other language codes Not all programs and VHS videotapes offer closed captions In the Closed Caption system there can be more than one caption service provided Each is identified by its own number The CC1 to CC4 services display sub...

Page 30: ...s at the top and bottom of the screen Suitable for viewing conventional 4 3 programs in their normal format Suitable for stretching 4 3 programs to fill the screen Suitable for viewing wide screen 2 35 1 anamorphic DVDs in full screen For PC input Example Screen size images Input signal Stretch Side Bar Dot by Dot 4 3 An image fully fills the screen Suitable for viewing conventional 4 3 programs i...

Page 31: ...35 SPDIF Type 35 Auto Volume Control 35 TV Menu Tuner Mode 36 Auto CH Search 36 CH Skip 36 Audio Mode 36 Audio Language 36 Favorite Channels 36 Setup Menu OSD Language 37 VIEW MODE 29 Automatic 29 Stretch 29 Side Bar 29 S stretch Smart stretch 29 Zoom 29 Blue Mute 37 Time Setup 37 Time Zone 37 Time 37 Sleep Timer 37 Auto Sleep 37 Caption 37 Analog Closed Caption 37 Digital Closed Caption 38 Digita...

Page 32: ...r 35 Speaker 35 SPDIF Type 35 Auto Volume Control 35 Setup Menu OSD Language 37 VIEW MODE 29 Stretch 29 Side Bar 29 Dot by Dot 29 Blue Mute 37 Time Setup 37 Time Zone 37 Time 37 Sleep Timer 37 Auto Sleep 37 Location 38 Version Info 38 Reset 38 Parental Menu Program Block 40 Rating Enable 40 U S TV Ratings 40 U S Movie Ratings 41 Canadian English Ratings 41 Canadian French Ratings 42 Block Unrated ...

Page 33: ...the selected input terminal The function is not compatible with the current input signal Item displayed in box This indicates the item currently selected Menu options differ in the selected input modes but the operating procedures are the same Example Enter Select Exit Return Enter Press to enter the desired item or return to the upper level menu Press to select the desired item Press to adjust th...

Page 34: ...ons on the control panel correspond to the ones on the remote control as shown below Menu Operation Button Video Menu Adjusts the picture to your preference with the following picture settings Example 1 Press MENU to display the MENU screen and then press to select Video and press Enter or to enter it 2 Press to select a specific adjustment item and press Enter or to enter the setting 3 Press to a...

Page 35: ...e picture Flesh Tone You can adjust the skin color to be more natural DI Film Mode Automatically detects a film based source originally encoded at 24 frames seconds analyzes it then recreates each still film frame for high definition picture quality Blue Stretch When Blue Stretch is selected the brightest part of the screen will be leveled down to reduce the saturation Game Mode The Game Mode enha...

Page 36: ...t from the speakers On Makes it possible to enjoy natural realistic surround sound Off Outputs the normal sound You can choose Surround by pressing SURROUND on the remote control unit See page 27 Equalizer Select the preset audio mode from Off Rock Pop Live Dance Techno Classic or Soft Subwoofer The subwoofer function is dedicated to reproducting lower bass frequency effect Select the preset audio...

Page 37: ...control the selected channel can be skipped The skipped channel may not be found by pressing CH buttons but can be access by pressing number buttons directly Audio Mode Select the audio mode from Stereo SAP or Mono Audio Language Gives you the possibility to swap between main and alternative language when it is available in digital channel Favorite Channels This function allows you to program 4 fa...

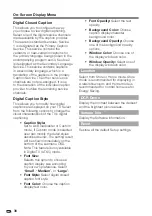
Page 38: ...t a time when the TV automatically switches to standby See page 26 Auto Sleep Set the TV to put itself to sleep after it has not been used for 1 2 or 5 hours Caption Analog Closed Caption This allows you to select the Closed Captions service levels of analog broadcasting to be displayed Closed captioning allows you to read the voice content of television programs on the TV screen Designed to help ...

Page 39: ...e TV s digital captioning Caption Style Set to As Broadcaster or Custom mode If Custom mode is selected user can modify the detail styles described below The setting result will be shown immediately on the bottom of the submenu OSD Note This feature is only available in Digital TV ATSC mode Font Size Selects this option to choose a caption display size according to your own preference Select Small...

Page 40: ...e control The default password is 0000 Example 1 Press MENU to display the MENU screen and then press to select Parental and press ENTER or to enter it 2 Enter the master password 0000 3 Press to select a specific item and press ENTER or to enter 4 Press MENU to exit Channel Block This function prevents children from watching certain channels Restart the TV for the change to take effect If you acc...

Page 41: ...ren age 7 and older Fantasy Violence FV TV G Programs suitable for all ages These programs contain little or no violence no strong language and little or no sexual dialog or situations None TV PG Programs contain elements that some parents may find unsuitable for younger children and which may need parental guidance The program may contain moderate violence sexual dialog and or situations and some...

Page 42: ... to be rated the structure developed takes into consideration other program content like language nudity sexuality and mature themes When setting the V CHIP on the Canadian system you can choose either the Canadian English ratings or the Canadian French ratings Canadian English Ratings Movie rating Description E Exempt Includes news sports documentaries and other information programming talk shows...

Page 43: ...be viewed by a wide public audience but could contain scenes disturbing to children under 8 who cannot distinguish between imaginary and real situations Recommended for viewing with parent 13 ans Over 13 years Could contain frequent violent scenes and therefore recommended for viewing with parent 16 ans Over 16 years Could contain frequent violent scenes and intense violence 18 ans Over 18 years O...

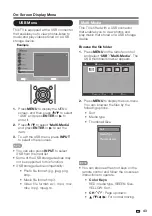
Page 44: ... file format jpg jpeg png bmp Music file format mp3 Video file format avi mp4 mov mkv mpg mpeg ts On Screen Display Menu Multi Media This TV is fitted with a USB connector that enables you to view photos and play music that stored on a USB storage device Browse the file folder 1 Press MENU on the remote control and select USB Multi Media The USB thumbnail browser appears 8 E 4 X O 1 A6 5 5 0 UXSUX...
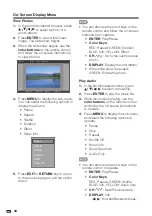
Page 45: ...control and follow the on screen instructions to operate ENTER Play Pause Color Keys RED Repeat GREEN Duration BLUE Info YELLOW Effect CH Go to the next previous photo DISPLAY Display the information When slide show is paused GREEN Rotate the photo Play Audio 1 In the file thumbnail browser press to select a music file 2 Press ENTER to play the music file 3 While the music is playing use the color...

Page 46: ...or buttons on the remote control and follow the on screen instructions to operate 4 Press MENU to display the sub menu and select the following options to operate Pause Repeat Show Info AV mode View mode You can also use the short keys on the remote control to operate ENTER Play Pause Color Keys RED Repeat BLUE Info CH Next Previous track DISPLAY Info Forward Backward seek ...

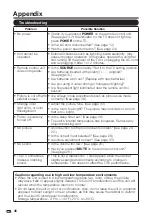
Page 47: ...one See page 33 Is the room too bright The picture may look dark in a room that is too bright Power is suddenly turned off Is the sleep timer set See page 26 The unit s internal temperature has increased Remove any objects blocking vent No picture Is connection to other components correct See page 20 23 Is the correct input selected See page 26 Is picture adjustment correct See page 33 No sound Is...

Page 48: ...dio output RS 232C D sub 9 pin for service Hotel mode using Side INPUT 1 AV in AUDIO in USB Multi Media use Software update INPUT 8 HDMI in with HDCP Earphone Output Ø 3 5mm jack Audio output OSD language English French Spanish Power Requirement 120V 60Hz Power Consumption 130 W 0 3 W Standby with AC 120 V 160 W 0 3 W Standby with AC 120 V 180 W 0 3 W Standby with AC 120 V Weight TV stand 35 49 lb...

Page 49: ...ion Horizontal Frequency Vertical Frequency Pixel Clock Frequency HDMI VGA 640 x 480 31 469 kHz 60 000 Hz 25 175 MHz SVGA 800 x 600 37 879 kHz 60 000 Hz 40 000 MHz XGA 1024 x 768 48 363 kHz 60 000 Hz 65 000 MHz WXGA 1280 x 768 47 712 kHz 60 000 Hz 85 500 MHz 1080P 1920 x 1080P 67 500 kHz 60 000 Hz 148 500 MHz 720P 1280 x 720P 45 000 kHz 60 000 Hz 74 250 MHz 1080i 1920 x 1080i 33 750 kHz 60 000 Hz ...

Page 50: ...G 4 ASP HL 4 0 B VOP and 4MV are supported GMC is supported but only one point allowed 1920 x 1080 30 H 263 1408 x 1152 30 Motion JPEG 640 x480 30 mkv MKV H 264 BP LV 4 0 Not support for FMO ASO redundant slice 1920 x 1080 30 H 264 MP LV 4 0 1920 x 1080 30 H 264 HP LV 4 0 1920 x 1080 30 MPEG 4 SP L 3 0 1920 x 1080 30 MPEG 4 ASP HL 4 0 B VOP and 4MV are supported GMC is supported but only one point...

Page 51: ...ovide the source code with the executable software components GPL and LGPL include similar requirements For information on obtaining the source code for the open source software and for obtaining the GPL LGPL and other license agreement information visit the following website http www sharpusa com gpl We are unable to answer any questions about the source code for the open source software The sour...

Page 52: ...nterference to radio or television reception which can be determined by turning the equipment off and on the user is encouraged to try to correct the interference by one or more of the following measures Reorient or relocate the receiving antenna Increase the separation between the equipment and receiver Connect the equipment into an outlet on a circuit different from that to which the receiver is...

Page 53: ...RATION warrants to the first consumer purchaser that this Sharp brand Liquid Crystal Display product the Product when shipped in its original container will be free from defective workmanship and materials and agrees that it will at its option either repair the defect or replace the defective Product or part thereof with a new or remanufactured equivalent at no charge to the purchaser for parts or...

Page 54: ... LC 52 60LE920UN E 07 indd 76 2010 06 14 14 23 03 ...

Page 55: ...Dimensional Drawings LC 55LE620UT 33 14 16 860 32 1 32 814 1 27 32 47 47 13 16 1215 26 31 32 685 18 7 32 463 52 1 8 1324 21 1 4 540 13 3 8 340 6 13 32 163 1 27 32 47 15 3 4 400 15 3 4 400 ...

Reviews: