background image

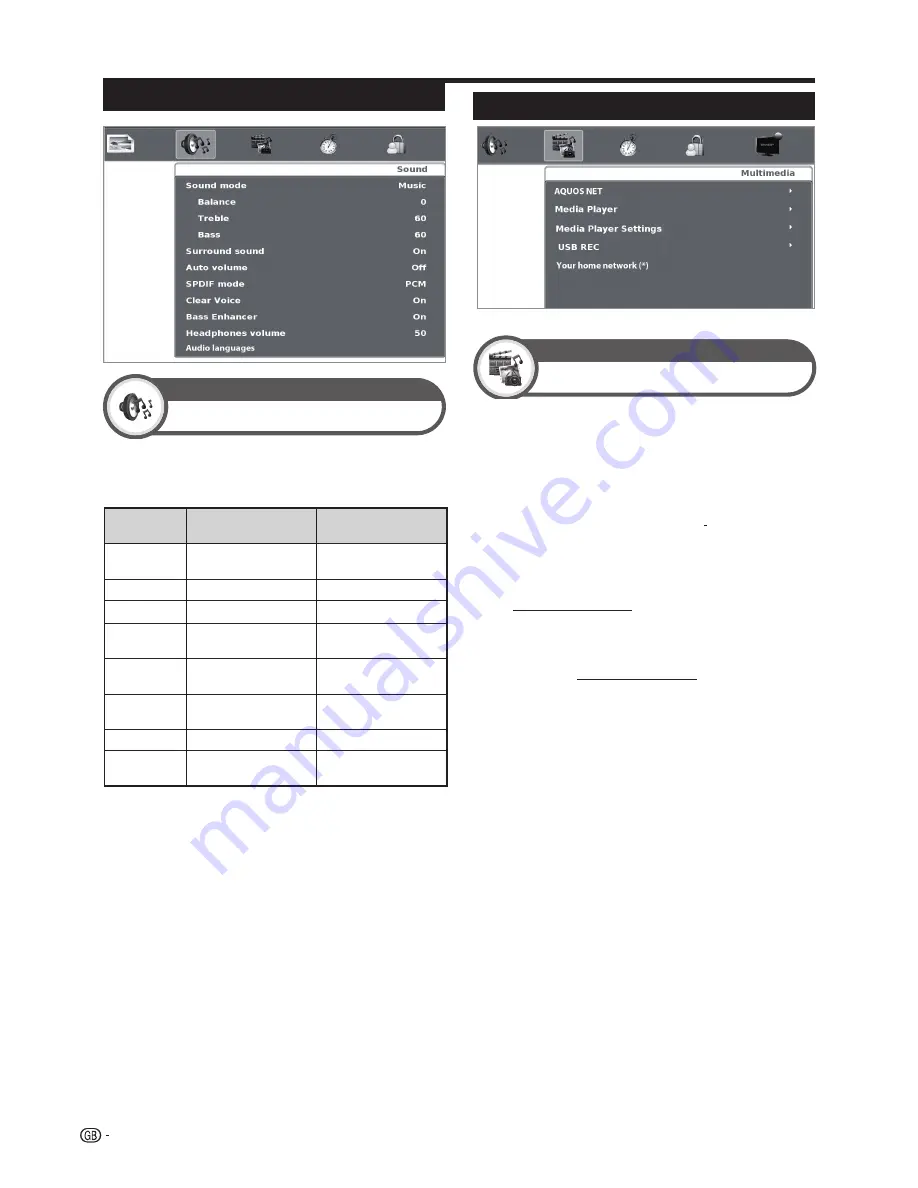
Audio settings

When the 

Sound Mode

 is set to 

“User”

, the sound 

can be adjusted according to your preferences. See the 
following setting table.

Adjustments options

Selected 

setting

 Button


Button


Balance

Increase audio from 

the left speaker

Increase audio from 

the right speaker

Treble

Reduce treble

Increase treble 

Bass

Reduce bass

Increase bass

Surround 

Sound

Off

On

Auto

Volume

Off

On

SPDIF 

Mode

(PCM) Activates 

digital audio output 

Dolby Digital

Clear voice

Off

On

Bass 

Enhancer

Off

On


Sound Mode

Select your desired setting. The available options are:  
S

TANDARD

MUSIC

MOVIE

SPORTS

USER

6


Surround Sound

This function allows you to enjoy surround sound.


Auto Volume

Reduces sudden volume changes, for example, 
during commercials or when switching from one 
channel to another.


SPDIF Mode

Digital audio output

.


Clear voice

This function emphasises speech against 
background noise for greater clarity.


Bass Enhancer

This function allows you to enjoy bass-enhancer. 


Headphones Volume

Headphones volume control.


Audio languages

Allows you to choose between audio languages 
available. See page 10.

Sound

Sound adjustments

Multimedia menu

Multimedia


AQUOS NET

Access to Internet services.


Media Player

Access to Multimedia Menu. (See page 27)


Media Player Settings

This TV allows play video on demand (DivX

®

 VOD). 

You need to register the TV before playing the DivX

®


content.
This is the function to confirm your registration code.


DivX

®

 VOD Register

To activate this option you need to register the code 
at www.divx.com/vod, download  the VOD log file 
and reproduce it in TV.


DivX

®

 VOD Deregister

Displays the deactivation code necessary to write 
off this TV at www.divx.com/vod.


Video Preview

Setting this option to On, allows you preview the 
video that you select in a little window in the screen.


USB REC


USB REC Manual programming

Allows you to schedule the program recorder.


USB REC Programmed recording list

Allows you to visualize all scheduled recordings.


USB REC Recorded list

Allows you to see the recorded program list.


USB REC settings

Allows to select disk, disk setup, speed test and 
disk space reserved for this function. 

For 

USB REC 

detailed operation see page 35.


Your home network

Your home network will be available in the 

Multimedia

 menu in case it is connected to the 

TV set through the Ethernet terminal or via Wi-Fi 
(Optional Accessory, see page 5). 
See "

Network setup

"


for detailed operation (page 

31).

Multimedia

 (*) The name of your home network will appear here once detected.

Basic adjustment

 20

Summary of Contents for Aquos LC-40LE540E

Page 1: ...INSTRUKCJA OBSŁUGI KEZELÉSI ÚTMUTATÓ NÁVOD K OBSLUZE NÁVOD NA OBSLUHU ІНСТРУКЦІЯ З ЕКСПЛУАТАЦІЇ KASUTUSJUHEND LIETOŠANAS ROKASGRĀMATA NAUDOJIMO INSTRUKCIJA ΕΓΧΕΙΡΙΔΙΟ ΛΕΙΤΟΥΡΓΙΑΣ KULLANMA KILAVUZU MANUAL DE UTILIZARE ДАПАМОЖНІК ПА ЭКСПЛУАТАЦЫІ OPERATION MANUAL PRIRUČNIK ZA RUKOVANJE UPUTSTVO ZA UPOTREBU PRIROČNIK ZA UPORABO INSTRUKCJA O KEZELÉSI ÚTMUTATÓ NÁVOD K OBSLUZE NÁVOD NA OBSLUHU ІНСТРУКЦІЯ...

Page 2: ... plug proceed as follows The wire which is coloured blue must be connected to the plug terminal which is marked N or coloured black The wire which is coloured brown must be connected to the plug terminal which is marked L or coloured red Ensure that neither the brown nor the blue wire is connected to the earth terminal in your three pin plug Before replacing the plug cover make sure that If the ne...

Page 3: ...media 20 Time settings 21 Lock settings 21 Channel settings 22 Settings Menu 24 Sotware update via USB 24 Channel list 25 Selecting the channel you want display 25 Channel information display DTV CADTV only 25 Useful viewing functions 26 Selecting the picture format 26 Selecting the picture format manually 26 Setting when using external devices 26 Source list 26 Connecting a USB device Media Playe...

Page 4: ...nerating products including amplifiers Headphones Do not set the volume at a high level Hearing experts advise against extended listening at high volume levels To prevent fire never place any type of candle or naked flames on the top or near the TV set To prevent fire or shock hazard do not place the AC cord under the TV set or other heavy items Do not display a still picture for a long time as th...

Page 5: ...ree digits E b Source List Page 10 Select an input source R p Channel information Page 25 Display the station information channel number signal etc on the screen T USB REC Pages 11 20 34 and 35 Record a programme you are watching Y EPG Page 11 DTV SAT Display the EPG screen U SUBTITLE Pages 10 12 and 24 Switch subtitle languages on off 18 TEXT INFO Page 12 ATV Display analogue teletext DTV SAT Sel...

Page 6: ...RGB Y C Input terminal 6 PC Input 7 Antenna input terminal 8 OPTICAL DIGITAL AUDIO OUTPUT terminal SPDIF 9 SERVICE connector jack 3 5 mm 10 HDMI 1 HDMI DVI ARC 11 HDMI 2 HDMI DVI 12 HDMI 3 HDMI DVI 13 HDMI 4 HDMI DVI 14 AUDIO input for DVI and PC Jack 3 5mm connector 15 COMMON INTERFACE slot 16 AC INPUT terminal 17 SAT Satellite antenna input Only LE542 series 18 ETHERNET 10 100 terminal 19 COMPON...

Page 7: ...ional optional accessories may be available in the near future When purchasing please read the newest catalogue for compatibility and check the availability No Part name Part number 1 Wall mount bracket AN 52AG4 2 Wi Fi adapter AN WUD630 Stand unit x1 This TV should be fixed on a wall only with the wall fix bracket available from SHARP above table The use of other wall fix brackets may result in a...

Page 8: ...the remote control unit for an extended period of time remove the batteries from it When replacing the batteries use zinc carbon batteries instead of alkaline ones Note on disposing batteries The batteries provided contain no harmful materials such as cadmium lead or mercury Regulations concerning used batteries stipulate that batteries may no longer be thrown out with the household rubbish Deposi...

Page 9: ...varies in some countries Turn on the power using a on the TV Page 10 Run the initial auto installation Page 9 Language country tuner type settings and TV Location setting Go to Next Congratulations Now you can watch TV If necessary adjust the antenna to attain maximum signal reception Page 9 7 Preparation Power on and run the auto installation Watch TV Connect external devices Connect external dev...

Page 10: ... Module displays Menu Adjustment parameters of each CA Card displays Enquiry You can input numerical values such as passwords here NOTE The content of each screen depends on the provider of the CI Module Inserting a CA Card NOTE Make sure that the CI module is properly inserted This menu is only available for digital stations It takes about 30 seconds to certify the license key when you insert a C...

Page 11: ...ning from the menu CHANNEL Page 22 To watch both analogue broadcasts and digital broadcasts you should perform the channel search setting DTV ATV or CADTV ATV Is not possible to search digital and cable digital broadcasts at the same time 8 The TV searches for sorts and stores all the receivable TV stations according to their settings and the connected antenna To cancel the initial auto installati...

Page 12: ...ng the SUBTITLE key E Press TV RADIO FAV to access to the menu that allows you to change between modes Daily operation Switching on off Press a on the TV to switch it on Switch it off by pressing a on the TV Standby mode E Switching to standby mode If the TV is switched on BLUE LED you can switch it to standby by pressing a on the remote control unit E Switching on from standby From standby RED LE...

Page 13: ...n check the schedule of digital channels view detailed information about it tune to an event currently on air and set a timer for future events Other EPG functions 3 Revise the program information 1 Press to select the program you want to revise 2 Press p 3 Press p to return to EPG 4 Reminder function 1 Select the broadcasting emitting the program which you want to remember 2 Press the BLUE key on...

Page 14: ... the screen it disappears Note that with this menu on the screen the linked pages cannot be selected l Information Shows the main page Using the MHEG 5 application UK only Some services bring you programmes with the MHEG application encoded letting you experience DTV CADTV interactively When provided the MHEG 5 application will start when you press TEXT INFO Watching TV Teletext What is Teletext T...

Page 15: ...ed with the terminals as shown below Find the cable corresponding the TV s terminal and connect the device NOTE The cables illustrated in pages 13 14 and 15 are commercially available items 13 VIDEO Pr Pb Y R L AUDIO HDMI 4 SCART AV RGB S VIDEO SERVICE USB WIFI PC IN HDMI PC ANALOG AUDIO INPUT HDMI 1 ARC HDMI 2 HDMI 3 DIGITAL AUDIO OUTPUT Audio device Page 15 Video recording device Pages 14 and 15...

Page 16: ...e used it may appear a video noise Be sure to use a certified HDMI cable On reproducing HDMI picture the best format is automatically detected and adjusted for the picture Compatible video signal 576i 576p 480i 480p 1080i 720p 1080p Component connection You will enjoy accurate colour reproduction and high quality images through the INPUT COMPONENTS AV terminal when connecting a DVD player recorder...

Page 17: ...connecting Digital audio output setting After connecting an amplifier with optical digital audio input as shown you should set an audio output format compatible with the programme you are watching or the device connected Go to MENU Sound SPDIF Mode select PCM or Dolby Digital NOTE When you set this to Dolby Digital and you receive the Dolby Digital or Dolby Digital Plus audio formats Dolby Digital...

Page 18: ...e The Aspect ratio adjustment is only available for analogue signals through the PC IN terminal NOTE When using the PC IN terminal is necessary to connect a audio cable Normal Full Example DVI VGA Conversion cable ø 3 5 mm stereo mini jack cable After connection If after connecting a PC to the TV through a HDMI cable the audio does not run connect a mini stereo connector of ø 3 5mm between TV and ...

Page 19: ...matically Auto adjustment may fail if the PC image has low resolution has unclear black edges or is moved while executing Auto adjustment Be sure to connect the PC to the TV and switch it on before starting Auto adjustment Auto adjustment can be executed only when inputting analogue signals through the PC IN terminal Adjusting the PC image automatically Adjusting the PC image manually Ordinarily y...

Page 20: ...n shows the operations with the OSD The bar above is an operational guide for the remote control unit The bar will change in accordance with each menu setting screen This function is useful when there is no remote control unit within your reach 1 Press MENU to display initial MENU screen or to return to previous MENU screen 2 Press CHr s instead of a b or ik l instead of c d to select the item 3 P...

Page 21: ...our intensity goes up Tint Skin tones become purplish Skin tones become greenish Sharpness Soften details Emphasize details Backlight The screen dims The screen brightens Advanced Video This TV provides various functions for optimizing the picture quality See the following table Picture adjustments Picture Selected setting Button Button Advanced Video Aspect Ratio Changes between different picture...

Page 22: ...S NET Access to Internet services Media Player Access to Multimedia Menu See page 27 Media Player Settings This TV allows play video on demand DivX VOD You need to register the TV before playing the DivX content This is the function to confirm your registration code DivX VOD Register To activate this option you need to register the code at www divx com vod download the VOD log file and reproduce i...

Page 23: ...time zone Summer time Allows you to change automatically to summer time auto off on Time Time adjustments This function allows you to use a password to lock certain programs and adjustments The password is always needed to access to this menu by default the password is 3001 Parental guidance This function allows you to restrict DTV CADTV SADTV only LE542 model programs depending on the age classif...

Page 24: ...nel list pages or GREEN button to rename it NOTE If you choose FAV by pressing TV RADIO FAV button the favourite channel list will appear Satellite edit Only LE542 model series Allows you to adjust the satellite propierties Signal information Shows the signal power and quality CI information Allows to see the CA card information Conditional Access Module name supplier and OSD Auto channel number A...

Page 25: ...press OK to start searching Satellite edit This option allows you to adjust manually the satellite properties Press to select Satellite Edit and then press OK Select Satellite Set You can choose between the following options Consult your dealers before using a method other than Single Satellite 1 Select Single Satellite and then press OK 2 Press to select Satellite 1 and press OK 3 Select Satellit...

Page 26: ...ders including catch up TV video on demand VoD interactive advertising personalisation voting games and social networking See page 33 NOTE When the Audio description is set to On the audio description sound is superimposed on the main audio when you select a broadcast compatible with audio description This function is available only for DTV broadcasts This Audio description menu is not displayed f...

Page 27: ... to select the channel you want to watch and press OK CLEARING THE PIN If you lose or forget your PIN you can clear the PIN following these steps 1 Go to MENU LOCK 2 Enter 3001 to cancel out the current PIN The current PIN is reset to 3001 4 Press to select Yes and press OK The software update will start The updated percentage appears 5 When software update finishes remove the USB memory and press...

Page 28: ...and go to Picture Advanced video Aspect ratio to change between different kinds of pictures NOTE Some items do not appear depending on the type of received signal Normal 4 3 Keeps the original aspect ratio in a full screen display Zoom 14 9 For 14 9 letterbox pictures A thin side bar appears on each side and you may also see bars on the top and bottom with some programs Panorama In this mode pictu...

Page 29: ...rward on reproduction mode END button Go back to the previous screen RED button x1 Reproduce the selected file indefinitely x2 Reproduce all the files on the folder indefinitely OK button Play Pause reproduction Music mode Buttons for music reproduction Useful viewing functions After selecting Media Player the TV loads USB device files and shows the following screen 1 Pressing buttons you can chan...

Page 30: ...stop restart the reproduction 4Press END to exit the Video mode Buttons Description Cursor Backward Fast forward END button Go back to the previous screen RED button Allows you to repeat a fragment of a film indefinitely The first keystroke defines initial point the second keystroke defines final point The third keystroke restarts the normal reproduction BLUE button Allows you to backward or forwa...

Page 31: ... unit toward the TV not to the connected HDMI device Video noise may occur depending on the type of HDMI cable used Make sure to use a certified HDMI cable Up to three HDMI recording devices one AV amplifier and three players can be connected using this system These operations affect the HDMI device selected as the current external source If the device does not operate turn on the device and selec...

Page 32: ...t HDMI CEC allows you to operate the HDMI connected device with a single remote control unit 1 Press I to start playback of a title 2 Press J to fast forward Press G to reverse Press H to stop viewing Press F to pause Select On Mode to turn the HDMI connected device on off Operating a HDMI CEC device Device Scan Search all HDMI devices connected to the TV If multiple HDMI devices are connected in ...

Page 33: ...router commercially available Refer to the router s operation manual for switching on 2 Connect the ETHERNET terminal on the TV to the router commercially available with an ETHERNET cable commercially available 3 Go to SETTINGS Network settings Network type 4 Press OK and to select Wired and then press OK The wired connection will be automatically established To change the settings manually go to ...

Page 34: ...l of the router access point AP instructions to introduce the PIN number 5 Press to select Next and press OK Wait until the connection is stablished Assisted setup Shows the network name list SSID 1 Select the network you want to connect 2 If network is protected introduce the encryption key using the software keyboard and press Green button 3 Select Done and press OK The TV will connects to the n...

Page 35: ... use Search utility to select the service you want to see Select and press OK The following image appear Use to select a link you want to access Press OK the favourites services available are shown E Services arrangement Select and press OK When this tab becomes white this option is selected Use to select a service you want to arrange and press OK direction arrows appear around the service logo Mo...

Page 36: ...o avoid problems with the applications Using external USB keyboard is not possible to exit from AQUOS NET In case necessary use the END remote key NOTES Home Media DLNA requires external streaming media software installed on a PC inside the HOME Network that is not included with AQUOS NET Home Media DLNA server software as Windows Media Player 11 Windows Vista included or Windows Media Player 12 W...

Page 37: ...tion USB REC can activate immediately recording by using USB REC on the remote control or with a timer using data taken from EPG or programming an event manually To use either method follow the instructions below Immediate recording The recording starts when user decides 1 Press USB REC on the remote control to start recording the current programme REC symbol appears in the bottom left corner of t...

Page 38: ...ue with the recording until the end of the USB REC Manual programming In case it is an Immediate recording you pressed USB REC button you can decide to switch off completely or continue with the recording during the time you decide or stop the recording In both cases if you choose to continue with the recording the TV will switch off but continue showing the pyramid icon lighting in purple If you ...

Page 39: ...hall not be liable to you or any third party for your failure to abide by such authorization or terms of use Unless otherwise specifically authorized by the applicable content or service provider all third party content and services provided are for personal and non comercial use you may not modify copy distribute transmit display perform reproduce upload publish license create derivative works fr...

Page 40: ...PUT VGA D Sub 15pin Ø 3 5 mm jack shared with HDMI COMPONENTS COMPONENT IN Y PB CB PR CR RCA AUDIO R L HDMI1 HDMI Ø 3 5 mm jack shared with PC INPUT ARC HDMI2 HDMI Ø 3 5 mm jack shared with PC INPUT HDMI3 HDMI Ø 3 5 mm jack shared with PC INPUT HDMI4 Rear HDMI Ø 3 5 mm jack shared with PC INPUT USB 1 USB REC Media Player HDD Ready USB 2 0 HOST A Type USB 2 Media Player HDD Ready USB 2 0 HOST A typ...

Page 41: ...carded with your ordinary household waste for further details please refer to the Information on Proper Disposal mentioned in this operation manual Should repair become necessary please contact your retailer You can also contact your local Sharp approved service centre see Sharp local website What can you do to contribute towards helping to protect the environment Please do not leave your TV in st...

Page 42: ... will inform you about the take back of the product You might be charged for the costs arising from take back and recycling Small products and small amounts might be taken back by your local collection facilities For Spain Please contact the established collection system or your local authority for take back of your used products 2 In other Countries outside the EU If you wish to discard of this p...

Page 43: ...LC 40LE540E LC 40LE541E LC 40LE542E LC 46LE540E LC 46LE541E LC 46LE542E 40 46 40 46 457 484 6 947 1081 350 5 388 5 500 574 5 887 1020 1 560 635 70 630 705 400 400 196 187 2 18 8 40 111 4 115 2 242 265 ...

Page 44: ...MA KILAVUZU MANUAL DE UTILIZARE ДАПАМОЖНІК ПА ЭКСПЛУАТАЦЫІ OPERATION M Tiskano u Poljskoj Štampano u Poljskoj Tiskano v Poljska Wydrukowano w Polsce Készült Lengyelországban F509WJZZ SHARP MANUFACTURING POLAND Sp z o o Ostaszewo 57b 87 148 Łysomice Poland SHARP CORPORATION http www sharp eu LC 40LE540E LC 46LE540E LC 40LE541E LC 46LE541E LC 40LE542E LC 46LE542E ...

Reviews: