background image

20

4:3 Mode set to “Normal”

NOTE

• If the signal contains no WSS information, Auto Selection

will not function even when the WSS option is enabled.

WIDE MODE

You can select the picture size. Selectable picture size
varies with the type of signal received.

4:3 Mode set to “Panorama”

Normal:

 For 4:3 “standard” pictures. A side bar appears

on each side.

Zoom 14:9:

 For 14:9 letterbox pictures. A thin side bar

appears on each side, and you may see bars on the
top and bottom with some programmes.

Panorama:

 In this mode the picture is progressively

stretched toward each side of the screen.

Full:

 For 16:9 squeeze pictures.

Cinema 14:9:

 For 14:9 letterbox pictures. Bars may

appear on the top and bottom with some programmes.

Cinema 16:9:

 For 16:9 letterbox pictures. Bars may

appear on the top and bottom with some programmes.

Full: 

Display with the Overscan image. Crop all sides of

screen.

Manual Selection

1

Press 

f

.

• The WIDE MODE menu displays.
• The menu lists the wide mode options selectable

for the type of video signal currently received.

2

Press 

f

 or 

a

/

b

 while the WIDE MODE menu

displays on the screen.

• As you toggle down the options, each is immediately

reflected on the screen. No need to press 

OK

.

Auto Selection

If you set WSS and 4:3 Mode in the Setup menu on
page 18, the optimum WIDE MODE is automatically
chosen for every broadcast, VCR or DVD containing
the WSS information.

WSS menu

To enable Auto Selection, set WSS in the Setup menu
to “On”. (See page 18.)

4:3 Mode menu

To set the type of the wide screen, select “Normal” or
“Panorama” in the 4:3 Mode menu. (See page 18.)

Useful features

WIDE MODE

You can select the picture size.

1

Press 

f

.

• The WIDE MODE menu displays.

2

Press 

f

 or 

a

/

b

 to select a desired item on the

menu.

NOTE

• Connect the PC before making adjustments. (See page

10.)

• Selectable picture size may vary with input signal type.
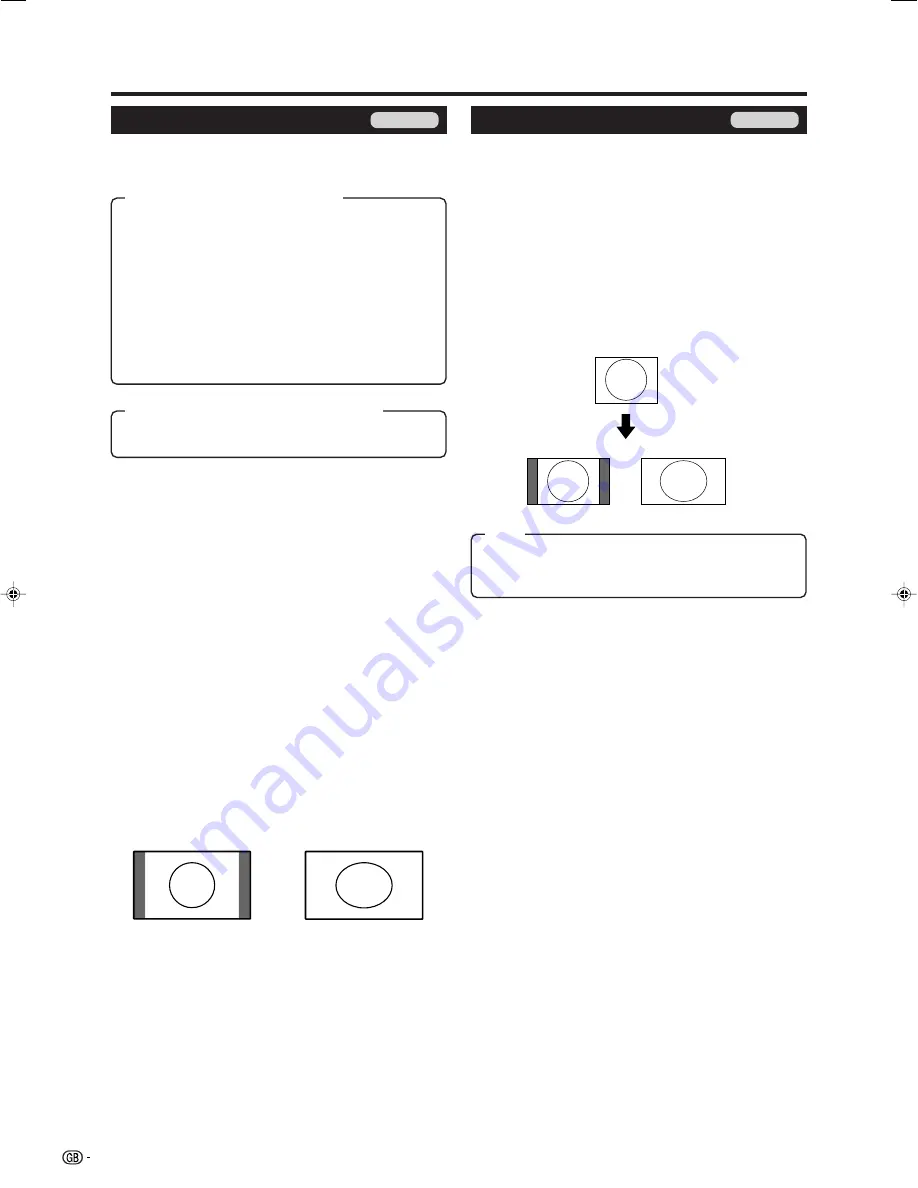
EXAMPLE

Normal:

 Keeps the original aspect ratio in a full screen

display.

Full:

 An image fully fills the screen.

Normal

Full

TV/AV only

PC only

Item (for SD (Standard) signal)

Item (for HD (High-Definition) signal)

Item

LC-32GD8E_GB_c

06.5.1, 0:08 PM

20

Summary of Contents for AQUOS LC-32BT8E

Page 1: ...D OPERATION MANUAL BEDIENUNGSANLEITUNG MODE D EMPLOI MANUALE DI ISTRUZIONI GEBRUIKSAANWIJZING MANUAL DE MANEJO LC 32GD8E LC 32BT8E LC 37GD8E LC 37BT8E OPERATION MANUAL BEDIENUNGSANLEITUNG MODE D EMPLOI MANUALE DI ISTRUZIONI GEBRUIKSAANWIJZING MANUAL DE MANEJO LC 32GD8E LC 32BT8E LC 37GD8E LC 37BT8E C483WJN2 1 ENGLISH FRANÇAIS DEUTSCH ITALIANO NEDERLANDS ESPAÑOL ...

Page 2: ...a serious electric shock may occur To fit an appropriate plug to the mains lead follow the instructions below IMPORTANT The wires in the mains lead are coloured in accordance with the following code Blue Neutral Brown Live As the colours of the wires in the mains lead of this product may not correspond with the coloured markings identifying the terminals in your plug proceed as follows The wire wh...

Page 3: ...ate 18 Language 18 Supply Voltage 18 Option menu 18 Audio Only 18 DNR Digital Noise Reduction 19 HDMI Setup 19 Input Select 19 Quick Shoot 19 Colour System 19 Demo 19 Useful features 20 WIDE MODE 20 Still image 21 Teletext function 21 DTV menu operations 22 DTV menu operation buttons 22 DTV On Screen Display 22 DTV common operations 22 About using the character set screen 23 Language 23 Programme ...

Page 4: ... shorten the life of the product Do not place the product on a bed sofa rug or other similar surface since they can block ventilation openings This product is not designed for built in installation do not place the product in an enclosed place such as a bookcase or rack unless proper ventilation is provided or the manufacturer s instructions are followed The LCD panel used in this product is made ...

Page 5: ...om the AC INPUT terminal 1 Confirm the 8 screws supplied with the TV Short screws m4 used in step 2 Long screws m4 used in step 4 2 Attach the two parts of the stand unit to each other using the 4 short screws as shown 3 Insert the stand into the opening on the bottom of the TV 4 Insert and tighten the 4 long screws on the rear of the TV as shown NOTE To detach the stand perform the above steps in...

Page 6: ... the antenna cable from your antenna cable socket or the room roof antenna for antenna input terminal on the back of your TV set to receive digitally terrestrially broadcast stations An indoor antenna can also be used under good reception conditions Passive and active room antennas are offered commercially In an active antenna its power is supplied via the antenna input terminal The supply voltage...

Page 7: ...their terminals corresponding to the e and f indications in the battery compartment 3 Close the battery cover Inserting the batteries Before using the TV for the first time insert two AAA size batteries supplied When the batteries become depleted and the remote control unit fails to operate replace the batteries with new AAA size batteries Using the remote control unit Use the remote control unit ...

Page 8: ...off 18 v Top Bottom Full Set the area of magnification in Teletext mode See page 21 19 b INPUT SOURCE Select an input source TV DTV EXT1 EXT2 EXT3 EXT4 EXT5 See page 9 20 EPG DTV To display EPG Electronic Programme Guide screen ESG DTV To display ESG Electronic Service Guide screen RADIO DTV Switch between RADIO and DTV mode 21 AV MODE Select a video setting See page 13 22 SURROUND Switch the surr...

Page 9: ...Remote control sensor B Standby On indicator OPC indicator a Power button b Input button i l k Volume buttons P s r Programme channel buttons SLEEP indicator EXT 2 RGB terminal EXT 3 terminals Headphone jack EXT 1 RGB terminal EXT 5 HDMI AUDIO terminals Antenna input terminal DVB T 5V 80 mA OUTPUT Audio terminals EXT 4 terminals RS 232C terminal COMMON INTERFACE slot ...

Page 10: ...creen is displayed Except external input 2 Press a b to select the desired channel to tune in and then press OK 3 Press END to exit the Programme List Initial auto installation DTV Digital Video Broadcasting is a transmission scheme It is much more than a simple replacement for existing analogue television transmission DVB provides more stations clearer picture quality and other services displayed...

Page 11: ... You can use the EXT 2 3 4 or 5 HDMI terminals when connecting to a DVD player and other audiovisual equipment DVD player EXT 3 A game console camcorder and some other audiovisual equipment are conveniently connected using the EXT 3 terminals NOTE EXT 3 The S VIDEO terminal has priority over the VIDEO terminals Connecting a game console or camcorder Game console Camcorder or S video cable Composit...

Page 12: ...he EXT 2 terminal NOTE Refer to operation manuals of each external equipment for the details Only works when the audiovisual equipment is connected to the EXT 2 terminal on the TV with AV Link via a fully wired SCART The use of the AV Link function is only possible if the TV set has enforced a complete auto installation with the connected audiovisual equipment page 8 Initial auto installation The ...

Page 13: ...s NOTE Menu options differ in the selected input modes but the operating procedures are the same The screens in the operation manual are for explanation purposes some are enlarged others cropped and may vary slightly from the actual screens Menu operation buttons Use the following buttons on the remote control unit to operate the menu MENU Press to open or close the menu screen a b c d Press to se...

Page 14: ... 1 Press MENU and the MENU screen displays 2 Press c d to select the desired menu 3 Press a b to select the desired menu item and then press OK Example AV Mode OPC etc Select Reset to reset all adjustment items to the factory preset values 4 Press a b c d to select the desired item and then press OK Menu operations Common operations Menu Operation A Menu Operation C 1 Press MENU and the MENU scree...

Page 15: ...u can set the mode for each input source DYNAMIC For a clear cut image emphasising high contrast for sports viewing AV Mode Menu Operation A page 12 AV Mode gives you five viewing options to choose from to best match the system environment which can vary due to factors like room brightness type of programme watched or the type of image input from external equipment Advanced Menu Operation C page 1...

Page 16: ...ference with the following settings MENU Audio Audio Power Control Treble Bass Balance Surround Reset Off Auto Vol Off Clear Voice Off 0 0 15 L 15 0 15 15 R AV Mode STANDARD Surround Menu Operation A page 12 Surround function allows you to enjoy realistic live sound NOTE You can also choose surround effects by pressing SURROUND on the remote control unit AV Mode Menu Operation A page 12 This optio...

Page 17: ...or setting PIN 4 Press a b to select Auto Search Manual Adjust Sort or Erase Programme and then press OK Auto Search Manual Adjust Sort Erase Programme No Yes Power Control menu No Signal Off Menu Operation A page 12 When set to Enable the TV will automatically enter the standby mode if there is no signal input for 15 minutes Five minutes before the TV enters standby mode the remaining time displa...

Page 18: ...tching the image from the TV Decoder When connecting a decoder to the unit you need to select EXT1 NOTE Off is factory preset value Lock You can block the viewing of any channel NOTE See page 17 for setting PIN When Lock is set to On for a channel Child lock has been activated displays and the image and sound of the channel are blocked When pressing OK while Child lock has been activated displays ...

Page 19: ...not reach See page 32 for resetting the current PIN to the factory preset 1234 if you lose or forget your PIN Menu operations Input Label You can assign each input source a label you like 1 Press b to select the desired input source 2 Press MENU and the MENU screen displays 3 Press c d to select Setup 4 Press a b to select Input Label and then press OK 5 Press a b c d to select each character of t...

Page 20: ...ama 4 3 mode Normal 4 3 Mode Menu Operation A page 12 The WSS signal has 4 3 auto switching that allows you to select between Normal and Panorama Normal Normal range keeping 4 3 or 16 9 aspect ratio Panorama Wide image without side bars Language Menu Operation A page 12 You can select a language from the Setup menu Select from among 13 languages Dutch English Finnish French German Greek Italian Po...

Page 21: ... colour system for each channel is automatically set If an image does not display clearly select another colour system e g PAL SECAM NTSC3 58 NTSC4 43 and PAL 60 cannot be selected in TV tuner mode Quick Shoot Menu Operation A page 12 Improve LCD response when viewing fast moving images The effect is greater at low room temperatures at or below 15 C NOTE Quick Shoot may cause image noise If this o...

Page 22: ...nu displays The menu lists the wide mode options selectable for the type of video signal currently received 2 Press f or a b while the WIDE MODE menu displays on the screen As you toggle down the options each is immediately reflected on the screen No need to press OK Auto Selection If you set WSS and 4 3 Mode in the Setup menu on page 18 the optimum WIDE MODE is automatically chosen for every broa...

Page 23: ...nnel display for several seconds 4 Even when you change the TV channel you can display the time information with steps 2 and 3 above NOTE The time display cannot be stored once the power is turned off When you turn on the power perform steps 1 to 4 again If acquired successfully the time information will appear in the upper right corner of the screen by pressing MENU Still image You can freeze a m...

Page 24: ... screen DTV MENU Press to open or close the DTV Menu screen LIST Press to open the Programme List p Press to open the service banner or view detailed information from the EPG ESG screen a b c d Press to select a desired item on the screen or adjust a selected item OK Press to go to the next step or complete the setting Press to open the Programme list when no other menu screen is active Except ext...

Page 25: ...ve To 6 Select 8 Label Select 0 9 OK END RADIO DTV MENU TV Radio Basque Catalan Croatian Czech Danish Dutch English Finnish French Gaelic Gallegan German Greek Italian Norwegian Polish Portuguese Russian Serbian Slovak Spanish Swedish Turkish Welsh Available language list Languages available for MHEG5 service Language Select language settings for audio if a programme is broadcast in more than one ...

Page 26: ...ce is locked Pressing will turn the lock icon on and off PIN entry is required when lifting the lock icon Do not press END to exit the screen here if you wish to register the change 3 Press OK NOTE See page 17 for setting the PIN Move To Use this function to change the position of two selected services 1 Press a b to select the desired service 2 Press on the remote control 3 Enter the number you w...

Page 27: ...V automatically detects and stores all available services in your area See Initial auto installation DTV on page 8 for details NOTE If the TV detects a new carrier service that has become available after performing Auto Installation the message Do you want to save displays Press c d to select Yes or No and then press OK Carrier Scan Select 35 554000 Channel Frequency kHz 0 9 OK END DTV MENU 3 Pres...

Page 28: ...tion Transparency Description Select how long the service banner information appears on screen Select whether the service banner information appears on top or bottom of the screen Select the desired level of On Screen Display transparency 1 To rename the selected carrier Select the carrier and then press RED Label The character set screen displays Enter a new name for the carrier See page 23 for d...

Page 29: ...e personnel before the software upgrade period expires Accessories Check the version information of the digital module and allow it to be upgraded when available Software Version 1 Press c d to select Accessories 2 Press OK The software version is displayed Software Upgrade The software for controlling the built in DTV decoder can be upgraded when necessary In Great Britain this can be achieved vi...

Page 30: ...ds the compatible CA card The caution screen appears 2 Insert the compatible CA card The caution screen disappears and you can view the programme CA system supported by Crypto Works Aston CAM VIAccess Nagra Vision Irdeto MR CAM NOTE To view paid TV broadcasting you need to make a contract with a service provider Please contact a service provider for details The Common Interface Module and the CA c...

Page 31: ... recording equipment as well Do not switch channels while recording using this function This function cannot be set for locked services or when Child Lock applies See pages 24 and 27 Up to 8 events can be preset using the Timer function If the TV is in standby mode when the preset on air time nears it will output signals for recording without image displayed on the screen If you are watching anoth...

Page 32: ...how the image in full screen NOTE Basic operation procedures are similar to EPG operations ESG does not provide information about future events or access to Timer function Q Logical channel number W Service name E Carrier name R Favourite type T Teletext available Y Subtitle available U Lock status I Multi audio status O Current event name P Current date and time MHEG5 service available 2 To displ...

Page 33: ...the TV is tuned to a service containing both MHEG5 and subtitle data the subtitle takes priority and subtitle presentation starts automatically In this case press m to start the MHEG5 presentation Subtitle English On Language Subtitle Select OK END DTV MENU 2 Press c d to select the desired audio mode Left Right L R Stereo and then press b to move down 3 Press a b to select the desired language av...

Page 34: ...ee page 33 Is picture adjustment correct See pages 13 and 14 Is the antenna connected properly See page 4 Is On selected in Audio Only See page 18 Is the volume too low See pages 6 and 7 Make sure that headphones are not connected See page 7 Check if you pressed e on the remote control unit See page 6 Check if Monochrome is set to On If so set it to Off See page 14 Troubleshooting Appendix IMPORTA...

Page 35: ...al response Problem response communication error or incorrect command Return code 0DH O K E R R RS 232C port specifications PC Control of the TV When a program is set the TV can be controlled from the PC using the RS 232C terminal The input signal PC video can be selected the volume can be adjusted and various other adjustments and settings can be made enabling automatic programmed playing Attach ...

Page 36: ... O O O O T T T D D H POSITION AV ⳮ10 Ⳮ10 AV ⳮ10 Ⳮ10 V POSITION AV ⳮ20 Ⳮ20 AV ⳮ20 Ⳮ20 CLOCK 0 180 0 to 180 PHASE 0 40 0 to 40 WIDE MODE Toggle NORMAL AV ZOOM 14 9 AV PANORAMA AV FULL AV CINEMA 16 9 AV CINEMA 14 9 AV NORMAL PC FULL PC 1 to 10 MUTE Toggle MUTE ON MUTE OFF 1 to 2 SURROUND Toggle SURROUND ON SURROUND OFF 1 to 2 SOUND SELECT ST Bilingual mono OFF 30 m 1 h 00 m 1 h 30 m 2 h 00 m 2 h 30 m...

Page 37: ...V Link Antenna input EXT 5 HDMI Ø 3 5 mm jack Audio input OSD language English German French Italian Spanish Dutch Swedish Portuguese Finnish Turkish Greek Russian Polish Power Requirement AC 220 240 V 50 Hz Power Consumption Weight Appendix 32o LCD COLOUR TV Model LC 32GD8E LC 32BT8E 32o Advanced Super View BLACK TFT LCD 37o LCD COLOUR TV Model LC 37GD8E LC 37BT8E 37o Advanced Super View BLACK TF...

Page 38: ...ich could otherwise arise due to inappropriate waste handling 2 In other Countries outside the EU If you wish to discard this product please contact your local authorities and ask for the correct method of disposal For Switzerland Used electrical or electronic equipment can be returned free of charge to the dealer even if you don t purchase a new product Further collection facilities are listed on...

Page 39: ...9 636 0 705 0 636 0 705 0 575 0 644 0 575 0 644 0 119 2 119 2 200 0 200 0 200 0 200 0 115 7 115 7 394 3 463 8 394 3 463 8 61 0 61 0 115 0 104 0 115 0 104 0 88 1 115 7 88 1 115 7 183 3 188 6 183 3 188 6 LC 32GD8E LC 32BT8E LC 37GD8E LC 37BT8E LC 32GD8E LC 32BT8E LC 37GD8E LC 37BT8E LC 32GD8E LC 32BT8E LC 37GD8E LC 37BT8E ...

Page 40: ...spaña TINS C483WJN2 OPERATION MANUAL BEDIENUNGSANLEITUNG MODE D EMPLOI MANUALE DI ISTRUZIONI GEBRUIKSAANWIJZING MANUAL DE MANEJO C483WJN2 1 06P05 SP NG PIN Printed on environmentally friendly paper Auf ökologischem Papier gedruckt Imprimé sur papier écologique Stampato su carta ecologica Afgedrukt op ecologisch papier Impreso en papel ecológico ...

Reviews: