background image

GB 

-5

Quick guide

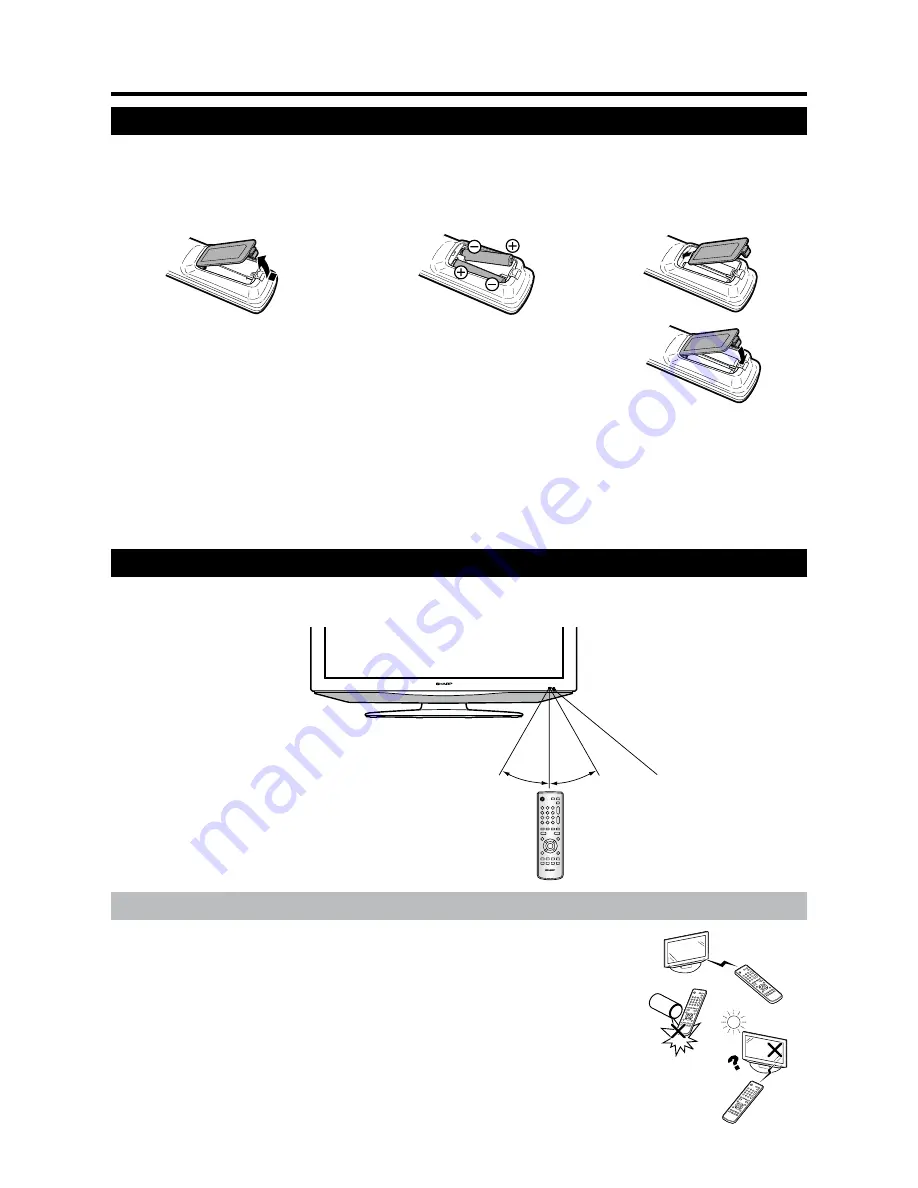
Inserting the batteries

Before using the TV for the first time, insert two “AA” size batteries (supplied). When the batteries become 

depleted and the remote control unit fails to operate, replace the batteries with new “AA” size batteries.

Open the battery cover.

2

Insert two supplied “AA” size 

batteries.

3

Close the battery cover.

Place batteries with their terminals 

corresponding to the (+) and (−) indications 

in the battery compartment.

CAUTION

Improper use of batteries can result in chemical leakage or explosion. Be sure to follow the instructions below.

Do not mix batteries of different types. Different types of batteries have different characteristics.

Do not mix old and new batteries. Mixing old and new batteries can shorten the life of new batteries or cause chemical 

leakage in old batteries.

Remove batteries as soon as they have worn out. Chemicals that leak from batteries can cause a rash. If you find any 

chemical leakage, wipe thoroughly with a cloth.

The batteries supplied with this product may have a shorter life expectancy due to storage conditions.

If you will not be using the remote control unit for an extended period of time, remove the batteries from it.

Using the remote control unit

Use the remote control unit by pointing it towards the remote control sensor. Objects between the remote 

control unit and sensor may prevent proper operation.


30

o

5m

30

o

Remote control sensor

Cautions regarding the remote control unit

Do not expose the remote control unit to shock. 

In addition, do not expose the remote control unit to liquids, and do not place 

in an area with high humidity.

Do not install or place the remote control unit under direct sunlight. The heat 

may cause deformation of the unit.

The remote control unit may not work properly if the remote control sensor of 

the TV is under direct sunlight or strong lighting. In such case, change the 

angle of the lighting or TV, or operate the remote control unit closer to the 

remote control sensor.

Summary of Contents for Aquos LC-20AD5E

Page 1: ...CD TELEVISORE A COLORI LCD LCD KLEURENTELEVISIE TELEVISIÓN EN COLOR LCD OPERATION MANUAL BEDIENUNGSANLEITUNG MODE D EMPLOI MANUALE DI ISTRUZIONI GEBRUIKSAANWIJZING MANUAL DE MANEJO LC 20AD5E LC 20AD5S LC 26AD5E LC 26AD5S LC 32AD5E LC 32AD5S ENGLISH FRANÇAIS DEUTSCH ITALIANO NEDERLANDS ESPAÑOL ...

Page 2: ... serious electric shock may occur To fit an appropriate plug to the mains lead follow the instructions below IMPORTANT The wires in the mains lead are coloured in accordance with the following code Blue Neutral Brown Live As the colours of the wires in the mains lead of this product may not correspond with the coloured markings identifying the terminals in your plug proceed as follows The wire whi...

Page 3: ...al auto installation 8 Using external equipment 9 Connecting a VCR 9 Connecting a game console or camcorder 9 Connecting a DVD player 9 Connecting a decoder 10 Connecting a PC 10 Menu operations 11 Menu operation buttons 11 On Screen Display 11 Common operations 12 Picture menu 12 Picture adjustments 12 Picture Mode Settings 13 Audio menu 13 Audio adjustments 13 Audio Mode Settings 13 Setup menu 1...

Page 4: ...is product is not designed for built in installation do not place the product in an enclosed place such as a bookcase or rack unless proper ventilation is provided or the manufacturer s instructions are followed The LCD panel used in this product is made of glass Therefore it can break when the product is dropped or impact applied If the LCD panel is broken be careful not to be injured by broken g...

Page 5: ...e base to the post 3 Attach the base to the 4 screws into the 4 holes on the bottom of the base NOTE To detach the stand perform the step in reverse order Hex key Screw Soft cushion 3 Insert the stand into the openings on the bottom of the TV 2 Insert and tighten the 4 screws into the 4 holes on the rear of the TV Setting the TV Removing the covering sheet For protection sheets and are covering th...

Page 6: ...AD5S LC 32AD5E LC 32AD5S Cable clamp This cable clamp is already attached to the housing of the LC 20AD5E and LC 20AD5S models For U K and Eire Setting the TV on the wall This TV should be mounted on the wall only with the wall mount bracket available from SHARP See page 33 The use of other wall mount brackets may result in an unstable installation and may cause serious injuries When you use the A...

Page 7: ...ries can cause a rash If you find any chemical leakage wipe thoroughly with a cloth The batteries supplied with this product may have a shorter life expectancy due to storage conditions If you will not be using the remote control unit for an extended period of time remove the batteries from it Using the remote control unit Use the remote control unit by pointing it towards the remote control senso...

Page 8: ...input mode Teletext Move to the next previous page 16 INPUT SOURCE Select an input source See page 9 17 SLEEP Set the sleep timer in units of 30 min up to max 2 hr 18 Display information Display various information channel number sleep timer etc See pages 27 and 28 19 DTV MENU DTV Display DTV Menu screen 20 MENU Display the MENU screen See page 11 21 Cursor Select a desired item on the setting scr...

Page 9: ... terminals EXT 3 terminals OUTPUT Audio terminals Headphone jack EXT1 2 RGB terminals AC INPUT terminal COMMON INTERFACE slot Headphone jack EXT 3 terminal EXT 4 COMPONENT AUDIO terminals OUTPUT Audio terminals EXT1 2 RGB terminals RS 232C terminal Antenna input terminal EXT 5 HDMI terminal EXT 5 6 Audio terminals EXT 6 terminal Power button Input button MENU button P Programme channel buttons Vol...

Page 10: ...he setup menu disappears and you can watch the programme on channel 1 NOTE With Automatic search of First installation digital broadcasts are scanned after scanning analogue broadcasts If you want to operate the digital mode first press END and then press DTV TV Follow the procedures in Installation on page 23 You can select a language from the Setup menu Select from 13 languages English Spanish G...

Page 11: ...3 The S VIDEO terminal has priority over the VIDEO terminal Connecting a DVD player You can use the EXT 2 3 4 5 HDMI or 6 HDMI terminals when connecting to a DVD player and other audiovisual equipment NOTE EXT 3 The S VIDEO terminal has priority over the VIDEO terminal NOTE For LC 20AD5E LC 20AD5S EXT6 is for connecting a PC see page 10 When connecting an HDMI DVI conversion adapter cable to the H...

Page 12: ...s are DDC1 2B compatible Refer to page 30 for a list of PC signals compatible with the TV Macintosh adaptor may be required for use for some Macintosh computers When connecting to a PC the correct input signal type is automatically detected For LC 26AD5E LC 26AD5S LC 32AD5E LC 32AD5S Audio input is shared with EXT5 and EXT7 For LC 20AD5E LC 20AD5S Audio input is shared with EXT5 and EXT6 SCART cab...

Page 13: ...a desired item on the screen or adjust a selected item OK Press to complete the setting END Press to close the menu screen On Screen Display Example Picture menu To adjust the picture settings Audio menu To adjust the audio settings Setup menu To set up TV channels select the language displayed on screen and other settings Option menu To customize various features Navigation buttons To navigate wi...

Page 14: ...st For more contrast Brightness For less brightness For more brightness Colour For less colour intensity For more colour intensity Tint Skin tones become purplish Skin tones become greenish Sharpness For less sharpness For more sharpness Adjustment items for PC source Selectable items Description Backlight To adjust the screen brightness for improved picture clarity Contrast To adjust the contrast...

Page 15: ...set each adjustment item in AV mode to the factory preset values Audio menu Audio adjustments Menu Operation B page 12 You can adjust the sound quality to your preference with the following settings Selectable items button button Treble For weaker treble For stronger treble Bass For weaker bass For stronger bass Balance Decrease audio from the right speaker Decrease audio from the left speaker Sel...

Page 16: ...XT connections It is possible to manually adjust various settings for connections with external devices on the EXT connections screen Select the appropriate signal type and colour standard for the signals from the video equipment connected to the EXT1 EXT2 or EXT3 terminal EXT1 EXT2 EXT3 Y C EXT3 CVBS Signal type 3 Press to select option CVBS RGB Y C To select the signal type of external equipment...

Page 17: ...ill go up down Press OK to exit the Move mode Erase Press to select the programme to be erased and press OK All the subsequent programmes move up NOTE Depending on the settings in the colour system of the channels switching between channels may be slow If you want to speed up channel switching switch Auto in Colour system to the current reception system PAL or SECAM Programmes This section describ...

Page 18: ... I N 4 Press to select Yes and press OK The lock remains effective until No is selected 5 Press END to exit 1 2 To set a Child Lock for individual programmes 1 Perform steps 1 and 2 in 2 Setting a Child Lock to display the Child lock screen 2 Press to select For individual prog only and press OK F o r a l l p r o g r a m m e s F o r i n d i v i d u a l p r o g o n l y C h a n g e P I N C a n c e l...

Page 19: ...urs Five minutes before the TV enters standby mode the remaining time displays every minute Off Blue screen On You can set the TV to automatically change to a blue screen and mute the sound if the signal is weak or absent when TV is TV mode Off Rec screen status On This function determines whether the TV screen switches on or not when a programmed timer setting begins Off Reset TV setting 3 Yes If...

Page 20: ...ast VCR or DVD containing the WSS information 4 3 mode menu To set the type of the wide screen select Normal or Panorama in the 4 3 mode menu See page 17 4 3 mode set to Normal 4 3 mode set to Panorama NOTE If the signal contains no WSS information Auto Selection will not function even when the screen format is set to Auto WIDE MODE You can select the picture size You can freeze a motion picture o...

Page 21: ...located in channels 1 to 99 To select the desired programme 1 Press OK to display the Programme table 2 Press to select the desired programme To display the next or previous list of the Programme table press when the cursor is at a programme in the lower right or upper left position or press when the cursor is at a programme in the right or left column 3 Press OK to display the selected programme ...

Page 22: ...ce application Channel Organizer To configure various settings for each service These include Fav Favourite Lock Skip Go To Delete Rename Move Move To and View functions Installation To scan all services available in your area or to Rename Delete Rescan the selected carrier System Configuration To configure On Screen Display and Password Setup settings If the broadcast contains the Time zone regio...

Page 23: ...age 14 Menu Language is automatically set to the one selected Language Setup Menu Language English Pref Audio Language English Pref Subtitle Language English Pref Digital Service Language English END Navigate OK Available language list Languages available only for Digital Service 3 Press to select a desired language for each item 4 Press END or OK NOTE See page 14 to change the language displayed ...

Page 24: ...or setting the PIN Skip Services that are set to skip will not be picked up when pressing P 1 Press to select the desired service 2 Press 3 on the remote control An icon displays indicating the service to be skipped Pressing 3 will turn the skip icon on and off 3 Press DTV MENU NOTE To view services that are set to be skipped use 0 9 numeric buttons or select from the Channel List Go To Use this f...

Page 25: ...quency kHz cannot be used When the Country is set to Sweden in the First installation Country When there is a Channel List in the data after Auto Scan or Manual Scan Channel Type Selection Menu will be displayed and available to set Channel List Type Select the Channel List Type by pressing and press OK Move Sort the order of the selected service by moving the service position 1 Press to select th...

Page 26: ...e station that provides a set of individual services 1 Press to select Installation 2 Press to select Carrier Setup and then press OK 001 DVB T 16QAM 184500 03 01 002 DVB T 16QAM 506000 03 01 003 DVB T 64QAM 842000 05 00 FEC 7 8 FFT 2k Frequency kHz 506000 QAM 16 GI 1 32 S No Carrier Name Frequency TV Radio Carrier Setup END Navigate OK Rename Delete Rescan To rename the selected carrier Select th...

Page 27: ...load Preparation Confirm and make a note of the current software version number as in step 2 of Software Version Manual upgrade 1 Press to select Technical Information 2 Press to select Software upgrade and then press OK The TV checks all carriers if there is a new software available for upgrade If upgrade via Over Air Download is available at the time A confirmation message appears asking you to ...

Page 28: ... Common Interface The CI module name is displayed Cl Module Module Name Top Up TV END OK 2 Press OK to access the CI menu Detailed information on the CI card in use is displayed 3 Press to select the item and then press OK Detailed information on the selected item is displayed Inserting a CA card A single DVB Common Interface CI slot is provided to allow adoption of a Conditional Access CA system ...

Page 29: ...t currently on air and other than this will display Timer OK The TV will show the image in full screen Selecting an event that has not yet started will activate the EPG Timer mode instead NOTE Pressing opens the EPG Description screen that provides more information about the selected event Press OK or END to exit Using the EPG Timer When the Timer is set the TV automatically tunes to a preset TV e...

Page 30: ...ou cannot hasten the start time from the original start time of the Event You cannot set with the same date and time of another Event Changing the time duration of the Event 1 Select the time duration of the event to change and press the BLUE Edit Duration 2 Change the time duration with and press OK Displaying the stored timer events 1 Press EPG twice You can confirm and edit the stored timer eve...

Page 31: ... when no other menu screen is displayed No Language Code Multi audio 001 ENG 002 SPA Audio mode Stereo END Navigate OK 2 Press to select the desired audio mode Left Right L R Stereo and then press to move down 3 Press to select the desired language available for the service and then press END NOTE Once you tune to another service or the power is turned off the setting returns to the parameter set ...

Page 32: ...oss type commercially available to a 9 pin D sub MINI DIN optional AN A1RS for the connections NOTE This operation system should be used by a person who is accustomed to using PCs 9 pin D sub MINI DIN conversion cable optional AN A1RS RS 232C serial control cable cross type commercially available Communication procedure Send the control commands from the PC via the RS 232C connector The TV operate...

Page 33: ...C 20AD5S AV MODE SELECTION A V M D 0 _ _ _ AV MODE SELECTION TOGGLE A V M D 1 _ _ _ STANDARD A V M D 2 _ _ _ SOFT A V M D 3 _ _ _ ECO A V M D 4 _ _ _ USER A V M D 5 _ _ _ DYNAMIC A V M D 1 to 5 CONTROL ITEM COMMAND PARAMETER CONTROL CONTENTS VOLUME V O L M _ _ VOLUME 0 50 V O L M 0 to 50 POSITION H P O S _ H POSITION PC 30 to 30 H P O S PC 30 to 30 V P O S _ V POSITION PC 10 to 10 V P O S PC 10 to...

Page 34: ...e batteries worn out Replace with new batteries Are you using it under strong or fluorescent lighting Is a fluorescent light illuminating the remote control sensor Picture is stretched vertically Are wide mode adjustments made correctly See page 18 Strange colour light colour or dark or colour misalignment Adjust the picture tone See page 12 Is the room too bright The picture may look dark in a ro...

Page 35: ... 2 Speaker 71 mm 30 mm 122 mm 41 mm Terminals Rear Antenna input UHF VHF 75Ω Din type Analogue Digital EXT1 SCART AV input Y C input RGB input TV output EXT2 SCART AV input output Y C input RGB input EXT3 S VIDEO Y C input RCA pin AV input EXT4 COMPONENT Y PB CB PR CR input RCA Audio input EXT5 HDMI Ø 3 5 mm jack Audio input EXT6 Ø 3 5 mm jack Audio input 15 pin mini D sub PC Component HDMI Ø 3 5 ...

Page 36: ... for Business Users 1 In the European Union If the product is used for business purposes and you want to discard it Please contact your SHARP dealer who will inform you about the take back of the product You might be charged for the costs arising from take back and recycling Small products and small amounts might be taken back by your local collection facilities For Spain Please contact the establ...

Page 37: ...567 5 663 500 451 49 320 5 293 79 116 243 100 500 100 60 LC 26AD5E LC 26AD5S 318 522 360 395 36 445 2 251 5 100 32 178 75 103 225 100 LC 20AD5E LC 20AD5S Unit mm ...

Page 38: ...700 797 583 534 49 394 8 337 79 116 243 200 100 500 200 Unit mm LC 32AD5E LC 32AD5S ...

Page 39: ...TRONICS Europe GmbH Sonnistraße 3 D 20097 Hamburg Deutschland Printed on environmentally friendly paper Auf ökologischem Papier gedruckt Imprimé sur papier écologique Stampato su carta ecologica Afgedrukt op ecologisch papier Impreso en papel ecológico J32A0101B SH 07 05 P SHARP ELECTRONICS Europe GmbH Sonnistraße 3 D 20097 Hamburg Deutschland ...

Reviews: